
Populära kategorier
Letar du efter ett garn?


Kommentarer / Frågor (65)
![]() Annick Mercier skrev:
Annick Mercier skrev:
Bonjour, je me demandais quel type de laine utiliser puisque la laine n'est pas disponible ici au Canada. Merci, Annick
02.09.2019 - 16:01DROPS Design svarede:
Bonjour Mme Mercier, je suis heureuse de vous informer que vous pouvez trouver notre laine au Canada - plus d'infos ici. Bon tricot!
02.09.2019 - 16:47
![]() Patricia Olivia Fuchs skrev:
Patricia Olivia Fuchs skrev:
Hallo, liebes Drops-Team. Wenn ich KEIN umgeknicktes Bündchen möchte, kann ich dann anstatt * 2 re., 3 li. * gleich mit Diagrammm M1 beginnen und der weiteren Anleitung folgen, oder muss ich dafür noch etwas anderes beachten?
24.06.2019 - 14:52DROPS Design svarede:
Liebe Frau Fuchs, also wahrscheinlich können Sie dann mit Zöpfen über die gewünschte Höhe stricken, dann setzt man eine Markierung und der Socken wird ab Markierer gemessen (nicht von der Anschlagskante). Viel Spaß beim stricken!
24.06.2019 - 17:00
![]() Mathilde skrev:
Mathilde skrev:
Bonjour, Je souhaiterais savoir ce que veux dire retourner le tricot ? Je ne comprends pas .... J'ai retourner mon ouvrage mais je tricote toujours dans le même sens ... Je vous remercie de bien vouloir l'éclairer Mathilde
14.01.2019 - 19:09DROPS Design svarede:
Bonjour Mathilde, après les côtes, retournez l'ouvrage sur l'envers = les premiers rangs de côtes seront retournés sur l'endroit à la fin et ont donc été tricotés sur l'envers. Au premier tour après avoir retourné votre ouvrage, vous allez tricoter la dernière maille du tour précédent pour terminer par la première maille, continuez ensuite toujours ainsi, c'est maintenant l'endroit de la chaussette. Bon tricot!
15.01.2019 - 09:02Nicola Stuart skrev:
Would love to knit these but would have to make them longer and bigger. How would I go about changing size?
11.11.2018 - 22:41DROPS Design svarede:
Dear Nicola, the pattern goes up to size 44. If you need even bigger by using a slightly bigger needle. Conversly, you can use the yarn Lima isntead of the Karisma =with bgger needles). If you only want it somewhat higher, you can continue knitting straight for a couple more cm-s, and6 or you can increase a stitch on both ides of this middle stitch. You can find the videos, related to this pattern at the left of the page, below the pictures. Also there are detailed explanation of the symbos of the pattern chart. If you need further help you can also ask for it in person in the store where you bought your DROPS yarn from. Happy Crafting!
12.11.2018 - 01:56
![]() Nicole skrev:
Nicole skrev:
Vielen Dank für diese tolle Anleitung. Die Strümpfe sehen im Original schöner aus wie auf Eurem Foto und war für mich als Anfänger leicht verständlich nach zu stricken. Inzwischen habe ich schon 3 Paar gestricht und es macht immer wieder Spaß.
08.08.2018 - 17:26
![]() Alexandra skrev:
Alexandra skrev:
When i get to this part in the M2 chart do I pearl the 6 after i pearl the first 18 or do i knit them I'm not sure how to determine if I am working on the right side or wrong side now? Knit following round like this: P the first 15-18-21 sts, chart M.2 (= 36 sts), P the last 15-18-21 sts. I hope you understand my question thank you , Alex
08.06.2016 - 21:34DROPS Design svarede:
Dear Alexandra, when working M.2 you are now working from RS and WS of M.1 is facing you (will be folded at the very end). M.2 is 36 sts in width, work rounds like this: P the first 15-18-21 sts from beg of round, then work the 36 sts in M.2 starting to read at the bottom corner on the right side towards the left and P the last 15-18-21 sts on round. Happy knitting!
09.06.2016 - 08:49
![]() Alexandra skrev:
Alexandra skrev:
I'm talking about the Drops long Sock pattern their is M,M2, M3 Diagram it's just a little harder to understand . Thanks, Alex
18.05.2016 - 16:05DROPS Design svarede:
Dear Alexandra, then follow the legend to diagram, and start reading diagram from the bottom corner on the right side towards the left every round. 1 square = 1 st x 1 round. Read more here. Happy knitting!
18.05.2016 - 17:11
![]() Alexandra skrev:
Alexandra skrev:
Okay What about the empty space at the bottom of the diagrams? What is that about? I'm sorry I'm new and to doING and reading diagrams. Thank you, Alexandra
18.05.2016 - 04:38DROPS Design svarede:
Dear Alexandra, an empty space can be added at the bottom of a diagram when there are less sts on some rows before you inc and get then more sts than on previous rows. Maybe you could ask your question on the pattern you are thinking about, it might help to make an accurate answer. Happy knitting!
18.05.2016 - 09:23
![]() Alexandra Dick skrev:
Alexandra Dick skrev:
I am wondering about the pattern for 103-10 are you to read the diagram from top to bottom or bottom to top? And is it read right to left or left to right? And what are the empty space at the bottom of diagram ment for? And are you to repeat pattern like the M1 it was p1,k4,p1,k4 do you continue doing that for a whole round? I tried finding a video to help but was unable to . Thank you
29.04.2016 - 05:27DROPS Design svarede:
Dear Mrs Dick, diagrams are read from bottom up starting on the corner on the right side, every round from the right towards the left (see here) 1st round in M1 will be workd; (K4, P1,K4, P1) repeat from (to) over all sts on round. Happy knitting!
29.04.2016 - 09:09
![]() Birgitt skrev:
Birgitt skrev:
Hallo, danke für die schnelle Antwort. Genau so habe ich die Anleitung auch verstanden, hatte schon bedenken, ich hätte es nicht kapiert. Meinem Mann ist das aber -zu langweilig- (OTon). Da ich für ihn die Maschenzahl ohnehin ändern muss, bekommt er auf der Rückseite M3 gestrickt (bis FerseI und in den linken Maschen zw. beiden Mustern kann ich super die Abnahmen für die Wade vornehmen. Gruß Birgitt
14.03.2016 - 19:03
|
||||||||||||||||||||||
Hilde & Winter |
||||||||||||||||||||||
|
|
||||||||||||||||||||||
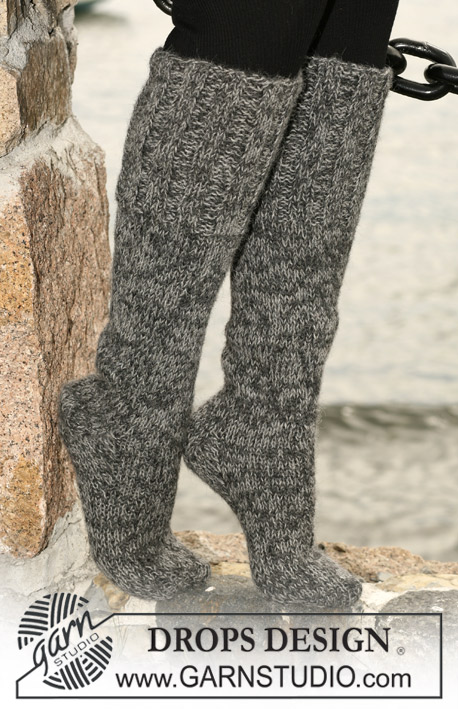
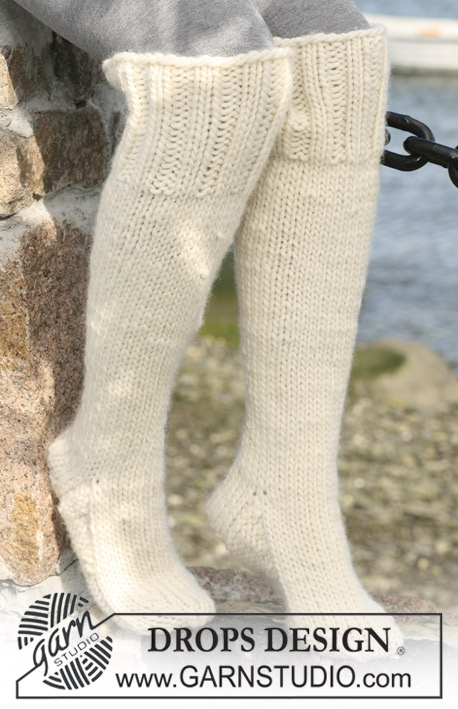
Långa DROPS sockor i ”Karisma Superwash” med flätor och nervikt kant.
DROPS 103-10 |
||||||||||||||||||||||
|
Resår: * 2 rm, 3 am *, upprepa *-*. Mönster: Se diagram M.1, M.2 och M.3. Diagr visar mönstret sett från rätsidan. Hälavmaskning: varv 1 (= rätsidan): Sticka tills det återstår 7-8-9 m på st, lyft nästa m som om den skulle stickas rät, 1 rm, drag den lyfta m över. varv 2 (= avigsidan): Sticka tills det återstår 7-8-9 m på st, lyft nästa m som om den skulle stickas rät, 1 am, drag den lyfta m över. varv 3 (= rätsidan): Sticka tills det återstår 6-7-8 m på st, lyft nästa m som om den skulle stickas rät, 1 rm, drag den lyfta m över. varv 4 (= avigsidan): Sticka tills det återstår 6-7-8 m på st, lyft nästa m som om den skulle stickas rät, 1 am, drag den lyfta m över. varv 5 (= rätsidan): Sticka tills det återstår 5-6-7 m på st, lyft nästa m som om den skulle stickas rät, 1 rm, drag den lyfta m över. varv 6 (= avigsidan): Sticka tills det återstår 5-6-7 m på st, lyft nästa m som om den skulle stickas rät, 1 am, drag den lyfta m över. Fortsätt att sticka tills det återstår 1 m mindre innan det lyfts 1 m. Fortsätt tills du har 8-10-12 m kvar på st. Sockar: Arb stickas runt från mitt bak. Lägg upp 80-90-100 m på strumpst 3,5 med Karisma och sticka resår – se förkl ovan. När resåren mäter 2 cm fortsätts det med M.1. När arb mäter 20 cm vänds arb – dvs det stickas vidare på avigsidan (de 20 cm som är stickade ska vikas ner över sockan när den är färdig). Sticka 1 räta v samtidigt som det minskas 14-18-22 m jämnt fördelat = 66-72-78 m. Sticka 1 avigt v. Sätt 1 märktråd i arb. Härifrån mäts nu arb. Nästa v stickas så här: am över de första 15-18-21 m, M.2 (= 36 m), am över de sista 15-18-21 m. När arb mäter 5 cm, minskas 1 m på varje sida av M.2 på varannan cm totalt 11-12-13 ggr (minska genom att sticka ihop 2 am) = 44-48-52 m. När arb mäter 33-36-39 cm sätts de mittersta 24 m ovanpå foten på 1 tråd. Sedan stickas det 5-5½-6 cm i slätst över de resterande 20-24-28 m bak (= häl). Sedan avm till häl - läs Hälavm ovan. Efter hälavm stickas det upp 11-13-15 m på varje sida av hälen. Fördela alla m på strumpst = 54-60-66 m. Sticka M.3 över de mittersta 24 m på foten (de övriga m slätstickas). Samtidigt minskas så här: sticka de 2 m före M.3 räta tills och de 2 m efter M.3 vridna räta tills (dvs att det stickas i bakre maskbågarna i stället för i de främre) på vartannat v totalt 6 ggr = 42-48-54 m. Sticka tills foten mäter ca 18-20-22 cm mätt från hälkanten (dvs där hälavm startar). Sedan stickas det slätst över alla m. Sätt 1 märktråd i varje sida på foten, dvs 22-24-26 m ovanpå foten och 20-24-28 m under foten. Minska för tårna på varje sida om varje märktråd så här: sticka de 2 m före märktråden räta tills och de 2 m efter märktråden vridna räta tills. Upprepa minskn på vartannat v totalt 3 ggr = 30-36-42 m. Fortsätt att minska på varje v totalt 6-7-9 ggr = 6-8-6 m. Drag en tråd genom de resterande m och fäst ordentligt. |
||||||||||||||||||||||
Diagram förklaring |
||||||||||||||||||||||
|
||||||||||||||||||||||
 |
||||||||||||||||||||||
Har du gjort detta mönster?Tagga då dina bilder med #dropspattern eller skicka in de till #dropsfan galleriet. Behöver du hjälp med mönstret?Du hittar 15 instruktionsvideoer, kommentarer/frågor och mer i mönstret på www.garnstudio.com © 1982-2026 DROPS Design A/S. Alla rättigheter är reserverade. Detta dokument med tillhörande underdokument har copyright. Läs mer om vad du kan göra med våra mönster längst ner på vår hemsida. |
||||||||||||||||||||||


Med över 40 år i stick- och virkbranschen erbjuder DROPS Design en av de mest omfattande samlingarna av gratis mönster på internet - översatt till 17 språk. Per idag har vi 324 kataloger och 12290 mönster på och alla är översatta till Svenska.
Vi arbetar hårt för att kunna erbjuda det bästa inom stickning och virkning, inspiration och goda råd, men också kvalitetsgarn till fantastiska priser! Vill du använda våra mönster till annat än personligt användande? Du kan läsa om vilka regler som gäller i texten Copyright längst ner på sidan på alla våra mönster. Lycka till!
Kommentera mönster DROPS 103-10
Vi vill gärna ha din åsikt om denna modell!
Om du har en fråga kring den, kom ihåg att välja rätt kategori i menyn under, så får du snabbare svar! Obligatoriska fält är markerade med *.