
Beliebte Kategorien
Suchen Sie nach einem Garn?


Kommentare / Fragen (66)
![]() Linda Langlois hat geschrieben:
Linda Langlois hat geschrieben:
Bonjour, mon questionnement se situe au début du rang 7 c'est-à-dire: est-ce que je commence par une maille endroit selon le graphique ou si je dois faire le M.1A (2 mailles) avant le commencer le M.1B. Le nombre de répétition du motif est-il 4 fois comme le rang 3? J'ai essayé de le faire en commençant par 1 m. end., 1 jeté et en continuant avec le M.1B et en terminant le rang par 1 m. end. mais j'arrive à 5 répétitions au lieu de 4. Est-ce correct?
07.11.2019 - 15:10DROPS Design hat geantwortet:
Bonjour Mme Langlois, vous devez toujours tricoter: 1 x M.1A, puis vous répétez M.1B et terminez par M.1C, au 7ème rang de M.1, tricotez les 2 premières m de A, puis vous répétez les mailles de B et terminez par les mailes de C - cf réponse ci-dessous pour le détail des mailles du 7ème rang. Bon tricot!
07.11.2019 - 15:23
![]() Linda Langlois hat geschrieben:
Linda Langlois hat geschrieben:
: M.1A (= 2 sts), then repeat M.1B a total of 4 times in width (= 24 sts) and finish with M.1C (= 3 sts) = 2+24+3= 29 stitches. Happy knitting! mais pour le rang 7???
05.11.2019 - 19:10
![]() Linda Langlois hat geschrieben:
Linda Langlois hat geschrieben:
Pouvez-vous m'explique le rang 7 du diagramme par rapport au rang 3? J'essaie de comprendre le M.1B Merci
05.11.2019 - 18:22DROPS Design hat geantwortet:
Bonjour Mme Langlois, au rang 7 de M.1, vous tricotez: 1 m end, 1 jeté (= 2 m pour A), glissez la m suivante (=la dernière m de A, 2 m ens à l'end, m glissée par-dessus m tricotée), 1 jeté, 3 m end, 1 jeté (= M.1B), tricotez maintenant la dernière m de M.1B avec les 2 premières m du M.1B suivant (puis de M.1C la dernière fois). Bon tricot!
06.11.2019 - 08:43
![]() Christine hat geschrieben:
Christine hat geschrieben:
I am almost ready to decrease for the toe shaping...once again, I do not understand...I have 52 stitches, but the pattern says separate 25 stitches , for the underfoot and 25 stitches for the upper foot...what happens to the other 2 sts?, sigh...sorry to be such a pain...
03.10.2019 - 02:34DROPS Design hat geantwortet:
Dear Christine, there should be 25 stitches for both upper and under foot + 1 stitch with marker on each side = 52 sts in total. Happy knitting!
03.10.2019 - 09:29
![]() Kendall hat geschrieben:
Kendall hat geschrieben:
Christine,thanks for your help I appreciated it😊I figured out to put the 35 stitches to the side by talking it over with my sister,she knits too,and the comment just confirmed it which is great and if you still need help on when to start the lace pattern,you start the lace pattern the row after you pick up the 14 side stitches go across the top of the sock and pick up the other 14 stitches once you get back to the 29 stitches that’s when you do the lace pattern I hope I helped😊
01.10.2019 - 15:40
![]() Christine hat geschrieben:
Christine hat geschrieben:
Kendall, clearly I was wrong. This is not a typo error. As you can see from the answers. I was wrong and hope I have not confused you. now I understand. if you need help, don’t be shy, I can now help 😊
01.10.2019 - 02:06
![]() Christine hat geschrieben:
Christine hat geschrieben:
Thank you for your answer. Does that mean that I should put 3 stitches from the 35 to the 14 stitches picked up on both sides, and work the decrease including those 3 stitches? Thank you.
30.09.2019 - 14:11DROPS Design hat geantwortet:
Dear Christine, you will decrease before the 29 stitches (first 3 from the 35 sts are worked with the picked up stitches in stocking stitch) and after the 29 stitches in pattern (= the last 3 from the 35 sts are worked with the picked up sts in stocking st), ie these 3 sts on either side of the 29 middle sts will be worked in stocking stitch and decreased for instep. Happy knitting!
30.09.2019 - 16:04
![]() Christine hat geschrieben:
Christine hat geschrieben:
At what point do you start working with the Diagram please? I am totally confused. I am at the point where I have picked up 14 stitches on both sides as well as the 35 stitches that were on the stitch holder. I now have 76 stitches on the needles, but I am unsure how to proceed at this point. With big thanks in advance.
28.09.2019 - 20:03DROPS Design hat geantwortet:
Dear Christine, once you get the 76 sts on the needle (= heel is now worked),k you now work the stitches from under foot in stocking stitch (= over the first 3 sts from the 35 sts slipped on a thread + the last 3 sts from these 35 sts (=29 sts remain for upper foot) + the stitches from heel while decreasing for instep and work the 29 stitches (upper foot, the stitches slipped on a thread) in pattern: : M.1A (= 2 sts), then repeat M.1B a total of 4 times in width (= 24 sts) and finish with M.1C (= 3 sts) = 2+24+3= 29 stitches. Happy knitting!
30.09.2019 - 10:26
![]() Christine hat geschrieben:
Christine hat geschrieben:
Kendall, I just started this yesterday and came across the same problem. I figured it out to be simply a typo, and followed the pattern with 35 (for the medium sock). It is working out perfectly like that. I hope this helps.
28.09.2019 - 18:49
![]() Kendall hat geschrieben:
Kendall hat geschrieben:
How come you go from 35 stitches on top of the foot to 29?wheres the rest of the stitches?and then at the end when you work the toe where’s the missing two stitches?
28.09.2019 - 16:28
|
|||||||
Neptunia Socks#neptuniasocks |
|||||||
|
|
|||||||
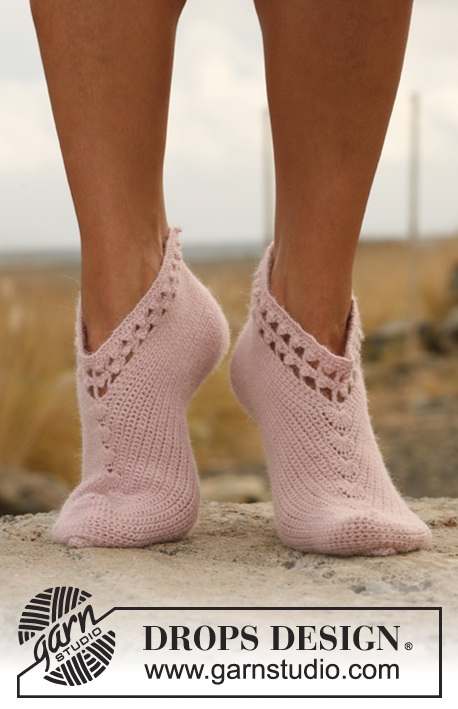
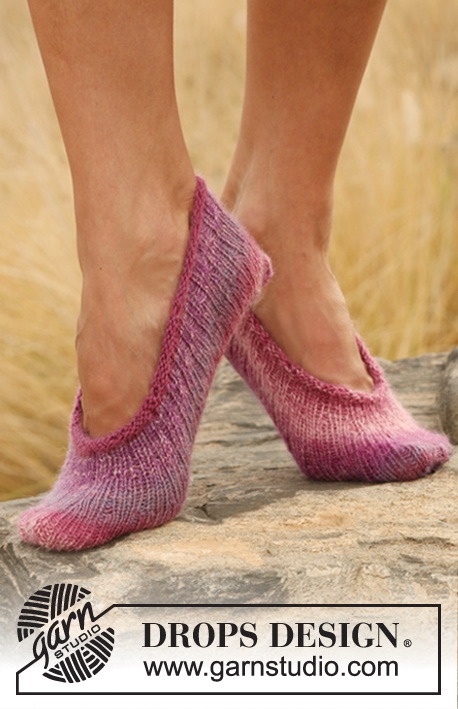
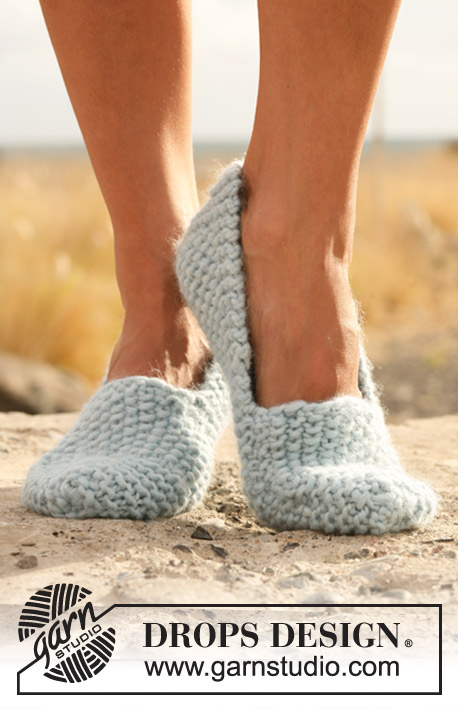
Kurze DROPS Socken mit Lochmuster in ”Fabel”.
DROPS 129-18 |
|||||||
|
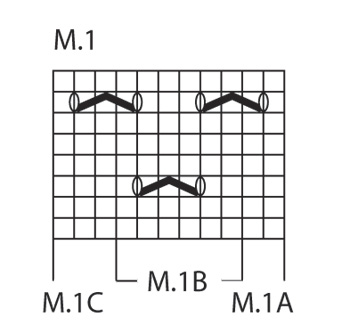
MUSTER: Siehe Diagramm M1. FERSENABNEHMEN : 1. R. (= rechte Seite): stricken bis noch 5-5-6 M. zu stricken sind, die nächste M. abheben, 1 re., die abgehobene über die gestrickte ziehen, Arbeit drehen. 2. R. (= linke Seite): stricken bis noch 5-5-6 M. zu stricken sind, die nächste M. abheben, 1 li., die abgehobene über die gestrickte ziehen, Arbeit drehen. 3. R. (= rechte Seite): stricken bis noch 4-4-5 M. zu stricken sind, die nächste M. abheben, 1 re., die abgehobene über die gestrickte ziehen, Arbeit drehen. 4. R. (= linke Seite): stricken bis noch 4-4-5 M. zu stricken sind, die nächste M. abheben, 1 li., die abgehobene über die gestrickte ziehen, Arbeit drehen. So weiterstricken bis noch 13-13-15 M. auf der Nadel sind. -------------------------------------------------------- SOCK: Die Arbeit wird auf einem Nadelspiel rund gestrickt. Mit Fabel auf Nadelspiel Nr. 2,5, 50-56-60 M. anschlagen und 1 R. re. stricken. Danach 2-2-3 cm Bündchen stricken = 1 re./1 li. Weiter die ersten 21-21-25 M. auf der Nadel lassen und die restlichen 29-35-35 M. auf einen Hilfsfaden legen (= Fussrücken). Über die Fersenmaschen 5-5½-6 cm glatt hin und zurück stricken. Die Ferse hinten in der Mitte markieren – die Arbeit wird von hier weitergemessen! Jetzt für die Ferse abnehmen – siehe Fersenabnahme! Nach der Fersenabnahme auf beiden Seiten je 13-14-15 M. aufnehmen und die 29-35-35 M. vom Hilfsfaden wieder auf die Nadel legen = 68-76-80 M. Auf beiden Seiten dieser 29-29-35 M. eine Markierung anbringen. An der Fusssohle glatt weiterstricken, über die 29-29-35 M. am Fussrücken wie folgt: M1A (= 2 M.), M1B über die nächsten 24-24-30 M. (= 4-4-5 Mal) und mit M1C abschliessen (= 3 M.). GLEICHZEITIG wie folgt abn.: Die letzten 2 M. vor den 29-29-35 M. vom Fussrücken verschränkt re. zusammen stricken (d.h. man sticht in das hintere Glied der Masche ein), die 2 ersten M. nach den 29-29-35 M. vom Fussrücken re. zusammen stricken. 10-12-12 Mal in jeder 2. R. = 48-52-56 M. Stricken bis die Arbeit, von der Markierung an der Ferse, 18-19-22 cm misst (= ca. 4-5-5 cm bis zur fertigen Länge). Auf beiden Seiten je eine Markierung einziehen (mit je 23-25-27 M. dazwischen). Glatt über alle M. stricken. GLEICHZEITIG auf beiden Seiten der Markierungen je 1 M. abn. - 2 M. vor der Markierung anfangen: 2 re. zusammen, 1 re. (hier liegt die Markierung dazwischen), 2 verschränkt re. zusammen. Zuerst 4-7-6 Mal in jeder 2.R. und danach 6-4-6 Mal in jeder R. = 8 M. Den Faden abschneiden und durch die restlichen M. ziehen. |
|||||||
Erklärungen zum Diagramm |
|||||||
|
|||||||
 |
|||||||
Haben Sie diese Anleitung nachgearbeitet?Dann taggen Sie Ihre Fotos mit #dropspattern #neptuniasocks oder schicken Sie sie an die #dropsfan Galerie Brauchen Sie Hilfe bei dieser Anleitung?Sie finden 18 Videotutorials, einen Kommentar/Fragen-Bereich und vieles mehr, wenn sie die Anleitung bei garnstudio.com aufrufen. © 1982-2026 DROPS Design A/S. Wir besitzen alle Rechte. Dieses Dokument, einschließlich aller Untersektionen, hat Urheberrechte. Mehr dazu, was Sie mit unseren Anleitungen machen können, finden Sie ganz unten auf der Seite zu jeder Anleitung. |
|||||||


Mit über 40 Jahren Tätigkeit im Entwerfen von Strick- und Häkelmustern bietet Ihnen DROPS Design eine der umfangreichsten Sammlungen von kostenlosen Anleitungen im Internet - in 17 Sprachen übersetzt. Zum jetzigen Zeitpunkt haben wir insgesamt 324 Handarbeitshefte und 12290 Anleitungen auf Deutsch. 12202
Unser Ziel ist es, Ihnen die besten Angebote zum Stricken und Häkeln, Inspirationen und Ratschläge sowie qualitativ hochstehende Garne zu unglaublichen Preisen zu bieten! Möchten Sie unsere Anleitungen nicht nur für den persönlichen Gebrauch nutzen? Unsere Copyright Bedingungen finden Sie bei allen unseren Anleitungen ganz unten auf der jeweiligen Seite. Viel Spaß beim Handarbeiten!
Kommentieren Sie die Anleitung DROPS 129-18
Wir würden gerne Ihre Meinung zu diesem Modell erfahren!
Wenn Sie eine Frage stellen möchten, prüfen Sie bitte, dass Sie die richtige Kategorie im unten stehenden Formular gewählt haben - so bekommen Sie schneller eine Antwort. Die obligatorischen Felder sind mit einem * gekennzeichnet.