
Beliebte Kategorien
Suchen Sie nach einem Garn?


Kommentare / Fragen (102)
![]() Soumya hat geschrieben:
Soumya hat geschrieben:
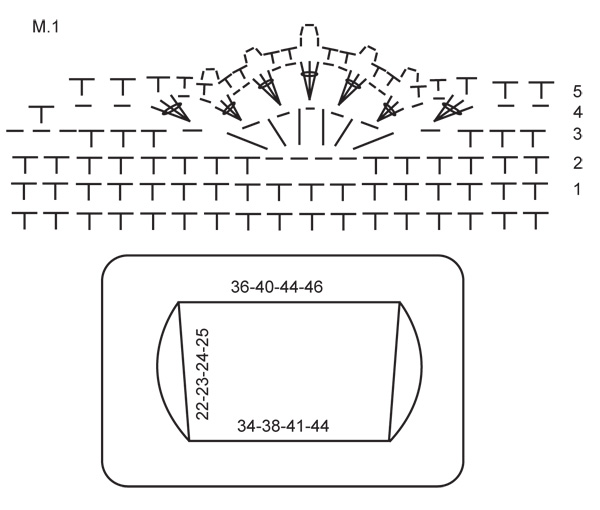
What is tr? Is it treble crochet? M.1 says I = tr so, is it treble crochet and 1 chain in the diagram?
19.03.2012 - 17:06DROPS Design hat geantwortet:
Soumya, make sure you are on the US pattern if you are a US crocheter, and the UK pattern if you are a UK crocheter. Symbols are different. tr (treble) in chart is in the UK pattern, are you a UK crocheter?
20.03.2012 - 17:24
![]() Soumya hat geschrieben:
Soumya hat geschrieben:
I am confused with "Now crochet 1 dc in each dc from back piece and around each ch band crochet 42-44-46-48 dc = 204-220-236-248 dc in total." What is the 42?? Without 42 its 232 total dc's. Need Help!! Soumya
10.03.2012 - 04:28DROPS Design hat geantwortet:
Smallest size, as an example: you have 58 dc at bottom of back piece and 62 dc at the top. You have a chain band each side. When starting edge piece, crochet 62 dc along the top, 42 dc around first ch-band, 58 dc along bottom, and 42 dc around next ch-band. 62+42+58+42 = 204 dc in total.
12.03.2012 - 21:18
![]() Jen hat geschrieben:
Jen hat geschrieben:
Thanks. Now I'm confused about the chart. Is it just repeated all the way across? Rows 4 and 5 just sort of stop, in the chart. I assume the stitches still keep going though?
01.03.2012 - 23:18DROPS Design hat geantwortet:
The chart shows one repeat of the pattern. So for pattern keep repeating the repeat over and over.
06.03.2012 - 01:33
![]() Jen hat geschrieben:
Jen hat geschrieben:
What is the second diagram for?
01.03.2012 - 02:02DROPS Design hat geantwortet:
There is one measure chart and one crochet chart for the edge. Pattern tells when to work the final edge.
01.03.2012 - 17:53
![]() Rachel hat geschrieben:
Rachel hat geschrieben:
On the first row of dc, should I be adding a ch1 where it says to skip?
22.02.2012 - 17:42DROPS Design hat geantwortet:
No you should not add a ch. The reason why you decrease on first row by skipping ch, is to make the starting row elastic.
28.02.2012 - 23:59
![]() Rachel hat geschrieben:
Rachel hat geschrieben:
On the first row of dc, should I be adding a ch1 where it says to skip?
22.02.2012 - 17:42DROPS Design hat geantwortet:
No do not add a ch.
28.02.2012 - 23:59
![]() Siv Hammarstedt hat geschrieben:
Siv Hammarstedt hat geschrieben:
Jag håller på med kantstycket och när jag har ökat klart till 220 maskor och virkar vidare står det att man ska öka 34 maskor på v det ska då bli 322 maskor. Jag förstår inte det för när jag lägger ihop 220 och 34 maskor blir det bara 254 maskor. Tacksam för svar
02.02.2012 - 11:48DROPS Design hat geantwortet:
Hej Siv, Totalt skall du öka 34 maskor ggr 3: enligt mönster så här: SAMTIDIGT när kanten mäter 5, 10 och 15 cm (avpassa så att det är ett varv med fm) ökas 34-34-34-36 fm jämnt fördelat på v. Då blir antalet maskor 322. Lycka till!
29.02.2012 - 15:12
![]() DROPS Design hat geschrieben:
DROPS Design hat geschrieben:
Hi Lindsey, there are no written instruction for the chart, the chart is showing the pattern and the chart symbols are explained above the chart. Please contact the shop where you bought the yarn for help.
08.04.2011 - 17:16
![]() Lindsey hat geschrieben:
Lindsey hat geschrieben:
What is the written version of diagram M.1?
08.04.2011 - 05:13
![]() DROPS Design hat geschrieben:
DROPS Design hat geschrieben:
Hi Melissa You are inc 34 sc 3 times, once at 2", next time at 4" and 3rd time at 6".
22.02.2011 - 04:20
|
|||||||||||||
Peach Perfection#peachperfectionbolero |
|||||||||||||
 |
 |
||||||||||||
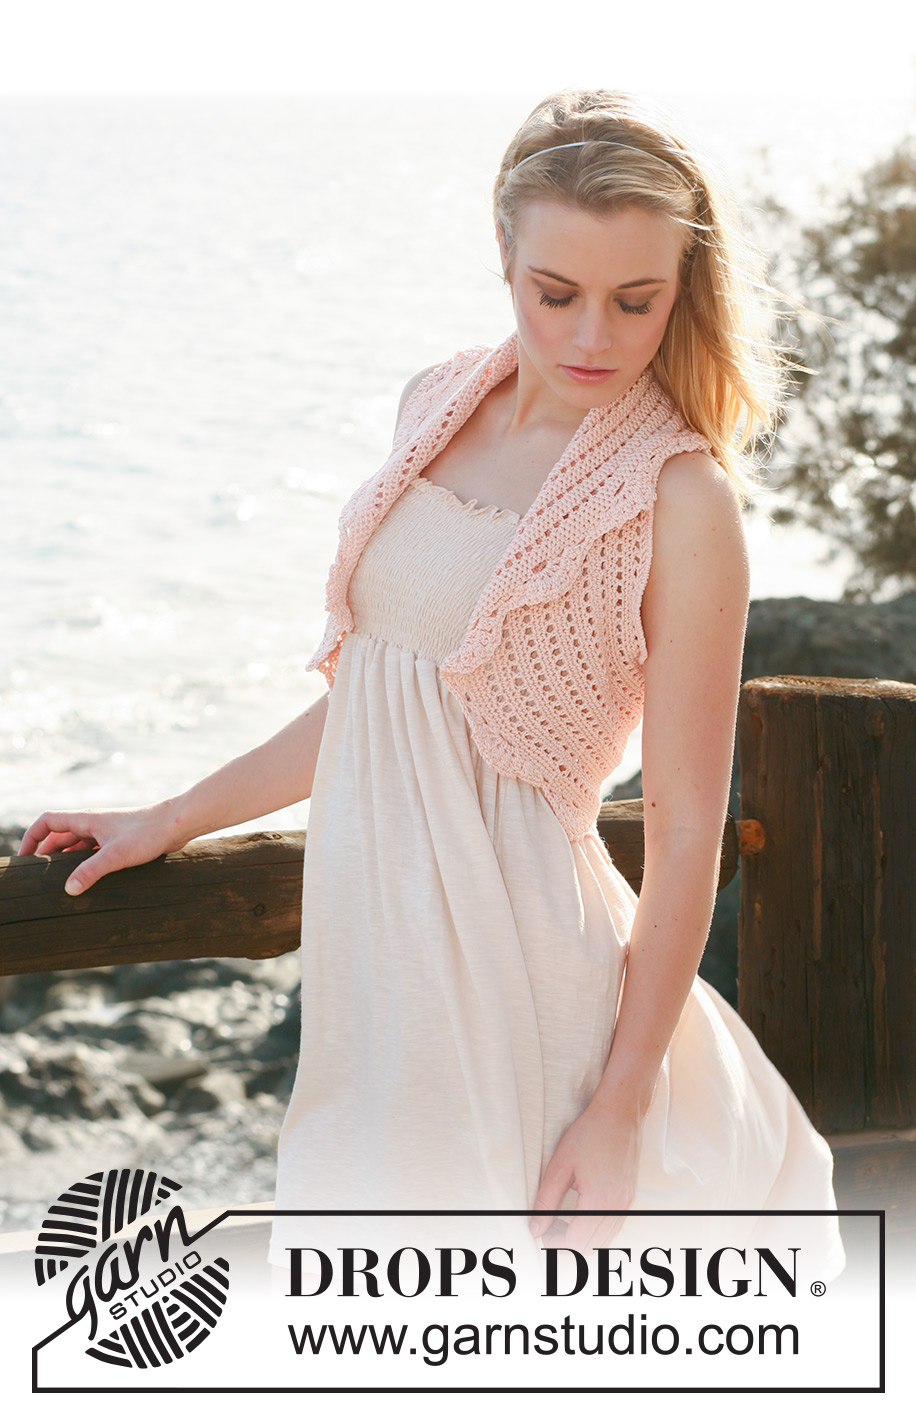
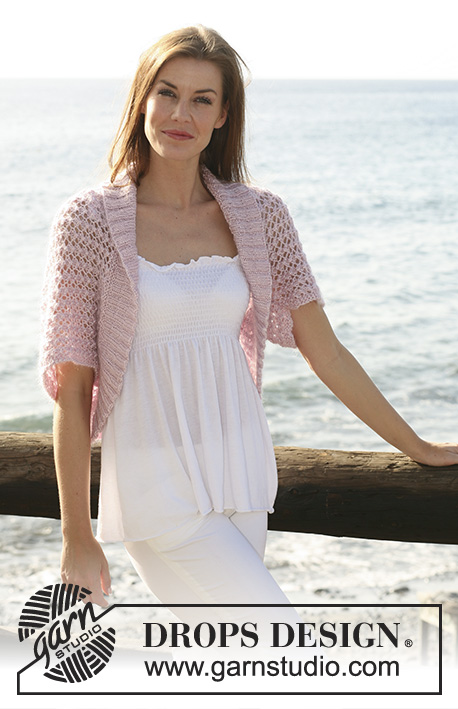
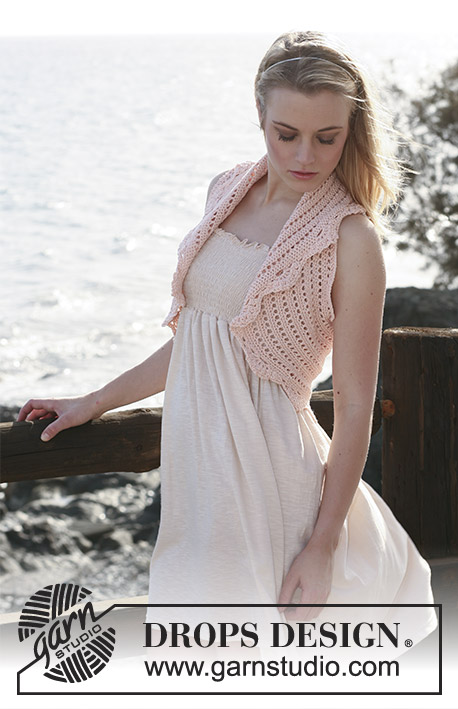
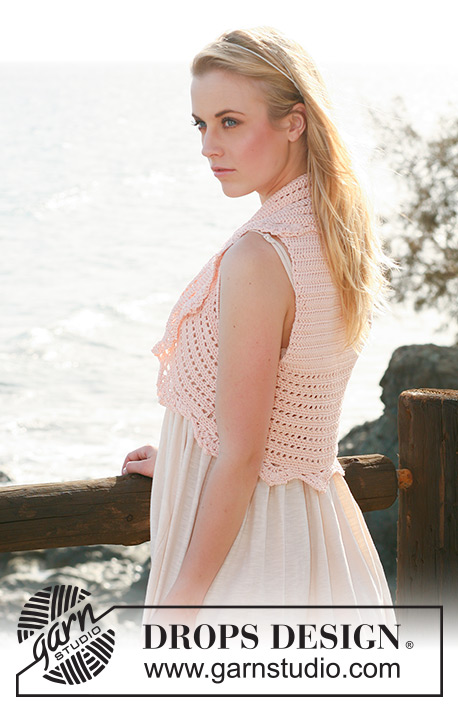
Gehäkelte DROPS Weste in ”Muskat”. Grösse S - XXXL. DROPS design: Modell Nr. R-559
DROPS 119-22 |
|||||||||||||
|
HÄKELINFO: Rücken: Das erste Stb jeder R. wird mit 3 Lm ersetzt. Kante: Die erste fM jeder R. wird mit 1 Lm ersetzt. Jede R. wird mit einer Kettm in die letzte Lm abgeschlossen. Das erste Stb jeder R. wird mit 3 Lm ersetzt. Jede R. wird mit einer Kettm in die letzte Lm abgeschlossen. TIPP ZUM AUFNEHMEN: 2 M. in 1 M. häkeln. -------------------------------------------------------- -------------------------------------------------------- RÜCKENTEIL: Mit Muskat auf Nadel Nr. 4, 78-86-94-99 lockere Lm häkeln. 1 Stb in die 4. Lm von der Nadel, * 1 Stb in jede der 3 nächsten Lm, 1 Lm überspringen *, von *-* wiederholen und mit je 1 Stb in die 2-2-2-3 letzten Lm abschliessen = 58-64-70-74 Stb. Weiter 1 Stb in jedes Stb häkeln. Nach 7 cm auf beiden Seiten 1 Stb aufnehmen – SIEHE TIPP ZUM AUFNEHMEN. Die Aufnahme nach 15 cm wiederholen = 62-68-74-78 Stb. Weiterfahren bis die Arbeit 22-23-24-25 cm misst. KANTE: Über dem Rückenteil je 1 Stb in jedes Stb, 56-58-60-64 Lm, 1 Stb in jedes Stb an der Unterseite des Rückenteils, 56-58-60-64 Lm und mit Kettm in das 1. Stb abschliessen. 1 Stb in jedes Stb über das Rückenteil, um jeden Lm-Bogen 42-44-46-48 Stb häkeln = 204-220-236-248 Stb. Danach wie folgt rund häkeln: 1.R.: 1 Stb in das erste Stb, *1 Lm, 1 Stb überspringen, 1 Stb in das nächste Stb *, von *-* wiederholen zum Schluss mit 1 Lm, 1 Stb überspringen und 1 Kettm am Anfang der R. abschliessen. 2.R.: 1 fM in jedes Stb und 1 fM in jede Lm. 3.R.: 1 fM in jede fM. Die 3 R. wiederholen und GLEICHZEITIG nach 5, 10 und 15 cm (bei einer R. mit fM) gleichmässig verteilt 34-34-34-36 fM aufnehmen – SIEHE TIPP ZUM AUFNEHMEN = 306-322-338-356 fM. Nach 17-18-19-20 cm (bei einer R. mit fM) gleichmässig verteilt 0-1-2-1 fM aufnehmen = 306-323-340-357 fM. Mit M1 weiterfahren. Achten Sie bitte darauf: Mit der Runde die mit der Zahl 1 markiert ist anfangen. M1 einmal in der Höhe häkeln. |
|||||||||||||
Erklärungen zum Diagramm |
|||||||||||||
|
|||||||||||||
 |
|||||||||||||
Haben Sie diese Anleitung nachgearbeitet?Dann taggen Sie Ihre Fotos mit #dropspattern #peachperfectionbolero oder schicken Sie sie an die #dropsfan Galerie Brauchen Sie Hilfe bei dieser Anleitung?Sie finden 8 Videotutorials, einen Kommentar/Fragen-Bereich und vieles mehr, wenn sie die Anleitung bei garnstudio.com aufrufen. © 1982-2026 DROPS Design A/S. Wir besitzen alle Rechte. Dieses Dokument, einschließlich aller Untersektionen, hat Urheberrechte. Mehr dazu, was Sie mit unseren Anleitungen machen können, finden Sie ganz unten auf der Seite zu jeder Anleitung. |
|||||||||||||


Mit über 40 Jahren Tätigkeit im Entwerfen von Strick- und Häkelmustern bietet Ihnen DROPS Design eine der umfangreichsten Sammlungen von kostenlosen Anleitungen im Internet - in 17 Sprachen übersetzt. Zum jetzigen Zeitpunkt haben wir insgesamt 325 Handarbeitshefte und 12298 Anleitungen auf Deutsch. 12210
Unser Ziel ist es, Ihnen die besten Angebote zum Stricken und Häkeln, Inspirationen und Ratschläge sowie qualitativ hochstehende Garne zu unglaublichen Preisen zu bieten! Möchten Sie unsere Anleitungen nicht nur für den persönlichen Gebrauch nutzen? Unsere Copyright Bedingungen finden Sie bei allen unseren Anleitungen ganz unten auf der jeweiligen Seite. Viel Spaß beim Handarbeiten!
Kommentieren Sie die Anleitung DROPS 119-22
Wir würden gerne Ihre Meinung zu diesem Modell erfahren!
Wenn Sie eine Frage stellen möchten, prüfen Sie bitte, dass Sie die richtige Kategorie im unten stehenden Formular gewählt haben - so bekommen Sie schneller eine Antwort. Die obligatorischen Felder sind mit einem * gekennzeichnet.