
Beliebte Kategorien
Suchen Sie nach einem Garn?


Kommentare / Fragen (43)
![]() Marion hat geschrieben:
Marion hat geschrieben:
Bonjour, que signifie « snow » dans l’expression « aiguille n 9 en snow » ? Svp
19.02.2026 - 20:14DROPS Design hat geantwortet:
Bonjour Marion, il s'agit du nom de la laine utilisée pour ce modèle que vous retrouverez dans la liste des fournitures, retrouvez plus d'infos ici, sur DROPS Snow. Bon tricot!
20.02.2026 - 07:51
![]() Aimée hat geschrieben:
Aimée hat geschrieben:
Hello, Can I use circular needles instead of straight ones for this pattern?
03.06.2023 - 14:31DROPS Design hat geantwortet:
Dear Aimée, here we use double pointed needles, not straight needles. You can use 2 sets of circular needles for this piece, using the method explained in this video: https://www.garnstudio.com/video.php?id=97&lang=en. You can also work with one circular needle and use the magic loop technique. Happy knitting!
04.06.2023 - 18:11
![]() Sharon Hunt hat geschrieben:
Sharon Hunt hat geschrieben:
Hei, is the short side referred to in the lace pattern the side that will be sewn on to the leg warmer. Thank for responding. Shaton
14.03.2023 - 23:49DROPS Design hat geantwortet:
Hi Sharon, Yes, the shorter side is the side which will be sewn to the leg warmer. Happy crafting!
15.03.2023 - 07:21
![]() Sharon Junt hat geschrieben:
Sharon Junt hat geschrieben:
Hello, am now working the lace border for the leg warmer. The 4 row says to bind off 3 and knit 4. am I supposed to put the last stitch on the left needle after the bonus off stiches back on the right needle. Does this stitch count as the first stitch? Thanks for your response.
13.03.2023 - 22:54DROPS Design hat geantwortet:
Hi Sharon, You bind off 3 stitches and have 1 stitch left on the right needle, which stays there while you knit the remaining 3 stitches (this stitch is included in the 4 knitted stitches). Happy knitting!
14.03.2023 - 07:11
![]() Sharon Hunt hat geschrieben:
Sharon Hunt hat geschrieben:
How do I make sure there is a p2 in the middle of this 6 stitch cable? Thank you.
11.03.2023 - 13:28DROPS Design hat geantwortet:
Dear Sharon, you need to ensure that you will have k2,p2,k2 over the 6 stitches of the cable. Since you are working a k2,p2 rib, adjust as necessary to obtain the indicated combination over the cable (start the row with k2 or p2 accordingly). Happy knitting!
12.03.2023 - 17:05
![]() Sharon Hunt hat geschrieben:
Sharon Hunt hat geschrieben:
Hi. What am I missing where are the instruction to knit 2 purl 2? When I follow the instruction I end up with garter stitch. I have ripped 2 times already and I don’t know what am doing wrong. I don’t see anywhere in the pattern instruction where i says to knit 2 purl 2 for X number of inches before starting the cable. How many cables are in the pattern? I see the cables at the front only? Are there more?
09.03.2023 - 21:40DROPS Design hat geantwortet:
Dear Mrs Hunt, piece is worked bottom up, at the very beginning you start with garter stitch (and you will work and sew the lace edge afterwards), then work the pattern .There is only one cable in the pattern. And then you work in rib (= K2, P2) - the rib as explained under Rib: at the top of pattern explanations - until piece measures 15 3/4" from the cast on row. Happy knitting!
10.03.2023 - 09:48
![]() Isa hat geschrieben:
Isa hat geschrieben:
Combien faut-il de pelotes pour ce modèle, je ne vois pas l'indication ?
05.10.2020 - 12:56DROPS Design hat geantwortet:
Bonjour Isa, vous trouverez la quantité indiquée sous l'en-tête, au poids, soit pour ce modèle300 g DROPS Eskimo /50 g la pelote = 6 pelotes. Bon tricot!
05.10.2020 - 15:33
![]() Martinique hat geschrieben:
Martinique hat geschrieben:
Please advise the pattern sais cast on then knit 3 rows and p3 rows etc then the next row the cable with the reverse stocking sts this I understand but then it sais When piece measures aprox 33 cm what rows am I repeating for my knitting to reach 34cm I am basically asking how many rows do I knit between cables? Secondly when I decrease 6 sts evenly where do I do this in the middle or where? Thank you
10.06.2020 - 15:06DROPS Design hat geantwortet:
Dear Martinique, you will continue working as established (from RS) = 1 edge st, P16, M.1, P16, 1 edge st, repeating the 16 rows in M.1 until piece measures 34 cm from cast on edge. Read more here about diagrams. You decrease 3 sts on each side of M.1 (= from RS, purl 2 together evenly distributed a total of 3 times before M.1 and after M.1). Happy knitting!
10.06.2020 - 15:18
![]() Lilou hat geschrieben:
Lilou hat geschrieben:
Bonjour, j'ai toujours du mal à trouver un modèle sur votre nouvelle présentation!! j'ai le numéro du modèle comment faire?... je passe donc systhèmatiquement par google avec le n0 du modèle pour trouver!!!...
18.12.2016 - 09:55DROPS Design hat geantwortet:
Bonjour Lilou, recherchez des modèles plus simplement dès la page d'accueil en indiquant le numéro du modèle dans la case indiquée dans la rubrique "Cherchez des modèles!" - voir aussi l'aide à la recherche ici. Bon tricot!
19.12.2016 - 10:04Nayla Menassa hat geschrieben:
Bonjour je ne comprend pas le tout debut:tricoter 3rang à l'endroit et 3 autres rangs à l'envers? 1m lis çà ve dire quoi? Merci pour votre patience
19.02.2015 - 12:50DROPS Design hat geantwortet:
Bonjour Mme Menassa, on tricote d'abord toutes les mailles à l'endroit pendant 3 rangs (= 3 rangs endroit), puis on tricote toutes les mailles à l'envers pendant 3 rangs (= 3 rangs envers). Le 1er de ces 6 rangs se fait sur l'endroit de l'ouvrage. 1 m lis = la 1ère et la dernière maille du rang qui sert ensuite à l'assemblage. Bon tricot!
19.02.2015 - 14:29
|
|||||||
DROPS 98-45 |
|||||||
 |
 |
||||||
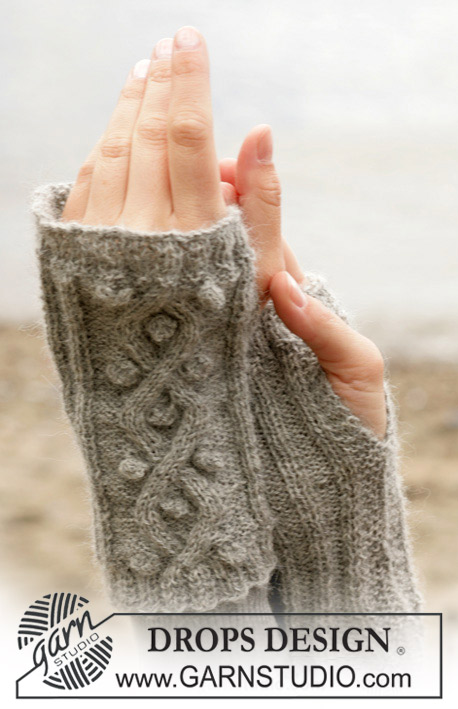
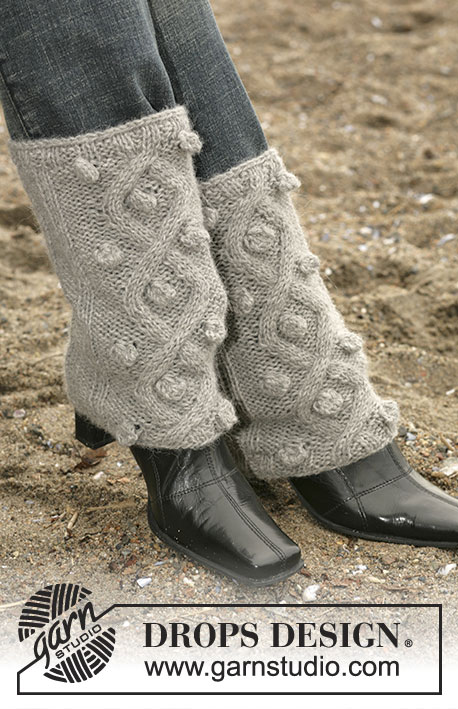
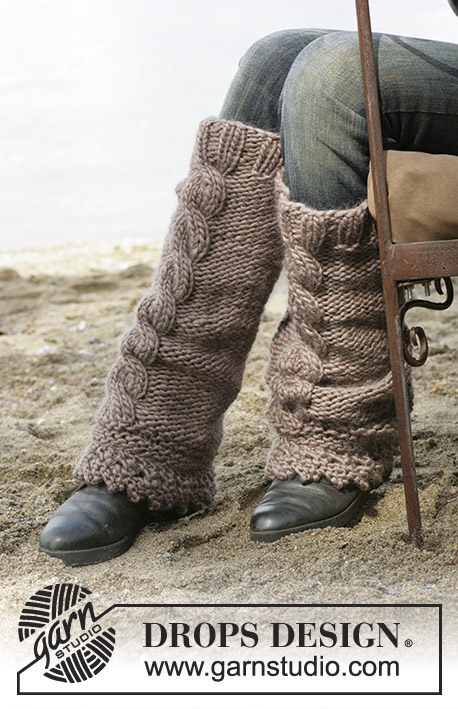
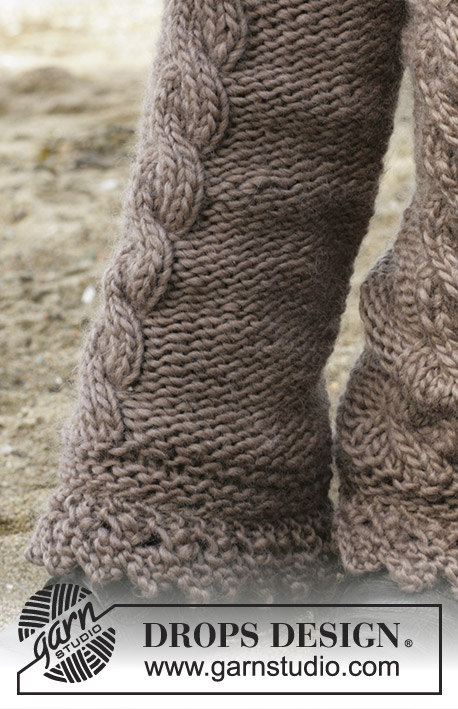
Gestrickte Beinstulpen mit Zopfmuster in DROPS Snow
DROPS 98-45 |
|||||||
|
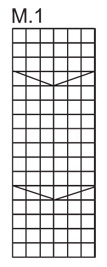
Maschenprobe: Achtung, die Nadelnummer (Ndl) ist nur ein Vorschlag! 10 M. x 14 R. auf Ndl. Nr. 9 und glatt gestrickt = 10 x 10 cm. Muster: Siehe Diagramm M1. Das Diagramm zeigt das Muster von rechts. Bündchen: * 2 re., 2 li. *, von *-* wiederholen. Spitzenkante: 1. R.: 2 re., 2 Umschlag, 2 re. 2. R.: 2 M. in die 1. M., 2 re., 1 li. (in den 2. Umschlag), 2 re. 3. R.: 7 re. 4. R.: 3 M. abk., 4 re. Stulpen: Mit Snow auf Ndl. Nr. 9, 38 M. anschlagen (Inkl. 1 Randm. auf beiden Seiten). 3 R. re. stricken (1. R. = rechte Seite) und 3 R. li. Gleichzeitig bei der letzten R. 2 M. aufnehmen indem man in die 16. und 18. M. 2 M. strickt (= 40 M.). Die nächste R. von der rechten Seite: 1 Randm, 16 M. glatt mit der linken Seite nach aussen, M1 (= 6 M.), 16 M. glatt mit der linken Seite nach aussen und mit 1 Randm abschliessen. Nach ca. 34 cm – gleich nach einem Zopf oder 2 R. nach einem Zopf – 1 R. re. auf rechts sticken und gleichzeitig gleichmässig verteilt 6 M. abk. (es wird nicht über die 6 Zopfmaschen abgekettet) = 34 M. Jetzt das Bündchen stricken – siehe oben – mit 2 li. über dem Zopf. Nach ca. 40 cm re. über rechts und li. über links abk. Zusammennähen: Die Stulpen innerhalb 1 Randm zusammennähen. Spitzenkante: Auf Ndl. Nr. 9, 4 M. anschlagen und die Spitzenkante stricken – siehe oben. Stricken bis die Kante 36 cm misst – an der kurzen Seite. Die Kante wird zuerst zusammengenäht und danach an der Unterkante (ohne Bündchen) angenäht – Kante an Kante, mit den Spitzen nach unten annähen. |
|||||||
Erklärungen zum Diagramm |
|||||||
|
|||||||
 |
|||||||
Haben Sie diese Anleitung nachgearbeitet?Dann taggen Sie Ihre Fotos mit #dropspattern oder schicken Sie sie an die #dropsfan Galerie Brauchen Sie Hilfe bei dieser Anleitung?Sie finden 12 Videotutorials, einen Kommentar/Fragen-Bereich und vieles mehr, wenn sie die Anleitung bei garnstudio.com aufrufen. © 1982-2026 DROPS Design A/S. Wir besitzen alle Rechte. Dieses Dokument, einschließlich aller Untersektionen, hat Urheberrechte. Mehr dazu, was Sie mit unseren Anleitungen machen können, finden Sie ganz unten auf der Seite zu jeder Anleitung. |
|||||||


Mit über 40 Jahren Tätigkeit im Entwerfen von Strick- und Häkelmustern bietet Ihnen DROPS Design eine der umfangreichsten Sammlungen von kostenlosen Anleitungen im Internet - in 17 Sprachen übersetzt. Zum jetzigen Zeitpunkt haben wir insgesamt 324 Handarbeitshefte und 12290 Anleitungen auf Deutsch. 12202
Unser Ziel ist es, Ihnen die besten Angebote zum Stricken und Häkeln, Inspirationen und Ratschläge sowie qualitativ hochstehende Garne zu unglaublichen Preisen zu bieten! Möchten Sie unsere Anleitungen nicht nur für den persönlichen Gebrauch nutzen? Unsere Copyright Bedingungen finden Sie bei allen unseren Anleitungen ganz unten auf der jeweiligen Seite. Viel Spaß beim Handarbeiten!
Kommentieren Sie die Anleitung DROPS 98-45
Wir würden gerne Ihre Meinung zu diesem Modell erfahren!
Wenn Sie eine Frage stellen möchten, prüfen Sie bitte, dass Sie die richtige Kategorie im unten stehenden Formular gewählt haben - so bekommen Sie schneller eine Antwort. Die obligatorischen Felder sind mit einem * gekennzeichnet.