
Beliebte Kategorien
Suchen Sie nach einem Garn?


Kommentare / Fragen (12)
![]() Clare hat geschrieben:
Clare hat geschrieben:
Hi, can you please let me know if this pattern can be updated to include larger sizes ? Like up to XXXL
21.01.2024 - 19:26
![]() Lynne Randall Caloggero hat geschrieben:
Lynne Randall Caloggero hat geschrieben:
I haven't begun to knit the project yet, but as I read through the instructions I'm wondering why it's necessary to shift M.1 half a pattern repeat to the right on every other row?
01.07.2020 - 15:30DROPS Design hat geantwortet:
Dear Mrs Randall Caloggero, you will displace the diagrams so that the flowers are note the one over each other but one flower will come over 2 from previous diagram. Happy knitting!
01.07.2020 - 15:43
![]() Debra hat geschrieben:
Debra hat geschrieben:
Hi, I have another question about the directions. I am working on the sleeve and am almost finished. I have cast off 10 sts mid underarm, ready to work back and forth on the needles. It says to decrease 6 sts 3 times on every other row. Where do I place these decreases- at the beginning, middle, end of row or equally spaced out across the row? Please clarify for me. Thanks for all your help so far.
20.06.2020 - 01:38DROPS Design hat geantwortet:
Dear Debra, after you have cast off 10 sts on mid under arm, you continue back and forth casting off (you don't decrease, pattern will be updated) 6 sts at the begining of every row on each side a total of 3 times (= 6 sts at the beg of next 6 rows). Happy knitting!
22.06.2020 - 07:37
![]() Debra hat geschrieben:
Debra hat geschrieben:
I am working on the sleeve and am questioning the instructions. Do I work M1 just once and then change to M2 as soon as it's completed or do I continue with M1 repeated several times until I have 122 sts and then switch to M2 once all 122 sts are made?
17.06.2020 - 19:41DROPS Design hat geantwortet:
Dear Debra, diagram M.1 is worked only one time in height (but around all stitches in the round - make sure to center a diagram mid on top of sleeve), then you work M.2 (both in width and height) to the end of sleeve. Happy knitting!
18.06.2020 - 09:37
![]() Debra hat geschrieben:
Debra hat geschrieben:
Thanks for your answer but I am still unsure about the meaning of decreasing 2 sts 2 times and 1 st 2 times. Is that all in one row and consecutively cast off. Why doesn't it just say cast off 6 stitches? Maybe I'm not understanding and making it more complicated than it is. Please help clear this up for me.
05.06.2020 - 18:08DROPS Design hat geantwortet:
Dear Debra, you don't cast off 6 sts 1 time to make the neck line somewhat rounded. You have to cast off the sts for neckline at the beg of row from neck towards armhole, then work row to the end, turn and work next row and repeat this 2 rows until all sts are cast off (you repeat these 2 rows 2 times casting off 2 sts at the beg of row then repeat 2 times castinf off 1 st at the beg of row). Happy knitting!
08.06.2020 - 07:35
![]() Debra hat geschrieben:
Debra hat geschrieben:
Can you give me more explicit details on how to shape the front neckline? I don't know what you mean by decrease 2 sts 2 times , 1 st 2 times. Are these all in the same row?How many stitches will I be decreasing in total? I assume I will be using the knit 2 together technique to do these decreases.
05.06.2020 - 02:08DROPS Design hat geantwortet:
Dear Debra, you first cast off the middle 41 sts for neck and finish each shoulder separately, at the beginning of every row from neck towards armhole (from RS on one shoulder, from WS on the other shoulder), you will cast off (will looks nicer than decrease): 2 sts 2 times and 1 stitch 2 times = you have cast off a total of 6 sts towards neck. Happy knitting!
05.06.2020 - 07:41
![]() Debra hat geschrieben:
Debra hat geschrieben:
Ughhh, I have already knitted one complete diagram as before the edits. Do you know if I can continue on pearling as the original pattern and just turn the garment inside out when finished so the knit side shows? Or is there a way to retread the stitches on the needle ? Or do I have to rip it all out and begin again? Please tell me what you think.
25.05.2020 - 23:14DROPS Design hat geantwortet:
Dear Debra, you could turn your work inside outside so that the knit side will be now towards outside (= from RS) and the purl side inside (from WS) - just do this at at the beg of the round - you might also continue working with purled sts outside and then just turn inside outside when dividing piece for armholes; Happy knitting!
26.05.2020 - 08:47
![]() Debra hat geschrieben:
Debra hat geschrieben:
Hi, Can you please give me some details as to how to shift the diagram half a pattern repeat to the right. Would I begin the rows on stitch 13 ? Thanks for your help.
24.05.2020 - 16:07DROPS Design hat geantwortet:
Dear Debra, when working the 2nd M.1 in height, you can start the round with the 13rd stitch and then repeat M.1 and finish round with the 12th stitch. On 3rd repeat, start again as before and continue like this. Happy knitting!
25.05.2020 - 09:53
![]() Debra hat geschrieben:
Debra hat geschrieben:
This pattern diagram is starting with a pearl row and the rose is done in knit stitch. Will this mean the right side of the sweater has the pearl side facing out? in the sweater photo, it looks like the main body is stocking stitch with the knitted side showing and the rose in pearls. Can you please help? Did I do something wrong to have the right side out showing pearl stitch?
23.05.2020 - 19:36DROPS Design hat geantwortet:
Dear Debra, diagram text has been reversed - it has been edited now, thanks for your feedback - a white square should be a K stitch and a small black square a P - Happy knitting!
25.05.2020 - 09:06
![]() Debra Briere hat geschrieben:
Debra Briere hat geschrieben:
I am confused with the instructions for the moss stitch pattern. It says to repeat second row but I am thinking it should say repeat these 2 rows of K1P1 over P1K1. Can you please clarify this for me?
22.05.2020 - 05:35DROPS Design hat geantwortet:
Hi Debra, Row 2 says to knit over purl and purl over knit, which is then repeated in the following rows - so all rows consist of knit over the previous row's purl and purl over the previous row's knit. I hope this helps and happy knitting!
22.05.2020 - 07:49
|
||||||||||
DROPS 29-22 |
||||||||||
|
|
||||||||||
DROPS Pulli mit Strukturmuster in „Muskat“
DROPS 29-22 |
||||||||||
|
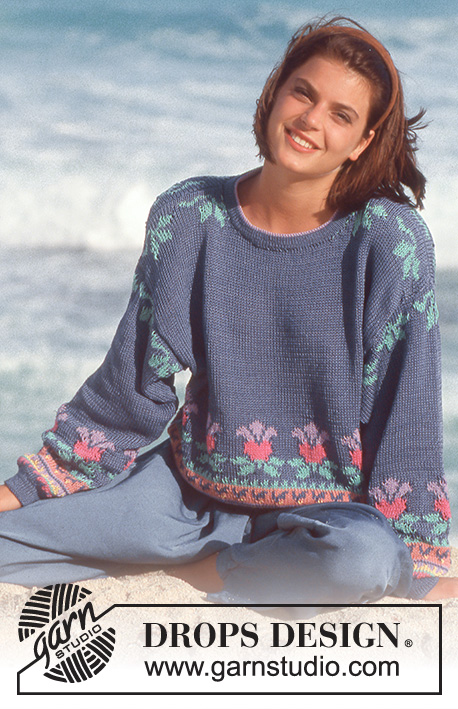
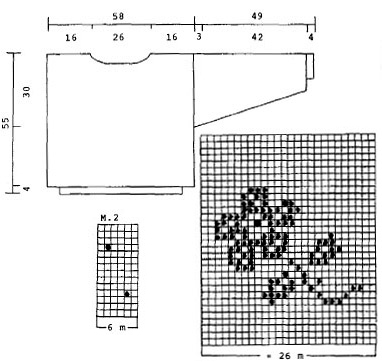
Maschenprobe: 10 x 10 cm = 20 M. x 26 R. auf Nadel Nr. 4 im Muster gestrickt Langes Modell: Sie brauchen 100 gr. mehr Garn. Alle Masse um 14 cm erhöhen (=69) cm. Perlmuster : * 1. R.: 1 re., 1 li. 2. R: re. über li. und li. über re. * 2. R. wiederholen. Vorder- und Rückenteil: Mit korall auf Rundstricknadel Nr. 2,5, 188 M. anschlagen und 4 cm Perlmuster stricken. Zu Rundstricknadel Nr. 4 wechseln und bei der 1. R. gleichmässig verteilt 46 M. aufnehmen = 234 M. M1 stricken und bei jeder 2 R. in der Höhe das Muster ein halbes Mal verschieben – damit sich die Blume verschieben. Stimmt die Maschenprobe? Nach 25 cm die Arbeit teilen. Jetzt die Teile für sich fertig stricken. Vorderteil: = 117 M. Nach 50 cm die mittleren 41 M. für den Hals abk. Weiter bei jeder 2. R. gegen den Hals abk.: 2 M. x 2, 1 M. x 2. Danach abk. Die Arbeit misst 55 cm. Rückenteil: = 117 M. Nach 53 cm die mittleren 49 M. für den Hals abk. und bei der nächsten R. 2 M. gegen den Hals abk. Nach 55 cm abk. Ärmel: Mit korall auf Nadelspiel Nr. 2,5, 46 M. anschlagen und 4 cm Perlmuster stricken. Zu Rundstricknadel Nr. 4 wechseln und bei der 1. R. gleichmässig verteilt 14 M. aufnehmen = 60 M. M1 stricken. Passen Sie auf dass das Muster in die Mitte kommt. Gleichzeitig unter dem Ärmel bei jeder 3. R. 2 M. aufnehmen und 31 Mal wiederholen = 122 M. Die neuen M. werden ins Muster eingestrickt. Nach M1 mit M2 fertig stricken. Nach 46 cm unter dem Ärmel die mittleren 10 M. abk. Danach bei jeder 2. R. gegen die Schulter abk.: 6 M. x 3. Nach 49 cm abk. Zusammennähen: Die Schulternaht zusammennähen. Rund um den Hals mit korall auf Nadelspiel Nr. 2,5, 102 M. aufnehmen und 4 R. Perlmuster stricken. Danach abk. Jetzt mit Häkelnadel Nr. 3 wie folgt: 1 fM, * 3 Lm, 1 Stb in die erste Lm, 2 M. überspringen , 1 fM*. Die Ärmel einnähen. |
||||||||||
Erklärungen zum Diagramm |
||||||||||
|
||||||||||
 |
||||||||||
Haben Sie diese Anleitung nachgearbeitet?Dann taggen Sie Ihre Fotos mit #dropspattern oder schicken Sie sie an die #dropsfan Galerie Brauchen Sie Hilfe bei dieser Anleitung?Sie finden 26 Videotutorials, einen Kommentar/Fragen-Bereich und vieles mehr, wenn sie die Anleitung bei garnstudio.com aufrufen. © 1982-2026 DROPS Design A/S. Wir besitzen alle Rechte. Dieses Dokument, einschließlich aller Untersektionen, hat Urheberrechte. Mehr dazu, was Sie mit unseren Anleitungen machen können, finden Sie ganz unten auf der Seite zu jeder Anleitung. |
||||||||||


Mit über 40 Jahren Tätigkeit im Entwerfen von Strick- und Häkelmustern bietet Ihnen DROPS Design eine der umfangreichsten Sammlungen von kostenlosen Anleitungen im Internet - in 17 Sprachen übersetzt. Zum jetzigen Zeitpunkt haben wir insgesamt 324 Handarbeitshefte und 12290 Anleitungen auf Deutsch. 12202
Unser Ziel ist es, Ihnen die besten Angebote zum Stricken und Häkeln, Inspirationen und Ratschläge sowie qualitativ hochstehende Garne zu unglaublichen Preisen zu bieten! Möchten Sie unsere Anleitungen nicht nur für den persönlichen Gebrauch nutzen? Unsere Copyright Bedingungen finden Sie bei allen unseren Anleitungen ganz unten auf der jeweiligen Seite. Viel Spaß beim Handarbeiten!
Kommentieren Sie die Anleitung DROPS 29-22
Wir würden gerne Ihre Meinung zu diesem Modell erfahren!
Wenn Sie eine Frage stellen möchten, prüfen Sie bitte, dass Sie die richtige Kategorie im unten stehenden Formular gewählt haben - so bekommen Sie schneller eine Antwort. Die obligatorischen Felder sind mit einem * gekennzeichnet.