
Populære kategorier
Ser du etter et garn?


Kommentarer / Spørsmål (48)
![]() María Fernanda Yáñez skrev:
María Fernanda Yáñez skrev:
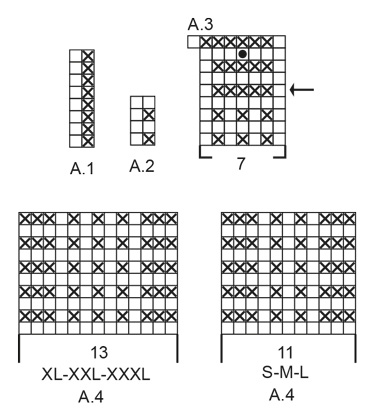
Hola! Para la talla M, los 95 puntos de A2 no encajan con el sentido de los 7 puntos centrales de A3 (para que encajen tendría que tener 43 puntos a un lado y 45 en el otro). Hago el comentario para saber si es que hay un error en el patrón. Gracias por la respuesta.
15.03.2022 - 05:30
![]() Irene Simeone skrev:
Irene Simeone skrev:
Buongiorno, un'altra domanda. Quando si deve iniziare il diagramma A.3, le istruzioni dicono di iniziare dalla riga indicata dalla freccia su un ferro sul rovescio del lavoro. Questo significa che le 7 maglie centrali devono essere lavorati così: 1 dir, 5 rov, 1 dir? Grazie ancora. Irene
03.03.2022 - 15:43DROPS Design answered:
Buonasera Irene, dal rovescio del lavoro deve lavorare come indicato nella legenda e cioè 1 maglia rovescio, 5 maglie diritto e 1 maglia rovescio. Buon lavoro!
05.03.2022 - 22:09
![]() Irene Simeone skrev:
Irene Simeone skrev:
Buongiorno, sto seguendo le istruzioni ma sono un po' confusa :( il davanti del lavoro è quello in cui si vedono le coste oppure quello in cui ci sono una specie di nodini? spero riusciate a capire cosa intendo. Grazie mille! Irene
03.03.2022 - 15:24DROPS Design answered:
Buonasera Irene, il davanti del lavoro è quello in cui inizia a lavorare a coste sul dietro. Buon lavoro!
04.03.2022 - 17:46
![]() Stella skrev:
Stella skrev:
When it says to work 4 rows over 10 garter stitches, does is mean 4 rows with the 10 garter stitches or the 10 garter stitches with 4 rows of A2 over it?
03.01.2022 - 21:52DROPS Design answered:
Dear Stella, this means you work the next 4 rows with the 10 sts in garter stitch instead of pattern and the remaining stitches as before. Happy knitting!
04.01.2022 - 07:26
![]() Angela Beaty skrev:
Angela Beaty skrev:
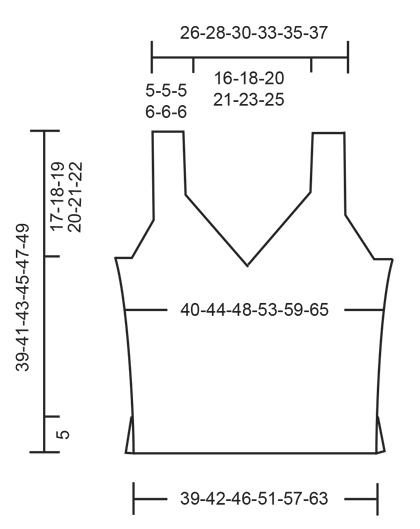
In the Back Piece section, work from arrow in A.3 over the middle 7 stitches on row, Is this actually in the middle of the 96 stitches? So you skip the first 4 rows and just do the arrow row? Then work A.3 over the first 48 stitches do you start from the bottom of the diagram or from the arrow?
19.08.2021 - 10:21DROPS Design answered:
Dear Angela, when you work from the arrow, yes, you're working over the middle 7 stitches of the 96 stitches and you skip the first 4 rows and start from the arrow row. In the rest of the stitches, you work A.2. After finishing A.3, in the next row, there is a split for the opening. The rows under the arrow are actually from A.2 and are there just to give a context or to make it continuous visually.
30.08.2021 - 19:26
![]() Katzilicious skrev:
Katzilicious skrev:
I'm still confused, can you explain "work from arrow in A.3 over the middle 7 stitches on row - adjust so that this row marked with arrow is worked from wrong side. On first row from right side after A.3 work over the first 44-48-52-57-63-70 stitches on row and slip the remaining 44-48-52-57-63-70 stitches on 1 stitch holder"? So how do I read the chart? From the right bottom? And when i work from arrow A.3 do i start with RS or WS? Thank you
18.05.2021 - 12:06DROPS Design answered:
Dear Katzilicious, you read the diagram from right to left and from bottom up, from the right side. Here you have a lesson on how to read a diagram: https://www.garnstudio.com/lesson.php?id=68&cid=19 A.3 begins from the wrong side. Work 5 rows of A.3, which is in the center of the front or the back. The next step is to separate this part into two. You work one part with the V-neck and then you work the second part from the stitch holder. Happy knitting!
07.08.2021 - 11:30
![]() Jessica skrev:
Jessica skrev:
Hi again! Thanks for the help, it clears things up, but I’m still not sure what I should be doing when I switch to the A.3 chart. It says the row marked by the arrow should be worked from the WS, but to do that, I’d have to work the row below from the RS, meaning I’d be doing a row of knitting. But the A.2 pattern states that for RS rows I should P1 K1. I’m not sure how these two charts fit together. Any help would be great.
07.05.2021 - 13:32
![]() Jessica skrev:
Jessica skrev:
Hi! I’m a little confused about what to do once I’ve done the first 8 rows in A.1. I’m finishing on the WS so starting A.2 on the RS with a P1 K1 and 3 garter stitches at each end, then on the WS purling all stitches, but from previous comments that doesn’t seem to be the correct pattern, and after I got to switching to A.3, doing the row indicated by the arrow on the WS indicates that the previous RS row should be all knitted, not P1 K1 as I have done. Any help would be appreciated.
07.05.2021 - 11:22DROPS Design answered:
Dear Jessica, the garter stitches in A.2 (= P from RS, P from WS) should be worked over the P stitches in A.1, so that you will work A.2 from RS: 3 sts in garter st, K1, (P1, K1) repeat from (to) and finish with 3 sts in garter stitch and from WS: K3, P to the last 3 sts, P3. Happy knitting!
07.05.2021 - 13:00
![]() Katzilicious skrev:
Katzilicious skrev:
I'm confuse about worked A.1 until it had been vertically worked and work A.2 over A.1 can you please explain? Thank you
06.05.2021 - 07:39DROPS Design answered:
Dear Katzilicious, work first the 8 rows in A.1 as explained: (from RS = 3 sts in garter stitch, knit 1, repeat A.1 (read from the right towards the left= P1, K1), 3 sts in garter st / from WS: 3 sts in garter st, A.1 (read from the left towards the right = P1, K1), P1, 3 sts in garter st). Then work: 3 sts in garter st, knit 1, repeat A.2 (= 1 st in garter st, 1 st in stocking st), and finish with 3 sts in garter st, from WS: 3 sts in garter st, repeat A.1 (=1 st in stocking st = P, 1 st in garter st = K), P1, 3 sts in garter st. Hope this help. Happy knitting!
06.05.2021 - 07:45
![]() Diana skrev:
Diana skrev:
I prefer written instructions as opposed to charts. Is there anyone who has written out the instructions? Also, there are no instructions on how many inches or rows we need to knit for each diagram. I am a long time knitter but find almost all of the patterns here quite confusing with no written instructions or actual row/inches for each size. I understand the patterns are translated from Norwegian and it is not an easy task to ensure everything is explained in detail.
29.03.2021 - 22:35DROPS Design answered:
Dear Diana, we use charts insted of written out instructions not only because they are available in many languages, but also because we believe that with charts one can see not only the very next step, but one can see teh larger picture, as how stitches and rows relate to each other en large. We also have a lesson about how to read diagrams here, and one can always ask for help in the store where they bought their DROPS yarn from (over the phone or in person). We have many knitters who actually prefer diagrams to written instructions. Happy Knitting!
30.03.2021 - 11:50
|
|||||||||||||
Mazo#mazotop |
|||||||||||||
 |
 |
||||||||||||
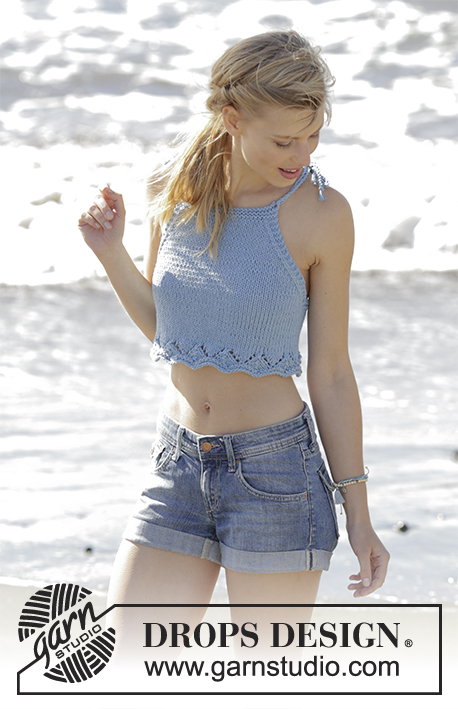
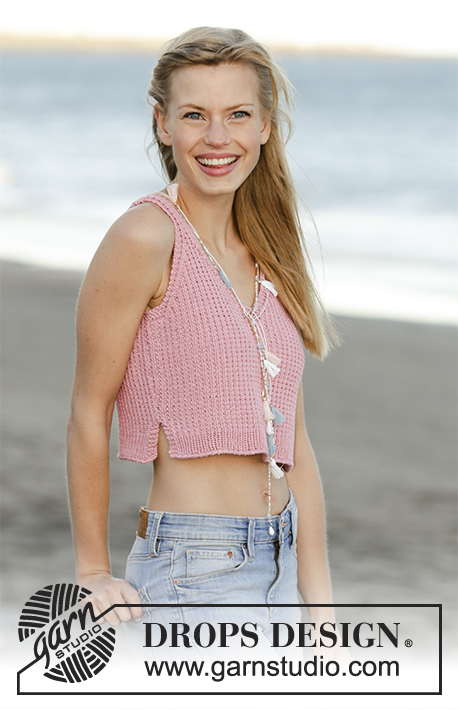
Topp med v-hals, strukturmønster og splitt i sidene, strikket nedenfra og opp i DROPS Muskat. Str S - XXXL
DROPS 178-66 |
|||||||||||||
|
RILLE (strikkes frem og tilbake): 1 rille = 2 pinner rett. MØNSTER: Se diagram A.1 til A.4. Diagrammet viser alle pinnene i mønsteret sett fra retten. Velg diagram for din størrelse. ØKETIPS: Øk 1 maske ved å lage et kast om pinnen. På neste pinne strikkes kastet vridd rett, slik at det ikke blir hull. NB: De nye masker strikkes fortløpende inn i mønsteret A.2. FELLETIPS: Fell 1 maske på innsiden av 3 kantmasker i rille. Alle fellinger skjer fra retten! Fell slik etter 3 kantmasker i rille: Ta 1 maske løs av pinnen som om den skulle strikkes rett, 1 rett, løft den løse masken over den som er strikket. Fell slik før 3 kantmasker i rille: Start 2 masker før de 3 kantmasker i rille og strikk 2 masker rett sammen. ---------------------------------------------------------- TOPP: Toppen strikks frem og tilbake i 2 deler og sys sammen til slutt. BAKSTYKKE: Legg opp 81-89-97-107-119-133 masker med Muskat på rundpinne 4. Strikk 1 pinne vrang fra vrangen. Strikk vrangbord slik (1.pinne = retten): Strikk 3 masker RILLE - se forklaring over, strikk 1 maske rett, gjenta A.1 (= 2 masker) til det gjenstår 3 masker på pinnen, strikk 3 masker rille. Fortsett mønsteret frem og tilbake slik til A.1 er strikket ferdig i høyden. Deretter strikkes A.2 (= 2 masker) over A.1. HUSK PÅ STRIKKEFASTHETEN! Når arbeidet måler 5 cm legges det opp 1 ny maske på slutten av de 2 neste pinnene (markerer at splitten slutter) = 83-91-99-109-121-135 masker. Strikk mønster slik: 1 kantmaske rille, 1 rett, A.2 til det gjenstår 1 maske, 1 kantmaske i rille. Når arbeidet måler 7 cm økes det 1 maske innenfor 1 kantmaske i rille i hver side – LES ØKETIPS! Gjenta økningen når arb måler 10 cm = 87-95-103-113-125-139 masker. Når arbeidet måler 19-20-21-22-23-24 cm strikkes det fra pil i A.3 over de midterste 7 masker på pinnen - avpass slik at denne pinnen markert med pil strikkes fra vrangen! På første pinne fra retten etter A.3 strikkes det videre over de første 44-48-52-57-63-70 masker på pinnen og de resterende 44-48-52-57-63-70 masker settes på 1 tråd. HØYRE SIDE BAK: = 44-48-52-57-63-70 masker. LES HELE NESTE AVSNITT - det felles til hals og ermhull samtidig slik: Strikk mønster A.2 som før med 3 kantmasker i rille mot halsen og 1 kantmaske rille mot siden. HALS: På første pinne fra retten starter fellingen til hals. Fell 1 maske på innsiden av de 3 kantmaskene i rille – LES FELLETIPS. Fell slik på hver 2.pinne (dvs på hver pinne fra retten) totalt 16-18-20-22-24-26 ganger. ERMHULL: Når arb måler 21-22-23-24-25-26 cm strikkes det riller over de ytterste 10-10-12-11-11-14 masker mot siden (inkl 1 kantmaske i rille). Når det er strikket 4 pinner (= 2 riller) over disse maskene felles de første 7-7-9-8-8-11 masker på begynnelsen av pinnen av til ermhull. De neste 3 maskene strikkes i rille (= kant mot ermhullet). Fell 1 maske på innsiden av de 3 kantmasker i rille mot ermhullet. Fell slik på hver 2.pinne (dvs på hver pinne fra retten) totalt 10-12-12-14-18-20 ganger. Etter alle fellinger til ermhull og hals er det 11-11-11-13-13-13 masker tilbake på pinnen til stropp. Fortsett mønsteret som før med 3 kantmasker i rille i hver side. Stroppen strikkes videre som vist i A.4 – velg diagram for din størrelse. Når arb måler 39-41-43-45-47-49 cm felles det av. VENSTRE SIDE BAK: Sett de 44-48-52-57-63-70 masker fra tråden i den andre siden tilbake på rundpinne 4 og strikk på samme måte som høyre side bak, men speilvendt – NB: Når det felles av til ermhull i siden felles det av på begynnelsen av pinnen fra vrangen (istedenfor på begynnelsen av pinnen fra retten). De resterende fellingene til ermhull og hals gjøres fra retten! FORSTYKKE: Legg opp og strikk som bakstykket. MONTERING: Sy de to stroppene sammen med maskesting slik at det ikke blir en tykk søm. Sy sidesømmen innenfor 1 kantmaske rille i hver side fra ermhullet og ned til splitten. Gjenta i den andre siden. Klipp og fest tråder. |
|||||||||||||
Diagramforklaring |
|||||||||||||
|
|||||||||||||
 |
|||||||||||||
 |
|||||||||||||
Har du fullført dette mønsteret?Tagg bildene dine med #dropspattern #mazotop eller send dem til #dropsfan-galleriet. Trenger du hjelp med denne oppskriften?Du finner 23 instruksjonsvideoer, kommentarer/spørsmål og mer i oppskriften på www.garnstudio.com © 1982-2026 DROPS Design A/S. Alle rettigheter er reservert. Dette dokumentet med sine underdokumenter har copyright. Les mer om hva du er tillatt å gjøre med våre oppskrifter nederst i alle våre oppskrifter på vår nettside. |
|||||||||||||


Med over 40 år i strikke- og heklebransjen, tilbyr DROPS Design en av de mest omfattende samlingene av gratis oppskrifter på internett - oversatt til 17 språk. Per i dag har vi 324 kataloger og 12290 oppskrifter på Norsk.
Vi jobber hardt for å tilby det beste innen strikking og hekling, inspirasjon og gode råd, men også kvalitetsgarn til fantastiske priser! Vil du bruke våre oppskrifter til annet enn personlig bruk? Du kan lese om hvilke regler som gjelder i teksten Copyright nederst på siden i alle våre oppskrifter. God fornøyelse!
Kommenter oppskrift DROPS 178-66
Vi vil gjerne høre din mening om denne modellen!
Hvis du ønsker å stille et spørsmål, husk å velge riktig kategori i menyen under - det vil sørge for at du får svar raskere. Obligatoriske felt er markert med *.