
Categorie popolari
State cercando un filato?


Commenti / Domande (17)
![]() Erika ha scritto:
Erika ha scritto:
Hello, I need some help with the short rows every 8th ridge please. What are they for? Can I skip them? Do I count it every 8th ridge from the beg. of the piece or from when I changed to 4mm needles and started the chart? Thank you
17.05.2023 - 20:53DROPS Design ha risposto:
Dear Erika, additional short rows are worked to prevent the band from tightening too much. As the garter stitch is dense and the band wide, garment could be deformed (band x rest of sweater). Therefore, we "flattened" band using short rows. The ridges are counted from the bottom edge, i.e. from the beginning of the piece. Happy knitting! Milá Eriko, zkrác. řady přidáváme proto, abychom předešli deformování úpletu - kontrast mezi hustotou lég a zbytku svetru může vytvořit "kapsu". Légy tedy "vyrovnáme" zkr. řadami. Vroubky počítáme od začátku, od dolního okraje. Hodně zdaru! Hana
18.05.2023 - 15:44
![]() Denise ha scritto:
Denise ha scritto:
Liebes Drops Team Ich bin schon bei der Halsblende (li. Vorderteil) und habe eine Frage zu den verkürzten Reihen: Meiner Auffassung nach müssten diese auf der linken Seite der Vorderseite sein, also am äußeren Rand der Blende. Es bildet sich ja eine Art Fächer dadurch und wenn der auf der rechten Seite wäre, wie in Eurer Beschreibung angegeben, wüsste ich gar nicht, wie ich den an den Kragen nähen soll. Ich bin verwirrt. Danke für Eure Rückmeldung und LG Denise
20.01.2023 - 20:21DROPS Design ha risposto:
Liebe Denise, also ja genau, um den Schlalkragen zu bilden, will man mehr Reihen über die außer Maschen (die werden danach schön gefaltet), und die inneren Maschen werden an den Halsausschnitt vom Rückenteil angenäht. Also wie in diesem Video, obwhol keine verkürzten Reihen im Video gestrickt waren. Viel Spaß beim stricken!
23.01.2023 - 08:42
![]() Claudia ha scritto:
Claudia ha scritto:
Hallo, Ich bin inzwischen am Kragen angekommen. Hier wird ja weiterhin in verkürzten Reihen über die 10 Maschen gestrickt... bleibt es bei dem "in jeder 16ten Reihe"? Oder in jeder zweiten Reihe ? Danke für die Hilfe
29.06.2021 - 22:08DROPS Design ha risposto:
Liebe Claudia, beim Kragen stricken Sie nur die beschriebenen verkürzten Reihen, dh 2 Reihen über die ersten 10 Maschen, 2 Reihen über alle Maschen und diese 4 Reihen wiederholen bis der Kragen 9-10 cm vom Schulter misst. Viel Spaß beim stricken!
30.06.2021 - 07:20
![]() Lea ha scritto:
Lea ha scritto:
Ich habe nochmal eine Frage. Wie muss ich den folgenden Satz aus der Anleitung des Rückenteils verstehen? "Am Anfang jeder R, d.h. beidseitig, für die Armausschnitte wie folgt abketten: 2 M je 1-2-2-2-2 x und 1 M je 2-2-3-1-2 x (= 64-64-66-74-76 M)." Diese Angabe kann ich nicht nachvollziehen, vielleicht kann mir das jemand en bisschen bildlicher beschreiben? Danke
21.04.2021 - 09:49DROPS Design ha risposto:
Liebe Lea, Sie sollen für die Armausschnitte beidesitig in jeder 2. Reihe so abketten: 2 M je 1-2-2-2-2 x (= 2 Maschen am Anfang jeder der nächsten 2-4-4-4-4-4 Reihen) und 1 M je 2-2-3-1-2 x (= 1 Masche am Anfang jeder der nächsten 4-4-6-2-4 Reihen). Viel Spaß beim stricken!
21.04.2021 - 13:19
![]() Lea ha scritto:
Lea ha scritto:
Hallo, ich finde diese Jacke total super, und suche schon lange nach genau so einer Anleitung für Erwachsene. Kann man das nicht vielleicht nochmal für größere Größen umrechnen???
21.04.2021 - 07:37DROPS Design ha risposto:
Liebe Lea, hier finden Sie Herrenjacken mit Zöpfe - kann das Ihnen helfen?
21.04.2021 - 08:09
![]() Jessica ha scritto:
Jessica ha scritto:
I’m doing 5/6 on back piece do I only decrease until I’ve reached 64sts then continue pattern as normal until 18in?
15.01.2021 - 02:51DROPS Design ha risposto:
Dear Jessica, work back piece in pattern as before over the 76 middle stitches casting off at the beginning of each row (both from RS and WS): 2 sts 2 times and 1 stitch 2 times = you will cast off 6 sts on each side = 64 sts remain. Work then over these 64 sts in pattern as before until 18 inches. Happy knitting!
15.01.2021 - 07:34
![]() Emanuela ha scritto:
Emanuela ha scritto:
Buongiorno, vorrei avere una precisazione: durante l'esecuzione del cardigan, la NOTA dice: "su ogni 8° costa lavorare a ferri accorciati" essendo 1 costa = 2 ferri diritti quindi ogni 16 ferri devo fare un ferro accorciato? Grazie
02.04.2020 - 16:50DROPS Design ha risposto:
Buongiorno Emanuela, esattamente, deve lavorare i ferri accorciati sul bordo ogni 8 coste, cioè ogni 16 ferri. Buon lavoro!
03.04.2020 - 09:17
![]() Maliza ha scritto:
Maliza ha scritto:
Please help me understand the following stitches: = slip 3 sts on cable needle in front of piece, K or P 1 (see diagram), K 3 from cable needle Knit or purl? How should I decide. What should I be looking in the picture? = slip 1 st on cable needle behind piece, K 3, K or P 1 from cable needle (see diagram) Same for this stitch. Is there any standard term for these stitches? Thank you for your help!
15.10.2019 - 04:52DROPS Design ha risposto:
Dear Maliza, the stitches in the middle of the mid-cable are worked in moss stitch, so that they have to be either purled or knitted, depending on how the next/previous stitch has to be worked, ie if next stitch in moss stitch is P you have to knit this stitch, if previous stitch is a K, you have to purl this stitch. Happy knitting!
15.10.2019 - 10:15
![]() Carol ha scritto:
Carol ha scritto:
I would like to know in this pattern for Charming Cooper, in the 2nd row on starting the pattern stitch it mentions you must start short rows after the 8th ridge on the band. what does this mean and what is the 8th ridge worked.
16.07.2019 - 11:38DROPS Design ha risposto:
Dear Carok, a ridge is two rows/ rounds knitted with garter stitch. When you knit garter stitch back and forth, it is two rows with knit stitch, when you knit it on the round it is one round of knit and the second round is purled. I hope this help. Happy Knitting!
16.07.2019 - 11:44
![]() Nadege MAILLET ha scritto:
Nadege MAILLET ha scritto:
Bonjour, je ne comprends pas les diminutions. Je le fais en taille 9/10 ans Du coup pour le dos je commence avec 84 mailles Si je fais 1-2-2-2-2 fois 2 mailles je retire déjà 18 mailles et 2-2-3-1-2 fois 1 mailles je retire 10 mailles + les 18 précédentes ca fais 28 mailles retirées. Comment je fais pour arriver à 74 mailles ? Merci pour votre réponse
22.03.2019 - 14:07DROPS Design ha risposto:
Bonjour Mme Maillet, en taille 9/10 ans, vous allez rabattre de chaque côté 2 fois 2 m et 1 fois 1 m soit 10 m au total, il va rester: 84-10= 74 mailles. Bon tricot!
22.03.2019 - 15:53
|
|||||||||||||||||||||||||
Charming Cooper#charmingcoopercardigan |
|||||||||||||||||||||||||
 |
 |
||||||||||||||||||||||||
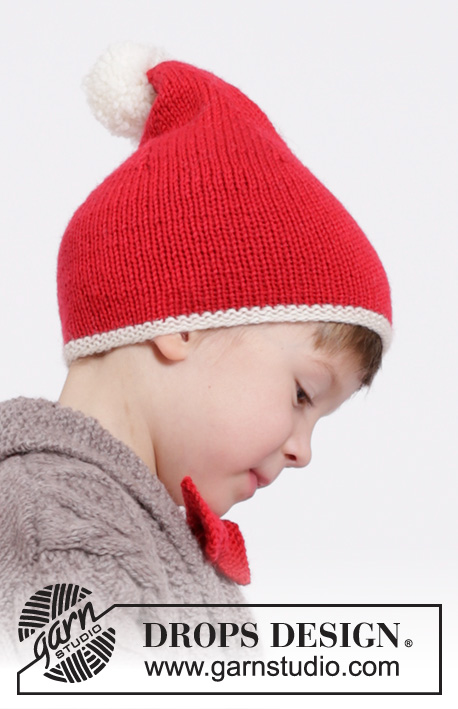
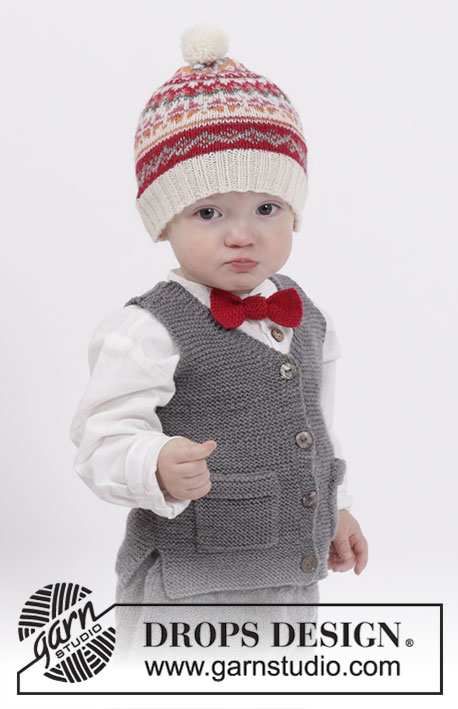
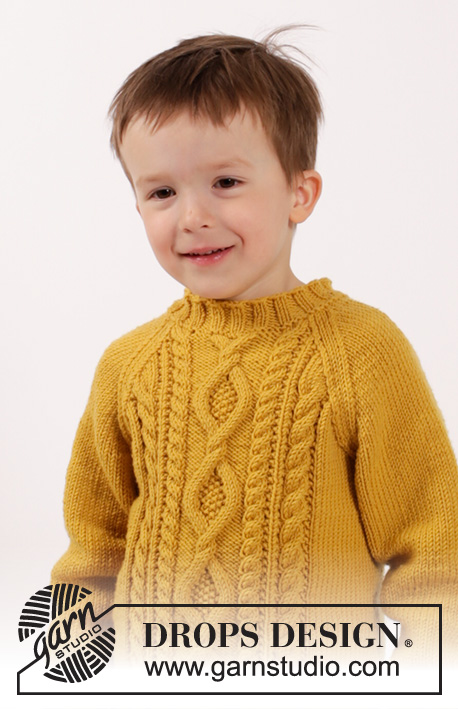
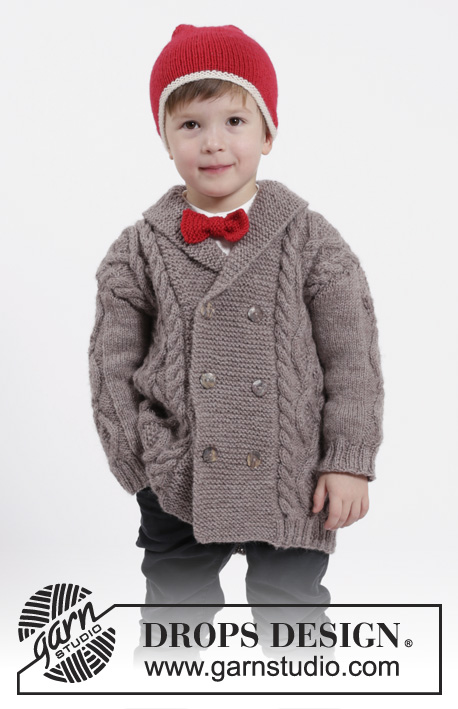
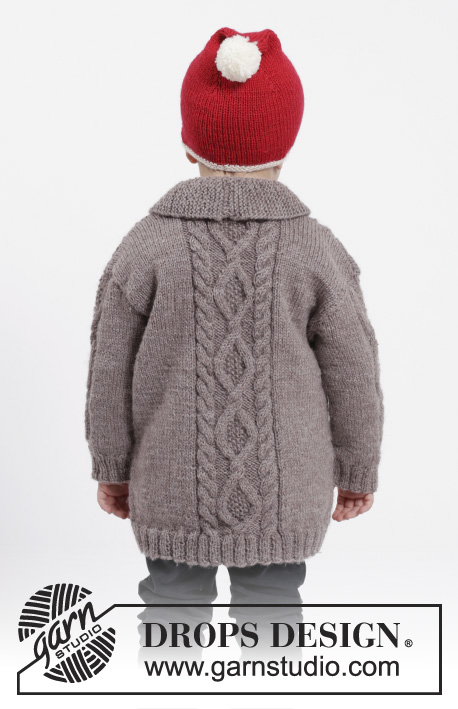
Completo formato da: Cardigan lavorato ai ferri con trecce e collo a scialle, cappello con pompom e fiocco in DROPS Karisma. Taglie: 3 - 12 anni.
DROPS Children 26-16 |
|||||||||||||||||||||||||
|
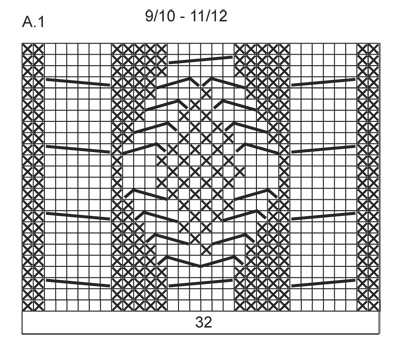
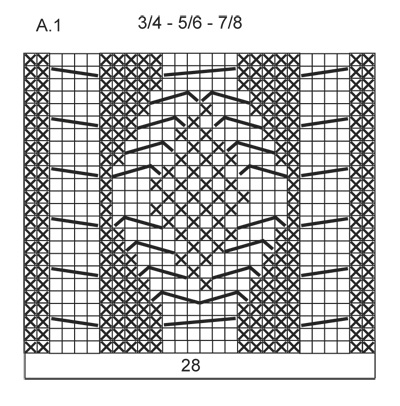
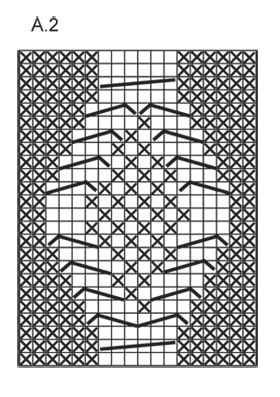
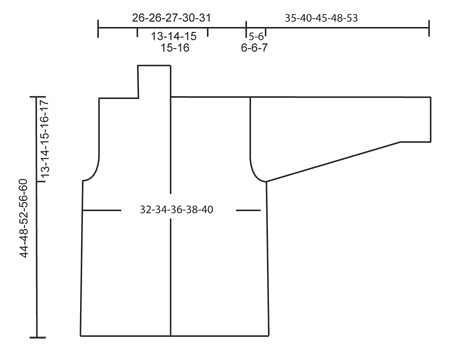
M LEGACCIO (avanti e indietro sui f): Lavorare tutti i f a dir. 1 “costa” a m legaccio = 2 f dir. MOTIVO: Vedere i diagrammi A.1 e A.2. Vedere il diagramma per la vostra taglia! I diagrammi mostrano tutti i f del motivo visti dal diritto del lavoro. ASOLE: Il cardigan è a doppio petto. Diminuire per 6-6-6-8-8 asole sul bordo sinistro. Diminuire per le asole alla fine del f dal diritto del lavoro. 1 ASOLA = lavorare insieme a dir la 4°e la 5° m sul bordo e fare un gettato. Sullo stesso f lavorare insieme a dir anche la quart’ultima e quint’ultima m sul bordo, fare un gettato. Diminuire per 2 asole quando il lavoro misura: TAGLIA 3/4 anni: 10, 18 e 26 cm TAGLIA 5/6 anni: 14, 22 e 30 cm TAGLIA 7/8 anni: 16, 25 e 34 cm TAGLIA 9/10 anni: 11, 20, 29 e 38 cm. TAGLIA 11/12 anni: 15, 24, 33 e 42 cm. ---------------------------------------------------------- CARDIGAN: Lavorato avanti e indietro sui f circolari. Avviare 186-198-206-214-226 m con i f circolari n° 3,5 mm con Karisma. Lavorare come segue: 18-20-20-22-24 m a M LEGACCIO – leggere la spiegazione sopra (= bordo), * 2 m dir, 2 m rov *, ripetere *-* e finire con 2 m dir e 18-20-20-22-24 m a m legaccio ( = bordo). Lavorare a coste fino a quando il lavoro misura 4 cm, passare ai f circolari n° 4 mm, poi lavorare 1 f rov dal rovescio del lavoro (continuare il bordo a m legaccio), ALLO STESSO TEMPO aggiustare il n° di m a 184-196-202-214-224. Lavorare il f successivo come segue – dal diritto del lavoro: 18-20-20-22-24 m a m legaccio, A.1 (= 28-28-28-32-32 m – vedere il diagramma per la vostra taglia), 32-36-39-37-40 m a m rasata, A.1, 32-36-39-37-40 m a m rasata, A.1, finire con 18-20-20-22-24 m a m legaccio. NOTA: su ogni 8° costa lavorare a ferri accorciati sul bordo come segue: 18-20-20-22-24 m dir, girare e lavorare 18-20-20-22-24 m dir, lavorare 1 f su tutte le m. Girare e lavorare 18-20-20-22-24 m dir, girare e lavorare 18-20-20-22-24 m dir. Lavorare 1 f dir su tutte le m. Continuare il motivo in questo modo. Diminuire per le ASOLE sul bordo sinistro – leggere la spiegazione sopra. Quando il lavoro misura 31-34-37-40-43 cm, lavorare come segue – dal diritto del lavoro (continuare il motivo come prima): lavorare 50-54-55-59-62 m (= davanti destro), intrecciare le 6 m successive per lo scalfo, lavorare 72-76-80-84-88 m (= dietro), intrecciare le 6 m successive per lo scalfo, lavorare 50-54-55-59-62 m (= davanti sinistro). Finire ogni parte in modo separato. DIETRO: = 72-76-80-84-88 m. Continuare il motivo come prima. Poi intrecciare per gli scalfi a ogni lato all’inizio di ogni f come segue: 2 m 1-2-2-2-2 volte e 1 m 2-2-3-1-2 volte = 64-64-66-74-76 m. Quando il lavoro misura 42-46-50-54-58 cm, distribuire 10 diminuzioni in modo uniforme su A.1, sul f successivo intrecciare le 16-16-18-18-20 m centrali per il collo e finire ogni lato in modo separato. Poi intrecciare 1 m sul f successivo verso il collo = 18-18-18-22-22 m rimaste sulla spalla. Intrecciare quando il lavoro misura 44-48-52-56-60 cm. DAVANTI SINISTRO: = 50-54-55-59-62 m. Continuare il motivo come prima. Intrecciare per lo scalfo a lato come sul dietro = 46-48-48-54-56 m. Quando il lavoro misura 43-47-51-55-59 cm, distribuire 10 diminuzioni in modo uniforme su A.1. Sul f successivo dal diritto del lavoro, intrecciare le prime 18-18-18-22-22 m = 18-20-20-22-24 m rimaste sul f (= bordo). Continuare a m legaccio su tutte le m sul bordo, e lavorare a f accorciati come segue, iniziando dal diritto del lavoro: * lavorare le prime 9-10-10-11-12 m, girare e tornare indietro, lavorare su tutte le m, girare e tornare indietro *, ripetere *-* fino a quando il bordo misura 7-8-9-10-11 cm dalla spalla (misurati nel punto più corto). Intrecciare. DAVANTI DESTRO: = 50-54-55-59-62 m. Lavorare come per il davanti sinistro ma a specchio. MANICA: Lavorata in tondo con i f a doppia punta. Avviare 44-44-48-48-52 m con i f a doppia punta n° 3,5 mm con Karisma. Lavorare a coste = 2 m dir/2 m rov per 4 cm. Passare ai f a doppia punta n° 4 mm e lavorare 1 giro dir e ALLO STESSO TEMPO distribuire 0-0-2-2-4 diminuzioni in modo uniforme = 44-44-46-46-48 m. Poi lavorare come segue: 13-13-14-14-15 m a m rasata, A.2 (= 18 m), 13-13-14-14-15 m a m rasata. Inserire 1 segnapunti all’inizio del giro = centro sotto la manica. Quando il lavoro misura 6-6-5-5-5 cm, aumentare 1 m a ogni lato del segnapunti. Aumentare ogni 4½-3½-3½-3½-3½ cm 6-8-9-11-12 volte in totale = 56-60-64-68-72 m. Quando il lavoro misura 30-34-39-42-46 cm, intrecciare 6 m al centro sotto la manica. Poi lavorare la manica avanti e indietro e diminuire per l’arrotondamento della manica a ogni lato come segue: Diminuire 2 m a ogni lato fino a quando il lavoro misura 34-39-44-47-52 cm. Diminuire 3 m a ogni lato, poi intrecciare le m rimaste. Il lavoro misura circa 35-40-45-48-53 cm. Lavorare un’altra manica. CONFEZIONE: Cucire i margini delle spalle. Attaccare le maniche. Cucire i bordi al centro dietro e attaccarli alla scollatura sul dietro del collo. ---------------------------------------------------------- CAPPELLO: M LEGACCIO (lavorato in tondo): * 1 giro dir e 1 giro rov *, ripetere *-*. 1 “costa” a m legaccio = 2 giri. ---------------------------------------------------------- CAPPELLO: Lavorato in tondo con i f circolari e poi i f a doppia punta. Avviare 85-90-95-100-105 m con i f circolari n° 3,5 mm con il panna. Lavorare 2 “coste” a M LEGACCIO – leggere la spiegazione sopra. Passare ai f circolari n° 4 mm e al rosso. Poi continuare a m rasata fino alla fine del lavoro. FARE ATTENZIONE ALLA TENSIONE DEL LAVORO! Quando il lavoro misura 12 cm, inserire 5 segnapunti nel lavoro, con 17-18-19-20-21 m tra ognuno. Sul giro successivo, diminuire 1 m dopo ogni segnapunti lavorando 2 m insieme a dir = 5 m diminuite su ogni giro. Ripetere le diminuzioni ogni 3 giro altre 14-15-16-17-18 volte = 15 m rimaste sui f a doppia punta. Dopo l’ultima diminuzione lavorare tutte le m insieme 2 a 2 a dir. Far passare il filo attraverso le m rimaste, tirare forte e affrancare. Il cappello misura circa 27-28-30-31-32 cm. POMPOM: Fare un pompom con un diametro di circa 5 cm in panna. Attaccare il pompom in cima nella punta del cappello. ---------------------------------------------------------- FIOCCO: M LEGACCIO (avanti e indietro): Lavorare tutti i f a dir. 1 “costa” a m legaccio = 2 f dir. ---------------------------------------------------------- FIOCCO: Avviare 10 m con i f n° 3,5 mm con Karisma. Lavorare a “coste” a M LEGACCIO – leggere la spiegazione sopra – avanti e indietro fino a quando il lavoro misura 8 cm, intrecciare. BORDO CENTRALE: Avviare 10 m con i f n° 3,5 mm e lavorare 4 “coste” a m legaccio. Intrecciare. Cucire la fine dei pantaloni per formare un anello. Far passare il fiocco attraverso l’anello e affrancare insieme le 2 parti con un paio di punti. Attaccare un nastrino o un elastico attraverso l’anello sul dietro del fiocco. |
|||||||||||||||||||||||||
Spiegazioni del diagramma |
|||||||||||||||||||||||||
|
|||||||||||||||||||||||||
 |
|||||||||||||||||||||||||
 |
|||||||||||||||||||||||||
 |
|||||||||||||||||||||||||
 |
|||||||||||||||||||||||||
Avete terminato questo modello?Allora taggate le vostre foto con #dropspattern #charmingcoopercardigan o inviatele alla #dropsfan gallery. Avete bisogno di aiuto con questo modello?Troverete 32 video tutorial, una sezione per i commenti/domande e molto altro guardando il modello su www.garnstudio.com © 1982-2025 DROPS Design A/S. Ci riserviamo tutti i diritti. Questo documento, compreso tutte le sue sotto-sezioni, è protetto dalle leggi sul copyright. Potete leggere quello che potete fare con i nostri modelli alla fine di ogni modello sul nostro sito. |
|||||||||||||||||||||||||


Con oltre 40 anni di esperienza nel design di modelli di maglia e uncinetto, DROPS Design offre la più estesa collezione di modelli gratuiti su internet - tradotti in 17 lingue. Ad oggi vi possiamo fornire 320 cataloghi e 12094 modelli - 9356 dei quali sono tradotti in Italiano.
Ci stiamo impegnando molto per darvi il meglio che vi possiamo offrire in termini di maglia e uncinetto, ispirazioni e consigli così come filati di grande qualità ad un prezzo incredibile! Volete utilizzare i nostri modelli per qualcosa d'altro oltre al vostro uso personale? Potete leggere tutto ciò che è consentito nel testo sul Copyright in basso su tutte le pagine dei nostri modelli. Buon lavoro!
Lasciare un commento sul modello DROPS Children 26-16
Noi saremmo felici di ricevere i tuoi commenti e opinioni su questo modello!
Se vuoi fare una domanda, fai per favore attenzione a selezionare la categoria corretta nella casella qui sotto per velocizzare il processo di risposta. I campi richiesti sono indicati da *.