
Beliebte Kategorien
Suchen Sie nach einem Garn?


Kommentare / Fragen (16)
![]() Sharon hat geschrieben:
Sharon hat geschrieben:
Any suggestion on how I could make this a bit wider? This was a funn project. Instruction was easy to follow. S
06.12.2021 - 16:33DROPS Design hat geantwortet:
Hi Sharon, If you cast on more stitches then the head band will be wider. Just make sure the number of stitches is divisible by 3 + 2. Happy knitting!
07.12.2021 - 07:03
![]() Stephanie Bedard hat geschrieben:
Stephanie Bedard hat geschrieben:
Hi there, I am stuck at the middle part! Here’s the part of the pattern I’m having issues with: ROW 5: K 1 edge st, * 1 YO, K 2 in next st *, repeat from *-* 4 times in total and finish with K 1 edge st = 14 sts on needle I had 6 sts on my needle as mentioned after decreasing on row 1 as expected, but when increasing at row 5, I am left with only 11 sts and not 14. Is there any troubleshooting possible here ? Thank you!!
03.12.2021 - 18:29DROPS Design hat geantwortet:
Dear Stephanie, you have 2 edge stitches on each side + 4 YO + 2x4=8 sts. So in total you have 14 stitches. You k2 in each of the 4 sts between the edge stitches, so you increase one stitch in each stitch. Happy knitting!
05.12.2021 - 17:27
![]() Sharon hat geschrieben:
Sharon hat geschrieben:
What is the correct size needles to make the headband. A size 10,75 give a head band hard like a board. This cannot be the correct needles. Is the size give in the pattern correct.
26.11.2021 - 18:29DROPS Design hat geantwortet:
Dear Sharon, everyone knits with a different gauge, Pleade make a swatch and use the needles with which you can achieve the knitting tension goven in the pattern. Happy Stitching!
28.11.2021 - 00:26
![]() Sharon hat geschrieben:
Sharon hat geschrieben:
Hi, looking to start the headband an am confused on how to join the back invisible using kitichner stitch. The first time I made this 3 needle bind off was the solution but it was not invisible and an unhappy with the results. The one am working on now is a Christmas gift so it has to be prefect. So my question again is how do I kitichner the back to make it invisible? Thanks for your response.
26.11.2021 - 09:33DROPS Design hat geantwortet:
Dear Sharon, this video shows how to sew together patterns such as rib in this pattern and should help you to finish your piece. Happy finishing!
26.11.2021 - 15:46
![]() Pru hat geschrieben:
Pru hat geschrieben:
Hello- on knitting the headband as per the instructions...i get a 'seed stitch' pattern...ive ripped out and started 5 times now...am i reading this wrong? please help me...thank you!!
07.12.2019 - 22:19DROPS Design hat geantwortet:
Dear Pru, check your number of stitches (you should have 14) and remember to work with 1 edge stitch in garter stitch in each side.On row 1, work: K1 (edge st), then (K1, P1, K1) until 1 stitch remain, K the last st. On row 2, work: K1 (edge st), then repeat: (P1, K1, P1) until last st remain, K last st. Repeat rows 1 and 2. Happy knitting!
09.12.2019 - 08:54
![]() Tanja Kroczek hat geschrieben:
Tanja Kroczek hat geschrieben:
Hallo Zusammen! Ich stricke gerade das Stirnband. Nach dem 1. Absatz "Wie folgt weiterstricken" steht unter dem 1. Punkt: 6 Maschen übrig, was passiert damit?
02.02.2019 - 12:16DROPS Design hat geantwortet:
Liebe Frau Kroczek, bei der 1. Hin-Reihe hier nehmen Sie Maschen ab (= 2 M so abheben als würden sie re zusgestr, 1 M re, die 2 abgehobenen M überziehen), am Ende dieser Reihe sind es nur noch 6 Maschen auf der Nadel. Viel Spaß beim stricken!
04.02.2019 - 11:06
![]() Nagymama hat geschrieben:
Nagymama hat geschrieben:
Pedig automatával könnyebb és mindenekelőtt pontosabb lenne a fordítás! Egyszer kell jól beprogramozni, és onnantól kezdve nem hibázik. Nem úgy, mint... na mindegy, szóval a leírás még mindig nem jó, mert van ám 6. meg 7. sora is. Hogy a helyesírásról meg az elírásokról ne is beszéljünk. :(
01.10.2018 - 09:39
![]() Nagymama hat geschrieben:
Nagymama hat geschrieben:
Már megint rossz a magyar leírás. Nem ez az első eset. Tessenek már végiggondolni, hogy ha a fejpántnál ezt a két sort váltogatjuk, akkor abból milyen minta lesz!
30.09.2018 - 09:34DROPS Design hat geantwortet:
Kedves Nagymama! Köszönjük, hogy felhívta a figyelmünket a hibára, ami így javításra is került. A fordításokat nem automata készíti, így sajnos, a legnagyobb odafigyelés mellett is előfordulhatnak hibák. Célunk, hogy minél pontosabb minták legyenek a weboldalon, ezért mindig köszönettel vesszük, ha jelzést kapunk egy-egy javítani valóról. Sikeres kézimunkázást!
30.09.2018 - 14:52
![]() Gail Thorpe hat geschrieben:
Gail Thorpe hat geschrieben:
Thank you for your help on pattern #164-27. The tutorial is very helpful. I have another question. I knit the piece in Polaris yarn. Should I block it before I sew it together? The yarn is so plush and heavy that it seems daunting to plunge it under water. Will it be okay to do so? Please give me some detailed instructions. Thank you.
16.06.2017 - 01:11DROPS Design hat geantwortet:
Dear Mrs Thorpe, some knitters block every piece, some others don't. Feel free to contact your DROPS store even per mail or telephone they will have some more individual tipps for you. Happy knitting!
16.06.2017 - 09:12
![]() Anne hat geschrieben:
Anne hat geschrieben:
Que veux dire, pour le rang 2 du tour de cou: i m lis à l'end. Que veux dire lis???je n'ai jamais pu trouver l'explication! Merci
01.03.2017 - 19:52DROPS Design hat geantwortet:
Chere Anne, 1 maille lis est la premiere maille du rang. Parfois elle est tricotee autrement que les autres mailles pour que le bord du tricot soit esthetique et facile a assemler a la fin. Bon tricot!
01.03.2017 - 20:27
|
|
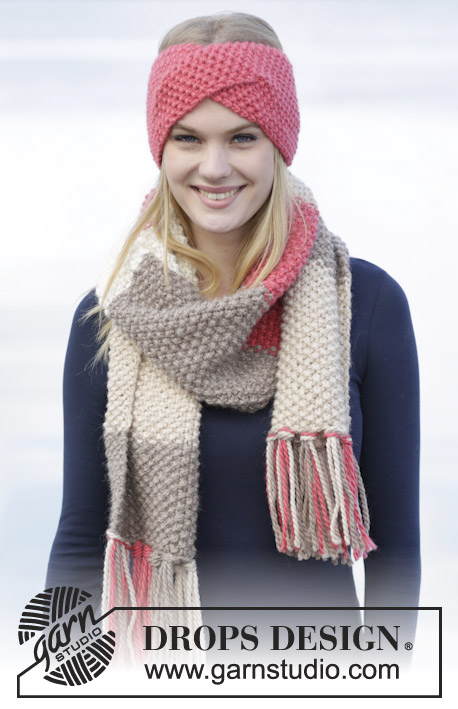
What A Sight!#whatasightset |
|
|
|
|
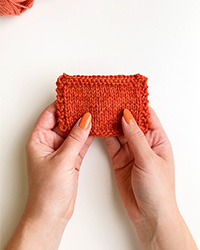
Das Set umfasst: Gestricktes DROPS Stirnband und Kragenschal in ”Polaris” mit Rippenmuster
DROPS 164-27 |
|
|
STIRNBAND: 14 M auf Stricknadel Nr. 7 mit Polaris anschlagen und wie folgt hin- und zurückstr: 1. R (= Rück-R): 1 Rand-M re, * 1 M re, 1 M li, 1 M re *, von *-* insgesamt 4 x arb und enden mit 1 Rand-M re. 2. R (= Hin-R): 1 Rand-M re, * 1 M li, 1 M re, 1 M li *, von *-* insgesamt 4 x arb und enden mit 1 Rand-M re. Die 1. und 2. R wdh, bis die Arb eine Gesamtlänge von ca. 23 cm hat – daran angepasst, dass die nächste R eine Hin-R ist. MASCHENPROBE BEACHTEN! Wie folgt weiterstr: 1. R (= Hin-R): 1 Rand-M re, * 2 M so abheben als würden sie re zusgestr, 1 M re, die 2 abgehobenen M überziehen *, von *-* insgesamt 4 x arb und enden mit 1 Rand-M re = 6 M übrig. 2. R (= Rück-R): re str. 3. R: re str. 4. R: re str. 5. R: 1 Rand-M re, * 1 Umschlag, 2 M aus der nächsten M herausstr (= 1 M zugenommen) *, von *-* insgesamt 4 x arb und enden mit 1 Rand-M re = 14 M auf der Nadel. 6. R: 1 Rand-M re, * 1 M re, 1 M li, 1 M re *, von *-* insgesamt 4 x arb und enden mit 1 Rand-M re – BITTE BEACHTEN: Die Umschläge li verschränkt str, um Löcher zu vermeiden. 7. R: 1 Rand-M re, * 1 M li, 1 M re, 1 M li *, von *-* insgesamt 4 x arb und enden mit 1 Rand-M re. Die 6. und 7. R wdh, bis die Arb eine Gesamtlänge von ca. 48 cm hat (oder bis zur gewünschten Länge) und die M mustergemäß abketten (d.h. re M re und li M li abketten). Das Stirnband an der hinteren Mitte im Maschenstich zusnähen, sodass die Naht nicht sichtbar wird. ---------------------------------------------------------- KRAGENSCHAL: KRAUSRIPPEN (in Hin- und Rück-R): 1 Krausrippe = 2 R kraus re = 2 R re. TIPP ZUM FADENWECHSEL: Wenn das nächste Knäuel Polaris angefangen wird, die letzten 15 cm des alten Fadens längs halbieren, die eine Hälfte abschneiden (sodass der Faden bei diesen 15 cm nun nur noch halb so dick ist). Dasselbe beim neuen Faden machen. Die letzten 15 cm des alten Fadens und die ersten 15 cm des neuen Fadens übereinander legen, auf diese Weise ergibt sich wieder die ursprüngliche Garnstärke. Weiterstr, auf diese Weise wird der Fadenwechsel unsichtbar und das Garn muss nicht vernäht werden. ---------------------------------------------------------- KRAGENSCHAL: Der Kragenschal wird in Hin- und Rück-R gestr und anschließend zusgenäht. 18-21 M auf Nadel Nr. 10 mit Polaris anschlagen. 2 KRAUSRIPPEN (= 4 R kraus re, siehe oben) str. Dann wie folgt im Rippenmuster str: 1. R (= Hin-R): 2 M re, * 2 M li, 1 M re *, von *-* wdh bis noch 1 M auf der Nadel übrig ist und enden mit 1 M re. 2. R (= Rück-R): 1 Rand-M re, * 1 M li, 2 M re *, von *-* wdh bis noch 2 M auf der Nadel übrig sind und enden mit 1 M li und 1 Rand-M re. Die 1. und 2. R fortlaufend wdh. MASCHENPROBE BEACHTEN und TIPP ZUM FADENWECHSEL lesen! Bei einer Gesamtlänge von 23-26 cm an der ersten M der Hin-R 1 Markierer anbringen. Str bis die Arb eine Gesamtlänge von 86-88 cm hat, dann 2 Krausrippen (= 4 R kraus re) str und in der nächsten Hin-R re abketten. FERTIGSTELLEN: Den Kragenschal so zusammenlegen, dass die Abkettkante zwischen der Anschlagkante und dem Markierer liegt. Die Kanten mit einem Stich in jede M zusammennähen. |
|
Haben Sie diese Anleitung nachgearbeitet?Dann taggen Sie Ihre Fotos mit #dropspattern #whatasightset oder schicken Sie sie an die #dropsfan Galerie Brauchen Sie Hilfe bei dieser Anleitung?Sie finden 19 Videotutorials, einen Kommentar/Fragen-Bereich und vieles mehr, wenn sie die Anleitung bei garnstudio.com aufrufen. © 1982-2025 DROPS Design A/S. Wir besitzen alle Rechte. Dieses Dokument, einschließlich aller Untersektionen, hat Urheberrechte. Mehr dazu, was Sie mit unseren Anleitungen machen können, finden Sie ganz unten auf der Seite zu jeder Anleitung. |


Mit über 40 Jahren Tätigkeit im Entwerfen von Strick- und Häkelmustern bietet Ihnen DROPS Design eine der umfangreichsten Sammlungen von kostenlosen Anleitungen im Internet - in 17 Sprachen übersetzt. Zum jetzigen Zeitpunkt haben wir insgesamt 319 Handarbeitshefte und 12042 Anleitungen auf Deutsch. 11954
Unser Ziel ist es, Ihnen die besten Angebote zum Stricken und Häkeln, Inspirationen und Ratschläge sowie qualitativ hochstehende Garne zu unglaublichen Preisen zu bieten! Möchten Sie unsere Anleitungen nicht nur für den persönlichen Gebrauch nutzen? Unsere Copyright Bedingungen finden Sie bei allen unseren Anleitungen ganz unten auf der jeweiligen Seite. Viel Spaß beim Handarbeiten!
Kommentieren Sie die Anleitung DROPS 164-27
Wir würden gerne Ihre Meinung zu diesem Modell erfahren!
Wenn Sie eine Frage stellen möchten, prüfen Sie bitte, dass Sie die richtige Kategorie im unten stehenden Formular gewählt haben - so bekommen Sie schneller eine Antwort. Die obligatorischen Felder sind mit einem * gekennzeichnet.