
Popular categories
Looking for a yarn?


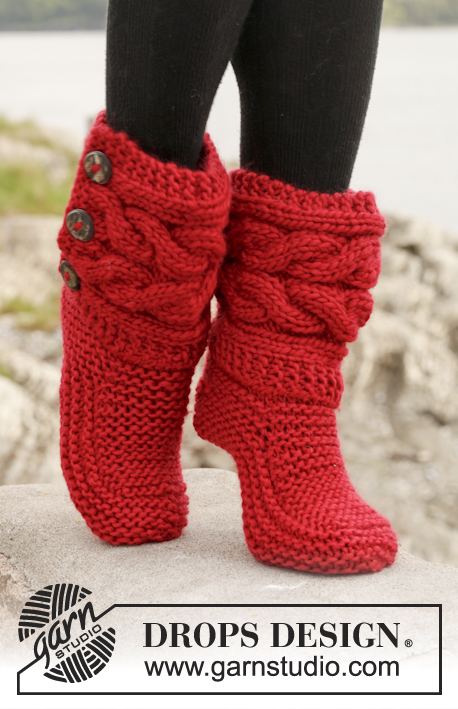
Knitted slippers and how to sew up the slippers in 150-4

Patterns using this technique
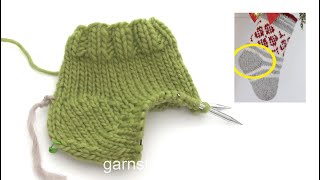
Video #567, listed in: Pattern tutorials, Socks and Slippers, Knitting pattern tutorial videos
Our videos do not have sound. We are a worldwide company and our videos are watched by people speaking endless of different languages and many do not understand English. So since there is not a given language for us to use, we instead have written instructions to accompany the video, and then there is no sound to disturb while watching.
You can adjust the speed of this video by clicking on the icon, on the play bar.
Leave a comment or question to this video
Your email address will not be published. Required fields are marked *.
You might also like


With over 40 years in knitting and crochet design, DROPS Design offers one of the most extensive collections of free patterns on the internet - translated to 17 languages. As of today we count 324 catalogs and 12245 patterns - 12235 of which are translated into English (US/in).
We work hard to bring you the best knitting and crochet have to offer, inspiration and advice as well as great quality yarns at incredible prices! Would you like to use our patterns for other than personal use? You can read what you are allowed to do in the Copyright text at the bottom of all our patterns. Happy crafting!
Mary MacDonald wrote:
I am a fairly experienced knitter, but. I find your video on the little red riding slippers a bit difficult to follow. It goes too fast and I have no sound. After you pick up the stitches do you divide the stitches evenly over the 4 needles? How do you then decide where the toe and heel are. I have tried this stage two or three times and getting frustrated.
16.10.2017 - 19:23DROPS Design :
Dear Mrs MacDonald, the toe is towards the middle part worked back and forth previously, so that the middle of toe is the middle of this part - the heel is in the middle of sts you put aside and knit up later. You should have same number of sts on each side of both markers. Happy knitting!
17.10.2017 - 11:44Not a spammer just a frustrated knitter trying to follow your video.
16.10.2017 - 19:21Je manque d'information quant aux nombres de fois que l' on diminue de chaque côté des marqueurs Manque de précisions quand aux nombres de mailles tricotées pour poser les deux marqueurs car en respectant votre vidéo mon marqueur dos se trouve sur le côté du chausson
07.03.2017 - 22:33DROPS Design :
Bonjour Dinou, vos marqueurs doivent être l'un au milieu devant (= côté pointe) et l'autre au milieu dos (= côté talon) et ne doivent pas être décalés; vous diminuez 1 m de chaque côté de chaque marqueur (les marqueurs restent en place) tous les 2 tours jusqu'à la hauteur indiquée (le nombre de rangs/diminutions va dépendre de votre tension en hauteur). Bon tricot!
08.03.2017 - 09:38Pourriez vous me dire si on doit tricoter les rangs envers comme les mailles se présente j'ai de la difficulté a comprendre
19.01.2017 - 23:42DROPS Design :
Bonjour Mme Charest, quand vous tricotez la torsade, lisez les rangs sur l'endroit de droite à gauche et les rangs sur l'envers de gauche à droite. Bon tricot!
20.01.2017 - 09:53I am unable to hear your videos, is there something I need to do to hear them? also how many balls of yarn do I need for 300 g 6 if there are 50g? thank you Susan
19.10.2016 - 21:39DROPS Design :
Hi Susan. Eskimo is 50 gr per ball, so you need 6 if you need a total of 300 gr. We are a worldwide company and our videos are watched by people around the world, speaking different languages, many of whom do not understand English. We have therefore written instructions to accompany this video, and there is no sound to disturb while watching. Enjoy!
20.10.2016 - 10:45Merci pour cette vidéo, j'étais bloquée et là je comprends mieux.
16.06.2016 - 08:33Je suis le diagramme , mais la 4 et la 5 ième mailles devrait arriver sur endroit mais moi elle arrive sur l`envers pourquoi , je fais mes deux premiers rang sur endroit mais après ses rangs arrive sur l`envers . Merci
04.03.2016 - 14:31DROPS Design :
Bonjour Mme Blanchette, le 1er rang du diagramme se tricote sur l'endroit ainsi: 3 m end (point mousse), 2 m end (jersey), 2 m env, 6 m end (torsade), 2 m env, 6 m end (torsade), 2 m env, 2 m end (jersey), 3 m end (point mousse) - lisez ensuite le diagramme de gauche à droite sur l'envers (tricotez les 3 m point mousse de chaque côté à l'end et les autres mailles comme elles se présentent). Voir aussi ici. Bon tricot!
05.03.2016 - 18:37Comment faire le haut de ce chausson pour que le motif du patron soit le même. Merci
27.02.2016 - 17:55DROPS Design :
Bonjour Mme Blanchette, pour avoir la même bordure torsadée, tricotez la "Bordure autour de la jambe" en suivant les indications du modèle et le diagramme A.1 - voir ici. Bon tricot!
29.02.2016 - 10:24Re-bonjour. Ok pour la pointe, mais je ne comprends pas ce qu'est le 'milieu du dos'. Merci
28.10.2015 - 12:43DROPS Design :
Bonjour Mme DesGagné, le "milieu dos" est le côté opposé au milieu devant, il se trouvera au niveau du talon - vous devez avoir le même nombre de mailles de chaque côté de chaque marqueur (+ d'éventuelles m lis en fonction de votre façon d'adapter le modèle). Bon tricot!
29.10.2015 - 09:39Bonjour, j'en suis rendue au point où je dois mettre un marqueur au milieu devant et un autre au milieu dos. Est-ce que ça veut dire un au milieu du travail et un au milieu du 11m du talon? Désolée, mais c'est ma 1ère fois avec des chaussons. Je fais le projet en aller-retour. Merci
27.10.2015 - 22:08DROPS Design :
Bonjour Mme DesGagné, le marqueur de la pointe doit être au milieu des 9-11 m tricotées pour le dessus du pied, et celui du talon doit être au milieu dos, vous devez avoir le même nombre de mailles entre les 2 marqueurs - ajustez en fonction de votre façon d'avoir tricoté les chaussons. Bon tricot!
28.10.2015 - 11:57