
Popular categories
Looking for a yarn?


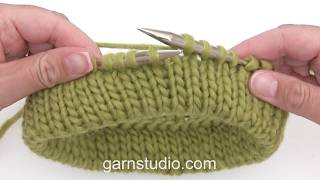
Italian cast on with a stable edge - rib with 1 knit / 1 purl

Turn the piece and twist the threads twice. Start 2nd row with K1, place the yarn in front of the needle and slip the P stitch over to the right needle as if to purl, K the next stitch. Place the yarn in front of the needle and slip the P stitch over to the right needle as if to purl, K the next stitch, continue like this the entire row, but P the last stitch, turn.
K 1, place the yarn in front of the needle and slip the P stitch over to the right needle as if to purl, K the next stitch. Place the yarn in front of the needle and slip the P stitch over to the right needle as if to purl, K the next stitch, continue like this the entire row, but P the last stitch, turn. Continue with K over K and P over P.
This method gives an elastic and nice result and a stable edge. We use the yarn DROPS Snow in the video.
Video #1672, listed in: Learn to knit, How to cast on stitches, Italian cast on
Our videos do not have sound. We are a worldwide company and our videos are watched by people speaking endless of different languages and many do not understand English. So since there is not a given language for us to use, we instead have written instructions to accompany the video, and then there is no sound to disturb while watching.
You can adjust the speed of this video by clicking on the icon, on the play bar.
Leave a comment or question to this video
Your email address will not be published. Required fields are marked *.
You might also like


With over 40 years in knitting and crochet design, DROPS Design offers one of the most extensive collections of free patterns on the internet - translated to 17 languages. As of today we count 324 catalogues and 12291 patterns translated into English (UK/cm).
We work hard to bring you the best knitting and crochet have to offer, inspiration and advice as well as great quality yarns at incredible prices! Would you like to use our patterns for other than personal use? You can read what you are allowed to do in the Copyright text at the bottom of all our patterns. Happy crafting!
Ik vind dit ideaal voor boorden, maar is het ook mogelijk 2 recht 2 averecht te doen? Als ik dat zelf probeer wordt het toch niet zo mooi doordat je grote lussen krijgt over de averechtse steken. Ik haal dan 2 averechtse steken af en brei 2 rechte
01.10.2025 - 08:33DROPS Design :
Hi Annet, please see the video HERE. Happy knitting!
02.02.2026 - 10:00Kan man bruke denne metoden med rundpinne også? Kunne dere evt. laget en video h or dere viser italiens opplegg med rundpinne?
05.06.2025 - 23:00DROPS Design :
Hei Mette. Ja, du kan bruke metoden på rundpinne også. Vi håper vi kan få laget en video som viser dette snart. mvh DROPS Design
10.06.2025 - 09:26Det står i teksten at man strikke 1 rett og en vrang maske, men på videoen strikkes første pinne m. vridd rett? Jeg skal strikke en vrangbord hvor alle "rett-maskene" skal strikkes vridd-rett, men ønsker å å bruke italiens opplegg. Må jeg da strikke vanlig rett- maske på første pinnen, slik at den forblir vridd? Og ikke vri den slik som vist i video? (Selv om det står man skal strikke vanlig rett i teksten?
05.06.2025 - 22:53DROPS Design :
Hei Mette. Når man bruker Italiensk opplegg vil man på 1. pinne strikke rett maskene i bakerste maskebue for at det skal bli en pen rett maske, (vil ikke kalle det vridd-rett), slik at det bli en naturlig overgang på begge sider. Usikker på hvordan det blir om du ønsker å strikke i fremste maskebue på 1. pinne. Anbefaler deg å strikke en liten prøvelapp for å se hvordan resulatet blir. mvh DROPS Design
10.06.2025 - 09:41Vänder man efter uppläggningsvarvet även om man stickar på rundstickar
16.03.2023 - 10:54DROPS Design :
Hei Eva-Brita Om du skal strikke rundt etter oppleggskanten, fortsetter du bare rundt og rundt med rett over rett og vrang over vrang (eller det som er forklart i oppskriften). mvh DROPS Design
20.03.2023 - 09:55Tack för era fina, tydliga videor. Vi vänsterhänta får alltid kämpa lite extra med stickbeskrivningar då vi, utöver att lära oss momenten, också behöver spegelvända det vi ser för att kunna använda det. Det finns en del stickvideor för vänsterhänta på nätet, men de är aldrig lika tydliga som era och dessutom på andra språk än svenska. Det finns videoredigeringsprogram där man lätt kan spegelvända videor. Skulle ni kunna lägga upp en spegelvänd variant av instruktionen?
21.04.2022 - 15:26DROPS Design :
Hei Kristina. Takk for dine fine og ditt innspill. Vi skal ta en titt på om dette lar seg gjøre. mvh DROPS Design
25.04.2022 - 08:10