DROPS Karisma
DROPS Karisma
100% Wool
from 3.00 $ /50g
Get the yarn to make this pattern from 18.00$.

The yarn cost is calculated from the pattern’s smallest size and the yarn’s cheapest product type. Looking for an even better price? You might find it on the DROPS Deals!

DROPS SS24

Winter Clouds

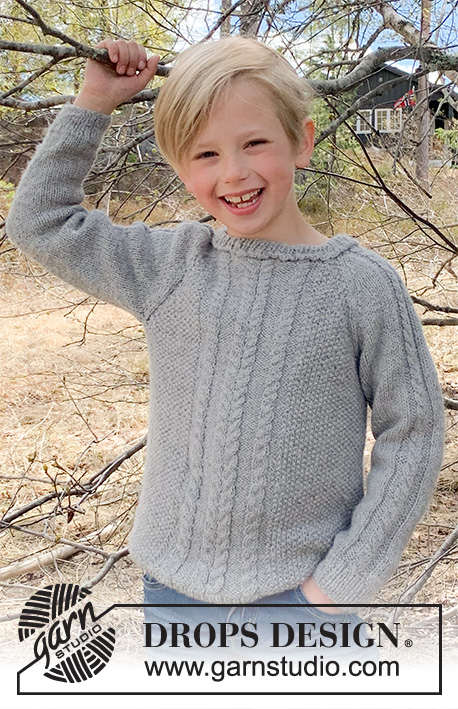
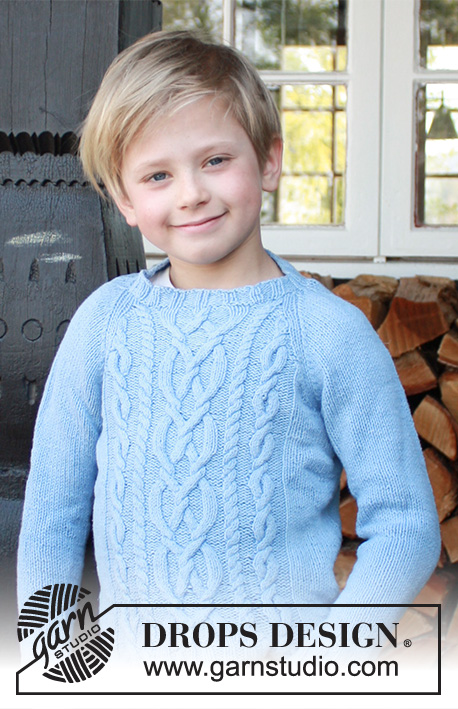
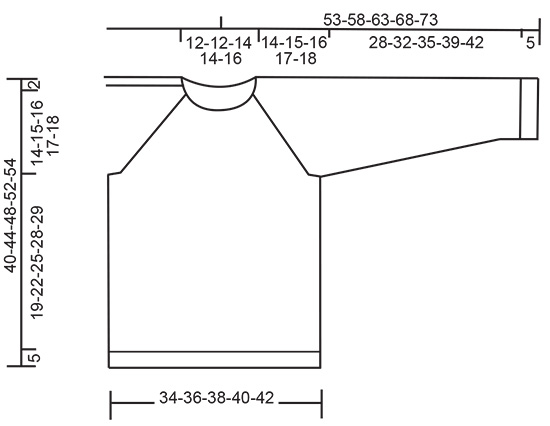
Knitted sweater for kids with raglan and cables in DROPS Karisma or DROPS Lima. Size 5-14 years

DROPS Children 37-12
DROPS design: Pattern u-079-bn
Yarn group B
----------------------------------------------------------

SIZE:
5/6 – 7/8 – 9/10 – 11/12 – 13/14 years
Size equals approx. kid’s height in cm:
110/116 - 122/128 - 134/140 - 146/152 – 158/164
Size equals approx. kid’s height in feet:
3ft3/3ft5 – 3ft7/3ft9 – 4ft/4ft2 – 4ft5/4ft7 – 4ft9/4ft12 – 5ft2/5ft5

MATERIALS:
DROPS KARISMA from Garnstudio (belongs to yarn group B)
300-350-400-450-500 g color 30, denim blue

Or use:
DROPS LIMA fra Garnstudio (belongs to yarn group B)
300-350-400-450-500 g color 6235, grey blue

KNITTING GAUGE:
21 stitches in width and 28 rows vertically in stockinette stitch = 10 x 10 cm = 4" x 4".

NEEDLES:
DROPS DOUBLE POINTED NEEDLES SIZE 4 mm = US 6
DROPS CIRCULAR NEEDLE SIZE 4 mm = US 6, length 40 and 60 cm = 16" and 24" on garment.
DROPS DOUBLE POINTED NEEDLES SIZE 3 mm = US 2,5 for rib
DROPS CIRCULAR NEEDLE SIZE 3 mm = US 2,5: length 40 and 60 cm = 16" and 24" for rib.
DROPS CABLE NEEDLE - for cables.
Needle size is only a suggestion! If you have too many stitches on 10 cm = 4" switch to a larger needle size. If you have too few stitches on 10 cm = 4" switch to a smaller needle size.

-------------------------------------------------------

Alternative Yarn – See how to change yarns here
Yarn Groups A to F – Use the same pattern and change the yarn here
Yarn usage using an alternative yarn – Use our yarn converter here

-------------------------------------------------------

DROPS Karisma
DROPS Karisma
100% Wool
from 3.00 $ /50g
Get the yarn to make this pattern from 18.00$.

The yarn cost is calculated from the pattern’s smallest size and the yarn’s cheapest product type. Looking for an even better price? You might find it on the DROPS Deals!

Pattern instructions

NOTE: This pattern is written in American English. All measurements in charts are in cm. For conversion from inches to cm - click here. There are different terms for crocheting in American and British English. If this pattern includes crochet, click for "crochet terms" here. For this pattern in British English, please click here.
----------------------------------------------------------

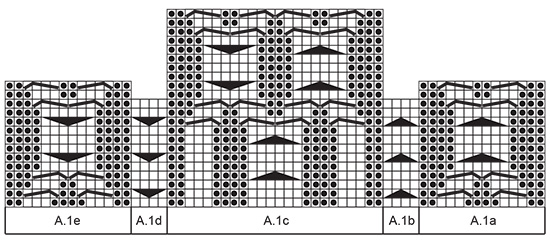
EXPLANATION FOR THE PATTERN:

----------------------------------------------------------

PATTERN:
See diagram A.1. The diagram shows the pattern seen from right side.

INCREASE TIP (applies to sleeve):
Increase stitches on each side of 2 stitches on the underside of sleeve. Increase by making 1 yarn over on each side of the 2 middle stitches. On next round work yarn overs twisted to avoid holes.

RAGLAN:
Decrease on each side of all 4 markers(= 8 decreases per round).
Work until 3 stitches remain before marker and knit 2 together, knit 2 (marker is between these 2 stitches), slip 1 stitch knitwise, knit 1, pass slipped stitch over stitch worked.

----------------------------------------------------------

START THE PIECE HERE:

----------------------------------------------------------

SWEATER - SHORT OVERVIEW OF THE PIECE:
Body is worked in the round on circular needle up to armhole. Work sleeves in the round on double pointed needles. Slip the parts together and work yoke in the round from here. After decrease for neck work back and forth. Work neck edge in the round on a short circular needle or double pointed needles.

BODY:
Cast on 158-166-174-182-190 stitches on circular needle size 3 mm = US 2,5 with Karisma or Lima. Knit 1 round, then work rib as follows: * Purl 2, knit 2 *, work from *-* over 20 stitches, knit 2, then work from *-* the rest of round (there are 4 knit stitches mid front, i.e. this round does not begin in the side).
When piece measures 5 cm = 2", switch to circular needle size 4 mm = US 6.
Work next round as follows: Purl 2, knit 1, 1 yarn over, knit 1, purl 2 in each of the next 2 stitches (= 4 purl stitches), knit 1, 1 yarn over, knit 1, purl 2, knit 2 in each of the next 2 stitches (= 4 knit stitches), purl 2, knit 1, 1 yarn over, knit 1, purl 2 in each of the next 2 stitches (= 4 purl stitches), knit 1, 1 yarn over, knit 2 (= mid front), 1 yarn over, knit 1, purl 2 stitches in each of the next 2 stitches (= 4 purl stitches), knit 1, 1 yarn over, knit 1, purl 2, knit 2 in each of the next 2 stitches (= 4 knit stitches), purl 2, knit 1, 1 yarn over, knit 1, purl 2 stitches in each of the next 2 stitches (= 4 purl stitches), knit 1, 1 yarn over, knit 1, purl 2. Work the rest of round as follows in the different sizes:

SIZE 5/6 years:
Knit 1, * knit 2 together, knit 4, knit 2 together, knit 5 *, work from *-* the rest of round.
SIZE 7/8 years:
* Knit 2 together, knit 5 *, work from *-* the rest of round.
SIZE 9/10 years:
Knit 8, * knit 2 together, knit 5 *, work from *-* the rest of round.
SIZE 11/12 years:
Knit 7, * knit 2 together, knit 5, knit 2 together, knit 6 *, work from *-* the rest of round.
SIZE 13/14 years:
Knit 6, * knit 2 together, knit 6 *, work from *-* the rest of round.

ALL SIZES:
There are now 160-168-176-184-192 stitches. Continue as follows: Work A.1 over the first 60 stitches (i.e. A.1a over the first 14 stitches, A.1b over the next 4 stitches, A.1c over the next 24 stitches, A.1d over the next 4 stitches and A.1e over the last 14 stitches), work in stockinette stitch over the remaining stitches on round. Count 14-16-18-20-22 stitches outwards from each side of A.1 and insert 1 marker (these marks the sides), there are 72-76-80-84-88 stitches between markers on back piece.
REMEMBER THE KNITTING GAUGE!
When piece measures 24-27-30-33-34 cm = 9½"-10⅝"-11¾"-13"-13 13/8", bind off 6 stitches in each side for armholes (i.e. 3 stitches on each side of each marker) = 148-156-164-172-180 stitches on needle. Put piece aside and work the sleeves.

SLEEVE:
Cast on 40-44-44-48-48 stitches on double pointed needles size 3 mm = US 2,5 with Karisma or Lima.
Knit 1 round, continue with rib with knit 2 and purl 2 for 5 cm = 2". Insert 1 marker between the first 2 stitches = mid under sleeve).
Switch to double pointed needles size 4 mm = US 6 and work in stockinette stitch.
When sleeve measures 8-8-9-9-10 cm = 3⅛"-3⅛"-3½"-3½"-4", increase 1 stitch on each side of the 2 stitches under sleeve – read INCREASE TIP in explanation above.
Repeat increase every 3-3½-3-3½-3 cm = 1⅛"-1¼"-1⅛"-1¼"-1⅛" a total of 7-7-9-9-11 times = 54-58-62-66-70 stitches.
When piece measures 33-37-40-44-47 cm = 13"-14½"-15¾"-17¼"-18½", bind off 6 stitches under sleeve (i.e. 3 stitches on each side of marker) = 48-52-56-60-64 stitches.
Put piece aside and knit another sleeve the same way.

YOKE:
Slip sleeves on to same circular needle as body, slip them on where armholes were bind off = 244-260-276-292-308 stitches. Insert 1 marker in all transitions between sleeves and body = 4 markers.

NOTE! Begin neck decrease before all decreases for raglan are done, READ THE ENTIRE SECTION BEFORE CONTINUING!
Continue with pattern A.1 and stockinette stitch as before but work 1 stitch in stockinette stitch on each side of each marker onwards. On 2nd round begin decreases for RAGLAN – see explanation above! Repeat decreases every other round 19-21-23-24-26 times in total.
When piece measures approx. 35-39-43-47-49 cm = 13¾"-15¼"-17"-18½"-19¼" (adjust so that so that you are on a round with 6 knit stitches mid front in pattern), work the middle 14 stitches at the front together 2 by 2 = 7 stitches (the middle 6 stitches are knitted together 2 by 2 and the 4 stitches on each side are purled together 2 by 2). On next round, slip the middle 17 stitches at the front on 1 stitch holder for neck (= entire A.1c). Continue piece back and forth from mid front until finished measurements - AT THE SAME TIME bind off for neck at the beginning of every row in each side: 2 stitches 2 times and 1 stitch 2 times. After all decreases for raglan and bind offs for neck, there are 56-56-56-64-64 stitches on needle.

NECK:
Switch to double pointed needles or a short circular needle size 3 mm = US 2,5, pick up approx. 29 to 35 stitches at the front of neck (including stitches from stitch holder) = approx. 85 to 99 stitches on needle.
Knit 1 round while at the same time adjusting number of stitches so that there are 8 stitches over each sleeve, 24-28-28-32-32 on the over back piece and 35-35-35-43-43 stitches over front piece (do not increase or decrease over the middle 17 stitches) = 75-79-79-91-91 stitches on round.
Work rib in the round as follows: Continue the 2 stitches from the raglan line as knit 2, then purl 2, knit 2 and purl 2 over each sleeve, work stitches on back piece into purl 2/knit 2, on the front piece work the 17 stitches in the middle as follows: Purl 2, knit 3, purl 2, knit 3, purl 2, knit 3, purl 2, work the remaining stitches on each side into knit 2 / purl 2. When neck edge measures 2-2-2-2-3 cm = ¾"-¾"-¾"-¾"-1⅛", bind off with knit over knit and purl over purl.

ASSEMBLY:
Sew the openings under the sleeves tog.

This pattern has been corrected.

Updated online: 21.12.2020
Correction: BODY:
... SIZE 5/6 years: Knit 1, * knit 2 together, knit 4, knit 2 together, knit 5 *, work from *-* the rest of round.
SIZE 7/8 years: * Knit 2 together, knit 5 *, work from *-* the rest of round.
SIZE 9/10 years: Knit 8, * knit 2 together, knit 5 *, work from *-* the rest of round.
SIZE 11/12 years: Knit 7, * knit 2 together, knit 5, knit 2 together, knit 6 *, work from *-* the rest of round.
SIZE 13/14 years: Knit 6, * knit 2 together, knit 6 *, work from *-* the rest of round...

Diagram

All measurements in charts are in cm.

symbols = knit from the right side, purl from the wrong side
symbols = purl from the right side, knit from the wrong side
symbols = slip 2 stitches on cable needle behind piece, knit 2, knit 2 stitches from cable needle
symbols = slip 2 stitches on cable needle in front of piece, knit 2, knit 2 stitches from cable needle
symbols = slip 3 stitches on cable needle in front of piece, purl 1, knit 3 stitches from cable needle
symbols = slip 1 stitch on cable needle behind piece, knit 3, purl 1 stitch from cable needle
symbols = slip 3 stitches on cable needle in front of piece, knit 3, knit 3 stitches from cable needle
symbols = slip 3 stitches on cable needle behind piece, knit 3, knit 3 stitches from cable needle
diagram
diagram

Each of our patterns has specific tutorial videos to help you.

Do you have a question? See a list of frequently asked questions (FAQ)

Knitting tension is what determines the final measurements of your work, and is usually measured per 10 x 10 cm. It is provided like so: number of stitches in width x number of rows in height - eg: 19 stitches x 26 rows = 10 x 10 cm.

The knitting tension is very individual; some people knit/crochet loosely while others work tightly. You adjust the knitting tension with the needle size, which is why the suggested needle size only serve as a guide! You need to adjust this (up or down) to ensure that YOUR knitting tension matches the knitting tension provided in the pattern. If you work with a different knitting tension than provided you will have a different yarn consumption, and your work will have different measurements than what the pattern suggests.

The knitting tension also determines which yarns can replace each other. As long as you achieve the same knitting tension you can replace one yarn with another.

See DROPS lesson: How to measure your tension/gauge

See DROPS video: How to make a gauge tension swatch

The required amount of yarn is provided in grams, eg: 450 g. To calculate how many balls you’ll need you first need to know how many grams are in 1 ball (25g, 50g or 100g). This information is available if you click on the individual yarn quality on our pages. Divide the amount required with the amount of each ball. For example, if each ball is 50g (the most common amount), the calculation will be as follows: 450 / 50 = 9 balls.

The important thing when changing from one yarn to another is that the knitting/crochet tension remains the same. This is so that the measurements of the finished piece will be the same as on the sketch provided. It is easier to achieve the same knitting tension using yarns from the same yarn group. It is also possible to work with multiple strands of a thinner yarn to achieve the knitting tension of a thicker one. Please try our yarn converter. We recommend you to always work a test swatch.

Please NOTE: when changing yarn the garment might have a different look and feel to the garment in the photo, due to individual properties and qualities of each yarn.

See DROPS lesson: Can I use a different yarn than the one mentioned in the pattern?

All our yarns are categorised into yarn groups (from A to F) according to thickness and knitting tension – group A contains the thinnest yarns and group F the thickest. This makes it easier for you to find alternative yarns to our patterns, should you wish to switch yarn. All yarns within the same group have a similar knitting tension and can easily replace each other. However, different yarn qualities have different structures and properties which will give the finished work a unique look and feel.

Click here for an overview of the yarns in each yarn group

At the top of all our patterns you’ll find a link to our yarn converter, which is a helpful tool should you wish to use a different yarn than suggested. By filling in the yarn quality you wish to replace, the amount (in your size) and number of strands, the converter will present good alternative yarns with the same knitting tension. Additionally it will tell you how much you’ll require in the new qualities and whether you’ll need to work with multiple strands. Most skeins are 50g (some are 25g or 100g).

If the pattern is worked with multiple colours, every colour will have to be converted separately. Similarly, if the pattern is worked with several strands of different yarns (for example 1 strand Alpaca and 1 strand Kid-Silk) you will have to find alternatives for each, individually.

Click here to see our yarn converter

Since different yarns have different qualities and textures we have chosen to keep the original yarn in our patterns. However, you can easily find options among our available qualities by using our yarn converter, or simply pick a yarn from the same yarn group.

It is possible that some retailers still have discontinued yarns in stock, or that someone has a few skeins at home that they would like to find patterns for.

The yarn converter will provide both alternative yarn as well as required amount in the new quality.

If you think it's hard to decide what size to make, it can be a good idea to measure a garment you own already and like the size of. Then you can pick the size by comparing those measures with the ones available in the pattern's size chart.

You'll find the size chart at the bottom of the pattern.

See DROPS lesson: How to read size chart

The needle size provided in the pattern serves only as a guide, the important thing is to follow the knitting tension. And since knitting tension is very individual, you will have to adjust the needle size to ensure that YOUR tension is the same as in the pattern – maybe you’ll have to adjust 1, or even 2 needle sizes, up or down to achieve the correct tension. For this, we recommend that you work test swatches.

Should you work with a different knitting tension than the one provided, the measurements of the finished garment might deviate from the measurement sketch.

See DROPS lesson: How to measure your tension/gauge

See DROPS video: How to make a gauge tension swatch

Working a garment top-down provides more flexibility and room for personal adjustment. For example it is easier to try the garment on while working, as well as making adjustments to length of yoke and shoulder caps.

The instructions are carefully explaining every step, in the correct order. Diagrams are adjusted to the knitting direction and are worked as usual.

The diagram depicts all rows/rounds, and every stitch seen from the right side. It is read from bottom to top, from right to left. 1 square = 1 stitch.

When working back and forth, every other row is worked from the right side and every other row is worked from the wrong side. When working from the wrong side, the diagram will have to be worked reversed: from left to right, knit stitches are purled, purl stitches are knit etc.

When working in the round every round is worked from the right side and the diagram are worked from right to left on all rounds.

See DROPS lesson: How to read knitting diagrams

The diagram depicts all rows/rounds, and every stitch seen from the right side. It is worked from bottom to top, from right to left.

When working back and forth every other row is worked from the right side: from right to left and every other row is worked from the wrong side: from left to right.

When working in the round, every row in the diagram are worked from the right side, from right to left.

When working a circular diagram you start in the middle and work your way outwards, counter clockwise, row by row.

The rows usually start with a given number of chain stitches (equivalent to the height of the following stitch), this will either be depicted in the diagram or explained in the pattern.

See DROPS lesson: How to read crochet diagrams

Instructions for working several diagrams after each other on the same row/round, will often be written like so: “work A.1, A.2, A.3 a total of 0-0-2-3-4 times". This means you work A.1 once, then A.2 is worked once, and A.3 is repeated (in width) the number of times provided for your size – in this case like so: S = 0 times, M = 0 times, L=2 times, XL= 3 times and XXL = 4 times.

The diagrams are worked as usual: begin with the first row in A.1, then work the first row in A.2 etc.

See DROPS lesson: How to read knitting diagrams

See DROPS lesson: How to read crochet diagrams

The total width of the garment (from wrist-to-wrist) will be larger in the larger sizes, despite the actual sleeves being shorter. The larger sizes have longer sleeve caps and wider shoulders, so there will be a good fit in all sizes.

The measurement sketch/schematic drawing provides information regarding the full length of the garment. If it’s a jumper or a jacket the length is measured from the highest point on the shoulder (usually closest to the neckline), and straight down to the bottom of the garment. It is NOT measured from the tip of shoulder. Similarly, the length of yoke is measured from the highest point on the shoulder and down to where yoke is split into body and sleeves.

See DROPS lesson: How to read a schematic drawing

Diagrams are often repeated on the round or in height. 1 repeat is the diagram the way it appears in the pattern. If it says to work 5 repeats of A.1 in the round, then you work A.1 a total of 5 times after/next to each other in the round. If it says to work 2 repeats of A.1 vertically/in height you work the entire diagram once, then begin again at the start and work the entire diagram one more time.

Chain stitches are slightly narrower than other stitches and to avoid working the cast-on edge too tight, we simply chain more stitches to begin with. The stitch count will be adjusted on the following row to fit the pattern and measurement sketch.

The rib edge is more elastic and will contract slightly compared to, for example, stocking stitch. By increasing before the rib edge, you avoid a visible difference in width between the rib edge and the rest of the body.

It’s very easy to cast off too tightly, and by making yarn overs while casting off (and simultaneously casting these off) you avoid a too tight cast off edge.

See DROPS video: How to bind off with yarn overs (yo)

To achieve an even increase (or decrease) you can increase on, for example: every 3rd and 4th row alternately, like so: work 2 rows and increase on the 3rd row, work 3 rows and increase on the 4th. Repeat this until the increase is complete.

See DROPS lesson: Increase or decrease 1 st on every 3rd and 4th row alternately

Should you prefer to work in the round instead of back and forth, you may of course adjust the pattern. You’ll need to add steeks mid-front (usually 5 stitches), and follow the instructions. When you would normally turn and work from the wrong side, simply work across the steek and continue in the round. At the end you’ll cut the piece open, pick up stitches to work bands, and cover the cut edges.

See DROPS video: How to knit steeks and cut open

Should you prefer to work back and forth instead of in the round, you may of course adjust the pattern so you work the pieces separately and then assemble them at the end. Divide the stitches for the body in 2, add 1 edge stitch in each side (for sewing) and work the front and back pieces separately.

See DROPS lesson: Can I adapt a pattern for circular needles into straight needles?

Pattern repeats can vary slightly in the different sizes, in order to get the correct proportions. If you’re not working the exact same size as the garment in the photo, yours might deviate slightly. This has been carefully developed and adjusted so that the complete impression of the garment is the same in all sizes.

Make sure to follow instructions and diagrams for your size!

If you have found a pattern you like which is available in women’s size it’s not very difficult to convert it to men’s size. The biggest difference will be the length of sleeves and body. Start working on the women size that you think would fit across the chest. The additional length will be worked right before you cast off for the armhole/sleeve cap. If the pattern is worked top-down you can add the length right after the armhole or before the first decrease on sleeve.

Regarding additional yarn amount, this will depend on how much length you add, but it is better with a skein too many than too few.

All yarns will have excess fibres (from production) that might come off as lint or shedding. Brushed yarns (ie hairier yarns) have more of these loose, excess fibres, causing more shedding.

Shedding also depends on what is worn under or over the garment, and whether this pulls at the yarn fibres. It’s therefore not possible to guarantee that there will be no shedding

Below are some tips on how to get the best result when working with hairier yarns:

1. When the garment is finished (before you wash it) shake it vigorously so the looser hairs come off. NOTE: do NOT use a lint roller, brush or any method that pulls at the yarn.

2. Place the garment in a plastic bag and put it in your freezer - the temperature will cause the fibres to become less attached to each other, and excess fibres will come off easier.

3. Leave in the freezer for a few hours before taking it out and shaking it again.

4. Wash the garment according to the instructions on the yarn label.

Pilling is a natural process that happens to even the most exclusive of fibers. It's a natural sign of wear and tear that is hard to avoid, and that is most visible in high friction areas of your garment like a sweater's arms and cuffs.

You can make your garment look as new by removing the pilling, using a fabric comb or a pill/lint remover.

Still can't find the answer you need? Then scroll down and leave your question so one of our experts can try to help you. This will be done normally within 5 to 10 working days.
In the meantime, you can read the questions and answers that others have left to this pattern or join the DROPS Workshop on Facebook to get help from fellow knitters/crocheters!

You might also like...

Post a comment to pattern DROPS Children 37-12

We would love to hear what you have to say about this pattern!

If you want to leave a question, please make sure you select the correct category in the form below, to speed up the answering process. Required fields are marked *.

Comments / Questions (41)

country flag Myriam DEVAUCHELLE wrote:

Merci, cela me parait clair

17.11.2022 - 16:30

country flag Myriam DEVAUCHELLE wrote:

Bonjour, je fais le modèle 11 /12 ans, j'ai fait le devant et le dos, j'ai fait les manches , j'ai rabattu les 6 mailles. Je dois maintenant tout remettre sur la même aiguille circulaire et là je ne vois pas comment cela est possible car la manche est déjà sur 4 aiguilles doubles pointes puisque tricotée en rond. Y a t'il une technique précise? Merci de m'aider

17.11.2022 - 08:55

DROPS Design answered:

Bonjour Mme Devauchelle, cette vidéo montre comment tricoter une manche en rond au-dessus des mailles rabattues pour l'emmanchure; les premiers tours peuvent être un peu "tricky", vous pouvez alors laisser les manches sur les doubles pointes pendant les premiers tours ou utiliser la technique du magic loop, après quelques tours, vous pourrez de nouveau tricoter en rond "normalement". Bon tricot!

17.11.2022 - 10:19

country flag Myriam DEVAUCHELLE wrote:

Grand merci, c'est bien clair

21.10.2022 - 11:16

country flag Myriam DEVAUCHELLE wrote:

Merci, si je comprends bien le devant mesure 100 mailles et le dos 84, et le rang du devant débute 20 mailles avant A1. Donc la première maille d'origine quand on monte le premier rang n'est pas celle du début du rang mais du début de A1. ai je bien compris? merci

21.10.2022 - 09:09

DROPS Design answered:

Bonjour Mme Devauchelle, tout à fait; il faut plus de mailles pour le devant à cause des torsades et la 1ère maille des tours est la 1ère de A.1.Bon tricot!

21.10.2022 - 09:43

country flag Myriam DEVAUCHELLE wrote:

Je n'arrive pas à comprendre l'emplacement des marqueurs (dos, devant). A1 fait 60 mailles + 20 =80= 1° marqueur Si je mets le deuxième marqueur de l'autre côté de A1 après la 20° maille, j'ai 100 mailles entre les deux marqueurs et non 84 (taille 11/12 ans). pouvez vous m'expliquer ce que je fais mal merci d'avance

20.10.2022 - 19:53

DROPS Design answered:

Bonjour Mme Devauchelle, les tours commencent juste avant les torsades, pas sur le côté, autrement dit, vous devez avoir cette configuration: 20 m jersey, (début du tour), A.1 (60 m), 20 m jersey (côté), 84 m jersey. Ainsi vous avez bien vos 20+60+20+84=184 mailles (le dos se tricote en jersey, sans torsades). Bon tricot!

21.10.2022 - 08:33

country flag Denise Badeau wrote:

Bonjour, Le diagramme contient plusieurs rangs. Je fais les 12 premiers rangs en partant du bas et de droite à gauche car je tricote en rond, ensuite, je recommence au 1er rang pour obtenir ma longueur désirée. Est-ce que bien comme ça que je dois lire le diagramme? Merci beaucoup

10.10.2022 - 15:46

DROPS Design answered:

Bonjour Mme Badeau, les différents diagrammes ne se tricotent pas sur le même nombre de rangs en hauteur, autrement dit, quand vous avez terminé A.1b (= 12 rangs), reprenez au 1er rang mais continuez les autres diagrammes comme avant; quand A.1a est terminé (= 14 rangs), reprenez-le au 1er rang mais continuez les autres diagrammes comme avant, et, quand A.1c est terminé, reprenez-le au 1er rang. Veillez à toujours bien avoir le bon nombre de rangs entre chaque torsade dans chaque diagramme. Bon tricot!

10.10.2022 - 16:09

country flag Denise Badeau wrote:

Bonjour, cela fait 3 fois que je démanche mon tricot car le motif du milieu (A.1c) n'est pas correct. Je tricote en rond et je lis le patron de droite à gauche. Pourriez-vous avoir une idée pourquoi? Merci

08.10.2022 - 20:40

DROPS Design answered:

Bonjour Mme Badeau, il est très difficile de pouvoir vous répondre ainsi sans voir votre ouvrage, essayez de placer des marqueurs après chaque diagramme pour bien délimiter les zones et vérifier comment les tricoter - en cas de doute, apportez votre ouvrage à votre magasin ou bien envoyez-lui une photo, ce sera plus simple pour eux de vous aider à repérer l'erreur. Bon tricot!

10.10.2022 - 09:06

country flag Denise wrote:

Bonjour, Je fais le modèle u-079-bn, drops children 37-12. Le motif du diagramme A.1c ne fonctionne pas. Je tricote les 12 rangs et lorsque je recommence à partir du premier rang le motif n’est pas correct. Qu’est-ce je fais de pas correct? Merci

01.07.2022 - 20:12

DROPS Design answered:

Bonjour Denise, lorsque vous tricotez les diagrammes, ils se répètent à un rythme différent, par ex. A.1a et A.1e se tricotent sur 14 rangs; A.1b et A.1d sur 12 rangs et A.1c sur 22 rangs. Autrement dit, lorsque vous avez tricoté 12 rangs, reprenez A.1b et d au début, mais continuez les autres diagrammes, lorsque vous avez tricoté 14 rangs, reprenez A.1 a et e au début, mais continuez les autres diagrammes et ainsi de suite. Bon tricot!

04.07.2022 - 07:48

country flag Trine wrote:

Andre omgang starter med vrangbord og etter 20 m 2 rett, slikat det blir 4 rett etter hverandre. Det står at det er 4 masker rett midt foran dvs ar denne omgangen ikke starter i siden (?) Blir usikker på hvor omg 3 begynner. Skal vel ikke ‘hoppe’ over 20 masker?

29.04.2022 - 17:07

DROPS Design answered:

Hei Trine. Du skal ikke "hoppe" over noen masker, men når du begynner med vrangborden er det 20 masker fra midt foran. Når du er ferdig med vrangborden (5 cm) og skal strikke etter forklaringen vil vrangborden stemme overens med flettene (forklaringen etter du har byttet til rundpinne 4), og du vil da se, i den str. du strikker at flettemønstrene kommer i front. mvh DROPS Design

02.05.2022 - 12:14

country flag Eli Karin Haaland wrote:

Skal A1c starte på omgang 1 igjen etter at en har strikket de 22 omgangene i diagrammet

13.12.2021 - 23:13

DROPS Design answered:

Hei Eli Karin. Ja, det stemmer. mvh DROPS Design

14.12.2021 - 13:55