
Popular categories
Looking for a yarn?


|
|
Autumn Pathways |
|
 |
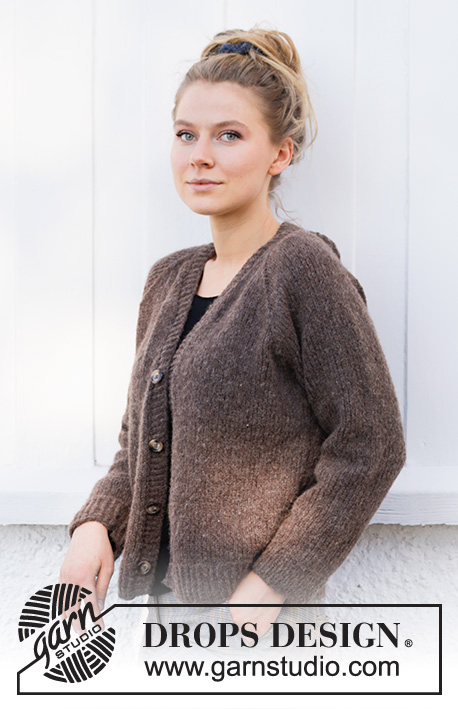 |
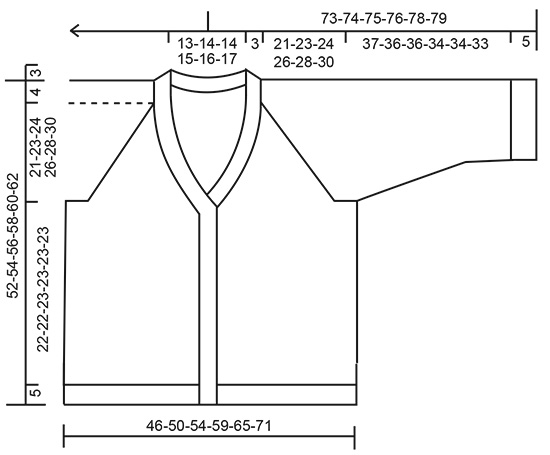
Knitted jacket with raglan in DROPS Air. The piece is worked with V-neck and split in the sides. Sizes S - XXXL.
DROPS 216-11 |
|
|
------------------------------------------------------- EXPLANATIONS FOR THE PATTERN: ------------------------------------------------------- RIDGE/GARTER STITCH (worked back and forth): Knit all rows. 1 ridge in height = Knit 2 rows. DECREASE TIP (evenly spaced): To work out how to decrease evenly, count the total number of stitches to be worked (e.g. 45 stitches) and divide by the number of decreases to be made (e.g. 8) = 5.6. In this example decrease by knitting together alternately each 4th and 5th stitch and each 5th and 6th stitch. INCREASE TIP (for sleeves): Work until there are 2 stitches left before the marker thread, 1 yarn over, knit 4 (marker thread sits between these 4 stitches), 1 yarn over. On the next round knit the yarn overs twisted to avoid holes. Then work the new stitches in stockinette stitch. RAGLAN: Decrease 2 stitches in each transition between body and sleeves as follows: Work until there is 1 stitch left before the marker-stitch, slip 2 stitches as if to knit together, knit 1, pass the 2 slipped stitches over the knitted stitch (= 2 stitches decreased). BUTTONHOLES: Work buttonholes on the right band (when the garment is worn). 1 buttonhole = Make 1 yarn over, knit 2 together. On the next row (wrong side), knit the yarn over to leave a hole. The first buttonhole is worked when the band measures approx. 5 cm = 2" (transition between rib and stockinette stitch on body). Then work the 3 other buttonholes with approx. 8 cm = 3⅛" between each one. ------------------------------------------------------- START THE PIECE HERE: ------------------------------------------------------- JACKET – SHORT OVERVIEW OF THE PIECE: Front and back pieces are worked separately, back and forth, until the rib is nearly finished. Then all sections are placed on the same circular needle and worked back and forth as far as the armholes. The sleeves are worked in the round with double pointed needles/short circular needle, then placed on the same circular needle as the body. The yoke is finished back and forth. The bands and neck are worked to finish. BACK PIECE: Cast on 91-101-109-117-129-141 stitches (including 1 edge stitch on each side) with circular needle size 4 mm = US 6 and Air. Purl 1 row from the wrong side. Then work rib as follows: ROW 1 (right side): 1 edge stitch in GARTER STITCH – read description above, * knit 1 twisted, purl 1 *, work from *-* until there are 2 stitches left, knit 1 twisted and 1 edge stitch in garter stitch. ROW 2 (wrong side): 1 edge stitch in garter stitch * purl 1 twisted, knit 1 *, work from *-* until there are 2 stitches left, purl 1 twisted and 1 edge stitch in garter stitch. Repeat rows 1 and 2 until the rib measures 5 cm = 2". Cut the strand, lay the piece to one side and work the front pieces. LEFT FRONT PIECE: Cast on 47-51-55-59-65-71 stitches (including 1 edge stitch on each side) with circular needle size 4 mm = US 6 and Air. Purl 1 row from the wrong side. Then work rib as follows: ROW 1 (right side): 1 edge stitch in garter stitch, * knit 1 twisted, purl 1 *, work from *-* until there are 2 stitches left, knit 1 twisted and 1 edge stitch in garter stitch. ROW 2 (wrong side): 1 edge stitch in garter stitch * purl 1 twisted, knit 1 *, work from *-* until there are 2 stitches left, purl 1 twisted and 1 edge stitch in garter stitch. Repeat rows 1 and 2 until the rib measures 5 cm = 2". Cut the strand, lay the piece to one side and work the right front piece. RIGHT FRONT PIECE: Work in the same way as the left front piece until it measures 5 cm = 2" – adjust so you finish after a row from the wrong side. Do not cut the strand. BODY: Now work the sections together. Work over the right front piece, from the right side, as follows: 1 edge stitch in garter stitch, knit 45-49-53-57-63-69 and decrease at the same time 8-9-10-10-11-12 stitches evenly over these stitches, knit the last stitch on the right front piece together with the first stitch on the back piece (= 1 stitch decreased), knit 89-99-107-115-127-139 and decrease at the same time 17-21-23-23-25-27 stitches evenly over these stitches, knit the last stitch on the back piece together with the first stitch on the left front piece (= 1 stitch decreased), knit 45-49-53-57-63-69 and decrease at the same time 8-9-10-10-11-12 stitches evenly over these stitches and work the last stitch in garter stitch = 150-162-174-190-210-230 stitches. Change to circular needle size 5.5 mm = US 9 and continue back and forth with stockinette stitch and 1 edge stitch in garter stitch on each side towards mid front. REMEMBER THE KNITTING GAUGE!. When the piece measures 27-27-28-28-28-28 cm = 10⅝"-10⅝"-11"-11"-11"-11" from the cast-on edge, bind off stitches for the armholes as follows: Work the first 34-37-39-43-47-51 stitches as before (right front piece), bind off the next 8-8-10-10-12-14 stitches (= armhole), work the next 66-72-76-84-92-100 stitches (= back piece), bind off the next 8-8-10-10-12-14 stitches (= armhole), work the last 34-37-39-43-47-51 stitches (= left front piece). Cut the strand, lay the piece to one side and work the sleeves. SLEEVE: Cast on 46-48-50-52-52-56 stitches with double pointed needles size 4 mm = US 6 and Air. Knit 1 round, then work rib (= knit 1 twisted /purl 1) in the round for 5 cm = 2". Knit 1 round where you decrease 8-8-8-8-8-10 stitches evenly spaced = 38-40-42-44-44-46 stitches. Change to double pointed needles size 5.5 mm = US 9 and insert a marker thread at the beginning of the round (= mid under sleeve). Allow the thread to follow your work onwards; it will be used when increasing under the sleeve. Continue with stockinette stitch until the sleeve measures 11-10-10-10-7-7 cm = 4⅜"-4"-4"-4"-2¾"-2¾", then increase 1 stitch on each side of the marker thread – read INCREASE TIP. Increase like this every 3-3-2½-2-2-2 cm = 1⅛"-1⅛"-1"-¾"-¾"-¾" a total of 10-10-12-13-15-15 times = 58-60-66-70-74-76 stitches. When the sleeve measures 42-41-41-39-39-38 cm = 16½"-16⅛"-16⅛"-15¼"-15¼"-15", bind off 8-8-10-10-12-14 stitches under the sleeve (4-4-5-5-6-7 stitches on each side of the marker thread) = 50-52-56-60-62-62 stitches. Cut the strand, lay the piece to one side and work the other sleeve in the same way. YOKE: Place the sleeves on the same circular needle as the body, where stitches were bind off for the armholes = 234-250-266-290-310-326 stitches. Work the first row from the right side as follows: 1 edge stitch in garter stitch, knit 30-32-34-38-41-44, knit 1 more stitch and insert 1 marker in this stitch (right front piece), knit 54-58-62-66-70-72 (= sleeve), knit 1 more stitch and insert 1 marker in this stitch, knit 60-64-68-76-82-88 (= back piece), knit 1 more stitch and insert 1 marker in this stitch, knit 54-58-62-66-70-72 (= sleeve), knit 1 more stitch and insert 1 marker in this stitch, knit 30-32-34-38-41-44 and 1 edge stitch in garter stitch (= left front piece). The marker stitches are in the transitions between body and sleeves. Continue back and forth with stockinette stitch and 1 edge stitch in garter stitch on each side towards mid front. Now decrease for raglan and V-neck as follows. RAGLAN: When you have worked 4-4-2-2-2-2 rows on the yoke, begin to decrease for RAGLAN – read description above. Decrease like this every 2nd row a total of 19-21-23-25-27-29 times. V-NECK: When you have worked 2-4-4-4-4-4 rows on the yoke, begin to decrease for the V-neck from right side as follows: 1 edge stitch in garter stitch, slip 1 stitch as if to knit, knit 1 and pass the slipped stitch over the knitted stitch (= 1 stitch decreased), work until there are 3 stitches left, knit 2 together (= 1 stitch decreased) and1 edge stitch in garter stitch. Decrease like this one more time after 7 rows and then on every 4th row 8-9-9-10-11-12 times = 10-11-11-12-13-14 decreases in total for V-neck on each side. When all the decreases for raglan and V-neck are finished there are 62-60-60-66-68-66 stitches left on the needle. The next row from the right side is worked as follows: 1 edge stitch in garter stitch, slip 1 stitch as if to knit, knit 1, pass the slipped stitch over (= 1 stitch decreased), knit 56-54-54-60-62-60 stitches – decrease at the same time 12-8-8-12-13-9 stitches evenly spaced, knit 2 together (= 1 stitch decreased), 1 edge stitch in garter stitch = 48-50-50-52-53-55 stitches. Bind off. RIGHT BAND: Start from the right side at the bottom of the right front piece, with circular needle size 4 mm = US 6, and knit up, inside the 1 edge stitch, 123 to 147 stitches (number of stitches must be divisible by 2 + 1) along the front piece and up to mid back. Purl 1 row from the wrong side – increase with yarn overs just where the first decrease for the neck started by working as follows: * Purl 1, 1 yarn over *, work from *-* 2 times (= 2 stitches increased) – on the next row work the yarn overs twisted to avoid holes. Now work rib from the right side as follows: ROW 1 (right side): 1 edge stitch in garter stitch, * knit 1 twisted, purl 1 *, work from *-* until there are 2 stitches left, knit 1 twisted and 1 edge stitch in garter stitch. ROW 2 (wrong side): 1 edge stitch in garter stitch * purl 1 twisted, knit 1 *, work from *-* until there are 2 stitches left, purl 1 twisted and 1 edge stitch in garter stitch. Repeat rows 1 and 2 until the band measures 1-1½ cm = ⅜"-½". Now work BUTTONHOLES – read description above. Continue working until the band measures a total of 3-3½ cm = 1⅛"-1¼". Bind off with knit over knit and purl over purl. LEFT BAND: Knit up 123 to 147 stitches (number of stitches must be divisible by 2 + 1) from the right side and inside the 1 edge stitch, starting from mid back and down the left front piece. Purl 1 row from the wrong side – increase with yarn overs where the first decrease for the neck started by working as follows: * Purl 1, 1 yarn over *, work from *-* 2 times (= 2 stitches increased) – on the next row work the yarn overs twisted to avoid holes. Now work rib from the right side as follows: ROW 1 (right side): 1 edge stitch in garter stitch, * knit 1 twisted, purl 1 *, work from *-* until there are 2 stitches left, knit 1 twisted and 1 edge stitch in garter stitch. ROW 2 (wrong side): 1 edge stitch in garter stitch * purl 1 twisted, knit 1 *, work from *-* until there are 2 stitches left, purl 1 twisted and 1 edge stitch in garter stitch. Repeat rows 1 and 2 until the band measures 3-3½ cm = 1⅛"-1¼". Bind off with knit over knit and purl over purl. ASSEMBLY: Sew bands together mid-back inside the 1 edge stitch. Sew the buttons onto the left band. Sew the openings under the sleeves. |
|
|
|
|
Have you made this or any other of our designs? Tag your pictures in social media with #dropsdesign so we can see them! Do you need help with this pattern?You'll find tutorial videos, a Comments/Questions area and more by visiting the pattern on garnstudio.com. © 1982-2024 DROPS Design A/S. We reserve all rights. This document, including all its sub-sections, has copyrights. Read more about what you can do with our patterns at the bottom of each pattern on our site. |
|


With over 40 years in knitting and crochet design, DROPS Design offers one of the most extensive collections of free patterns on the internet - translated to 17 languages. As of today we count 304 catalogs and 11422 patterns - 11417 of which are translated into English (US/in).
We work hard to bring you the best knitting and crochet have to offer, inspiration and advice as well as great quality yarns at incredible prices! Would you like to use our patterns for other than personal use? You can read what you are allowed to do in the Copyright text at the bottom of all our patterns. Happy crafting!
Comments / Questions (39)
Kann eine Jacke/ein Pullover bei Bedarf in der Länge angepasst werden, also wie zB. in meinem Fall das Rücken- und die Vorderteile länger gestrickt werden als es die Anleitung vorgibt, ohne dass sich etwas an der Passform verändert (außer dass es länger wird!)? Mir sind die meisten Strickjackenmodelle viel zu kurz, deshalb die Frage. Vielen Dank im voraus...
11.04.2023 - 12:07DROPS Design answered:
Liebe Frau Kitzmüller, ja sicher können Sie die Jacken/Pullover bei Bedarf länger stricken (Garnmenge sollten Sie natürlich auch anpassen) - beachten Sie nur, wenn es Zu- und/oder Abnahmen beim Rumpfeil gibt, diese sollten Sie dann auch anpassen; Viel Spaß beim stricken!
11.04.2023 - 14:24Het lukt mij niet om de voorpanden goed te krijgen bij het minderen van de raglan. neem ik het draadje ertussen mee? er moeten toch aan beide voorpanden minder steken komen zoals op de foto dat je eindigt zonder steken van het voorpand. Je mindert ook bij elke overgang naar de zelfde kant, dat klopt toch niet?
15.01.2023 - 16:32DROPS Design answered:
Dag Anja,
De minderingen voor de v-hals brei je op verschillend op het begin en op het eind van de naald. De raglan kun je wel steeds op dezelfde manier breien. Het kan per maat verschillend zijn hoe het uitkomt met de raglanlijn en de schuine hals. Dus als je een andere maat breit dan maat S, kijk dan niet te veel naar de foto.
18.01.2023 - 21:01I am using Autumn Pathways pattern. For the raglan sleeves do I decrease 2 stitches each side of the marker making 4 stitches altogether each row or do I decrease the 2 stitches one on either side of the marker? If the last one where then does the marker go?
09.10.2021 - 03:34DROPS Design answered:
Dear Elizabeth, you decrease two stitcheas at each raglan line, which means after a row with decreases, you will have 8 stitches less. Happy Stitching!
09.10.2021 - 05:03Hola, después de hacer la disminución del raglán, donde pongo el marcapuntos?
04.10.2021 - 19:54DROPS Design answered:
Hola Senora Goretti, pones el marcapunto en el punto que queda despues de esta disminucion. Buen trabajo!
05.10.2021 - 20:24Hola, al a hacer las disminuciones del raglán, cuando hay que hacerlas? Antes o depues del marcapuntos?
04.10.2021 - 19:53DROPS Design answered:
Hola Senora Coretti, trabajas hasta que quede 1 punto antes del punto con el marcapunto y haces la disminucion para el raglan. Mira la seccion RAGLAN y el video AQUI. Buen trabajo!
05.10.2021 - 20:19Stemmer det at det er samme type felling på begge sidene av erma (raglanfelling). Det minker 2 masker av ermene på den første fellinga, men ved fellinga etter ermet minker maskene av ryggen. Det samme for erme 2 - da minker det 2 masker av venstre forstykke. Har jeg misforstått noe?
12.07.2021 - 19:45DROPS Design answered:
Hej Tora, ja det stemmer, du feller 1 maske i hver side af ryg, forstykke og ærmer, ialt 8 masker pr felleomgang: RAGLAN: Det felles 2 masker i hver overgang mellom bol og ermer slik: Strikk til det gjenstår 1 maske før masken med merke i, ta 2 masker løs av pinnen som om de skulle strikkes rett sammen, 1 rett, løft de 2 løse maskene over masken som ble strikket (= 2 masker felt).
14.07.2021 - 09:18Hallo, werden für die Raglanärmel wirklich in jeder 2. Reihe (also in jeder rechten Reihe) 2 Maschen abgenommen pro Übergang zwischen Ärmel und Körper? Kommt mir sehr viel vor, wird da nicht die gesamte Jacke zu kurz? Vielen Dank für den Support!
23.03.2021 - 22:27DROPS Design answered:
Liebe Silke, stimmt Ihre Maschenprobe in der Höhe? Wenn Sie mehr als 20 Reihen für 10 cm haben, sollen Sie exta Reihen ohne Abnahmen regelmäßig verteilt um diesen Unterschied zu kompensieren. Wenn Ihre Maschenprobe stimmt, dann soll die fertige Passe ca 21 bis 30 cm messen. Viel Spaß beim stricken!
24.03.2021 - 08:15Beim Ärmel heisst es „nach 42 cm 8 Maschen an der unteren Ärmelmitte abnehmen.“ ist damit abketten gemeint? Oder wie nehme ich auf einmal 8 M ab?? Danke!
18.03.2021 - 14:50DROPS Design answered:
Liebe Silke, oh ja richtig, hier ist es "abketten" gemeint, danke für den Hinweis. Viel Spaß beim stricken!
18.03.2021 - 14:56Hello, Are the raglan and V neck meant to be done at the same time or the raglan first and the v neck second separately?
08.02.2021 - 20:55DROPS Design answered:
Hi Sofia, it depends on your size. Please see RAGLAN and V-NECK instructions. Happy knitting!
08.02.2021 - 21:04Hi, Do I cast off for the armholes when the piece measures 27 cm in total or 27 cm from the top of the rib? In the body section I am at: When the piece measures 27-27-28-28-28-28 cm from the cast-on edge, cast off stitches for the armholes as follows Thank you!
14.01.2021 - 14:01DROPS Design answered:
Dear Sofia, these 27 cm are in total = from the cast on edge of back/front pieces, ie including the rib. Happy knitting!
14.01.2021 - 16:02