
Popular categories
Looking for a yarn?


|
|||||||||||||
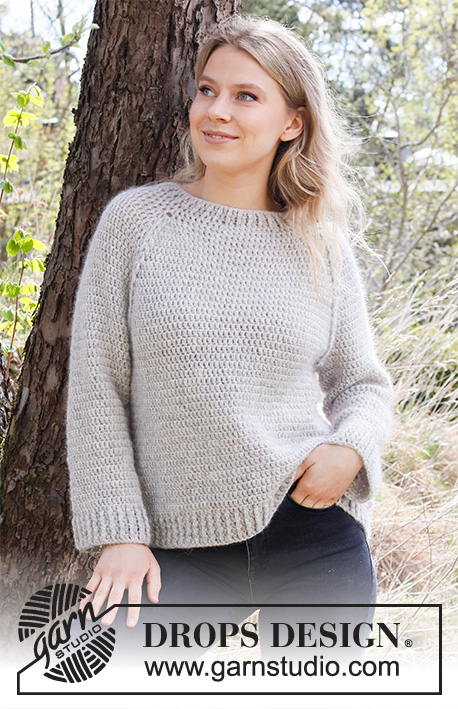
Stone Fence |
|||||||||||||
 |
 |
||||||||||||
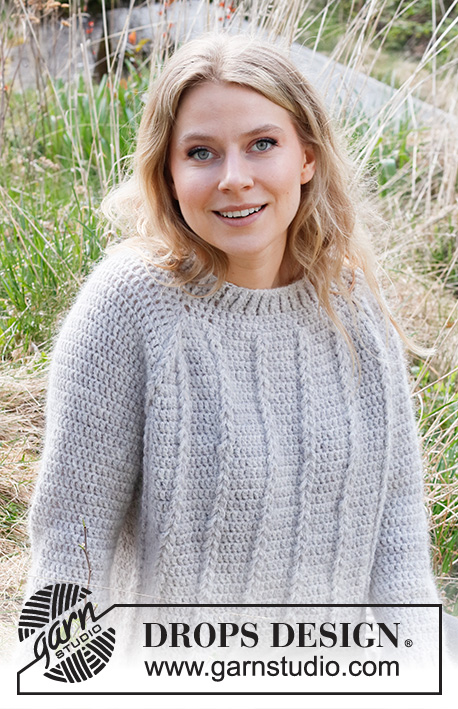
Crocheted sweater in DROPS Sky and DROPS Kid-Silk. The piece is worked top down with raglan and loop cables. Sizes XS - XXL.
DROPS 217-5 |
|||||||||||||
|
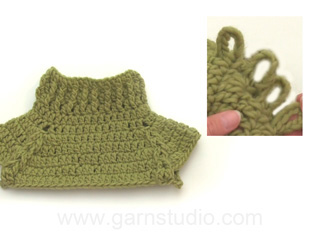
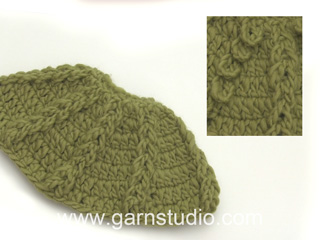
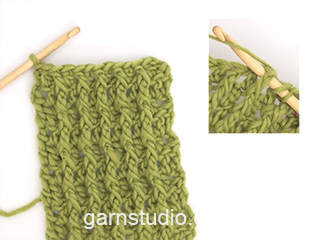
------------------------------------------------------- EXPLANATIONS FOR THE PATTERN: ------------------------------------------------------- CHAIN STITCH: If you work outermost on the hook the chain stitch will often be too tight; 1 chain stitch should be as long as 1 double crochet is wide. CROCHET INFORMATION: At the beginning of each row/round of double crochets work 3 chain stitches; these chain stitches replace the first double crochet, i.e. skip the first double crochet from the previous row/round. The round ends with 1 slip stitch in the 3rd chain stitch at the beginning of the round. PATTERN: See diagrams A.1 and A.2. INCREASE TIP (evenly spaced): To work out how to increase evenly, count the total number of stitches on the row (e.g. 66 stitches) and divide by the number of increases to be made (e.g. 8) = 8.2. In this example, increase by working 2 double crochets in approx. each 8th double crochet. RAGLAN: Increase 2 double crochets by working 3 double crochets in the first and the last double crochet in A.2 (= 4 double crochets increased at each raglan and 16 double crochets increased on the round). DECREASE TIP (for sleeves): Decrease 1 double crochet on each side of the marker thread as follows: Work until there are 4 double crochets left before the marker thread, * make 1 yarn over, insert the hook through the next stitch, pick up the strand, make 1 yarn over and pull it through the first 2 loops on the hook *, work from *-* a total of 2 times, make 1 yarn over and pull it through all 3 loops on the hook (= 1 stitch decreased), work the next 4 double crochets as before (the marker thread sits in the middle of these 4 stitches). Decrease 1 stitch in the same way as before the marker thread. ------------------------------------------------------- START THE PIECE HERE: ------------------------------------------------------- SWEATER – SHORT OVERVIEW OF THE PIECE: The neck and yoke are worked in the round, from mid back and top down. The yoke is divided for body and sleeves, which are finished separately. NECK: Work 66-66-70-72-76-80 chain stitches – read CHAIN STITCH, with hook size 5 mm = US H/8 and 1 strand Sky + 1 strand Kid-Silk (= 2 strands). Form them into a ring with 1 slip stitch in the first chain stitch. Work 1 double crochet in each chain stitch – read CROCHET INFORMATION. Then work A.1 in the round. When A.1 has been completed in height, work a round of double crochets where you increase 8-12-12-12-16-24 double crochets evenly spaced – read INCREASE TIP = 74-78-82-84-92-104 double crochets. Insert a marker at the beginning of the round (= mid-back); the yoke is measured from this marker! YOKE: REMEMBER THE CROCHET GAUGE! Continue as follows: Work 1 double crochet in each of the first 13-14-14-15-16-19 double crochets – remember CROCHET INFORMATION (= half back piece), A.2 over the next 2 double crochets (= raglan), 1 double crochet in each of the next 7-7-9-9-11-11 double crochets (= sleeve), A.2 over the next 2 double crochets (= raglan), 1 double crochet in each of the next 26-28-28-29-31-37 double crochets (= front piece), A.2 over the next 2 double crochets (= raglan), 1 double crochet in each of the next 7-7-9-9-11-11 double crochets (= sleeve), A.2 over the next 2 double crochets (= raglan), 1 double crochet in each of the last 13-14-14-14-15-18 double crochets. Continue this pattern, at the same time as you begin to increase to RAGLAN – read description above, on the next round. Increase like this every round 4-5-5-6-6-6 times, every 2nd round 1-2-3-3-4-5 times and then every 3rd round 3-2-2-2-2-2 times = 202-222-242-260-284-312 stitches. Continue working until the piece measures 20-20-22-23-26-28 cm = 8"-8"-8¾"-9"-10¼"-11" from the marker on the neck. Now work the chain-stitch loops in A.2 together to make loop cables as follows: Insert the hook down the first chain-stitch loop at the top of the neck, from the right side, pull the 2nd chain-stitch loop through the first chain-stitch loop, insert the hook down the 2nd chain-stitch loop and pull the 3rd chain-stitch loop through the 2nd chain-stitch loop. Continue like this until all the chain-stitch loops have been worked together. Repeat on all A.2 sections on the round. You can thread a strand through the last chain-stitch loop if necessary, to prevent the cable from ravelling. On next round work as explained below. The chain-stitch loops in A.2 are not counted in the stitch numbers and work 1 single crochet around the last chain-stitch loop in each A.2 to prevent the cable form ravelling (then skip this single crochet; it is not counted in the stitch number onwards either): Work pattern as before over the first 30-33-35-38-41-46 stitches and work at the same time 1 double crochet around the last chain-stitch loop in the loop cable, work 6-6-8-8-10-10 loose chain stitches (= in side under sleeve), skip the next 41-45-51-55-61-65 double crochets (= sleeve), work double crochets as before over the next 60-66-70-75-81-91 stitches and work at the same time 1 single crochet around the last chain-stitch loop in each loop cable (= front piece), work 6-6-8-8-10-10 loose chain stitches (= in side under sleeve), skip the next 41-45-51-55-61-65 double crochets (= sleeve), work double crochets as before over the remaining 30-33-35-37-40-45 double crochets and work at the same time 1 single crochet around the last chain-stitch loop in the loop cable. Cut the strand. Body and sleeves are finished separately. BODY: = 132-144-156-166-182-202 double crochets. Insert a marker in the middle of the 6-6-8-8-10-10 stitches cast on under one of the sleeves. Fasten the strand with 1 slip stitch in the chain stitch after the marker and work 3 chain stitches (= 1 double crochet) – remember CROCHET INFORMATION. Work double crochets in the round. until the body measures 24-26-26-27-26-26 cm = 9½"-10¼"-10¼"-10⅝"-10¼"-10¼" from the division. Now work an edge as follows: Work A.1 the whole round. When A.1 has been completed in height, repeat the last row in the diagram until the edge measures 5 cm = 2". Cut and fasten the strand. The sweater measures approx. 52-54-56-58-60-62 cm = 20½"-21¼"-22"-22¾"-23⅝"-24⅜" from the shoulder down. SLEEVE: Insert a marker thread in the middle of the 6-6-8-8-10-10 chain stitches under the sleeve (= beginning of the round). Allow the thread to follow your work onwards. Fasten the strand with 1 slip stitch in the stitch after the marker thread and work 3 chain stitches (= 1 double crochet) – remember CROCHET INFORMATION, then work 1 double crochet in each of the next 2-2-3-3-4-4 chain stitches, 1 double crochet around the next double crochet (= in the corner between the chain stitches and the skipped double crochets), work 1 double crochet in each of these 41-45-51-55-61-65 double crochets, 1 double crochet around the next double crochet (= in the corner between the chain stitches and the skipped double crochets), work 1 double crochet in each of the last 3-3-4-4-5-5 chain stitches = 49-53-61-65-73-77 double crochets. Continue in the round with 1 double crochet in each double crochet. When the sleeve measures 3 cm = 1⅛" from the division, start to decrease under the sleeve – read DECREASE TIP. Decrease like this every round 1-1-2-6-10-11 times and then every 2nd round 4-5-7-5-4-4 times = 39-41-43-43-45-47 stitches. Continue working until the sleeve measures 36-37-35-35-32-30 cm = 14¼"-14½"-13¾"-13¾"-12½"-11¾" from the division. Work 1 round where you increase 1 stitch by working 2 stitches in the last stitch on the round = 40-42-44-44-46-48 stitches. Now work an edge as follows: Work A.1 the whole round. When the diagram has been completed in height, repeat the last row in the diagram until the edge measures 5 cm = 2". Cut and fasten the strand. Work the other sleeve in the same way. |
|||||||||||||
Diagram explanations |
|||||||||||||
|
|||||||||||||

|
|||||||||||||
|
Have you made this or any other of our designs? Tag your pictures in social media with #dropsdesign so we can see them! Do you need help with this pattern?You'll find tutorial videos, a Comments/Questions area and more by visiting the pattern on garnstudio.com. © 1982-2024 DROPS Design A/S. We reserve all rights. This document, including all its sub-sections, has copyrights. Read more about what you can do with our patterns at the bottom of each pattern on our site. |
|||||||||||||


With over 40 years in knitting and crochet design, DROPS Design offers one of the most extensive collections of free patterns on the internet - translated to 17 languages. As of today we count 304 catalogs and 11422 patterns - 11417 of which are translated into English (US/in).
We work hard to bring you the best knitting and crochet have to offer, inspiration and advice as well as great quality yarns at incredible prices! Would you like to use our patterns for other than personal use? You can read what you are allowed to do in the Copyright text at the bottom of all our patterns. Happy crafting!
Comments / Questions (34)
Je ne comprends pas de quelle façon on doit faire les augmentations pour le raglan. Que veut-on dire par (pour la grandeur large): « augmenter 6 fois tous les tours, deux fois tour, 2 fois tous les 3 tours= 260 mailles. Continuer jusqu'à ce que l'ouvrage mesure 23 cm depuis le marqueur du col. »
24.03.2024 - 23:45Ik wil deze trui graag haken. Echter, ik kan de telpatronen niet vinden. Zou u de telpatronen a.u.b. willen delen? Hartelijk dank alvast.
23.01.2024 - 19:02DROPS Design answered:
Dag Lies,
Hier vind je de link naar het Nederlandstalige patroon.
Al onze patronen zijn gratis af te drukken via de knop 'Afdrukken' onder de materialenlijst. Klik op de knop 'Afdrukken' en dan op 'Patroon'. In het pop-up venster dat vervolgens in beeld komt klik je rechts boven op de link 'Het patroon afdrukken'.
24.01.2024 - 09:31Jeg sliter med å forstå begynnelsen av ermet. Jeg hekler i størrelse XS, og skal da ha 6 luftmasker mellom den siste luftmaskeløkken. Hvordan går det opp hvis jeg skal hekle 2 staver, om neste stav, og så «de 3 siste luftmaskene» hvis merketråden er plassert i midten av de 6 luftmaskene?
04.12.2023 - 11:08DROPS Design answered:
Hei Gina. Husk å lese HEKLEINFORMASJON, altså du starter med 3 luftmasker (=1 stav), deretter hekles det 1 stav i hver av de neste 2 luftmaskene = 3 staver. Så hekles det det staver rundt ermet og det avsluttes med 1 stav i hver av de 3 siste luftmaskene. Du har da 3 staver på hver side av merketråden under ermet. mvh DROPS Design
11.12.2023 - 07:38Bonjour je suis sur le modèle Ston Fence taille M que j'essaie d'adapter à un autre fil et une autre taille de crochet. Je rencontre un problème avec les mesures de l'encolure qui selon moi ne permettent pas d'y passer la tête (17x2) + (4x2) + (3x2) cela donne 48 cm au total. Selon mon échantillon je dois avoir 18 brides pour 10 cm . J'ai donc débuté sur 86 ms mais c'est trop petit comme encolure alors que sur le photo l'encolure est bien plus large. Merci pour votre aide
09.10.2023 - 14:25DROPS Design answered:
Bonjour Hélène, nous ne sommes pas en mesure de pouvoir ajuster chacun de nos modèles à chaque tension individuelle - avec l'échantillon indiqué, vous devez avoir environ 48 cm de circonférence pour le col en taille S et M, si votre chaînette de base est trop serrée, la tête ne passera pas, essayez de la crocheter avec un crochet plus gros ou bien avec le fil en double, technique qui peut servir aussi. Pour toute assistance personnalisée à votre propre tension, merci de bien vouloir vous rapprocher du magasin où vous avez acheté votre laine, merci pour votre compréhension. Bon crochet!
09.10.2023 - 16:19Hei, jeg lurte på når det står at jeg skal hekle videre på bæresykket til 23 cm i str L, skal man da hekle videre med antall masker man har eller skal man øke antallet masker da også?
16.09.2023 - 10:46DROPS Design answered:
Hei Helene. Dersom du er ferdig med alle økningene som er forklart foran, skal du da bare hekle (uten økninger) til arbeidet måler 23 cm fra merket. mvh DROPS Design
18.09.2023 - 14:11Hoe werkt de raglan meerdering voor maat S? Ik kom er niet uit
13.09.2023 - 17:00DROPS Design answered:
Dag Lisanne,
Voor maat S meerder je iedere toer 4 keer en daarna iedere 2e toer 1 keer, vervolgens iedere 3e toer 3 keer. Daarna ben je klaar met de raglanmeerderingen en haak je de pas verder tot het werk 20 cm meet.
13.09.2023 - 20:11I love drops design yarns. I find the patterns extremely difficult to follow
01.03.2023 - 15:34Jeg strever med å forstå oppskriften når den beskriver hvordan jeg skal øke på omgangene med raglan. Hekler i str L. Under RAGLAN står det at jeg skal øke med to masker i hver raglan, og litt lenger ned står det at jeg skal gjøre det på hver omgang 6 ganger, men at det hver andre og tredje omgang skal økes 3 og 2 ganger? Hvordan går dette opp?
19.01.2023 - 22:07DROPS Design answered:
Hei Thea, Dette betyr at du øker på samme måten (2 masker hver side av hver raglan, 16 masker økte på omgangen) første hver omgang, så hver annen omgang x 3 (med en omgang uten økning mellom hver økeomgang; hekler 6 omganger) og til slutt hver tredje omgang x 2 (med 2 omganger uten økning mellom hver økeomgang; hekler 6 omganger her også). Håper dette hjelper og god fornøyelse!
22.01.2023 - 12:41I can't find the charts where are they ?
16.10.2022 - 05:29DROPS Design answered:
Dear Susanna, charts A.2 and A.1 can be found under the measurement schematic's sleeve, after the pattern's written instructions. Happy crocheting!
17.10.2022 - 00:00Bonjour, Je crochète le modèle Stone Fence sk-108 je viens de terminer les augmentations mais malheureusement je trouve au total 245 mailles au lieu de 242 ! Pouvez-vous me guider ? Merci.
11.10.2022 - 11:13DROPS Design answered:
Bonjour Janick, en taille M vous augmentez 5 + 3 + 2 fois 16 mailles au total soit 160 mailles au total, vous aviez 82 brides, 82+160=242 mailles. Bon crochet!
11.10.2022 - 13:11