
Categorie popolari
State cercando un filato?


Commenti / Domande (18)
![]() Wilhelmina Boustead ha scritto:
Wilhelmina Boustead ha scritto:
While the pattern is the one I've been looking for, I find the chart very difficult to read. Could you please post the pattern in a written form. From snowy ontario, thank you
07.02.2025 - 15:08DROPS Design ha risposto:
Dear Mrs Boustead, we only have diagrams for this pattern, but this lesson might help you understanding how to read crochet diagrams. Happy crocheting!
07.02.2025 - 16:04
![]() Malin ha scritto:
Malin ha scritto:
Hej Jag håller precis på med sista varvet av A.2a-A.3a-A.4a-A.3a-A.5a. Ska jag öka fler gånger på detta varvet än de ökningar som är markerade? Eller hur får jag fram 59 stolpar? Är det längs ena sidan eller från ökning höger till ökning vänster? Väldigt svårt att förstå detta. Ska jag repetera A.2a ännu en gång med ökningen?
11.04.2024 - 17:23DROPS Design ha risposto:
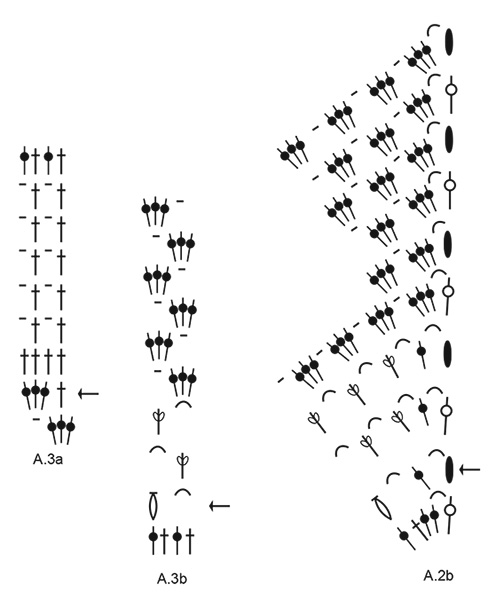
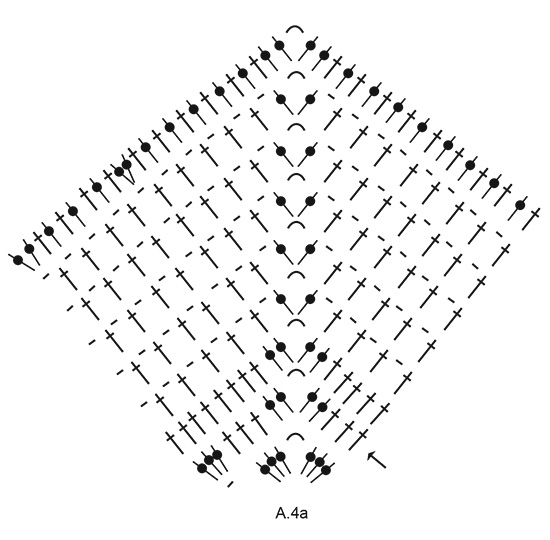
Hei Malin. Når A.1 er ferdig heklet har du 36 staver (stolpar) / 12 stavgrupper og nå skal A.2a, A.3a, A.4a, A.3a, A:5a hekles. Når dun har heklet diagrammene 1 gang i høyden har du: A.2a (= 24 staver) + A.3a ((x4)= 16 staver) +A.4a 19 staver før midt foran + 24 staver etter midt foran) +A.3a ((x4) = 16 staver) + A.5a(=19 staver) ferdig i høyden skal du ha 118 staver på raden. Skrevet med tall: 24+16+19 = 59 masker før midt foran OG 24+16+19 = 59 masker etter midt foran. mvh DROPS Design
15.04.2024 - 13:01
![]() Christine SANCHEZ BARBER ha scritto:
Christine SANCHEZ BARBER ha scritto:
Bonjour, existe-t-il des explications écrites ou vidéo, car j'ai un problème de compréhension des schémas seuls. Avec tous mes remerciements. Cordialement.
17.09.2022 - 18:23DROPS Design ha risposto:
Bonjour Mme Sanchez-Barber, nous n'avons que des diagrammes pour ce modèle, peut-être que cette leçon peut vous aider, sinon n'hésitez pas à nous indiquer à quel niveau vous coincez. Bon crochet!
19.09.2022 - 09:47
![]() Karolina ha scritto:
Karolina ha scritto:
Hello I would like to ask you if you would mind if the pattern was written out by me using the international signs used in crochet patterns? Obviously no changes have been made, it is just an easier to read version. On a crochet group on FB that I belong to, we would like to crochet Calm Shores together however the graphic scheme and description is quite complicated in places. Using more accessible graphic signs, would allow a larger audience to crochet your shawl. Thank you in advance
18.08.2022 - 22:53
![]() Gudrun Ebeling ha scritto:
Gudrun Ebeling ha scritto:
Hallo.ich versuche die häkelschrift zu Modell 211-21 zu lesen und komm nicht klar.bei A.1 ist der luftmaschenkreis und soll von da an nach links gehäkelt werden. Aber fängt denn das Tuch nicht an der Spitze an? Also mit 4luftmaschen im Kreis in den ich drei stäbchen 4luftmaschenen ,1Stäbchen häkele.Dann wenden.Also von unten nach oben lesen?
08.03.2022 - 15:35DROPS Design ha risposto:
Liebe Frau Ebeling, beginnen Sie mit der Luftmaschenring, dann (siehe Pfeil und lesen Sie rechts nach links), 4 Luftmaschen und dann: 4 Luftmaschen, 3 Stb, 4 Lufmtaschen, 3 Stb, 4 Luftmaschen, 1 Doppelstäbchen um Ring; bei der 2. Reihe lesen Sie links nach rechts, und so weiterhäkeln. Viel Spaß beim häkeln!
08.03.2022 - 22:13
![]() ZP ha scritto:
ZP ha scritto:
I love so many of your designs, but your instructions are so confusing. If your designers could provide complete written instruction as well as their nicely drawn charts it would probably make a lot of people happy. I would be happy to pay for the,.
04.02.2022 - 00:05
![]() Karen ha scritto:
Karen ha scritto:
Thank you for the link to instructions, but after reading them, I am even more confused than before. I haven't the faintest clue how this new crochet language works. I have given up on this. Please put warnings on the front page of your crochet patterns so people don't waste money on yarn they can't use.
13.10.2021 - 00:17
![]() Karen ha scritto:
Karen ha scritto:
This is a lovely pattern and was looking forward to making the shawl. I thought it would be reasonably straightforward and I bought the yarn. Very disappointed now as I am completely baffled by the pattern drawings. I am an experienced crocheter, but the pattern drawing makes as much sense to me as a technical drawing to build a rocket. Is there perhaps a case for having written crochet instructions in Drops patterns, so those not literate in these patterns could also make the garments?
12.10.2021 - 00:11DROPS Design ha risposto:
Dear Karen, there are only diagrams to this pattern, but this lesson should be able to help you to understand how to work/follow the diagrams. Hope this can help, happy crocheting!
12.10.2021 - 08:56
![]() Lola ha scritto:
Lola ha scritto:
Buenas tardes, ¿Cómo puedo descargar el patron?
04.10.2021 - 16:40DROPS Design ha risposto:
Hola Lola, en la pagina del patron tienes una opcion IMPRIMIR el patron. Buen trabajo!
04.10.2021 - 16:49
![]() Christine Tremblay ha scritto:
Christine Tremblay ha scritto:
Dans le modèle DROPS211-21, on parle de rayures. Est ce que vous entendez par ce terme le changement de couleur? Le châle se tricote t-il en une fois ou plusieurs morceaux de diagrammes à joindre à la fin. Je ne comprends pas comment continuer de A.1 à A.2a et suis-je encore dans la rayure 1? J’espère vraiment que vous pourrez m’aider. Merci
25.09.2020 - 17:08DROPS Design ha risposto:
Bonjour Mme Tremblay, les rayures s'entendent en changement de couleur - cf RAYURES au début des explications. Ce châle se tricote en une seule partie, de bas en haut, on va crocheter les diagrammes comme indiqué (plus d'infos sur les diagrammes ici) et augmenter de chaque côté et au milieu pour obtenir le triangle à la taille souhaitée. Bon crochet!
28.09.2020 - 07:47
|
|||||||||||||||||||||||||||||||
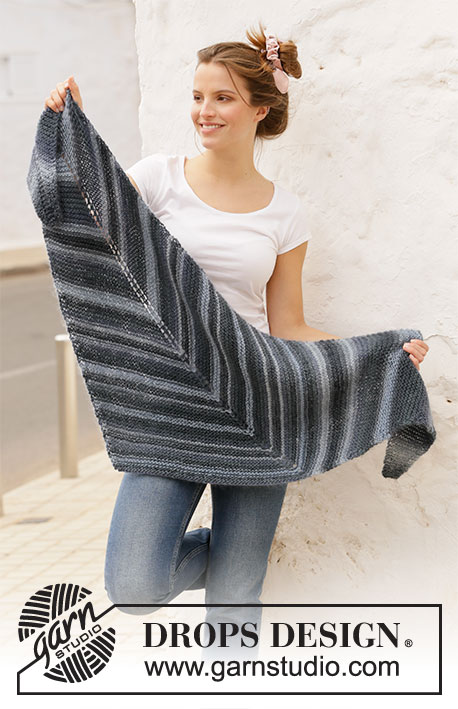
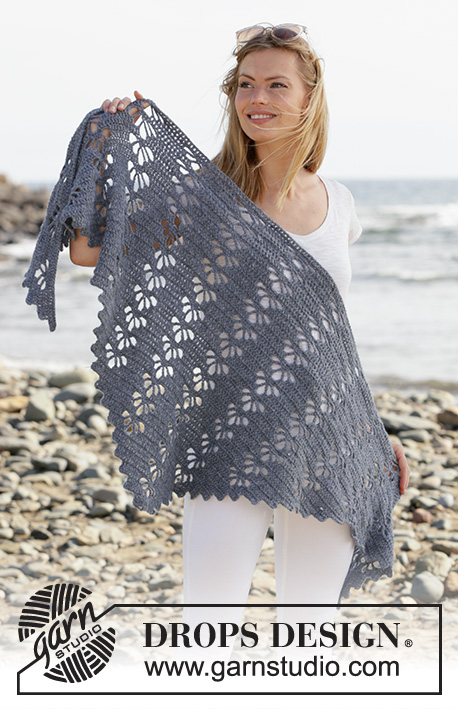
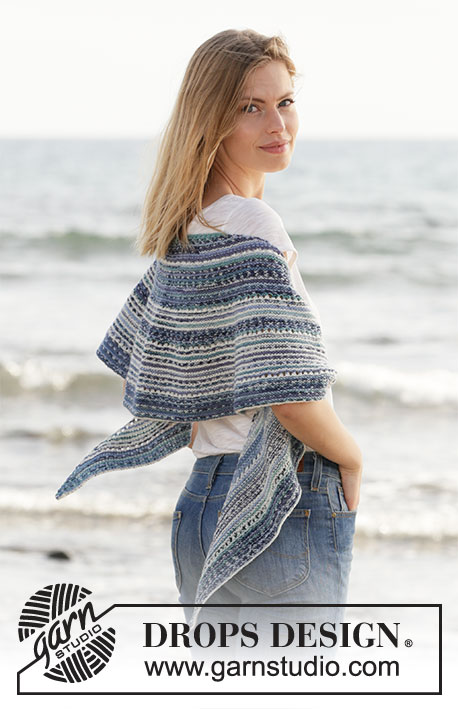
Calm Shores#calmshoresshawl |
|||||||||||||||||||||||||||||||
 |
 |
||||||||||||||||||||||||||||||
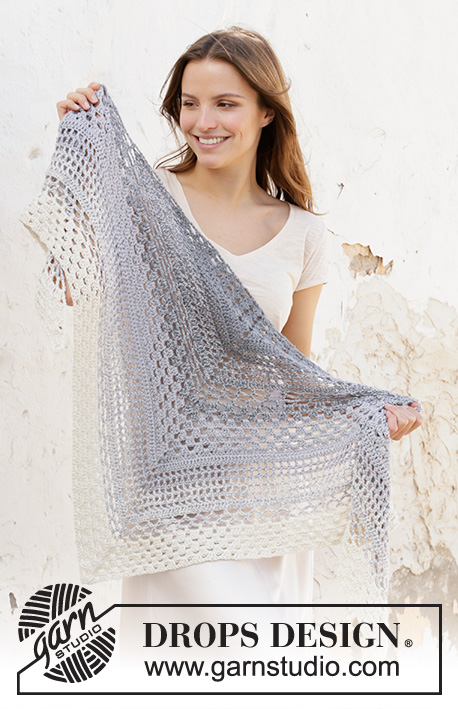
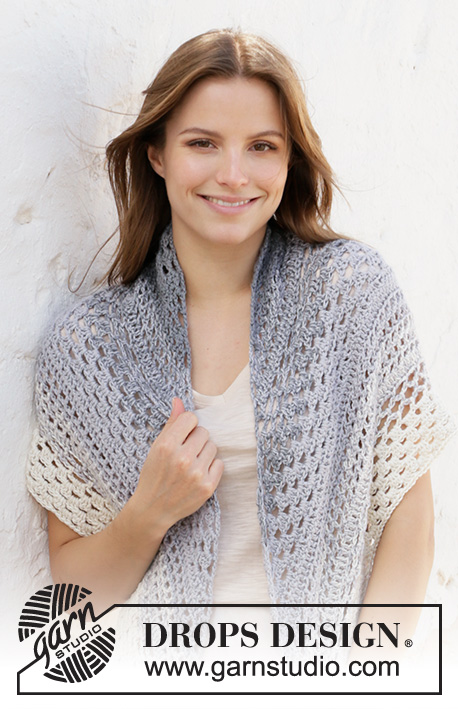
Scialle all’uncinetto lavorato con 2 capi del filato DROPS BabyAlpaca Silk. Lavorato con un motivo traforato e a strisce
DROPS 211-21 |
|||||||||||||||||||||||||||||||
|
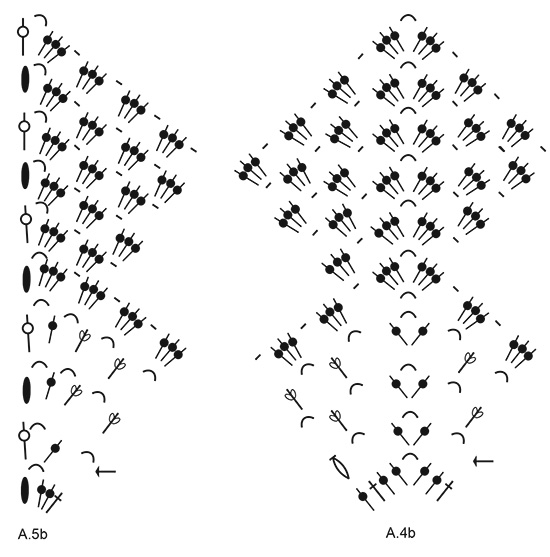
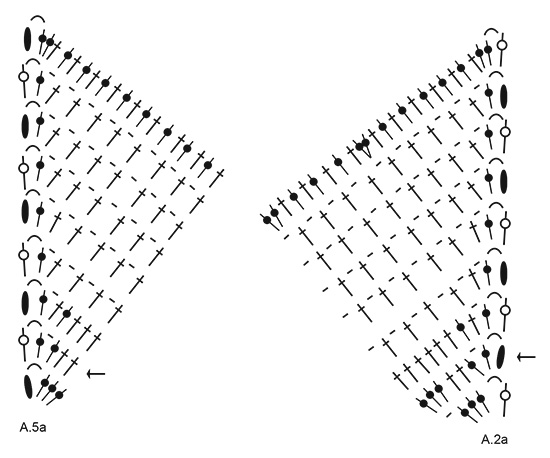
------------------------------------------------------- TECNICHE IMPIEGATE: ------------------------------------------------------- MOTIVO: Vedere i diagrammi da A.1 a A.5. CATENELLE: Se si lavora solo sulla punta dell’uncinetto, la catenella sarà troppo stretta. 1 catenella deve essere lunga come la larghezza di una mezza maglia alta/di una maglia alta / di una maglia bassa. STRISCE: ATTENZIONE: Le strisce sono misurate nella direzione del lavoro, tra l’aumento su un lato e quello al centro dello scialle. Sia che il motivo sia terminato o meno in altezza, le strisce devono avere le seguenti misure: STRISCIA 1: 12 cm con 2 capi del colore grigio medio. STRISCIA 2: 11 cm con 1 capo del colore grigio medio e 1 capo del colore grigio chiaro. STRISCIA 3: 9 cm con 2 capi del colore grigio chiaro. STRISCIA 4: 8 cm con 1 capo del colore grigio chiaro e 1 capo del colore panna. STRISCIA 5: Lavorare con 2 capi del colore panna fino alla fine del lavoro (= circa 7 cm). ------------------------------------------------------- IL LAVORO INIZIA QUI: ------------------------------------------------------- SCIALLE – BREVI INDICAZIONI PER IL LAVORO: Si lavora avanti e indietro con un motivo traforato e a strisce. SCIALLE: Con l’uncinetto n° 5 e 2 capi del colore grigio medio, avviare 5 catenelle; formare un anello con 1 maglia bassissima nella prima catenella – vedere CATENELLE. Lavorare le STRISCE – vedere la spiegazione sopra, e il diagramma A.1 avanti e indietro. Dopo aver lavorato il diagramma A.1 1 volta in verticale, ripetere ancora 1 volta le ultime 2 righe in verticale = 6 righe; ci sono in tutto 12 gruppi di maglie alte sull’ultima riga. RICORDARSI DI MANTENERE LA CORRETTA TENSIONE DEL LAVORO! Lavorare ora come segue: diagramma A.2a (= aumento sul lato), ripetere il diagramma A.3a in tutto 4 volte in larghezza, diagramma A.4a (= aumento al centro), ripetere il diagramma A.3a in tutto 4 volte in larghezza, diagramma A.5a (= aumento sul lato). Proseguire avanti e indietro in questo modo finché i diagrammi da A.2a a A.5a non sono stati completati in verticale. Ci sono ora 59 maglie alte da ciascun lato dell’aumento al centro (non contare le 4 catenelle all’inizio della riga e la maglia alta doppia alla fine della riga). Lavorare ora come segue: diagramma A.2b (= aumento sul lato), ripetere il diagramma A.3b in tutto 13 volte in larghezza, diagramma A.4b (= aumento al centro), ripetere il diagramma A.3b in tutto 13 volte in larghezza, diagramma A.5b (= aumento sul lato). Dopo aver completato i diagrammi in verticale, ripetere il motivo a partire dalla freccia nei diagrammi A.2a, A.3a, A.4a e A.5a come indicato prima (lavorare tante ripetizioni del diagramma A.3a quante possibili tra i diagrammi con gli aumenti – vale a dire quelli ai lati e al centro). Lavorare poi il motivo a partire dalla freccia nei diagrammi A.2b, A.3b, A.4b, A.5b come prima (lavorare tante ripetizioni del diagramma A.3b quante possibili tra i diagrammi con gli aumenti). Proseguire in questo modo finché non sono state completate le strisce e il lavoro non misura circa 47 cm nella direzione del lavoro (= circa 67 cm lungo l’aumento al centro) – o fino alla lunghezza desiderata. Tagliare e fermare i fili. |
|||||||||||||||||||||||||||||||
Spiegazioni del diagramma |
|||||||||||||||||||||||||||||||
|
|||||||||||||||||||||||||||||||

|
|||||||||||||||||||||||||||||||
|
|||||||||||||||||||||||||||||||
|
|||||||||||||||||||||||||||||||
|
|||||||||||||||||||||||||||||||
|
|||||||||||||||||||||||||||||||
Avete terminato questo modello?Allora taggate le vostre foto con #dropspattern #calmshoresshawl o inviatele alla #dropsfan gallery. Avete bisogno di aiuto con questo modello?Troverete 7 video tutorial, una sezione per i commenti/domande e molto altro guardando il modello su www.garnstudio.com © 1982-2025 DROPS Design A/S. Ci riserviamo tutti i diritti. Questo documento, compreso tutte le sue sotto-sezioni, è protetto dalle leggi sul copyright. Potete leggere quello che potete fare con i nostri modelli alla fine di ogni modello sul nostro sito. |
|||||||||||||||||||||||||||||||


Con oltre 40 anni di esperienza nel design di modelli di maglia e uncinetto, DROPS Design offre la più estesa collezione di modelli gratuiti su internet - tradotti in 17 lingue. Ad oggi vi possiamo fornire 314 cataloghi e 11821 modelli - 9093 dei quali sono tradotti in Italiano.
Ci stiamo impegnando molto per darvi il meglio che vi possiamo offrire in termini di maglia e uncinetto, ispirazioni e consigli così come filati di grande qualità ad un prezzo incredibile! Volete utilizzare i nostri modelli per qualcosa d'altro oltre al vostro uso personale? Potete leggere tutto ciò che è consentito nel testo sul Copyright in basso su tutte le pagine dei nostri modelli. Buon lavoro!
Lasciare un commento sul modello DROPS 211-21
Noi saremmo felici di ricevere i tuoi commenti e opinioni su questo modello!
Se vuoi fare una domanda, fai per favore attenzione a selezionare la categoria corretta nella casella qui sotto per velocizzare il processo di risposta. I campi richiesti sono indicati da *.