
Popular categories
Looking for a yarn?


|
||||||||||
Simply Confident |
||||||||||
 |
 |
|||||||||
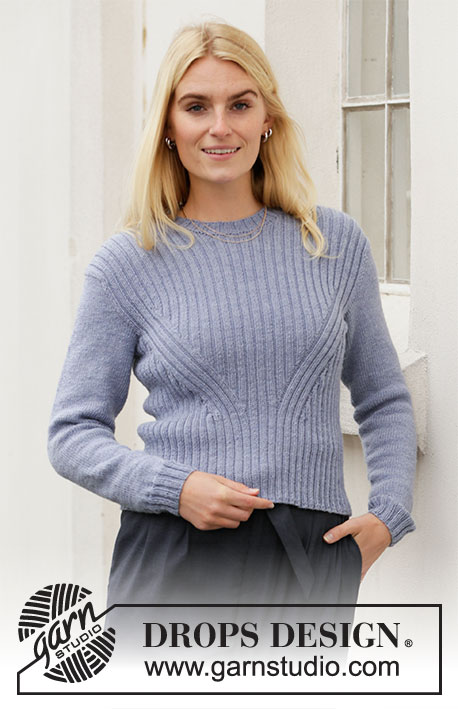
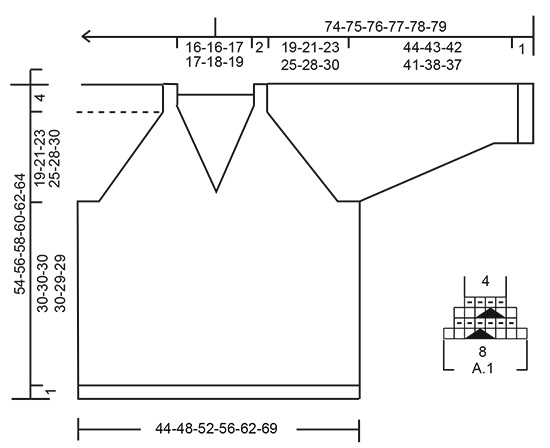
Knitted sweater with raglan and v-neck in DROPS Lace and DROPS Kid-Silk or DROPS Sky. The piece is worked top down. Sizes S - XXXL.
DROPS 205-14 |
||||||||||
|
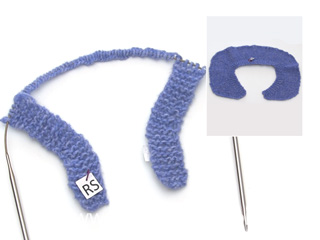
------------------------------------------------------- EXPLANATIONS FOR THE PATTERN: ------------------------------------------------------- RIDGE/GARTER STITCH (worked in the round): 1 ridge in height = 2 rounds; Knit 1 round and purl 1 round. RIDGE/GARTER STITCH (worked back and forth): Knit all rows. 1 ridge in height = Knit 2 rows. PATTERN: See diagram A.1. The diagram shows all rows in the pattern seen from the right side. SHORT ROWS-1 (for right neck-edge): Start from the right side and work as follows: * 1 ridge back and forth over the first 3 stitches, 1 ridge back and forth over all 4 stitches *, work from *-* a total of 3 times. SHORT ROWS-2 (for left neck-edge): Start from the wrong side and work as follows: * 1 ridge back and forth over the first 3 stitches, 1 ridge back and forth over all 4 stitches *, work from *-* a total of 3 times, then knit 1 row from the wrong side over all 4 stitches. RAGLAN: All increases are worked from the right side! Increase to raglan on each side of the marker thread as follows: Work until there is 1 stitch left before marker thread, 1 yarn over, knit 1 (marker thread sits here), knit 1, 1 yarn over (= 2 stitches increased). Increase like this at all the other marker threads (8 stitches increased on the round). On the next row/round work the yarn overs twisted to avoid holes. Then work the new stitches in stockinette stitch. V-NECK: All increases are worked from the right side! Increase 1 stitch inside the 4 stitches in garter stitch on each side of the piece by making 1 yarn over. On the next row purl the yarn overs twisted to avoid holes. Then work the new stitches in stockinette stitch. DECREASE TIP (for sleeves): Decrease 1 stitch on each side of the marker thread as follows: Work until there are 3 stitches left before the marker thread, knit 2 together, knit 2 (marker thread sits between these 2 stitches), slip 1 stitch as if to knit, knit 1 and pass the slipped stitch over the knitted stitch. ------------------------------------------------------- START THE PIECE HERE: ------------------------------------------------------- SWEATER – SHORT OVERVIEW OF THE PIECE: You first work 2 loose neck-edges. These are then placed on the circular needle and stitches are cast on for the neck as described in the text (the neck-edges are sewn together mid back and sewn onto the neck later). Then the yoke is worked back and forth from mid front and top down. AT THE SAME TIME, you increase stitches for v-neck and raglan. When the increases to v-neck are finished the piece is continued in the round. The sleeves are worked in the round with double pointed needles/short circular needle, top down. NECK-EDGES: Cast on 4 stitches with needle size 3.5 mm = US 4 and Lace + Kid-Silk (= 2 strands) or 1 strand Sky and work GARTER STITCH back and forth – read description above (row 1 = right side). When the neck edge measures 6-6-6½-6½-7-7½ cm = 2⅜"-2⅜"-2½"-2½"-2¾"-2⅞", work SHORT ROWS-1 – read description above. When the short rows are finished, work garter stitch back and forth over all 4 stitches for 6 cm = 2⅜" in all sizes; finish with a row from the wrong side (right neck-edge now measures 14-14-14½-14½-15-15½ cm = 5½"-5½"-5¾"-5¾"-6"-6⅛" in length on the inside where it is shortest). Cut the strand and lay the piece to one side. Work left neck-edge in the same way, but when it measures 6-6-6½-6½-7-7½ cm = 2⅜"-2⅜"-2½"-2½"-2¾"-2⅞", work SHORT ROWS-2 – read description above. When the short rows are finished, work garter stitch back and forth over all 4 stitches for 6 cm = 2⅜" in all sizes; finish with a row from the right side (left neck-edge now measures 14-14-14½-14½-15-15½ cm = 5½"-5½"-5¾"-5¾"-6"-6⅛" in length on the inside where it is shortest). Place the stitches on circular needle size 4 mm = US 6 (do not cut the strand) and cast on 66-66-68-68-70-72 stitches with the same circular needle (straight after the left neck edge) then knit the 4 stitches from the right neck edge = 74-74-76-76-78-80 stitches on the needle. Work the next row from the wrong side as follows: 4 stitches in garter stitch, work 2 stitches in the next stitch (= 1 stitch increased), purl until there are 5 stitches left on row, work 2 stitches in the next stitch (= 1 stitch increased) and work 4 stitches in garter stitch = 76-76-78-78-80-82 stitches. Insert a marker in the middle of the 4 neck-edge stitches on one side. THE PIECE IS NOW MEASURED FROM HERE! Now work the yoke as described below. YOKE: Insert 1 marker thread in each transition between body and sleeves (= 4 marker threads) as follows: Insert 1 marker thread 5 stitches in from each side, i.e., after 4 stitches in garter stitch + 1 knitted stitch (= transition between front pieces and sleeves), insert the next 2 marker threads after 16 new stitches on each side (= transition between sleeves and back piece). There are 34-34-36-36-38-40 stitches between the last 2 marker threads (= back piece). Work stockinette stitch with 4 stitches in garter stitch on each side towards the v-neck mid front. AT THE SAME TIME increase to raglan and v-neck as follows: REMEMBER THE KNITTING GAUGE! RAGLAN: On the first row from the right side start to increase to RAGLAN – read description above. Increase to raglan every 2nd row a total of 24-28-31-34-36-38 times. V-NECK: On row 3 start to increase to V-NECK – read description above. Increase like this every 4th row 4-5-6-7-8-8 times, then every 2nd row 10-9-9-8-8-9 times (= a total of 14-14-15-15-16-17 stitches increased for the v-neck on each side). When all increases to v-neck are finished, cut the yarn. Insert a marker on mid back. This is now the beginning of the round. Continue working in the round from right side; over the 8 stitches in garter stitch work pattern A.1. When A.1 has been completed in height 4 stitches have been decreased in the diagram. When all the increases to raglan (+ the 4 decreases in A.1) are finished there are 292-324-352-376-396-416 stitches on the round. Now continue with stockinette stitch until the piece measures 19-21-23-25-28-30 cm = 7½"-8¼"-9"-9¾"-11"-11¾" from the marker. Finish the round mid back. The next round is worked as follows: NOTE: The piece is divided for body and sleeves and 1-1-1-2-4-6 stitches from each side of each sleeve are worked into the body; the transitions between body and sleeves are no longer at the marker threads: Work the first 42-46-50-54-59-64 stitches (= half back piece), place the next 62-70-76-80-80-80 stitches on a thread for sleeve and cast on 8-8-10-10-12-16 new stitches on the needle (= in side under sleeve), work the next 84-92-100-108-118-128 stitches (= front piece), place the next 62-70-76-80-80-80 stitches on a thread for sleeve and cast on 8-8-10-10-12-16 new stitches on the needle (= in side under sleeve), work the remaining 42-46-50-54-59-64 stitches (= half back piece). Body and sleeves are finished separately. THE PIECE IS NOW MEASURED FROM HERE! BODY: = 184-200-220-236-260-288 stitches. Work stockinette stitch in the round with circular needle size 4 mm = US 6. When the piece measures 30-30-30-30-29-29 cm = 11¾"-11¾"-11¾"-11¾"-11⅜"-11⅜" change to circular needle size 3.5 mm = US 4. Work 2 ridges. Bind off. The sweater measures approx. 54-56-58-60-62-64 cm = 21¼"-22"-22¾"-23⅝"-24⅜"-25¼" from the shoulder down. SLEEVE: Place the 62-70-76-80-80-80 stitches from the thread on the one side of the piece on short circular needle/double pointed needles size 4 mm = US 6 and knit up 1 stitch in each of the 8-8-10-10-12-16 stitches cast on under the sleeve = 70-78-86-90-92-96 stitches. Insert a marker thread in the middle of the new stitches (= 4-4-5-5-6-8 new stitches on each side). Work stockinette stitch in the round. When the sleeve measures 4 cm = 1½" decrease 2 stitches under the sleeve – read DECREASE TIP. Decrease like this every 3½-2½-2-2-1½-1½ cm = 1¼"-1"-¾"-¾"-½"-½" a total of 10-13-16-17-17-18 times = 50-52-54-56-58-60 stitches. When the sleeve measures 44-43-42-41-38-37 cm = 17¼"-17"-16½"-16⅛"-15"-14½" change to double pointed needles size 3.5 mm = US 4 and work 2 ridges. Bind off. The sleeve measures approx. 45-44-43-42-39-38 cm = 17¾"-17¼"-17"-16½"-15¼"-15". Work the other sleeve in the same way. ASSEMBLY: Sew the neck-edges together mid back with the seam on wrong side. Stretch the neck-edge slightly and sew to the neck at the back. |
||||||||||
Diagram explanations |
||||||||||
|
||||||||||
|
||||||||||
|
Have you made this or any other of our designs? Tag your pictures in social media with #dropsdesign so we can see them! Do you need help with this pattern?You'll find tutorial videos, a Comments/Questions area and more by visiting the pattern on garnstudio.com. © 1982-2024 DROPS Design A/S. We reserve all rights. This document, including all its sub-sections, has copyrights. Read more about what you can do with our patterns at the bottom of each pattern on our site. |
||||||||||


With over 40 years in knitting and crochet design, DROPS Design offers one of the most extensive collections of free patterns on the internet - translated to 17 languages. As of today we count 304 catalogs and 11422 patterns - 11417 of which are translated into English (US/in).
We work hard to bring you the best knitting and crochet have to offer, inspiration and advice as well as great quality yarns at incredible prices! Would you like to use our patterns for other than personal use? You can read what you are allowed to do in the Copyright text at the bottom of all our patterns. Happy crafting!
Comments / Questions (68)
This raglan does not come symmetrical.
09.12.2019 - 16:11Bonjour très contente de mon projet et de mes progrès vous indiquez de commencer les diminutions manche quand celle ci fait 4 cms mais ou dois je mesurer ces 4 cms ? sous la manche ? merci par avance
24.11.2019 - 23:03DROPS Design answered:
Bonjour Karima, vous mesurez depuis la fin de l'empiècement (où il est indiqué MESURER DÉSORMAIS L'OUVRAGE À PARTIR D'ICI!), c'est-à-dire à partir du premier rang de la manche, mais bien dans le sens du tricot (le long des mailles) pour que la longueur finale soit juste. Bon tricot!
25.11.2019 - 10:39Bonjour! J'ai tricoté les 2 bordures au point mousse. Quand je les mets sur l'aiguille circulaire avec les 66 mailles supplémentaires, est ce qu'elles tournent vers l'intérieur ( < ---------->) ou vers l'extérieur ( > --------
13.11.2019 - 23:51DROPS Design answered:
Bonjour Béatrice, l'arrondi des rangs raccourcis de chacune des bordures doit se trouver sous les mailles montées pour l'encolure - placez bien un marqueur sur l'endroit de chacune des bordures d'encolure pour mieux vous repérer. Bon tricot!
14.11.2019 - 10:07Bonjour Merci pour toutes vos réponses à mes questions précédentes ,j'ai bien progressé . Je suis bloquée au moment de la mise en attente des mailles pour les manches . Vous indiquez :Tricotez les mailles du demi dos , Mettre en attente les mailles de la manche et monter 8 mailles ( = côté , sous la manche ) Je les monte sur l'aiguille gauche coté demi devant alors ? merci de votre aide précieuse
13.11.2019 - 11:39DROPS Design answered:
Bonjour Karima, vous allez mettre les mailles des manches en attente et monter vos mailles sous la manche comme au time code 07:00 de cette vidéo = sur l'aiguille droite, puis tricoter les mailles du devant et répéter pour la 2ème manche. La vidéo montre un pull différent mais la technique des manches sera la même ici. Bon tricot!
13.11.2019 - 12:15Hi, it is not very clear at all which way the initial neck edges should face when putting them on the circular needle. As it is very hard for me to follow right and wrong sides with the garter stitch, perhaps you could clarify this with a picture or smth. Maybe like this: assuming the neck edge makes a shape like this: < , and the new cast-on stitches are a simple line: ____, does the shape on the circular needle look like this: < ___________ > or like this: >__________< ?
10.11.2019 - 19:59DROPS Design answered:
Dear Helena, you can insert a marker the first row worked on both neck edges, so that the marker will mark the right side of both piece and you will be sure then to continue the pattern as explained. Happy knitting!
11.11.2019 - 11:28Bonjour. Que faut il faire pour avoir une encolure V plus profonde ? Merci ! Ps il fait bien rassembler les 4 mailles + 4 mailles de l encolure pour commencer à tricoter en rond ? Comment procéder ? Merci
04.11.2019 - 14:38DROPS Design answered:
Bonjour Mme Rezig, nous ne sommes malheureusement pas en mesure de pouvoir adapter chaque modèle à chaque demande, n'hésitez pas à demander de l'aide à votre magasin, même par mail ou téléphone. Pour continuer en rond on fait glisser la moitié des mailles de l'aiguille gauche (= début des rangs sur l'endroit précédents) sur l'aiguille droite, à la suite de la dernière maille (fin des rangs sur l'endroit précédents) et on tricote A.1 sur les 4 dernières m des rangs + les 4 premières mailles des rangs = 8 mailles au milieu devant. Bon tricot!
05.11.2019 - 08:25Bonjour. Je viens de finir mes augmentations d’encolure. J ai coupé le fil mais je ne comprends pas comment continuer. J ai mon travail sur deux aiguilles Vous dites que les tours commencent’ ici ,? Continuez en rond ? Dois je joindre les bandes d’encolure en rond ? Je suis perdue ( pas le marqueur milieu de dos c est bien entre les raglans? ) merci
03.11.2019 - 18:38DROPS Design answered:
Bonjour Karima, quand les augmentations de l'encolure sont terminées, on continue le pull en rond, on va donc joindre l'ouvrage sur l'aiguille circulaire pour que la dernière maille du dernier rang tricoté soit juste avant la première maille de ce même rang, on fait glisser les mailles de l'aiguille gauche sur l'aiguille droite jusqu'à ce qu'on arrive au marqueur du milieu dos, on joint le fil et on continue en rond à partir du milieu dos. Bon tricot!
05.11.2019 - 07:58Bonjour , est il normal que j'ai de chaque coté les deux bandes d'encolures ( de 14 cms ) tricotés initialement qui pendouillent ... j'en suis au tout début augmentations raglan et encolure . Comment faire pour repérer ou faire ces augmentations ,j'ai placé des fils marqueurs mais ils sont sur le premier rang ,j'ai du mal à me repérer . merci de votre aide c'est une technique toute nouvelle pour moi (les autres top downs sont souvent avec un début encolure ronde .... )
31.10.2019 - 21:55DROPS Design answered:
Bonjour Karima, oui tout à fait, on va les coudre ensuite le long de l'encolure - cf ASSEMBLAGE.Ce sont les fils marqueurs qui vont servir de repère aux augmentations, regardez ici comment les faire suivre. Bon tricot!
04.11.2019 - 14:30Buongiorno,io non riesco ad usare i ferri accorciati,c'è un altro modo per eseguire questo modello?se sì come fare?grazie
16.10.2019 - 22:28DROPS Design answered:
Buongiorno Rosita, i ferri accorciati sono ferri in cui lavora solo una parte delle maglie sul ferro e non tutte le maglie. Per lavorarlo, basta seguire le istruzioni riportate all'inizio del modello. Buon lavoro!
17.10.2019 - 06:48Buongiorno 😃 Potreste indicarmi un video tutorial della tecnica più indicata per cucire il bordo al collo? Grazie
02.10.2019 - 09:59DROPS Design answered:
Buongiorno! Use the same technique as in the video HERE. Buon lavoro!
26.02.2020 - 16:23