


Komentáře / Otázky (24)
![]() Lucie napsala:
Lucie napsala:
Bonjour, Je suis désolée d'insister mais je n'ai pas compris votre réponse. Si je ne décale pas 1 maille vers la gauche aux rangs 29 - 31... du A1 les trous ne partent pas en biais. Pouvez-vous me confirmer ?
02.07.2025 - 06:53Odpověď DROPS Design :
Bonjour Lucie, j'ai dû mal m'exprimer, désolée. Au rang avec la flèche-1, vous décalez le début comme indiqué de 2 mailles à droite, le début des tours sera là jusqu'à la flèche -2 (et plus au niveau des tours précédents). Lorsque vous arrivez à la flèche -2, vous décalez le début du tour d'1 m, le début des tours est maintenant (et jusqu'à la fin du diagramme) ici. Changez votre marqueur qui vous sert de repère pour le début des tours aux 2 rangs avec la flèche d'abord -1 puis la flèche-2; les tours commencent à ce marqueur; en espérant avoir été plus claire. Bon tricot!
02.07.2025 - 16:08
![]() Lucie napsala:
Lucie napsala:
Bonjour, Quand vous dites de décaler les rangs de chaque diagramme. Je decale à chaque motif ?: 2 mailles décalées- 5m endroit - 1 jeté- 1m endroit - 5m endroit - 1 m glissée- 3 m ensemble- maille glissée par dessus les 3m - 2m décalées...Parce que ça ne tombe plus en face des trous du milieu du rang 23. Mais quand je ne decale que le rang 27 de 2 mailles, Au rang 29 les trous ne partent en biais que pour les premiers trous mais les seconds restent alignés.
29.06.2025 - 20:34Odpověď DROPS Design :
Bonjour Lucie, décalez uniquement les rangs avec la flèche, ceux avec le décalage aux rangs suivants, mais jusqu'à la prochaine flèche, les tours continueront comme au rang avec la flèche. Bon tricot!
30.06.2025 - 09:25
![]() Lucie Clavel napsala:
Lucie Clavel napsala:
Bonjour \r\nIl me semble avoir bien suivi le diagramme. Toutefois les seconds trous à partir du rang 27 du diagramme A1 sont aligné verticalement au lieu d\'être en diagonales. Je tricote en rond. Est-ce que je dois décaler chaque rang de 2 mailles ou chaque motif A1 ? Je n'ai décalé que le rang indiqué par la flèche. \r\nMerci pour votre retour. \r\nLucie
11.06.2025 - 22:57Odpověď DROPS Design :
Bonjour Mme Clavel, Au rang avec la flèche, on décale le début des tours de chaque diagramme, ainsi, les jetés du point ajouré (à partir de la flèche 1), vont automatiquement s'aligner de biais car on ne tricote pas le même nombre de mailles avant/entre/après ces jetés, autrement dit, au 1er rang (avec la flèche), vous tricotez: 5 m end, 1 jeté, 1 m end, 1 jeté, etc.. Au 3ème rang, vous tricoterez 4 m end, 1 jeté, 3 m end, 1 jeté, etc.. vos jetés vont ainsi se mettre naturellement en diagonale. Bon tricot!
12.06.2025 - 09:39
![]() Veronica Elm napsala:
Veronica Elm napsala:
På 5:e varvet på A1 ska jag ju sticka 2 omslag på stickan för hål. Varvet efter ska stickas avigt men det står att jag ska sticka 1 RÄT på första omslaget och släppa ner det andra. Stämmer det? Ska inte alla maskor stickas avigt?
22.05.2025 - 21:33Odpověď DROPS Design :
Hej Veronica, varvet efter omslagen stickas avigt om du stickar runt från rätsiden. Och det stickas rät om du stickar från avigsidan (fram och tillbaka) :)
27.05.2025 - 09:49
![]() HannaV napsala:
HannaV napsala:
Hei, en saa kuviota täsmäämään\r\nkuviossa A1, rivistä 29 eteenpäin, vaikka olen siirtänyt aloituskohtaa kaksi merkkiä vasemmalle.Mitä pitäisi tehdä?
12.03.2023 - 15:13
![]() Magda napsala:
Magda napsala:
Robię tę sukienkę i utknęłam na rzędzie 27. Robię 5 oczek prawych, podwójny narzut, oczko prawe, podwójny narzut, 5oczek prawych, przekładam 1 oczko na prawy drut, przerabiam 3 oczka razem i przekładam oczko zdjęte ponad oczkami przerobionymi razem. Wzoru powinny być zamknięte 2 oczka, żeby pozostało 15 oczek na motyw, z moich obliczeń wynika, że zamykam 3 oczka, więc zostaje mi 14 oczek na motyw... Co robię źle? 21.09.2022 - 19:50
22.09.2022 - 09:51Odpověď DROPS Design :
Witaj Magdo, wyjściowo masz 15 oczek na każdy motyw zanim zaczniesz przerabiać rząd 27. Po przerobieniu rz. 27 będziesz miała o 1 oczko mniej w każdym motywie, czyli 14 oczek > dodasz 2 oczka wykonując narzuty i zamkniesz 3 oczka (+2-3 = -1). Tak więc po przerobieniu rz. 27 zostanie Ci 14 oczek na każdy motyw, czyli dokładnie jak u Ciebie. Powodzenia!
22.09.2022 - 11:50
![]() Isabel napsala:
Isabel napsala:
Guten Tag, für die Vorderteile soll laut Anleitung 3 Reihen hin- und zurückgestrickt werden, dann für den Armausschnitt in der nächsten Hin-Reihe abnehmen. Ist damit gemeint, dass jeweils 3 Reihen hin und 3 Reihen rück gestrickt werden soll oder soll insg. 3 Reihen gestrickt werden bis zum Abnehmen? Danke für die Hilfe!
06.03.2022 - 10:28Odpověď DROPS Design :
Liebe Isabel, es sind insgesamt 3 Reihen gemeint. Viel Spaß beim stricken!
07.03.2022 - 08:59
![]() Debay JOCELNE napsala:
Debay JOCELNE napsala:
Bonjour, vous avez toujours des beaux modèles mais malheureusement, il me faut me contenter chaque fois du dessin du patron parce que vous ne mettez plus que des tricots faits avec les aiguilles circulaires. c'est pour ça que je ne peut essayer vos laine, mes machines à tricoter ne se prêtant pas volontiers au tricots circulaire. Je suis triste de ne plus comme avant tricoter vos propositions !
13.12.2021 - 12:52Odpověď DROPS Design :
Bonjour Mme Debay, peut-être que cette leçon pourrait vous donner quelques pistes pour adapter nos explications sur des aiguilles droites/machine à tricoter?
14.12.2021 - 07:57
![]() Therese napsala:
Therese napsala:
I A1 er det pil 1 og 2. Hvordan forskyver jeg disse maskene? Har prøvd, men blir feil. Et eller annet jeg ikke forstår.
09.07.2021 - 23:03Odpověď DROPS Design :
Hej Therese, jo hvis du sørger for at de 2 midterste kast havner lige over de 2 midterste kast fra tidligere pinde, så vil du få 5 retmasker på hver side af omslagene ved pil 1 og 4 retmasker ved pil 2. God fornøjelse!
13.07.2021 - 14:51
![]() TinaP napsala:
TinaP napsala:
3 st kantmaskor vid ärmhålan, hur ska jag göra de?
20.04.2021 - 18:17Odpověď DROPS Design :
Hej Tina. Du stickar 3 kantmaskor i rätstickning, dvs du stickar de räta på varje varv när du stickar fram och tillbaka. Mvh DROPS Design
21.04.2021 - 07:10
|
||||||||||||||||||||||||||||
Love Letter#loveletterdress |
||||||||||||||||||||||||||||
 |
 |
|||||||||||||||||||||||||||
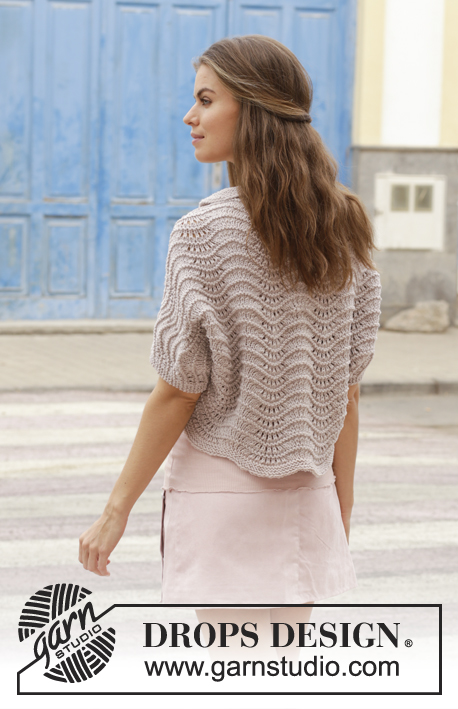
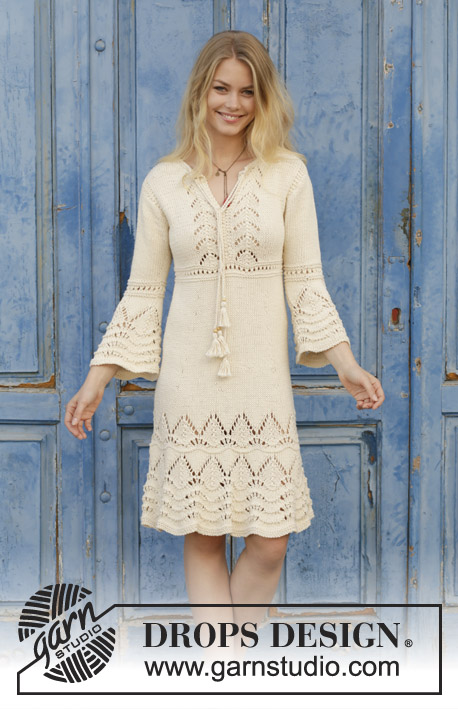
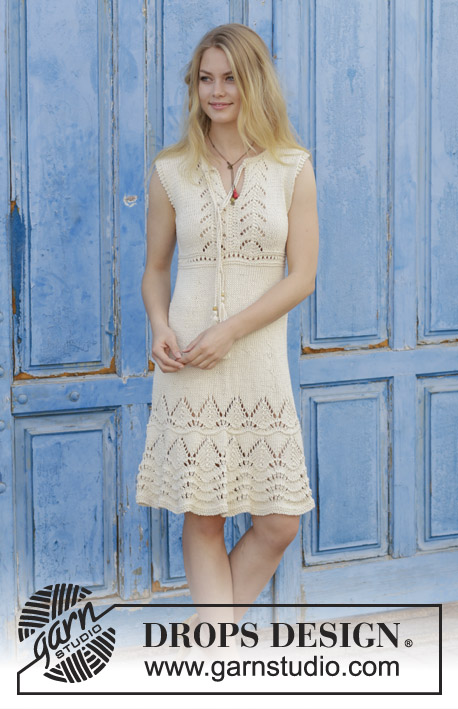
Šaty s ažurovým vzorem pletené z příze DROPS Paris. Velikost: S - XXXL.
DROPS 188-31 |
||||||||||||||||||||||||||||
|
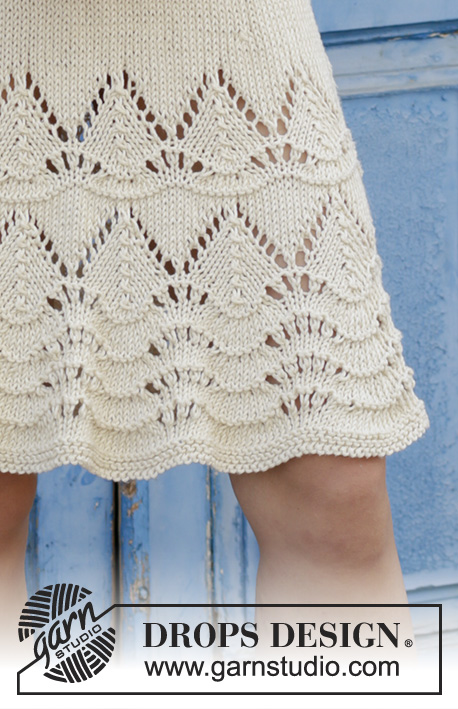
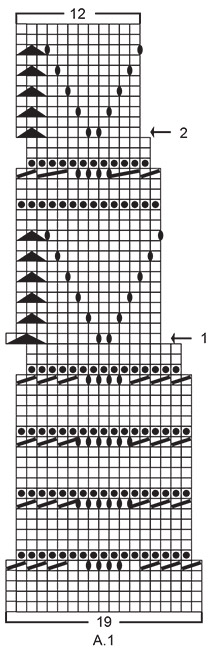
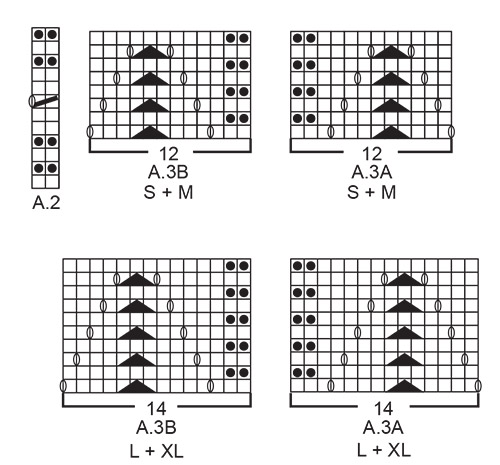
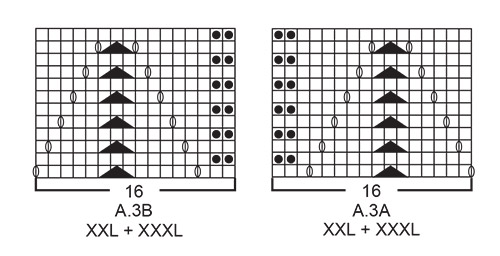
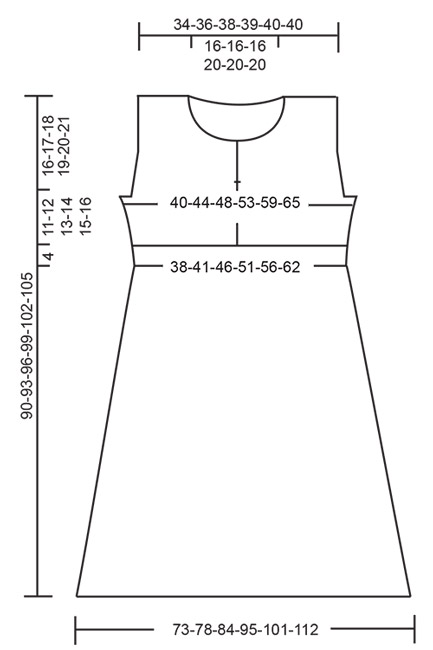
POUŽITÉ POSTUPY: VROUBKOVÝ VZOR: V řadách: 1 vroubek = 2 řady hladce. Pleteme stále hladce, lícové i rubové řady. V kruhových řadách: 1 vroubek = 2 kruhové řady. Pleteme střídavě 1 kruhovou řadu hladce, 1 obrace. VZOR: Viz schémata A.1 až A.3. Zvolte si schéma pro požadovanou velikost (platí pro schéma A.3). Zobrazeny jsou všechny řady vzoru nahlížené z lícové strany. TIP - MĚŘENÍ: Při pletení vlnkového vzoru se bude díl u dolního okraje stáčet a vlnit. Délku proto měříme vždy v místě, kde je zvlnění nejkratší. TIP – UJÍMÁNÍ 1 (sukně): ZA značkou ujímáme přetažením, tj. 1 oko sejmeme hladce, 1 oko upleteme hladce a sejmuté přes ně přetáhneme (= ujmeme 1 oko). PŘED značkou spleteme 2 oka hladce (= ujmeme 1 oko). TIP – UJÍMÁNÍ 2 (průramky): Ujímáme vedle 3 krajních ok vroubkovým vzorem, vždy z lícové strany. ZA 3 krajními oky ujímáme přetažením, tj. 1 oko sejmeme hladce, 1 oko upleteme hladce a sejmuté přes ně přetáhneme (= ujmeme 1 oko). PŘED 3 krajními oky spleteme 2 oka hladce (= ujmeme 1 oko). TIP – UJÍMÁNÍ 3: Abychom vypočítali, jak často máme ujímat, vydělíme celkový počet ok v řadě (např. 180 ok) počtem ok, která potřebujeme ujmout (tj. 8), takže 180 : 8 = 22,5. V tomto případě tedy spleteme dohromady střídavě každé 21. a 22. oko a každé 22. a 23. oko. TIP - PŘIDÁVÁNÍ (boky): Přidáváme vždy v lícových řadách! Přidáváme na obou stranách obou značek na bocích - začínáme 2 oka před značkou: 1x nahodíme, 4 oka upleteme hladce (značka leží uprostřed těchto ok) a 1x nahodíme (= přidali jsme 2 oka). V následující řadě/kruhové řadě pleteme nahození za zadní nit, aby se v pletenině netvořily dírky. ---------------------------------------------------------- ŠATY: Pleteme v kruhových řadách na kruhové jehlici zdola nahoru až k začátku výstřihu na předním dílu, pak pleteme v řadách od středu předního dílu. Po dokončení ujímání průramků pleteme přední a zadní díl v řadách odděleně. SUKNĚ: Na kruhovou jehlici č. 5 nahodíme přízí Paris trochu volněji 247-266-285-323-342-380 ok a upleteme v kruhových řadách 2 vroubky VROUBKOVÝM VZOREM – viz výše. Pak pleteme vzor A.1 (= 13-14-15-17-18-20 sekvencí po 19 okách). POZOR! V kruhové řadě označené ve schématu A.1 šipkou 1 posuneme začátek kruhové řady o 2 oka doleva, aby nám vycházel vzor. V kruhové řadě označené ve schématu A.1 šipkou 2 posuneme začátek kruhové řady o 1 oko doleva. Po dokončení celé sekvence vzoru A.1 (na výšku) máme na jehlici 156-168-180-204-216-240 ok. Pokračujeme lícovým žerzejem. Ve výši 28 cm - viz TIP – MĚŘENÍ - vložíme do pleteniny 4 značky, takto: 1. značku vložíme za prvních 18-21-24-30-32-38 ok, 2. značku umístíme za následujících 42-42-42-42-44-44 ok, 3. značku dáme za dalších 36-42-48-60-64-76 ok a 4. značku za následujících 42-42-42-42-44-44 ok; v kruhové řadě zůstane za poslední značkou 18-21-24-30-32-38 ok. Značky při práci snímáme vždy do aktuálně pletené řady. V následující kruhové řadě ujmeme za 1. a 3. značkou a před 2. a 4. značkou 1 oko – viz TIP – UJÍMÁNÍ 1 (= ujmeme 4 oka). Takto ujímáme vždy po 4,5-4,5-5,5-5,5-6-6 cm výšky, celkem 7-7-6-6-6-6x u každé značky = 128-140-156-180-192-216 ok. Pak všechny značky odstraníme. Ve výši 59-60-61-62-63-64 cm (ujímání je nyní dokončeno) upleteme 1 kruhovou řadu hladce a SOUČASNĚ ujmeme rovnoměrně 0-0-0-8-0-4 ok = 128-140-156-172-192-212 ok. Pleteninu převedeme na kruhovou jehlici č.4 a pleteme v kruhových řadách vzor A.2. Po dokončení celé sekvence vzoru A.2 (na výšku) označíme začátek kruhové řady (= bok), druhou značku vložíme za 32.-35.-39.-43.-48.-53. oko (= střed předního dílu) a třetí značku dáme za dalších 32-35-39-43-48-53 ok (= bok); mezi značkami leží 64-70-78-86-96-106 ok zadního dílu. Pak pleteninu převedeme zpět na kruhovou jehlici č.5. Přízi odstřihneme. Nyní pleteme v řadách od značky uprostřed předního dílu. První – lícovou – řadu začínáme u značky uprostřed předního dílu a pleteme takto: vzor A.3B (= 12-12-14-14-16-16 ok), 40-46-50-58-64-74 ok lícovým žerzejem (značka leží uprostřed těchto 40-46-50-58-64-74 ok), vzor A.3A (= 12-12-14-14-16-16 ok), vzor A.3B (= 12-12-14-14-16-16 ok), 40-46-50-58-64-74 ok lícovým žerzejem (značka leží uprostřed těchto 40-46-50-58-64-74 ok) a končíme vzorem A.3A (= 12-12-14-14-16-16 ok). Pokračujeme v řadách v tomto rozvržení vzorů. Ve výši 3 cm od místa, kde jsme pleteninu rozdělili, přidáme na obou stranách obou značek na bocích 1 oko - viz TIP – PŘIDÁVÁNÍ (= přidáme 4 oka). Toto přidávání zopakujeme ještě ve výši 8-8-9-9-10-10 cm od rozdělení = 136-148-164-180-200-220 ok. Ve výši 73-75-77-79-81-83 cm upleteme nad prostředními 12-12-14-18-22-26 oky na každém boku 2 vroubky (tj. na obou stranách obou značek upleteme 6-6-7-9-11-13 ok vroubkovým vzorem – ostatní oka pleteme jako dříve). V 1. lícové řadě po upletení vroubků uzavřeme na každém boku 6-6-8-12-16-20 ok (= průramky; tj. uzavřeme 3-3-4-6-8-10 ok na obou stranách obou značek). Přední díly a zadní díl pak dokončíme odděleně. LEVÝ PŘEDNÍ DÍL (na šaty se díváme, jako by byly oblečené): = 31-34-37-39-42-45 ok. Pokračujeme v řadách ve stejném rozvržení vzorů jako dosud (tj. podél výstřihu pleteme vzor A.3A, pak lícovým žezejem a na okraji průramku pleteme dál 3 krajní oka vroubkovým vzorem); první řada je rubová. Když upleteme 3 řady, začneme dál tvarovat průramek – v následující lícové řadě ujmeme – viz TIP – UJÍMÁNÍ 2; toto ujímání opakujeme v každé 2. řadě (tj. v každé lícové), celkem 2-3-5-6-8-11x = 29-31-32-33-34-34 ok. Dál pleteme v řadách ve stejném rozvržení vzorů jako dosud: 3 krajní oka na okraji průramku vroubkovým vzorem, pak lícovým žerzejem a vzorem A.3A podél výstřihu, a to až do výše asi 84-87-90-93-96-99 cm (končíme lícovou řadou a nejlépe po dokončení celé sekvence vzoru). Nyní odložíme prvních 7-8-8-9-10-10 ok na pomocnou jehlici (= průkrčník; oka nejprve upleteme a pak teprve odložíme – vyhneme se tak stříhání příze). Průkrčník dále tvarujeme – uzavíráme na jeho okraji, vždy na začátku řady (tj. na začátku každé rubové řady) 2x 2 oka a 3x 1 oko = zbývá 15-16-17-17-17-17 ok náramenice. Pokračujeme až do chvíle, kdy nám zbývá uplést 1 řadu, aby díl měřil 90-93-96-99-102-105 cm – pak upleteme 1 rubovou řadu hladce a v další lícové řadě všechna oka hladce uzavřeme. PRAVÝ PŘEDNÍ DÍL: = 31-34-37-39-42-45 ok. Pokračujeme v řadách ve stejném rozvržení vzorů jako dosud (tj. na okraji průramku pleteme dál 3 krajní oka vroubkovým vzorem, pak lícovým žezejem a podél výstřihu pleteme vzor A.3B); první řada je rubová. Když upleteme 3 řady, začneme dál tvarovat průramek – v následující lícové řadě ujmeme – viz TIP – UJÍMÁNÍ 2; toto ujímání opakujeme v každé 2. řadě (tj. v každé lícové), celkem 2-3-5-6-8-11x = 29-31-32-33-34-34 ok. Dál pleteme v řadách ve stejném rozvržení vzorů jako dosud: vzor A.3B podél výstřihu, pak lícovým žerzejem a na okraji průramku 3 krajní oka vroubkovým vzorem, a to až do výše asi 84-87-90-93-96-99 cm (končíme lícovou řadou a stejnou řadou vzoru A.3 jako u levého předního dílu). Nyní odložíme prvních 7-8-8-9-10-10 ok na pomocnou jehlici (= průkrčník; oka nejprve upleteme a pak teprve odložíme – vyhneme se tak stříhání příze). Průkrčník dále tvarujeme – uzavíráme na jeho okraji, vždy na začátku řady (tj. na začátku každé lícové řady) 2x 2 oka a 3x 1 oko = zbývá 15-16-17-17-17-17 ok náramenice. Pokračujeme až do chvíle, kdy nám zbývá uplést 1 řadu, aby díl měřil 90-93-96-99-102-105 cm – pak upleteme 1 rubovou řadu hladce a v další lícové řadě všechna oka hladce uzavřeme. ZADNÍ DÍL: = 62-68-74-78-84-90 ok. Pokračujeme v řadách ve stejném rozvržení vzorů jako dosud (tj. na okrajích průramků pleteme dál 3 krajní oka vroubkovým vzorem, pak lícovým žerzejem a uprostřed zadního dílu pleteme vzor A.3A/A.3B); první řada je rubová. Když upleteme 3 řady, začneme dál tvarovat průramky – v následující lícové řadě ujmeme na každé straně dílu - viz TIP – UJÍMÁNÍ 2 (= ujmeme 2 oka). Toto ujímání opakujeme v každé 2. řadě (tj. v každé lícové), celkem 2-3-5-6-8-11x = 58-62-64-66-68-68 ok. Dál pleteme v řadách ve stejném rozvržení vzorů jako dosud: uprostřed dílu pleteme vzor A.3A/A.3B, pak lícovým žerzejem a 3 krajními oky vroubkovým vzorem na každé straně (= okraje průramků), a to až do výše 88-91-94-97-100-103 cm. Nyní uzavřeme prostředních 26-28-28-30-32-32 ok (= průkrčník) a obě náramenice dokončíme odděleně = zbývá 15-16-17-17-17-17 ok každé náramenice. Nad oky každé náramenice pokračujeme jako dosud a SOUČASNĚ uzavřeme v následující řadě na obou okrajích průkrčníku ještě 1 oko. Pokračujeme až do chvíle, kdy nám zbývá uplést 1 řadu, aby díl měřil 90-93-96-99-102-105 cm, pak upleteme 1 rubovou řadu hladce a v další lícové řadě všechna oka hladce uzavřeme. DOKONČENÍ: Sešijeme náramenice. Výstřih částečně sešijeme – začínáme u dolního okraje a sešijeme okraje výstřihu do výše asi 10 cm od horního okraje (ppř. libovolně vysoko). Šev vedeme vnější částí krajních ok, aby byl plochý a jemný. LEM PRŮKRČNÍKU: Začínáme na jednom okraji výstřihu a z lícové strany nabereme kruhovou jehlicí č.4 z okraje průkrčníku asi 72 až 88 ok (včetně odložených ok z pomocné jehlice). Upleteme 1 rubovou řadu hladce, pak 1 lícovou a ještě 1 rubovou. Poté všechna oka v lícové řadě hladce uzavřeme. VÁZAČKA (KROUCENÁ ŠŇŮRKA): Ustřihneme si 2 vlákna příze Paris, každé dlouhé 3 metry. Vlákna stáčíme pevně dohromady - jakmile se začnou samovolně kroutit, přeložíme je napolovic a necháme zkroutit znovu. Na každém konci šňůrky uvážeme uzel a přivážeme malý dřevěný korálek. Vyrobíme si 2 střapce a také je připevníme na konce šňůrky, pod korálek. 1 střapec = ustřihneme si 12 vláken příze Paris, každé o délce 11 cm. Pak ustřihneme 1 vlákno dlouhé asi 25 cm na připevnění střapce - toto vlákno položíme doprostřed svazku 12 vláken, ta přeložíme napolovic a upevňovací vlákno ovážeme kolem horní části střapce (asi 1 cm od místa přeložení); pevně svážeme a hotový střapec přišijeme k vázačce, jak je popsáno níže. Stejným způsobem vyrobíme ještě jeden střapec. Vázačku se střapce přeložíme napolovic, smyčku provlečeme okem v horním rohu výstřihu, smyčkou pak protáhneme konce vázačky a stáhneme. Stejnou šňůrku s korálky a střapci vyrobíme ještě jednu a připevníme na druhou stranu výstřihu. |
||||||||||||||||||||||||||||
Vysvětlivky ke schématu |
||||||||||||||||||||||||||||
|
||||||||||||||||||||||||||||
|
||||||||||||||||||||||||||||
|
||||||||||||||||||||||||||||
|
||||||||||||||||||||||||||||
|
||||||||||||||||||||||||||||
Dokončili jste tento model?Pak označte své fotky tagem #dropspattern #loveletterdress nebo je pošlete do galerie #dropsfan. Potřebujete s tímto návodem poradit?Otevřete-li si návod na stránce garnstudio.com, najdete tam 29 výukových video-ukázek, Komentáře/Dotazy a další užitečné informace. © 1982-2025 DROPS Design A/S. Vyhrazujeme si veškerá práva. Tento dokument, včetně všech jeho dílčích částí, podléhá autorským právům. Podrobnější komentář k možnostem užití našich návodů najdete dole pod každým návodem na našich stránkách. |
||||||||||||||||||||||||||||


V oblasti pletené a háčkované módy působí DROPS Design více než 40 let. Díky tomu vám můžeme nabídnout jednu z nejrozsáhlejších kolekcí modelů s bezplatnými návody dostupnými na internetu - navíc v 17 jazycích. K dnešnímu dni máme na 314 katalogů a 11822 návodů celkem - z nich je už 7048 dostupných v [češtině].
Přidejte komentář k návodu DROPS 188-31
Rádi bychom věděli, co si o tomto modelu myslíte!
Pokud se chcete na něco zeptat, dbejte prosím na to, abyste ve formuláři níže vybrali správnou kategorii - díky tomu se dříve dozvíte, co potřebujete vědět. Povinná pole jsou označena *.