Shark Attack Blanket by DROPS Design

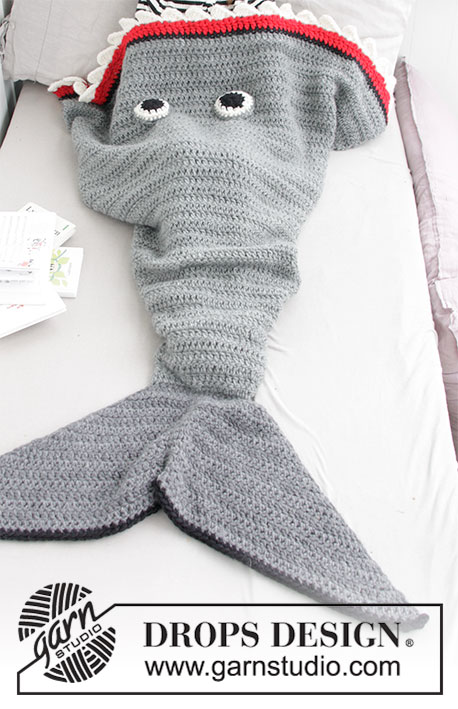
Dětská deka Žralok háčkovaná z příze DROPS Snow. Velikost 3-14 let.

DROPS Children 28-13
DROPS design: model ee-138-bn
Skupina přízí E
----------------------------------------------------------
Velikost: 3/4 - 5/6 - 7/8 - 9/10 - 11/12 - 13/14 let
Velikost v cm: 98/104 - 110/116 - 122/128 - 134/140 - 146/152 - 158/164 
Rozměry: Délka bez ocasní ploutve = 70-84-98-112-128-142 cm
Šířka u horního okraje = 81-86-90-99-103-112 cm
Obvod před ocasem = 35-37-39-40-42-44 cm
Výška ocasu = 27-31-33-35-37-39 cm
Materiál:
DROPS SNOW firmy Garnstudio (spadá do skupiny přízí E)
600-650-750-800-900-950 g, barva č. 46, šedá
300-300-350-350-400-450 g, barva č. 14, tmavá šedá
50-50-50-50-50-100 g, barva č. 02, černá
50 g pro všechny velikosti, barva č. 01, smetanová
50 g pro všechny velikosti, barva č. 56, jasná červená

Použitou přízi můžete také nahradit některou ze seznamu:
"Náhradní příze (Skupina přízí E)" – viz link níže.

DROPS HÁČEK č. 8 - nebo velikosti potřebné k uháčkování zkušebního vzorku o rozměrech 9 dlouhých sloupků x 5 řad = 10 cm na šířku a 10 cm na výšku.

----------------------------------------------------------

-------------------------------------------------------

Náhradní příze – Podívejte se, jak změnit přízi
Skupina přízí A až F – Neměňte návod, změňte přízi
Spotřeba příze při použití náhradní příze – Využijte náš převodník

-------------------------------------------------------


100% vlna
od 61.00 Kč /50g
DROPS Snow uni colour DROPS Snow uni colour 61.00 Kč /50g
Ganella
Objednat
DROPS Snow mix DROPS Snow mix 71.00 Kč /50g
Ganella
Objednat
needles Jehlice a háčky Objednat
Přízi na tento model můžete mít už za 915Kč. Více zde.

Návod

TIP - PŘIDÁVÁNÍ:
Přidáváme uháčkováním 2 dlouhých sloupků do jednoho a téhož oka.

INFO:
První krátký sloupek v každé řadě nahrazujeme 1 řetízkovým okem.
První dlouhý sloupek v každé řadě nahrazujeme 3 řetízkovými oky.
----------------------------------------------------------

DEKA:
Trup žraloka háčkujeme zdola nahoru. K dolníku okraji trupu pak přiháčkujeme ocasní ploutev. Celou deku háčkujeme v řadách (tj. líc a rub).

TRUP:
Háčkem č.8 uháčkujeme šedou přízí 32-34-34-36-38-40 řetízkových ok a spojíme je pevným okem do kroužku. Dál háčkujeme v řadách! Viz INFO. Háčkujeme po 1 dlouhém sloupku do každého oka v řadě = 32-34-34-36-38-40 dlouhých sloupků. Práci otočíme a háčkujeme po 1 dlouhém sloupku do každého dlouhého sloupku v průběhu celé řady.
V následující řadě přidáme rovnoměrně nová oka – viz TIP - PŘIDÁVÁNÍ! Háčkujeme dlouhými sloupky a SOUČASNĚ přidáme rovnoměrně 8-6-6-9-7-10 dlouhých sloupků = 40-40-40-45-45-50 dlouhých sloupků.

Takto pokračujeme – háčkujeme v řadách a rovnoměrně přidáváme – NEŽ BUDETE POKRAČOVAT, PŘEČTĚTE SI POZORNĚ CELÝ NÁSLEDUJÍCÍ POPIS!

Přidáváme 5 dlouhých sloupků v řadě vždy po 4-5-6-8-7-10 cm výšky, a to celkem 6-6-8-7-9-10x = 70-70-80-80-90-100 dlouhých sloupků. Po dokončení veškerého přidávání uháčkujeme 1 řadu bez přidávání a v následující řadě háčkujeme dlouhými sloupky a opět přidáme rovnoměrně 3-7-1-9-3-1 dlouhých sloupků = 73-77-81-89-93-101 dlouhých sloupků. Pokračujeme dlouhými sloupky (tj. po 1 dlouhém sloupku do každého dlouhého sloupku) až do výše 66-80-94-108-124-138 cm.
Přízi změníme na černou a háčkujeme 1 řadu krátkých sloupků (tj. po 1 krátkém sloupku do každého dlouhého sloupku). Pak změníme přízi na červenou a uháčkujeme 1 řadu dlouhých sloupků, pak 1 řadu krátkých sloupků.
Přízi změníme na smetanovou a další řadu háčkujeme takto: 1 řetízkové oko,*2 krátké sloupky vynecháme, do následujícího krátkého sloupku háčkujeme: 1 2x nahozený dlouhý sloupek, 2 dlouhé sloupky, 1 2x nahozený dlouhý sloupek, 4 řetízková oka a 1 pevné oko, pak pevné oko do dalšího krátkého sloupku*, *-* opakujeme v průběhu celé řady. Přízi odstřihneme a zapošijeme. Trup je teď hotový.

OCASNÍ PLOUTEV:
Trup přeložíme napolovic, okraje dílu leží u sebe uprostřed (= rozparek). Tmavě šedou přízí uháčkujeme háčkem č.8 podél dolního okraje (= počáteční řada) 1 řadu krátkých sloupků vpíchnutých do obou vrstev (tj. okraj přeloženého trupu sháčkujeme dohromady) = 16-17-17-18-19-20 krátkých sloupků.
Další řadu pak háčkujeme takto: 3 dlouhé sloupky do 1. oka, po 1 dlouhém sloupku do každého oka až po prostřední 4 oka, po 1 krátkém sloupku do každého z těchto 4 ok, po 1 dlouhém sloupku do každého oka až po poslední oko v řadě – do posledního oka uháčkujeme 3 dlouhé sloupky.
Tuto řadu opakujeme celkem 13-15-16-17-18-19x = díl měří asi 26-30-32-34-36-38 cm. Přízi změníme na 2 vlákna černé a uháčkujeme 1 řadu krátkých sloupků. Přízi odstřihneme a zapošijeme.

OČI:
Vyrobíme 2 oči a šedou přízí je přišijeme asi 10 cm od horního okraje deky.
Postupujeme takto:
Háčkem č.8 uháčkujeme černou přízí 3 řetízková oka a spojíme je pevným okem do kroužku.
1. KRUHOVÁ ŘADA: 3 řetízková oka (nahrazují 1. dlouhý sloupek), 11 dlouhých sloupků kolem kroužku z řetízkových ok, končíme 1 pevným okem do 3. řetízkového oka (= 12 dlouhých sloupků). Přízi odstřihneme a změníme na smetanovou.
2. KRUHOVÁ ŘADA: 1 řetízkové oko (nahrazuje 1. krátký sloupek), po 1 krátkém sloupku do každého dlouhého sloupku, končíme 1 pevným okem do 1. řetízkového oka (= 12 krátkých sloupků). Přízi odstřihneme a změníme na šedou.
3. KRUHOVÁ ŘADA: 1 řetízkové oko (nahrazuje 1. krátký sloupek), 1 krátký sloupek do toho stejného oka, pak po 2 krátkých sloupcích do každého krátkého sloupku až do konce kruhové řady, končíme 1 pevným okem do 1. řetízkového oka (= 24 krátkých sloupků). Přízi odstřihneme a zapošijeme.

ROZPAREK:
Rozparek sešijeme do libovolné výše - 20-30 cm od ocasní ploutve, pokud chceme zabalit pouze chodidla, pokud chceme zabalit celé nohy, sešijeme tělo žraloka do poloviny.

Potřebujete poradit s tímto návodem?

Děkujeme, že jste si vybrali návod DROPS Design. Zakládáme si na tom, že dáváme k dispozici návody ověřené a snadno srozumitelné. Všechny návody jsou přeložené z norského originálu a tak si můžete kdykoli srovnat rozměry a počty s původním návodem (DROPS Children 28-13) .

Máte s návodem potíže? Níže najdete seznam odkazů, které vám pomohou dokončit vaše dílo co nejdříve - nebo se třeba přiučit něco nového.

signature-image signature

Máte s návodem potíže? Níže najdete seznam odkazů, které vám pomohou dokončit vaše dílo co nejdříve - nebo se třeba přiučit něco nového.

Máme takopodrobné rozpisy různých technik a postupů krok za krokem - najdete je zde.

1) Why is the knitting/crochet tension so important?

Knitting tension is what determines the final measurements of your work, and is usually measured per 10 x 10 cm. It is provided like so: number of stitches in width x number of rows in height - eg: 19 stitches x 26 rows = 10 x 10 cm.

The knitting tension is very individual; some people knit/crochet loosely while others work tightly. You adjust the knitting tension with the needle size, which is why the suggested needle size only serve as a guide! You need to adjust this (up or down) to ensure that YOUR knitting tension matches the knitting tension provided in the pattern. If you work with a different knitting tension than provided you will have a different yarn consumption, and your work will have different measurements than what the pattern suggests.

The knitting tension also determines which yarns can replace each other. As long as you achieve the same knitting tension you can replace one yarn with another.

See DROPS lesson: How to measure your tension/gauge

See DROPS video: How to make a gauge tension swatch

nahoru

2) What are the yarn groups?

All our yarns are categorised into yarn groups (from A to F) according to thickness and knitting tension – group A contains the thinnest yarns and group F the thickest. This makes it easier for you to find alternative yarns to our patterns, should you wish to switch yarn. All yarns within the same group have a similar knitting tension and can easily replace each other. However, different yarn qualities have different structures and properties which will give the finished work a unique look and feel.

Click here for an overview of the yarns in each yarn group

nahoru

3) Can I use a different yarn than what the pattern suggests?

The important thing when changing from one yarn to another is that the knitting/crochet tension remains the same. This is so that the measurements of the finished piece will be the same as on the sketch provided. It is easier to achieve the same knitting tension using yarns from the same yarn group. It is also possible to work with multiple strands of a thinner yarn to achieve the knitting tension of a thicker one. Please try our yarn converter. We recommend you to always work a test swatch.

Please NOTE: when changing yarn the garment might have a different look and feel to the garment in the photo, due to individual properties and qualities of each yarn.

See DROPS lesson: Can I use a different yarn than the one mentioned in the pattern?

nahoru

4) How do I use the yarn converter?

At the top of all our patterns you’ll find a link to our yarn converter, which is a helpful tool should you wish to use a different yarn than suggested. By filling in the yarn quality you wish to replace, the amount (in your size) and number of strands, the converter will present good alternative yarns with the same knitting tension. Additionally it will tell you how much you’ll require in the new qualities and whether you’ll need to work with multiple strands. Most skeins are 50g (some are 25g or 100g).

If the pattern is worked with multiple colours, every colour will have to be converted separately. Similarly, if the pattern is worked with several strands of different yarns (for example 1 strand Alpaca and 1 strand Kid-Silk) you will have to find alternatives for each, individually.

Click here to see our yarn converter

nahoru

5) Why do I get the wrong knitting tension with the suggested needle size?

The needle size provided in the pattern serves only as a guide, the important thing is to follow the knitting tension. And since knitting tension is very individual, you will have to adjust the needle size to ensure that YOUR tension is the same as in the pattern – maybe you’ll have to adjust 1, or even 2 needle sizes, up or down to achieve the correct tension. For this, we recommend that you work test swatches.

Should you work with a different knitting tension than the one provided, the measurements of the finished garment might deviate from the measurement sketch.

See DROPS lesson: How to measure your tension/gauge

See DROPS video: How to make a gauge tension swatch

nahoru

6) Why is the pattern worked top-down?

Working a garment top-down provides more flexibility and room for personal adjustment. For example it is easier to try the garment on while working, as well as making adjustments to length of yoke and shoulder caps.

The instructions are carefully explaining every step, in the correct order. Diagrams are adjusted to the knitting direction and are worked as usual.

nahoru

7) Why are the sleeves shorter in larger sizes?

The total width of the garment (from wrist-to-wrist) will be larger in the larger sizes, despite the actual sleeves being shorter. The larger sizes have longer sleeve caps and wider shoulders, so there will be a good fit in all sizes.

nahoru

8) What is a repeat?

Diagrams are often repeated on the round or in height. 1 repeat is the diagram the way it appears in the pattern. If it says to work 5 repeats of A.1 in the round, then you work A.1 a total of 5 times after/next to each other in the round. If it says to work 2 repeats of A.1 vertically/in height you work the entire diagram once, then begin again at the start and work the entire diagram one more time.

nahoru

9) How do I work according to a knitting diagram?

The diagram depicts all rows/rounds, and every stitch seen from the right side. It is read from bottom to top, from right to left. 1 square = 1 stitch.

When working back and forth, every other row is worked from the right side and every other row is worked from the wrong side. When working from the wrong side, the diagram will have to be worked reversed: from left to right, knit stitches are purled, purl stitches are knit etc.

When working in the round every round is worked from the right side and the diagram are worked from right to left on all rounds.

See DROPS lesson: How to read knitting diagrams

nahoru

10) How do I work according to a crochet diagram?

The diagram depicts all rows/rounds, and every stitch seen from the right side. It is worked from bottom to top, from right to left.

When working back and forth every other row is worked from the right side: from right to left and every other row is worked from the wrong side: from left to right.

When working in the round, every row in the diagram are worked from the right side, from right to left.

When working a circular diagram you start in the middle and work your way outwards, counter clockwise, row by row.

The rows usually start with a given number of chain stitches (equivalent to the height of the following stitch), this will either be depicted in the diagram or explained in the pattern.

See DROPS lesson: How to read crochet diagrams

nahoru

11) How do I work several diagrams simultaneously on the same row/round?

Instructions for working several diagrams after each other on the same row/round, will often be written like so: “work A.1, A.2, A.3 a total of 0-0-2-3-4 times". This means you work A.1 once, then A.2 is worked once, and A.3 is repeated (in width) the number of times provided for your size – in this case like so: S = 0 times, M = 0 times, L=2 times, XL= 3 times and XXL = 4 times.

The diagrams are worked as usual: begin with the first row in A.1, then work the first row in A.2 etc.

See DROPS lesson: How to read knitting diagrams

See DROPS lesson: How to read crochet diagrams

nahoru

12) Why does the piece start with more chain stitches than it’s worked with?

Chain stitches are slightly narrower than other stitches and to avoid working the cast-on edge too tight, we simply chain more stitches to begin with. The stitch count will be adjusted on the following row to fit the pattern and measurement sketch.

nahoru

13) Why increase before the rib edge when the piece is worked top-down?

The rib edge is more elastic and will contract slightly compared to, for example, stocking stitch. By increasing before the rib edge, you avoid a visible difference in width between the rib edge and the rest of the body.

nahoru

14) Why increase in the cast-off edge?

It’s very easy to cast off too tightly, and by making yarn overs while casting off (and simultaneously casting these off) you avoid a too tight cast off edge.

See DROPS video: How to bind off with yarn overs (yo)

nahoru

15) How do I increase/decrease on every 3rd and 4th row/round alternately?

To achieve an even increase (or decrease) you can increase on, for example: every 3rd and 4th row alternately, like so: work 2 rows and increase on the 3rd row, work 3 rows and increase on the 4th. Repeat this until the increase is complete.

See DROPS lesson: Increase or decrease 1 st on every 3rd and 4th row alternately

nahoru

16) Why is the pattern slightly different than what I see in the photo?

Pattern repeats can vary slightly in the different sizes, in order to get the correct proportions. If you’re not working the exact same size as the garment in the photo, yours might deviate slightly. This has been carefully developed and adjusted so that the complete impression of the garment is the same in all sizes.

Make sure to follow instructions and diagrams for your size!

nahoru

17) How can I work a jacket in the round instead of back and forth?

Should you prefer to work in the round instead of back and forth, you may of course adjust the pattern. You’ll need to add steeks mid-front (usually 5 stitches), and follow the instructions. When you would normally turn and work from the wrong side, simply work across the steek and continue in the round. At the end you’ll cut the piece open, pick up stitches to work bands, and cover the cut edges.

See DROPS video: How to knit steeks and cut open

nahoru

18) Can I work a jumper back and forth instead of in the round?

Should you prefer to work back and forth instead of in the round, you may of course adjust the pattern so you work the pieces separately and then assemble them at the end. Divide the stitches for the body in 2, add 1 edge stitch in each side (for sewing) and work the front and back pieces separately.

See DROPS lesson: Can I adapt a pattern for circular needles into straight needles?

nahoru

19) Why do you show discontinued yarns in the patterns?

Since different yarns have different qualities and textures we have chosen to keep the original yarn in our patterns. However, you can easily find options among our available qualities by using our yarn converter, or simply pick a yarn from the same yarn group.

It is possible that some retailers still have discontinued yarns in stock, or that someone has a few skeins at home that they would like to find patterns for.

The yarn converter will provide both alternative yarn as well as required amount in the new quality.

nahoru

20) How do I make a women’s size garment into a men’s size one?

If you have found a pattern you like which is available in women’s size it’s not very difficult to convert it to men’s size. The biggest difference will be the length of sleeves and body. Start working on the women size that you think would fit across the chest. The additional length will be worked right before you cast off for the armhole/sleeve cap. If the pattern is worked top-down you can add the length right after the armhole or before the first decrease on sleeve.

Regarding additional yarn amount, this will depend on how much length you add, but it is better with a skein too many than too few.

nahoru

21) How do I prevent a hairy garment from shedding?

All yarns will have excess fibres (from production) that might come off as lint or shedding. Brushed yarns (ie hairier yarns) have more of these loose, excess fibres, causing more shedding.

Shedding also depends on what is worn under or over the garment, and whether this pulls at the yarn fibres. It’s therefore not possible to guarantee that there will be no shedding

Below are some tips on how to get the best result when working with hairier yarns:

1. When the garment is finished (before you wash it) shake it vigorously so the looser hairs come off. NOTE: do NOT use a lint roller, brush or any method that pulls at the yarn.

2. Place the garment in a plastic bag and put it in your freezer - the temperature will cause the fibres to become less attached to each other, and excess fibres will come off easier.

3. Leave in the freezer for a few hours before taking it out and shaking it again.

4. Wash the garment according to the instructions on the yarn label.

nahoru

22) Where on the garment is the length measured?

The measurement sketch/schematic drawing provides information regarding the full length of the garment. If it’s a jumper or a jacket the length is measured from the highest point on the shoulder closest to the neckline, and straight down to the bottom of the garment. It is NOT measured from the tip of shoulder. Similarly, the length of yoke is measured from the highest point on the shoulder and down to where yoke is split into body and sleeves.

On a jacket measures are never taken along bands, unless specifically stated. Always measure inside band stitches when measuring the length.

See DROPS lesson: How to read a schematic drawing

nahoru

23) How do I know how many balls of yarn I need?

The required amount of yarn is provided in grams, eg: 450 g. To calculate how many balls you’ll need you first need to know how many grams are in 1 ball (25g, 50g or 100g). This information is available if you click on the individual yarn quality on our pages. Divide the amount required with the amount of each ball. For example, if each ball is 50g (the most common amount), the calculation will be as follows: 450 / 50 = 9 balls.

nahoru

Pořídili jste si přízi DROPS na tento model? Pak máte taky právo žádat po svém prodejci, u něhož jste nakoupili, pomoc a rady. Seznam DROPS obchodů najdete tady!
Pořád se nemůžete dobrat odpovědi, kterou hledáte? Pak posuňte stránku dolů a napište nám svůj dotaz, naši specialisté se vám pokusí poradit. Obvykle to zvládneme během 5 až 10 pracovních dnů.. Mezitím si můžete pročíst otázky a odpovědi, které k tomuto modelu položili ostatní, nebo navštívit skupinu DROPS Workshop na Facebooku, kde vám může poradit některá spřízněná duše!

Komentáře / Otázky (53)

country flag Gertrud wrote:

Hej igen! Jag menar om stjärtfenan skall virkas med dubbelt garn,eftersom jag får hälften över. Kan inte se att det står någonstans. Nån som vet??

16.10.2023 - 17:05

DROPS Design answered:

Hej Gertrud. Stjärtfenan ska inte virkas med dubbelt garn vad jag kan se heller. Jag ser inte att vi fått andra kommentarer om att det är för mycket garn i den färgen. Det som kan påverka garnåtgången är virkfastheten, så dubbelkolla gärna den. Mvh DROPS Design

19.10.2023 - 09:40

country flag Gertrud wrote:

Hej! Jag undrar angående stjärtfenan. Ska den virkas dubbel? Jag har nästan virkat den färdig och får hälften av det mörkgrå garnet över. Vad har jag gjort för fel? De andra färgerna har stämt jättebra.

12.10.2023 - 17:23

country flag Heidi wrote:

Hej, jeg er nyhækler og kunne godt tænke mig at hækle, haj tæppet i voksenudgave, ca. 185 cm høj, hvor mange masker vil I tro jeg skulle gå ud fra? Det er til min mand, da han elsker hajer.

05.09.2023 - 21:42

DROPS Design answered:

Hei Heidi. Se på målene på den største str. Om du syns bredden er bra, fortsetter du bare å hekle med grå til ønsket lengde før det byttet til sort/rødt/natur. Om du ønsker bredere teppe øverst, fortsetter du å øke til ønsket bredde, så hekles det til ønsket lengde før det byttet til sort/rødt/natur. HUSK du trenger mer garn (det har vi ikke oversikten over). mvh DROPS Design

11.09.2023 - 15:14

country flag Miriam wrote:

Boating

01.09.2023 - 04:08

country flag Josephine wrote:

Wenn ich bei 50 Stäbchen aller 10cm 5Stäbchen zunehmen muss (10x)komme ich auf 100stäbchen.wenn ich aber nach JEDER Zunahme in Jeder 2.Reihe noch 1Stäbchen zunehmen muss dann komm ich nicht auf 101 Stäbchen sondern auf 111Stäbchen oder nicht?

28.05.2023 - 18:33

DROPS Design answered:

Liebe Josephine, es sind 50 Stäbchen vor den Zunahmen, dann nehmen Sie zuerst 5 Stäbchen 10 Mal = 50 Stäbchen werden zugenommen = 100 Stäbchen + 1 Zunahme = 101 Stäbchen. Viel Spaß beim häkeln!

30.05.2023 - 10:50

country flag Christine wrote:

Die Anleitung ist wirklich gut. Allerdings habe ich Probleme mit den Zähnen. Zumal die Anleitung in Deutsch und Englisch sich an dieser Stelle widersprechen. Im Deutschen heisst es man startet mit 2 festen Maschen, dann ein Doppeltes Stäbchen, 2 Stäbchen und nochmal ein doppeltes Stäbchen in eine Masche, etc. Im Englischen heisst es man startet damit, zwei Maschen zu überspringen, was in meinen Augen viel mehr Sinn ergibt. Ich ribbel noch einmal die kompletten Zähne auf und starte neu.

18.05.2023 - 16:30

DROPS Design answered:

Liebe Christine, vielen Dank für den Hinweis, das Wort *überspringen* fehlt ja in deutch und wird korrigiert; viel Spaß beim häkeln!

19.05.2023 - 09:11

country flag Michelle wrote:

Hello! I am wondering how to scale up this pattern for an adult. I’d like to make this as a gift, but the person is 6ft tall 117kg so I’m not sure this will fit them! Love the pattern, seems straightforward enough as a beginner! Thank you :)

08.12.2022 - 03:53

DROPS Design answered:

Dear Michelle, we are unfortunately not able to adjust every pattern to every individual request - feel free to ask your yarn store or any crochet forum. Thanks for your comprehension. Happy crocheting!

08.12.2022 - 10:09

country flag Gitte wrote:

Any problems if I crochet the bottom of the tail in a circle instead of back and forth.? And avoid having to sew it together

10.01.2022 - 20:51

DROPS Design answered:

Dear Gitte, do you want to avoid the vent/opening at the top of blanket avoiding a seam? then just think about how long you would like this opening to be then work in the round (but maybe working alternately from RS and from WS to keep same texture all the way). Happy crocheting!

11.01.2022 - 09:03

country flag Laurie wrote:

Bonjour, pouvez vous me confirmer, pour le corp je fais le modèle 7/8 ans, après avoir augmenté de 1 BRIDE afin d'obtenir 81 brides, je dois continuer sans augmentation jusqu'à le modèle fasse 94 cm ou je dois augmenter de 1 bride un tour sur 2 jusqu'à le modèle fasse 94 cm ? Merci de votre réponse

06.10.2021 - 08:58

DROPS Design answered:

Bonjour Laurie, en taille 7/8 ans, quand toutes les augmentations sont faites, vous avez 81 brides, et vous continuez ensuite en brides (= 1 bride dans chacune de ces 81 brides) sans augmenter davantage jusqu'à ce que l'ouvrage mesure 94 cm. Bon crochet!

06.10.2021 - 16:14

country flag Annemiek Van De Rijt wrote:

Er staat bij het lijf dat je de lossen met een halve vaste tot een ring moet sluiten en daarna heen en weer haken maar de deken is toch niet rondom gesloten?

28.05.2021 - 18:31

DROPS Design answered:

Dag Annemiek,

Het werk wordt inderdaad heen en weer gehaakt en op het einde gesloten door de naad in de lengte dicht te naaien.

31.05.2021 - 10:18

Přidejte komentář k návodu DROPS Children 28-13

Rádi bychom věděli, co si o tomto modelu myslíte!

Pokud se chcete na něco zeptat, dbejte prosím na to, abyste ve formuláři níže vybrali správnou kategorii - díky tomu se dříve dozvíte, co potřebujete vědět. Povinná pole jsou označena *.