
Popular categories
Looking for a yarn?


Comments / Questions (21)
![]() Monika Seidemann wrote:
Monika Seidemann wrote:
Guten Tag, herzlichen Dank für die kurzfristige Antwort auf meine Frage vom 02.10.2023. Es hat mir sehr geholfen. Noch einen angenehmen Tag. Liebe Grüße Monika
10.10.2023 - 11:15
![]() Monika Seidemann wrote:
Monika Seidemann wrote:
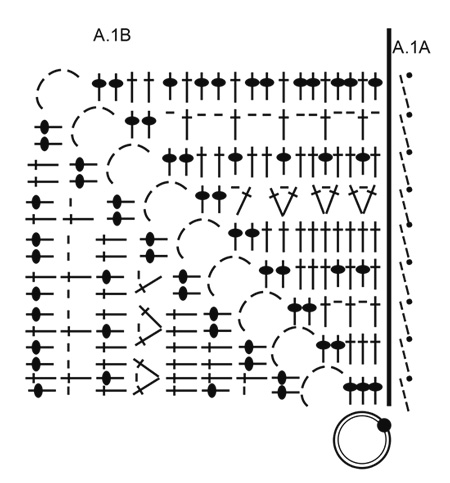
Zu meiner Frage vom 17.07.2023 - Ihre Antwort vom 20.07.2023. Der Rundenbeginn (3 LM) bedeutet das, das erste Stäbchen aus der Anleitung? Ich würde mich freuen von Ihnen zu hören. Viele Grüße Monika
02.10.2023 - 10:03DROPS Design answered:
Liebe Frau Seidemann, die 3 Luftmaschen in A.1A ersetzen nicht das 1. Stäbchen, die kommen extra. Viel Spaß beim häkeln!
02.10.2023 - 11:49
![]() Monika Seidemann wrote:
Monika Seidemann wrote:
Guten Tag, ich komm leider nicht mit dem Diagramm zurecht. Mir ist nicht klar, ob die Anfangsmasche am Rundenbeginnn A.A1 = 3 LM die 1. Masche des Diagrammfeldes (das Diagrammfeld wird ja 4x gehäkelt) ist. Ich hoffe, ich habe mich gut ausgedrückt und freue mich auf eine schnelle Rückantwort. Viele Grüße Monika
17.07.2023 - 07:38DROPS Design answered:
Liebe Monica. A.1A zeigt, wie jede Runde beginnt ( = 3 Luftmasche ) und endet (= 1 Kettmasche), A.1B wird 4 x gehäkelt. Viel Spass beim häkeln!
20.07.2023 - 10:55
![]() Charlotte Valentin wrote:
Charlotte Valentin wrote:
Bonsoir, combien faut-il de pelotes pour cette dimension 125 cm x 100 cm. Cordialement
14.12.2022 - 21:45DROPS Design answered:
Bonjour Mme Valentin, vous trouverez les quantités nécessaires pour réaliser la couverture sous l'en-tête, au poids et par couleur, autrement dit, il faut en gris par ex 300 g DROPS Nepal /50 g la pelote = 6 pelotes en gris 0501, procédez de la même façon pour chaque couleur pour avoir la quantité de pelotes nécessaire. Bon crochet!
15.12.2022 - 08:44
![]() Maria Luisa Casadei wrote:
Maria Luisa Casadei wrote:
Buongiorno vorrei solo gentilmente chiedere se fosse possibile avere una descrizione o grafico punto per punto su come realizzare la piastrella dall'inizio alla fine perchè non ci capisco niente e vorrei tanto realizzarla. Chiedo scusa se pretendo troppo. Grazie
03.03.2021 - 08:20DROPS Design answered:
Buonasera Maria Luisa, il grafico per la lavorazione della piastrella è in fondo alla pagina: si legge dal basso verso l'alto e da destra verso sinistra. Buon lavoro!
03.03.2021 - 23:10
![]() Margo Molenaar wrote:
Margo Molenaar wrote:
Bij het patroon Tangy Squares is geen geschreven patroon. Ik heb niet eerder met een dergelijk patroon gewerkt en snapte aanvankelijk niet dat het telpatroon slechts een kwart van het hele vierkant beslaat. Nu ik begrijp dat A1B slechts het eerste kwart is van het patroon, snap ik de aanwijzing: Haak A1B 4 keer om de lossenring. Ik denk dat het behulpzaam zou zijn om dat er bij te zetten én een plaatje erbij waar het patroon in zijn geheel te zien is.
26.07.2020 - 16:20
![]() Patricia wrote:
Patricia wrote:
Hermosa la manta, quiero hacerla!! Yo la voy a hacer de 125 cm x 200 cm Tengo una de ese tamaño tejida con cashmilon ( fibra sintética) y pesa 1600 kg Si la hiciera con el material que usaron pesaría 2200 entonces podrian decirme que cantides de cada color necesito en cashmilon?
26.06.2020 - 19:10DROPS Design answered:
Hola Patrícia. No conozco está calidad por lo tanto no puedo contestar a tu pregunta.
29.06.2020 - 21:20
![]() Kasia wrote:
Kasia wrote:
Bardzo piękny wzór ale bardzo trudno go zrobić z tego schematu.
19.01.2020 - 16:30
![]() Anna wrote:
Anna wrote:
Per favore potrei avere la spiegazione scritta della coperta? Non riesco a far combaciare i quadrati con i disegni perché non li capisco. Grazie
29.09.2019 - 10:34DROPS Design answered:
Buongiorno Anna, non ci è possibile in questa sede darle la spiegazione scritta della coperta. Può però provare a guardare i nostri video tutorial o le nostre FAQ (domanda 10) in fondo alla pagina per un ulteriore aiuto. Guardi se questa lezione le può essere di aiuto.
29.09.2019 - 11:12
![]() Anna wrote:
Anna wrote:
Vorrei la spiegazione passo passo al posto del disegno perché mi fa confondere. Grazie
29.09.2019 - 10:24DROPS Design answered:
Buongiorno Anna, purtroppo in questa sede non ci è possibile fornire un aiuto così personalizzato. Può però rivolgersi al suo rivenditore DROPS di fiducia. Buon lavoro!
29.09.2019 - 11:07
|
||||||||||||||||
Tangy Squares#tangysquaresblanket |
||||||||||||||||
 |
 |
|||||||||||||||
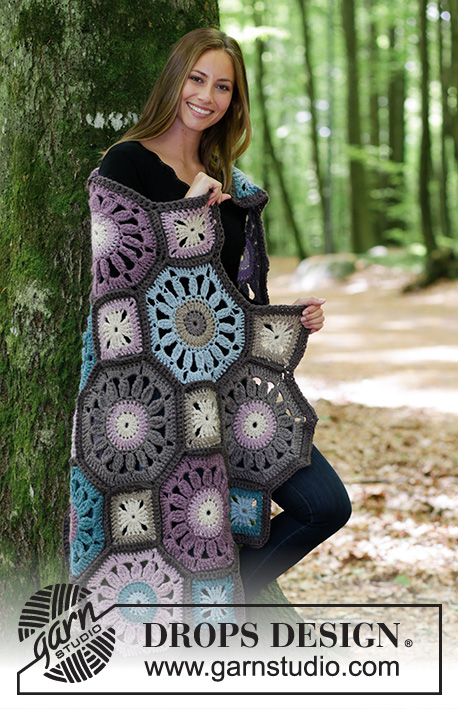
Crochet blanket with crochet squares. The piece is worked in DROPS Nepal.
DROPS 180-17 |
||||||||||||||||
|
INFORMATION FOR THE PATTERN: PATTERN: See diagrams A.1 and A.2. Diagram A.2 shows how the squares are laid out when sewn together. COLOUR CHANGE: To get a neat transition when changing colours, work the last slip stitch on the round with the new colour as follows: Insert the hook into the 3rd chain stitch at the beginning of the round, pick up the new strand, make a yarn over with the new colour and pull it through the loops on the hook. SQUARE COLOURS: SQUARE 1: ROUNDS 1-2: 0100, off white ROUNDS 3-4: 0501, grey ROUNDS 5-7: 0100, off white ROUNDS 8-9: 0501, grey SQUARE 2: ROUNDS 1-2: 0501, grey ROUNDS 3-4: 0517, medium grey ROUNDS 5-7: 0501, grey ROUNDS 8-9: 0517, medium grey SQUARE 3: ROUNDS 1-2: 2923, golden rod ROUNDS 3-4: 0517, medium grey ROUNDS 5-7: 2923, golden rod ROUNDS 8-9: 0517, medium grey SQUARE 4: ROUNDS 1-2: 0517, medium grey ROUNDS 3-4: 0501, grey ROUNDS 5-7: 0517, medium grey ROUNDS 8-9: 0501, grey SQUARE 5: ROUNDS 1-2: 2923, golden rod ROUNDS 3-4: 0500, light grey ROUNDS 5-7: 2923, golden rod ROUNDS 8-9: 0500, light grey ---------------------------------------------------------- BLANKET: The blanket consists of 20 squares with 5 different colour combinations – READ SQUARE COLOURS. Work A.1B a total of 4 times around the chain-stitch ring, A.1A shows how each round starts and finishes – read COLOUR CHANGE! REMEMBER THE CROCHET TENSION! Work a total of 4 squares in each colour combination. Cut and fasten all the strands. Sew the squares together in the outermost loop of the outermost stitch with grey – see A.2. |
||||||||||||||||
Diagram explanations |
||||||||||||||||
|
||||||||||||||||
|
||||||||||||||||

|
||||||||||||||||
Have you finished this pattern?Tag your pictures with #dropspattern #tangysquaresblanket or submit them to the #dropsfan gallery. Do you need help with this pattern?You'll find 7 tutorial videos, a Comments/Questions area and more by visiting the pattern on garnstudio.com. © 1982-2025 DROPS Design A/S. We reserve all rights. This document, including all its sub-sections, has copyrights. Read more about what you can do with our patterns at the bottom of each pattern on our site. |
||||||||||||||||


With over 40 years in knitting and crochet design, DROPS Design offers one of the most extensive collections of free patterns on the internet - translated to 17 languages. As of today we count 314 catalogues and 11822 patterns translated into English (UK/cm).
We work hard to bring you the best knitting and crochet have to offer, inspiration and advice as well as great quality yarns at incredible prices! Would you like to use our patterns for other than personal use? You can read what you are allowed to do in the Copyright text at the bottom of all our patterns. Happy crafting!
Post a comment to pattern DROPS 180-17
We would love to hear what you have to say about this pattern!
If you want to leave a question, please make sure you select the correct category in the form below, to speed up the answering process. Required fields are marked *.