
Popular categories
Looking for a yarn?


|
||||||||||||||||
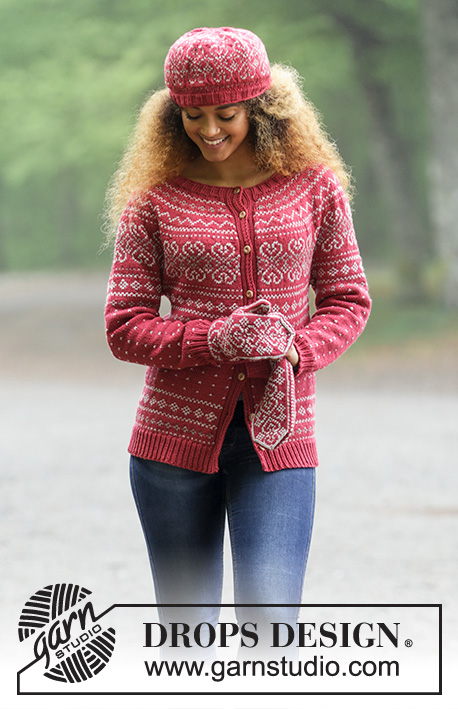
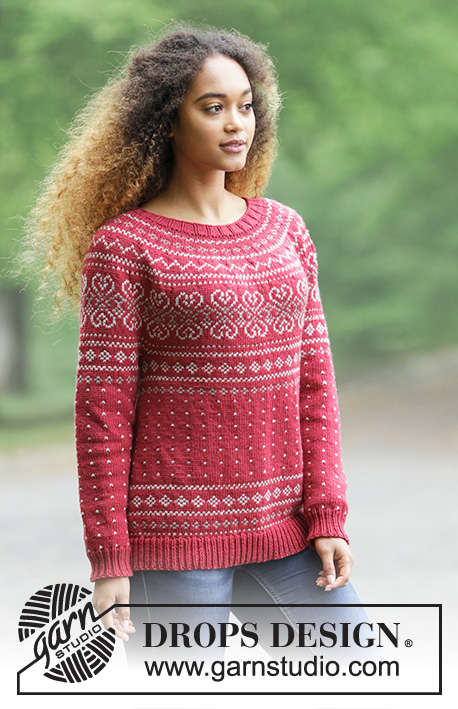
Rosendal Jumper |
||||||||||||||||
 |
 |
|||||||||||||||
Knitted jumper with round yoke and multi-colored Norwegian pattern, worked top down. Sizes S - XXXL. The piece is worked in DROPS Merino Extra Fine.
DROPS 181-2 |
||||||||||||||||
|
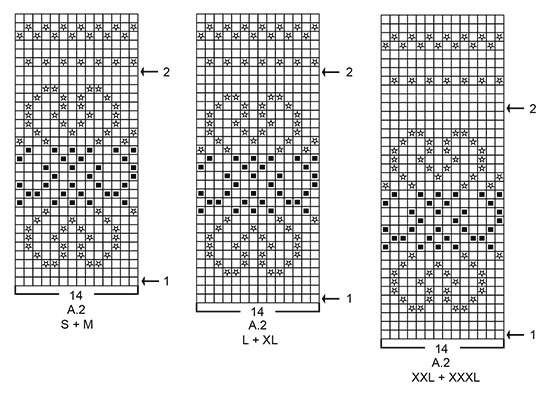
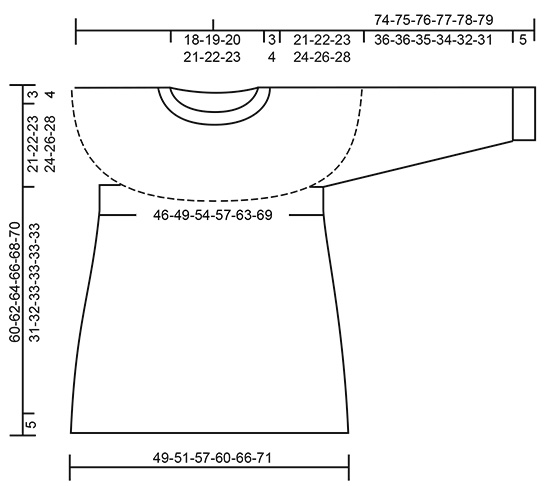
INFORMATION FOR THE PATTERN: INCREASE TIP: To work out how to increase evenly, count the total number of stitches on the row (e.g. 87 stitches) and divide by the number of increases to be made (e.g. 15) = 5.8. In this example, increase after approx. every 6th stitch by making 1 yarn over, on the next round knit the yarn overs twisted to prevent holes. ELEVATION (for back of neck): Insert 1 marker at the beginning of the round (= mid back). Start from the right side and knit until you have worked 12-13-14-14-15-15 stitches past the marker, turn, tighten the strand and purl 24-26-28-28-30-30 stitches back. Turn, tighten the strand and knit 36-39-42-42-45-45 stitches, turn, tighten the strand and purl 48-52-56-56-60-60 stitches. Turn, tighten the strand and knit 60-65-70-70-75-75 stitches, turn, tighten the strand and purl 72-78-84-84-90-90 stitches, turn, tighten and knit to mid back. KNITTING TIP-1: To prevent the knitting gauge becoming tighter when you work pattern, it is important that the strands do not tighten at the back of the piece. You can increase a size when working pattern, if the pattern tightens. PATTERN: See diagrams A.1 to A.5. Choose diagram for your size. The whole of the pattern is worked in stockinette stitch. DECREASE TIP (for mid under sleeve): Start 3 stitches before the marker thread, knit 2 together, knit 2 (the marker thread sits in the middle of these 2 stitches), slip 1 stitch as if to knit, knit 1, pass the slipped stitch over the knitted stitch (= 2 stitches decreased). ---------------------------------------------------------- JUMPER: The piece is worked in the round with circular needle from mid back and is worked top down. The sleeves are worked in the round with short circular needle top down, change to double pointed needles when necessary. NECKLINE: Cast on 87-90-93-99-102-105 stitches with circular needle size 3.5 mm / US 4 and dark rose. Knit 1 round. Then work rib (= knit 1 / purl 2). When the rib measures 3-3-3-4-4-4 cm / 1⅛"-1⅛"-1⅛"-1½"-1½"-1½" knit 1 round where you increase 15-15-17-16-18-15 stitches evenly on round – read INCREASE TIP = 102-105-110-115-120-120 stitches. Continue working yoke as described below. YOKE: Change to circular needle size 4 mm / US 6. Knit 1 round. For a better fit, you can now work an ELEVATION in the back of the neck – see description above. When the elevation has been completed, work A.1 in the round (= 17-21-22-23-24-24 repeats of 6-5-5-5-5-5 stitches). Continue the pattern in this way and increase as shown in the diagram. Read KNITTING TIP-1! REMEMBER THE GAUGE! When A.1 has been completed, there are 238-294-308-322-336-384 stitches on the needle and the piece measures approx. 12-14-14-16-16-18 cm / 4¾"-5½"-5½"-6¼"-6¼"-7" from the cast-on edge measured mid front. Continue working A.2 in the round, but on the first round (marked with arrow-1 in A.2) increase 28-14-14-28-42-22 stitches evenly on round = 266-308-322-350-378-406 stitches. Continue A.2 (= 19-22-23-25-27-29 repeats of 14 stitches). On the round marked with arrow-2 in A.2 increase 16-2-20-28-24-16 stitches evenly on round = 282-310-342-378-402-422 stitches. When A.2 has been completed, the piece measures approx. 24-25-26-28-30-32 cm / 9½"-9¾"-10¼"-11"-11¾"-12½" from the cast-on edge measured mid front. The next round is worked as follows with dark rose: Knit 42-46-49-55-61-65 stitches (= ½ back piece), place the next 58-64-74-80-80-82 stitches on a thread for sleeve, cast on 8-8-10-10-10-14 new stitches on the needle (= in the side under the sleeve), knit the next 83-91-97-109-121-129 stitches (= front piece), place the next 58-64-74-80-80-82 stitches on 1 thread for sleeve, cast on 8-8-10-10-10-14 new stitches on the needle (= in the side under the sleeve) and knit the remaining 41-45-48-54-60-64 stitches (= ½ back piece). Body and sleeves are now finished separately. THE PIECE IS NOW MEASURED FROM HERE! BODY: = 182-198-214-238-262-286 stitches. Knit 1 round with dark rose and increase at the same time 10-6-14-2-2-2 stitches evenly on round = 192-204-228-240-264-288 stitches. Continue working A.3 (= 16-17-19-20-22-24 repeats of 12 stitches). On the round marked with arrow-3 in A.3 increase 12 stitches evenly on round in all sizes = 204-216-240-252-276-300 stitches. When A.3 has been completed, work A.4 in the round (= 34-36-40-42-46-50 repeats of 6 stitches). Continue with A.4 until the piece measures approx. 22-23-24-24-24-24 cm / 8¾"-9"-9½"-9½"-9½"-9½" from the separation for sleeves – adjust so that you have worked 2-4 rounds with dark rose after a round with "dots" – AT THE SAME TIME increase 12 stitches evenly in all sizes on the last round = 216-228-252-264-288-312 stitches. Now work A.5 in the round (= 18-19-21-22-24-26 repeats of 12 stitches). When A.5 has been completed, knit 1 round with dark rose where you increase 42-42-48-48-54-60 stitches evenly on round = 258-270-300-312-342-372 stitches. Work rib (= knit 1 and purl 2) until the rib measures 5 cm/2 inches. Now bind off with knit over knit and purl over purl, but to avoid a tight bind-off edge, you can make 1 yarn over after every 6th stitch at the same time as you bind off (the yarn overs are bind off as normal stitches). The jumper measures approx. 60-62-64-66-68-70 cm / 23⅝"-24⅜"-25¼"-26"-26¾"-27½" from the shoulder down. SLEEVE: Place the 58-64-74-80-80-82 stitches from the one side of the piece on short circular needle size 4 mm / US 6 and, in addition, knit up 1 new stitch in each of the 8-8-10-10-10-14 stitches cast on under the sleeve with dark rose = 66-72-84-90-90-96 stitches. Insert 1 marker thread in the middle of these 8-8-10-10-10-14 stitches under the sleeve. Start the round by the marker thread and work A.3 in the round (= 5½-6-7-7½-7½-8 repeats of 12 stitches). When A.3 has been completed 1 time in height, continue with A.4 in the same way, but make sure that the dots are in the same place over A.3 as on the body. AT THE SAME TIME when the piece measures 2 cm / ¾" from the separation in all sizes, decrease 2 stitches mid under the sleeve – READ DECREASE TIP-1. Decrease in this way a total of 9-12-18-18-18-21 times; in S: Every 11th round, in M: Every 8th round, in L + XL: Every 5th round, in XXL: Alternately every 4th and 5th round and in XXXL: Alternately every 3rd and 4th round = 48-48-48-54-54-54 stitches. Continue A.4 until the piece measures approx. 36-36-35-34-32-31 cm / 14¼"-14¼"-13¾"-13½"-12½"-12¼" from the separation – adjust so that you have worked 2-4 rounds with dark rose after a round with "dots". Change to double pointed needles size 3.5 mm / US 4 and work rib in the round (= knit 1 / purl 2) for 5 cm / 2". Bind off with knit over knit and purl over purl, but to avoid the bind-off edge being tight, make 1 yarn over after every 6th stitch at the same time as you bind off (the yarn overs are bind off as normal stitches). The sleeve measures approx. 41-41-40-39-37-36 cm / 15¾"-16"-15¾"-15¼"-14½"-14¼" from the separation. Work the other sleeve in the same way. |
||||||||||||||||
Diagram explanations |
||||||||||||||||
|
||||||||||||||||

|
||||||||||||||||
|
||||||||||||||||

|
||||||||||||||||
|
||||||||||||||||
|
Have you made this or any other of our designs? Tag your pictures in social media with #dropsdesign so we can see them! Do you need help with this pattern?You'll find tutorial videos, a Comments/Questions area and more by visiting the pattern on garnstudio.com. © 1982-2024 DROPS Design A/S. We reserve all rights. This document, including all its sub-sections, has copyrights. Read more about what you can do with our patterns at the bottom of each pattern on our site. |
||||||||||||||||


With over 40 years in knitting and crochet design, DROPS Design offers one of the most extensive collections of free patterns on the internet - translated to 17 languages. As of today we count 304 catalogs and 11422 patterns - 11417 of which are translated into English (US/in).
We work hard to bring you the best knitting and crochet have to offer, inspiration and advice as well as great quality yarns at incredible prices! Would you like to use our patterns for other than personal use? You can read what you are allowed to do in the Copyright text at the bottom of all our patterns. Happy crafting!
Comments / Questions (10)
Hola! Las indicaciones dicen que el resorte del cuello y el de la cintura/puños es 1d/2r, sin embargo, en la foto me parecen distintos. ¿Cintura y puños no son en 2d/1r?
16.11.2021 - 08:56Ja, es bleibt mir nichts anderes übrig, als es einfach zu kalkulieren und zu probieren, bis ich zufrieden bin :-) Leider habt Ihr mit dieser Maschenprobe nicht sehr viel Auswahl. Es wäre im Allgemeinen super, wenn Ihr mehr Anleitungen für Männerpullover hättet. Ansonsten seid Ihr meistens die besten!!!!! Und Kompliment zu Drops Sky! Tolles Garn!
14.12.2018 - 13:08Ich stricke mit Nadeln 6, nehme Drops Sky zweifädig und komme dabei auf eine (gewaschene) Maschenprobe von 14x22. Für das Halsbündchen habe ich nun 76 M angeschlagen. Für einen Tipp, wieviele Maschen ich nun hinten als Erhöhung (Herrenpullover) stricken muss, wäre ich dankbar. Aber ich verstehe natürlich, dass Sie nicht für jede Anfrage Zeit haben.
14.12.2018 - 12:17DROPS Design answered:
Liebe Frau Fuchs, leider können wir Ihnen nicht hier weiterhelfen - vielleicht können Sie die Breite jede verkürzte/verlängerte Reihe in diesem Modell kalkulieren und dann mit Ihrer Maschenprobe anpassen? Die Maschenprobe sollen Sie auch sicher in der Höhe mit kalkulieren. Viel Spaß beim stricken!
14.12.2018 - 12:50Wie berechnet man im Allgemeinen die Erhöhung im Nacken (ich stricke mit Drops Sky doppelfädig, also eine komplett andere Maschenprobe). Gibt es dafür eine Formel? Wie kommen Sie von 102 Maschen auf 12-24-36-48 usw.?? Wie berechnet man das, ganz allgemein? Ich habe mir schon sehr viele Drops-Anleitungen angesehen und egal, was ich dividiere, ich komme nicht dahinter.
14.12.2018 - 01:06DROPS Design answered:
Liebe Frau Fuchs, leider können wir nicht jede Anleitung nach jeder individuellen Anfrage anpasse, am besten suchen Sie ein Modell mit Ihrer Maschenprobe und eine Erhöhung - Ihr DROPS Laden kann Ihnen in solchen Fällen weiterhelfen - auch telefonisch oder per E-Mail. Viel Spaß beim stricken!
14.12.2018 - 08:47I've now finished the jumper but I've a lot of wool left over. I knitted the medium and it came out the correct size but I've got 2 full balls of dark rose and 1 full ball of light beige left. I'm used to having some wool remaining but this seems excessive!
11.04.2018 - 01:46I'm just starting the sleeves on the jumper. Re the body there's no instruction to change to 3.5 mm needles for the rib even though the stitiches have been increased to allow for this. I used 3.5mm and cast off with 4mm needle and this looks right. I see that there's been an amendment to use chart A3 instead of A5 but 2 plain rows in rose need to be worked (to give a total of 3 rows between patt rows) before starting A3 to keep the pattern the same as the body.
22.03.2018 - 16:47Fehler: 1. Nackenerhöhung unvollständig beschrieben. 2. 7te Zunahme in A.1 zu stark, muss auf Reihen 23 und 28 aufgeteilt werden 3. Rumpfteil, letzte Zunahme vor dem Abschlussbund viel zu stark, selbst die Hälfte ist zuviel
13.01.2018 - 08:41Moet de boordsteek van het lijf ook niet met naalden 3,5? Moet je de mouw niet beginnen met A3 (bovenaan mouw), i.p.v. met A5 zoals beschreven?
19.11.2017 - 12:46DROPS Design answered:
Hallo Henriëtte, Dit patroon is zo ontworpen dat je de boordsteek van het lijf in dezelfde naadl breit als de rest van het lijf. Als je de boord wat meer wilt laten aansluiten kun je er natuurlijk voor kiezen om een kleinere naald te gebruiken. Wat de mouw betreft denk ik dat je gelijk hebt om met A3 te beginnen. Ik geef het even door aan de ontwerpafdeling om te controleren.
06.02.2018 - 17:26Dobrý deň. Zdá sa mi, že v návode tak anglickom ako aj českom je chyba v časti rukáv. Podľa fotiek modelu by tam mal byť vzor A3 (korešponduje s trupom) a nie, ako je uvedené, A5. A5 je viditeľný len v spodnej časti trupu. Prosím, je môj postreh správny? Vopred ďakujem za odpoveď. Jana
02.11.2017 - 21:26Warum gibt es diese Anleitung nicht mehr in einem Heft zu kaufen, sondern nur noch im Internet?
10.09.2017 - 17:13DROPS Design answered:
Liebe Frau Heinzmann, die Nachfrage nach Hefte war zu gering, weil die Kundinnen sich die Anleitung lieber direkt selber ausdrücken. Viel Spaß beim stricken!
11.09.2017 - 09:02