
Popular categories
Looking for a yarn?


|
|||||||||||||||||||||||||
Micaela |
|||||||||||||||||||||||||
 |
 |
||||||||||||||||||||||||
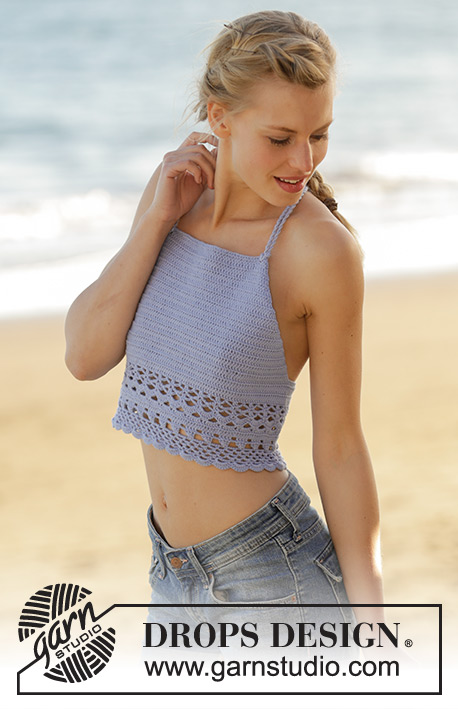
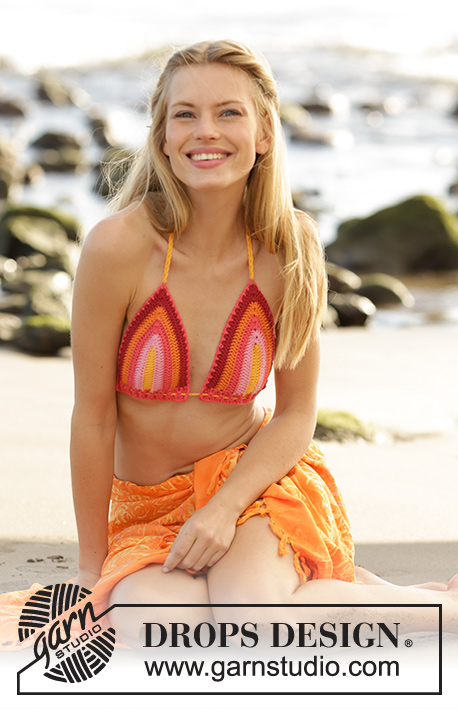
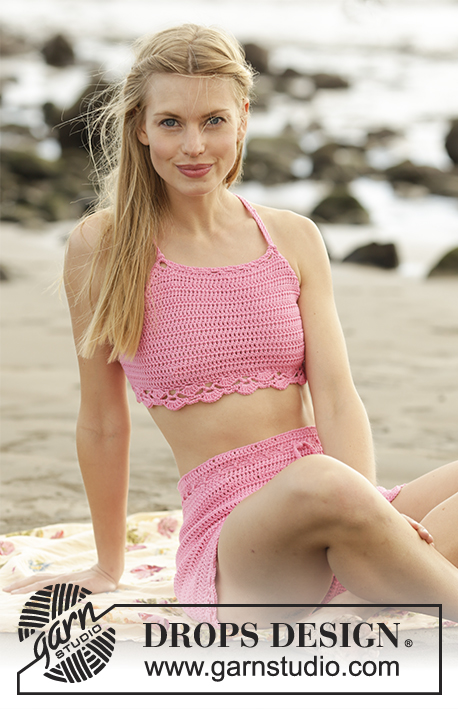
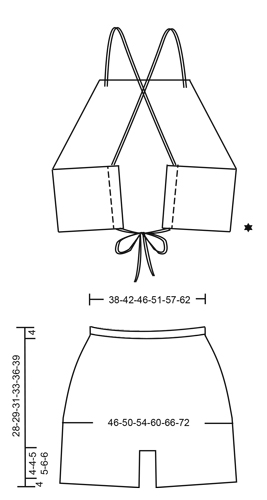
Bikini top and shorts with cord ties. The piece is crocheted in DROPS Muskat. Sizes S - XXXL.
DROPS 178-74 |
|||||||||||||||||||||||||
|
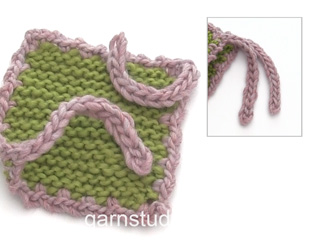
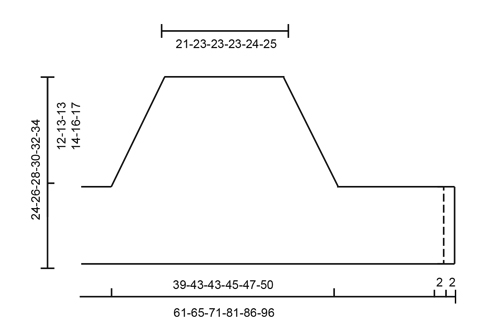
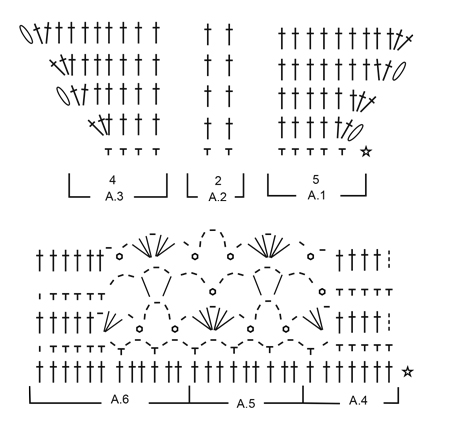
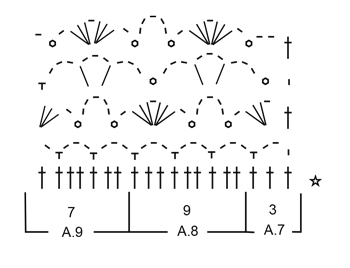
CROCHET INFO (for the bikini top): At the start of each row of double crochets, work 5 chain stitches to turn. These 5 chain stitches do not replace the first double crochet. PATTERN: See diagrams A.1 to A.9. CROCHET INFO (for the shorts): At the beginning of each round of double crochets, the first double crochet is replaced by 3 chain stitches. Finish the round with 1 slip stitch in the 3rd chain stitch at the beginning of the round. At the beginning of each round of single crochets, the first single crochet is replaced by 1 chain stitch. Finish the round with 1 slip stitch in the first chain stitch at the beginning of the round. INCREASE TIP (for the shorts): Work until there are 2 double crochets left before the marker, work 2 double crochets in the first double crochet, 1 double crochet in each of the next 2 double crochets (the marker sits in the middle of these double crochets) and 2 double crochets in the next double crochet (= 2 double crochets increased). Repeat in the other side (= 4 double crochets increased on the round). ---------------------------------------------------------- BIKINI TOP: The bikini top is worked back and forth, top down. Work 48-52-52-53-54-57 chain stitches (including 1 chain stitch to turn) with hook size 4 mm / G/6 and Muskat. Turn and work as follows: Work 1 single crochet in the second chain stitch from the hook (= 1 chain stitch to turn + 1 single crochet), work 1 single crochet in each of the next 1-0-0-1-2-0 chain stitches, * skip 1 chain stitch, work 1 single crochet in each of the next 4 chain stitches *, repeat from *-* 8-9-9-9-9-10 more times = 38-41-41-42-43-45 single crochets. Turn and work pattern as follows: Work A.1 over the first 5 single crochets, A.2 over the next 29-32-32-33-34-36 single crochets, A.3 over the remaining 4 single crochets – read CROCHET INFO! REMEMBER THE CROCHET GAUGE! When A.1 to A.3 have been completed in height, continue with double crochets and increases in the same way until you have worked a total of 11-12-12-13-14-15 rows of double crochets (you increase 3 double crochets on each row). There are now 71-77-77-81-85-90 double crochets on the row. Cut the strand. Work 22-26-33-39-44-52 loose chain stitches. Continue with double crochets as before over the 71-77-77-81-85-90 double crochets, then work 27-31-38-44-49-57 chain stitches (including the 5 chain stitches to turn) at the end of the row. Turn and work as follows: Work 1 double crochet in the 6th chain stitch from the hook, then work 1 double crochet in each of the next 3-1-2-2-1-3 chain stitches, * skip 1 chain stitch, work 1 double crochet in each of the next 5 double crochets *, repeat from *-* 2-3-4-5-6-7 more times, continue with double crochets as before over the 71-77-77-81-85-90 double crochets, then work over the chain stitches at the end of the row as follows: Work 1 double crochet in each of the next 4-2-3-3-2-4 chain stitches, * skip 1 chain stitch, work 1 double crochet in each of the next 5 chain stitches *, repeat from *-* 2-3-4-5-6-7 more times = 109-121-133-147-159-178 double crochets. Work 6-7-9-10-10-11 rows with 1 double crochet in each double crochet, on the last row of double crochets decrease0-3-6-2-5-6 stitches evenly on the row = 109-118-127-145-154-172 double crochets. Continue working as follows: A.4 over the first 7 double crochets, A.5 over the next 90-99-108-126-135-153 double crochets (= 10-11-12-14-15-17 repeats of 9 stitches), finish with A.6 over the last 12 double crochets. Work A.4, A.5 and A.6 one time in height. The last row is worked from the right side of the piece. Cut and fasten the strands. CROCHET EDGE: Work an edge around the top as follows: Begin from the wrong side of the piece – start with the one short side at the back, work up the diagonal side, over the row of chain stitches at top front, down the other diagonal side and along the last short side (do not work over the edge at the back of the fan pattern on the bottom edge): ROW 1: 1 single crochet,* 3 chain stitches, skip forward approx. 1-1½ cm / ⅜"-½", 1 single crochet *, repeat from *-*, make sure that the number of chain-spaces is divisible by 2. ROW 2: Work 1 single crochet around the first chain-space, * 3 chain stitches, 1 double crochet in the first chain stitch, 1 single crochet around the next chain-space, repeat from *-*. Cut and fasten the strand. ASSEMBLY: Fold down the outermost 2 cm / ¾" in each side on the wrong side of the top and sew down with small stitches through both layers so that there is a casting to thread the cord through. CORD TIE: Work 1 loose cord as follows: Work chain stitches with Muskat on hook size 4 mm / G/6 until you have a cord which measures 140-150-160-170-180-190 cm / 55"-59"-63"-67"-71"-75", turn and work 1 slip stitch in each chain stitch, but make sure that you do not work the slip stitches tighter than the chain stitches! Cut and fasten the strands. Work 1 more cord in the same way. Start from the right side and thread one end of the cord through the outermost hole at top front, around the double crochets and out through the next hole (= 2 cord ends out on the right side). Adjust the cord so that the ends are the same length, then thread the 2 ends under the cord on the wrong side and tighten. Repeat in the other side with the other cord. Then lay the cords in a cross at the back before they are threaded through the casting – see the illustration! The top is fastened by tying a knot. SHORTS: The piece is worked in the round, top down. Work 163-182-196-220-244-268 chain stitches with Muskat on hook size 4 mm / G/6 and form them to a ring with 1 slip stitch in the first chain stitch. Insert 1 marker thread at the beginning of the round = mid back. The first round is worked as follows: 3 chain stitches (= 1 double crochet) – read CROCHET INFO, work 0-1-1-1-1-1 double crochet in each of the next 0-1-3-3-3-3 chain stitches, * skip 1 chain stitch, 1 double crochet in each of the next 5 chain stitches *, repeat from *-* 26-29-31-35-39-43 more times = 136-152-164-184-204-224 double crochets. Work 1 more round with 1 double crochet in each double crochet. REMEMBER THE CROCHET GAUGE! Now work a row of holes as follows: Work 4 chain stitches (= 1 double crochet + 1 chain stitch), skip 1 double crochet, * 1 double crochet in the next double crochet, 1 chain stitch, skip 1 double crochet *, repeat from *-* the whole round, finish with 1 slip stitch in the 3rd chain stitch at the beginning of the round. On the next round work 1 double crochet in each double crochet/around each chain stitch. Then you are going to work the shorts higher in the back than the front and this is done as follows – WITH SINGLE CROCHETS: Work 8 single crochets past the marker thread mid back, turn and work 1 slip stitch in the first stitch, then 1 single crochet in each of the next 15 single crochets, turn and work 1 slip stitch in the first stitch, then 1 single crochet in each of the next 23 stitches (you also work the slip stitches). Continue in this way by working over 8 stitches more each time you turn, until you have worked over a total of 96-96-96-112-112-128 stitches. Turn again and work back to the marker thread mid back. The piece measures approx. 11-11-11-12-12-13 cm / 4½"-4½"-4½"-4¾"-4¾"-5" mid back. Insert 2 new marker threads in the piece, (keep the marker thread mid back), insert the 2nd marker thread after 34-38-41-46-51-56 stitches (= the side), 3rd marker thread after 68-76-82-92-102-112 new stitches (= the side). Continue with 1 double crochets in each double crochet, AT THE SAME TIME on the first round increase 1 double crochet on each side of the marker threads in the sides – READ INCREASE TIP. Increase in this way every 2nd-3rd-4th-4th-5th-6th round a total of 5-4-4-4-4-4 times. AT THE SAME TIME when you have worked 4-3-2-2-2-2 rounds, increase 1 double crochet on each side of the marker thread mid back. Increase in this way every 2nd round a total of 5-6-7-8-9-10 times. When all increases have been completed there are 166-180-194-216-238-260 double crochets on the round. Continue with 1 double crochet in each double crochet until the piece measures 20-21-22-24-26-28 cm / 8"-8¼"-8¾"-9½"-10¼"-11" mid front and 27-28-29-32-34-37 cm / 10½"-11"-11½"-12½"-13½"-14½" mid back. Now divide for the legs as follows: Work 1 single crochet in each of the first 3-3-4-4-4-5 double crochets on the round, turn and work back over the first 6-6-8-8-8-10 double crochets (i.e. 3-3-4-4-4-5 double crochets on each side of the marker mid back). These 6-6-8-8-8-10 double crochets = gusset. Work double crochets back and forth over these for 10-11-12-13-14-15 cm / 4"-4⅜"-4¾"-5⅛"-5½-6", cut the strand. Sew the gusset, edge to edge to the 6-6-8-8-8-10 middle stitches mid front. Continue by working the legs. LEG: Work 1 double crochet in each of the 77-84-89-100-111-120 double crochets around the one leg, in addition work 14-16-20-18-25-25 double crochets along the gusset = 91-100-109-118-136-145 double crochets. Continue with 1 double crochet in each double crochet until the leg measures 4-4-5-5-6-6 cm / 1½"-1½"-2"-2"-2⅜"-2⅜". Now work an edge at the bottom of the leg as follows: Work A.7 (= 3 double crochets), A.8 (= 9 double crochets) over the next 81-90-99-108-126-135 double crochets, finish with A.9 (= 7 double crochets). Work according to diagrams A.7. A.8 and A.9 one time in height. Cut and fasten the strand. TIE CORD: Work 120-140-150-160-170-180 cm / 47"-55"-59"-63"-67"-71" of LOOSE chain stitches, turn and work back with 1 slip stitch in each chain stitch. Thread the band into the row of holes at the top of the shorts – start mid front. |
|||||||||||||||||||||||||
Diagram explanations |
|||||||||||||||||||||||||
|
|||||||||||||||||||||||||
|
|||||||||||||||||||||||||
|
|||||||||||||||||||||||||
|
|||||||||||||||||||||||||
|
|||||||||||||||||||||||||
|
Have you made this or any other of our designs? Tag your pictures in social media with #dropsdesign so we can see them! Do you need help with this pattern?You'll find tutorial videos, a Comments/Questions area and more by visiting the pattern on garnstudio.com. © 1982-2024 DROPS Design A/S. We reserve all rights. This document, including all its sub-sections, has copyrights. Read more about what you can do with our patterns at the bottom of each pattern on our site. |
|||||||||||||||||||||||||


With over 40 years in knitting and crochet design, DROPS Design offers one of the most extensive collections of free patterns on the internet - translated to 17 languages. As of today we count 304 catalogs and 11422 patterns - 11417 of which are translated into English (US/in).
We work hard to bring you the best knitting and crochet have to offer, inspiration and advice as well as great quality yarns at incredible prices! Would you like to use our patterns for other than personal use? You can read what you are allowed to do in the Copyright text at the bottom of all our patterns. Happy crafting!
Comments / Questions (33)
I dont understand this paragraph under shorts (I'm making size XL): "Insert 2 new marker threads in the piece, (keep the marker thread mid back), insert the 2nd marker thread [...] Increase in this way every 2nd round a total of 5-6-7-8-9-10 times".
28.06.2021 - 23:41DROPS Design answered:
Dear Mrs Tasia, you have already one marker thread on mid back, you will now add 2 more marker threads: one for each side, then you will increase on each side of these both marker threads as explained under INCREASE TIP. Can this help? Happy crocheting!
29.06.2021 - 09:28Thanx for this lovely pattern I strugle a little bit with the high back Didn't understand the start with the dc and the turn Try on my own and I complete it Very proude at myself
23.05.2021 - 12:02Als ik de korte broek in de rondte haak, moet ik mijn werk dan keren?
21.05.2021 - 11:58DROPS Design answered:
Dag Lizanne,
Nee, volgens het patroon hoef je het werk dan niet te keren. Je kan er zelf trouwens voor kiezen om dit eventueel wel te doen, mocht je dat willen.
21.05.2021 - 14:18Me perdi en esta parte del shorts "Trabajar 8 puntos bajos más allá del marcapuntos en el centro de la espalda, girar y trabajar 1 punto enano en el primer punto, después trabajar 1 punto bajo en cada uno de los siguientes 15 puntos bajos, girar y trabajar 1 punto enano en el primer punto, 1 punto bajo en cada uno de los siguientes 23 puntos (continuar trabajando los puntos enanos)." pueden explicarme mejor, porque no entiendo lo que debo hacer. Gracias!
05.01.2021 - 04:29Thank you for sharing your beautiful work.
18.11.2020 - 00:30Hello! I am a little confused on the inc rounds (at the same time). Do you continue the side inc in the 5 times of middle inc? I'm thrown off by "after 4 rounds of side inc". Thank you, and I'm sorry if I've confused anyone. I'm amazed and appreciative that people are able to design (and share!) these patterns. I could never come up with this lol! Thanks again!!!
24.07.2020 - 05:43DROPS Design answered:
Dear Randie, you have to increase on the side on every other round a total of 5 times (= this will be worked on the next 10 rounds), but after you have worked 4 of these 10 rounds, ie on 5th round, you increase on mid back on every other round (= as the increases on the sides) a total of 5 times - this means when the increases on the sides will be done, you continue increasing only on back piece. Happy crocheting!
29.07.2020 - 09:33Nas instruções aparece descrito, 1 ponto baixo em cada um dos 1-0-0-1-2-0 ponto corrente seguinte, como se faz isto?
23.06.2020 - 20:32DROPS Design answered:
Se descer na páina da instruções vai encontrar muitos vídeos para a ajudar a conhecer os pontos. Basta ver no link abaixo e vai encontrar um vídeo como fazer ponto baixo. https://www.garnstudio.com/video.php?patternid=8029&lang=pt Bom Croché!
25.06.2020 - 10:11I förklaringen till diagrammet står det: O = 5 luftmaskor - LÄS VIRKINFO! Men jag hittar inte denna virkinfo någonstans. Vad menas?
22.06.2020 - 09:58Puedo hacer el short con Drops Safran? Si es así. ¿qué número de ganchillo debo utilizar? Gracias
10.06.2020 - 11:10DROPS Design answered:
Hola Luz. Si, se puede trabajar este modelo con Safran utilizando un ganchillo de 2,5-3 mm, pero tienes que recalcular los puntos, porque la tensión del tejido va a ser diferente.
14.06.2020 - 23:45Buongiorno molto bello questo modello ,non riesco a capire il diagramma A4 A5 A6 le maglie alte a ogni tot maglie si distanziano un pochino così significa che bisogna saltare una maglia? Parlo della prima riga grazie mille.
08.06.2020 - 18:35DROPS Design answered:
Buongiorno Loretta. La riga di maglie alte (quella con la stella vicino) è già stata lavorata; è l'ultima delle 6-7-9-10-10-11 righe con 1 maglia alta in ogni maglia alta che precedono i diagrammi. Non deve saltare nessuna maglia. Buon lavoro!
09.06.2020 - 10:52