
Popular categories
Looking for a yarn?


|
|||||||||||||||||||||||||
Micaela |
|||||||||||||||||||||||||
 |
 |
||||||||||||||||||||||||
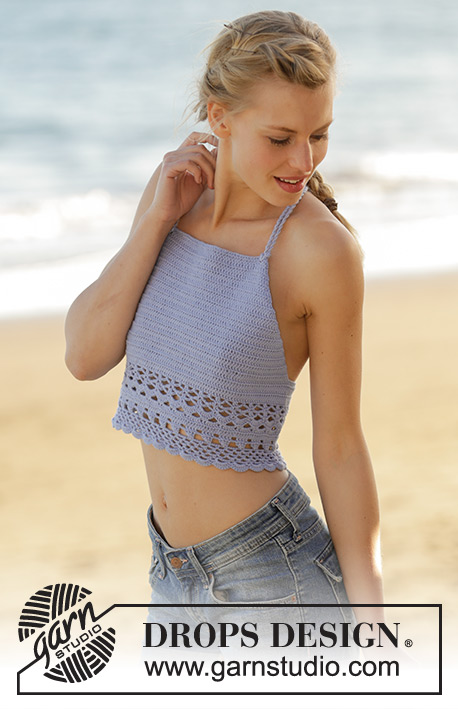
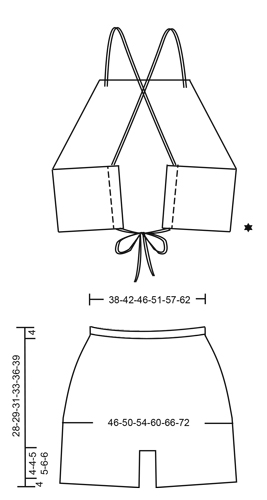
Bikini top and shorts with cord ties. The piece is crocheted in DROPS Muskat. Sizes S - XXXL.
DROPS 178-74 |
|||||||||||||||||||||||||
|
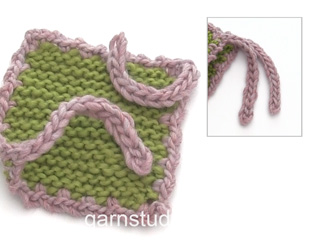
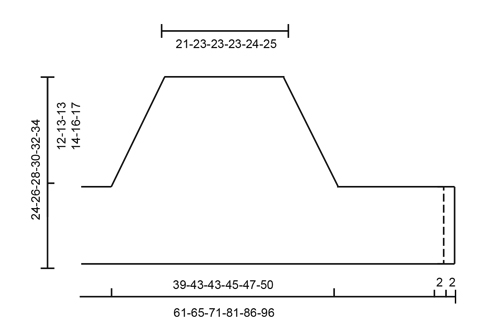
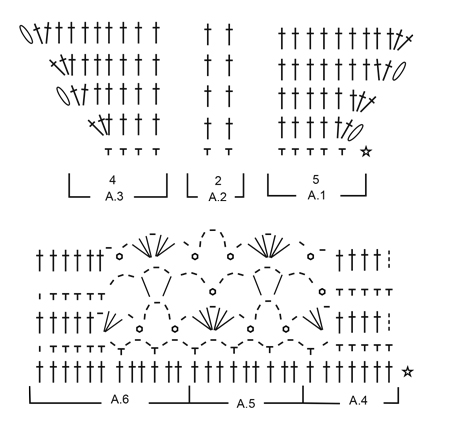
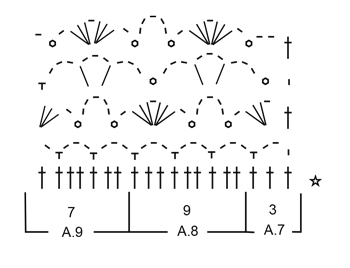
CROCHET INFO (for the bikini top): At the start of each row of double crochets, work 5 chain stitches to turn. These 5 chain stitches do not replace the first double crochet. PATTERN: See diagrams A.1 to A.9. CROCHET INFO (for the shorts): At the beginning of each round of double crochets, the first double crochet is replaced by 3 chain stitches. Finish the round with 1 slip stitch in the 3rd chain stitch at the beginning of the round. At the beginning of each round of single crochets, the first single crochet is replaced by 1 chain stitch. Finish the round with 1 slip stitch in the first chain stitch at the beginning of the round. INCREASE TIP (for the shorts): Work until there are 2 double crochets left before the marker, work 2 double crochets in the first double crochet, 1 double crochet in each of the next 2 double crochets (the marker sits in the middle of these double crochets) and 2 double crochets in the next double crochet (= 2 double crochets increased). Repeat in the other side (= 4 double crochets increased on the round). ---------------------------------------------------------- BIKINI TOP: The bikini top is worked back and forth, top down. Work 48-52-52-53-54-57 chain stitches (including 1 chain stitch to turn) with hook size 4 mm / G/6 and Muskat. Turn and work as follows: Work 1 single crochet in the second chain stitch from the hook (= 1 chain stitch to turn + 1 single crochet), work 1 single crochet in each of the next 1-0-0-1-2-0 chain stitches, * skip 1 chain stitch, work 1 single crochet in each of the next 4 chain stitches *, repeat from *-* 8-9-9-9-9-10 more times = 38-41-41-42-43-45 single crochets. Turn and work pattern as follows: Work A.1 over the first 5 single crochets, A.2 over the next 29-32-32-33-34-36 single crochets, A.3 over the remaining 4 single crochets – read CROCHET INFO! REMEMBER THE CROCHET GAUGE! When A.1 to A.3 have been completed in height, continue with double crochets and increases in the same way until you have worked a total of 11-12-12-13-14-15 rows of double crochets (you increase 3 double crochets on each row). There are now 71-77-77-81-85-90 double crochets on the row. Cut the strand. Work 22-26-33-39-44-52 loose chain stitches. Continue with double crochets as before over the 71-77-77-81-85-90 double crochets, then work 27-31-38-44-49-57 chain stitches (including the 5 chain stitches to turn) at the end of the row. Turn and work as follows: Work 1 double crochet in the 6th chain stitch from the hook, then work 1 double crochet in each of the next 3-1-2-2-1-3 chain stitches, * skip 1 chain stitch, work 1 double crochet in each of the next 5 double crochets *, repeat from *-* 2-3-4-5-6-7 more times, continue with double crochets as before over the 71-77-77-81-85-90 double crochets, then work over the chain stitches at the end of the row as follows: Work 1 double crochet in each of the next 4-2-3-3-2-4 chain stitches, * skip 1 chain stitch, work 1 double crochet in each of the next 5 chain stitches *, repeat from *-* 2-3-4-5-6-7 more times = 109-121-133-147-159-178 double crochets. Work 6-7-9-10-10-11 rows with 1 double crochet in each double crochet, on the last row of double crochets decrease0-3-6-2-5-6 stitches evenly on the row = 109-118-127-145-154-172 double crochets. Continue working as follows: A.4 over the first 7 double crochets, A.5 over the next 90-99-108-126-135-153 double crochets (= 10-11-12-14-15-17 repeats of 9 stitches), finish with A.6 over the last 12 double crochets. Work A.4, A.5 and A.6 one time in height. The last row is worked from the right side of the piece. Cut and fasten the strands. CROCHET EDGE: Work an edge around the top as follows: Begin from the wrong side of the piece – start with the one short side at the back, work up the diagonal side, over the row of chain stitches at top front, down the other diagonal side and along the last short side (do not work over the edge at the back of the fan pattern on the bottom edge): ROW 1: 1 single crochet,* 3 chain stitches, skip forward approx. 1-1½ cm / ⅜"-½", 1 single crochet *, repeat from *-*, make sure that the number of chain-spaces is divisible by 2. ROW 2: Work 1 single crochet around the first chain-space, * 3 chain stitches, 1 double crochet in the first chain stitch, 1 single crochet around the next chain-space, repeat from *-*. Cut and fasten the strand. ASSEMBLY: Fold down the outermost 2 cm / ¾" in each side on the wrong side of the top and sew down with small stitches through both layers so that there is a casting to thread the cord through. CORD TIE: Work 1 loose cord as follows: Work chain stitches with Muskat on hook size 4 mm / G/6 until you have a cord which measures 140-150-160-170-180-190 cm / 55"-59"-63"-67"-71"-75", turn and work 1 slip stitch in each chain stitch, but make sure that you do not work the slip stitches tighter than the chain stitches! Cut and fasten the strands. Work 1 more cord in the same way. Start from the right side and thread one end of the cord through the outermost hole at top front, around the double crochets and out through the next hole (= 2 cord ends out on the right side). Adjust the cord so that the ends are the same length, then thread the 2 ends under the cord on the wrong side and tighten. Repeat in the other side with the other cord. Then lay the cords in a cross at the back before they are threaded through the casting – see the illustration! The top is fastened by tying a knot. SHORTS: The piece is worked in the round, top down. Work 163-182-196-220-244-268 chain stitches with Muskat on hook size 4 mm / G/6 and form them to a ring with 1 slip stitch in the first chain stitch. Insert 1 marker thread at the beginning of the round = mid back. The first round is worked as follows: 3 chain stitches (= 1 double crochet) – read CROCHET INFO, work 0-1-1-1-1-1 double crochet in each of the next 0-1-3-3-3-3 chain stitches, * skip 1 chain stitch, 1 double crochet in each of the next 5 chain stitches *, repeat from *-* 26-29-31-35-39-43 more times = 136-152-164-184-204-224 double crochets. Work 1 more round with 1 double crochet in each double crochet. REMEMBER THE CROCHET GAUGE! Now work a row of holes as follows: Work 4 chain stitches (= 1 double crochet + 1 chain stitch), skip 1 double crochet, * 1 double crochet in the next double crochet, 1 chain stitch, skip 1 double crochet *, repeat from *-* the whole round, finish with 1 slip stitch in the 3rd chain stitch at the beginning of the round. On the next round work 1 double crochet in each double crochet/around each chain stitch. Then you are going to work the shorts higher in the back than the front and this is done as follows – WITH SINGLE CROCHETS: Work 8 single crochets past the marker thread mid back, turn and work 1 slip stitch in the first stitch, then 1 single crochet in each of the next 15 single crochets, turn and work 1 slip stitch in the first stitch, then 1 single crochet in each of the next 23 stitches (you also work the slip stitches). Continue in this way by working over 8 stitches more each time you turn, until you have worked over a total of 96-96-96-112-112-128 stitches. Turn again and work back to the marker thread mid back. The piece measures approx. 11-11-11-12-12-13 cm / 4½"-4½"-4½"-4¾"-4¾"-5" mid back. Insert 2 new marker threads in the piece, (keep the marker thread mid back), insert the 2nd marker thread after 34-38-41-46-51-56 stitches (= the side), 3rd marker thread after 68-76-82-92-102-112 new stitches (= the side). Continue with 1 double crochets in each double crochet, AT THE SAME TIME on the first round increase 1 double crochet on each side of the marker threads in the sides – READ INCREASE TIP. Increase in this way every 2nd-3rd-4th-4th-5th-6th round a total of 5-4-4-4-4-4 times. AT THE SAME TIME when you have worked 4-3-2-2-2-2 rounds, increase 1 double crochet on each side of the marker thread mid back. Increase in this way every 2nd round a total of 5-6-7-8-9-10 times. When all increases have been completed there are 166-180-194-216-238-260 double crochets on the round. Continue with 1 double crochet in each double crochet until the piece measures 20-21-22-24-26-28 cm / 8"-8¼"-8¾"-9½"-10¼"-11" mid front and 27-28-29-32-34-37 cm / 10½"-11"-11½"-12½"-13½"-14½" mid back. Now divide for the legs as follows: Work 1 single crochet in each of the first 3-3-4-4-4-5 double crochets on the round, turn and work back over the first 6-6-8-8-8-10 double crochets (i.e. 3-3-4-4-4-5 double crochets on each side of the marker mid back). These 6-6-8-8-8-10 double crochets = gusset. Work double crochets back and forth over these for 10-11-12-13-14-15 cm / 4"-4⅜"-4¾"-5⅛"-5½-6", cut the strand. Sew the gusset, edge to edge to the 6-6-8-8-8-10 middle stitches mid front. Continue by working the legs. LEG: Work 1 double crochet in each of the 77-84-89-100-111-120 double crochets around the one leg, in addition work 14-16-20-18-25-25 double crochets along the gusset = 91-100-109-118-136-145 double crochets. Continue with 1 double crochet in each double crochet until the leg measures 4-4-5-5-6-6 cm / 1½"-1½"-2"-2"-2⅜"-2⅜". Now work an edge at the bottom of the leg as follows: Work A.7 (= 3 double crochets), A.8 (= 9 double crochets) over the next 81-90-99-108-126-135 double crochets, finish with A.9 (= 7 double crochets). Work according to diagrams A.7. A.8 and A.9 one time in height. Cut and fasten the strand. TIE CORD: Work 120-140-150-160-170-180 cm / 47"-55"-59"-63"-67"-71" of LOOSE chain stitches, turn and work back with 1 slip stitch in each chain stitch. Thread the band into the row of holes at the top of the shorts – start mid front. |
|||||||||||||||||||||||||
Diagram explanations |
|||||||||||||||||||||||||
|
|||||||||||||||||||||||||
|
|||||||||||||||||||||||||
|
|||||||||||||||||||||||||
|
|||||||||||||||||||||||||
|
|||||||||||||||||||||||||
|
Have you made this or any other of our designs? Tag your pictures in social media with #dropsdesign so we can see them! Do you need help with this pattern?You'll find tutorial videos, a Comments/Questions area and more by visiting the pattern on garnstudio.com. © 1982-2024 DROPS Design A/S. We reserve all rights. This document, including all its sub-sections, has copyrights. Read more about what you can do with our patterns at the bottom of each pattern on our site. |
|||||||||||||||||||||||||


With over 40 years in knitting and crochet design, DROPS Design offers one of the most extensive collections of free patterns on the internet - translated to 17 languages. As of today we count 304 catalogs and 11422 patterns - 11417 of which are translated into English (US/in).
We work hard to bring you the best knitting and crochet have to offer, inspiration and advice as well as great quality yarns at incredible prices! Would you like to use our patterns for other than personal use? You can read what you are allowed to do in the Copyright text at the bottom of all our patterns. Happy crafting!
Comments / Questions (33)
Hallo, Ich habe Probleme das Bikinilberteil nachzuarbeiten. Die 5 Luftmaschen zum Wenden passen bei den Zunahmen ganz gut, aber an der hinteren Seite stehen dadurch Schlaufen ab. Auch der Häkelrand ergibt durch diese Schlaufen und den zusätzlichen Luftmaschen große Löcher und sieht nicht aus wie das Ergebnis in der Anleitung. Ich bin schon seit Monaten am Verzweifeln deswegen.
30.12.2019 - 13:52DROPS Design answered:
Liebe Frau Lutzenberger, ich bin nicht sicher, Ihre Frage zu verstehen, am besten zeigen Sie Ihr Arbeit dem Laden wo Sie die Wolle gekauft haben (auch ein Foto per E-Mail ist gut), so kann man Ihnen am besten helfen. Viel Spaß beim häkeln!
02.01.2020 - 13:38Vielen Dank für diese wunderbare und fehlerfreie Anleitung! Habe mir die Shorts gehäkelt und dank der genauen Maßangaben und der Maschenprobe auch mit einem anderen Baumwollgarn ein tolles Ergebnis erzielt. Die Anleitung ist sehr leicht zu verstehen.
17.11.2019 - 01:04Bonjour petite question pour les augmentations sur les côtés en taille xxl c'est bien tout les 5 tours ? 4 fois car alors je n'optien pas 238 brides
17.09.2019 - 15:53DROPS Design answered:
Bonjour Mme Janssens, on augmente sur les côtés tous les 5 rangs: 4 fois 1 bride de chaque côté du 2ème et du 3ème marqueur = 4 augmentations x 4 fois au total = 16 augmentations + on augmente 1 bride de chaque côté du 1er marqueur (milieu dos) x 9 tous les 2 tours = 18 augmentations - on avait 204 brides + 16 + 18 = 238 brides. Bon crochet!
17.09.2019 - 16:28êtes-vous sure que c'est un crochet numero 4 car j'ai effectué une grande partie du travail mais c'est bien trop grand !
24.07.2019 - 01:07DROPS Design answered:
Bonjour Laura! La taille du crochet est uniquement à titre indicatif. Si vous avez trop de mailles pour 10 cm, essayez avec un crochet plus gros. Si vous n'avez pas assez de mailles pour 10 cm, essayez avec un crochet plus fin. Bon crochet!
24.07.2019 - 08:02I want to make this for a friend and her hips are 42" what size should I make?
14.05.2019 - 03:37DROPS Design answered:
Dear Murphy, you will find the measurement chart for each size at the bottom of the pattern - measure a garment she likes the shape and compare to the measurements in chart to find out the matching size. Read more about sizing and convert into cm/inch here. Happy crocheting!
14.05.2019 - 08:30Scusi ancora , ma perche' mi dice tagliare il filo quando e' finita la parte superiore del top e devo iniziare a montare le catenelle da ambo le parti per la parte del fascione sotto...non si puo' fare come nel modello Mandarina che le monta automaticamente senza tagliare il filo ma prosegue con la lavorazione?..grazie ancora forse ci saltero' fuori...aiuto...
28.04.2019 - 17:42DROPS Design answered:
Buongiorno Maria Teresa. Viene tagliato il filo perché in questo modo, su quella riga, ci sono le nuove catenelle da entrambe le parti. Nel modello Mandarina, avvia le catenelle da una parte, gira il lavoro, e avrà una riga di m.a su queste catenelle e sulle maglie del corpo; la riga finisce con l’avvio delle ultime catenelle (quindi da una parte m.alte e dall’altra catenelle). Se preferisce non tagliare il filo, può seguire le indicazioni del modello Mandarina: la differenza nella lavorazione non sarà evidente. Buon lavoro!
28.04.2019 - 23:46Scusi ancora ..forse sono un po' tonta... vorrei avere una spiegazione riguardo il paragrafo dove dice avviare ora 22 ecc catenelle..fino alla fine ..leggendo la spiegazione le due parti non vengono uguali .grazie
28.04.2019 - 16:28DROPS Design answered:
Buongiorno Maria Teresa. Le due parti sono lavorate in modo uguale, ma non sono speculari rispetto al corpino. Può eventualmente lavorare a specchio sulle ultime catenelle. Buon lavoro!
28.04.2019 - 23:37Non riesco a capire dove e' stata fatta la correzzione...grazie
28.04.2019 - 12:19DROPS Design answered:
Buongiorno Maria Teresa. La correzione è già inserita nel testo delle spiegazioni. In precedenza, era stato scritto maglie alte al posto di catenelle, ma il testo ora è corretto. Buon lavoro!
28.04.2019 - 12:49Oui, j'ai bien compris comment crocheter des brides en rond. Mais cette méthode n'empêche pas le décalage de la couture au fur et à mesure que l'ouvrage monte. Ce qui est dommage, car la couture au lieu de se trouver au milieu comme sur le modèle, se retrouve sur une fesse :((
08.06.2018 - 13:23DROPS Design answered:
Bonjour Graziella, n'hésitez pas à montrer votre ouvrage à votre magasin - envoyez une photo par mail si vous avez acheté votre laine en ligne, on pourra plus facilement vous aider et vous conseiller en voyant votre ouvrage. Bon crochet!
08.06.2018 - 15:14Bonjour, J'ai un souci au niveau de la couture du short qui n'est pas droite. En effet, la couture se décale de plus en plus vers la droite au fur et à mesure que l'ouvrage monte. Auriez vous une astuce pour que celle-ci reste bien au centre ? Merci à vous.
08.06.2018 - 11:50DROPS Design answered:
Bonjour Graziella, cette vidéo montre comment crocheter des brides en rond: remplacez la 1ère bride du tour par 3 ml et terminez le tour par 1 mc dans la 3ème de ces mailles en l'air. Bon crochet!
08.06.2018 - 13:15