
Popular categories
Looking for a yarn?


Comments / Questions (19)
![]() Sabine wrote:
Sabine wrote:
Also müsste es richtig lauten: In der nächsten Hinreihe ... ... dies wiederholen in jeder 2. ... 4. Reihe".
22.11.2024 - 10:25
![]() Sabine wrote:
Sabine wrote:
Nach der ersten Lochreihe heißt es: "Dann auf der rechten Seite der Arb in jeder 4.R 1 M aufn und auf der linken Seite der Arb in jeder 2. Reihe 1 M abn" Geschieht dies weiterhin in den Hinreihen? Ist die Lochreihe dann bereits die 1. Reihe? Oder wird nach der Lochreihe erst eine Hinreihe gestrickt und dann beginnt das Zählen neu?
20.11.2024 - 13:38DROPS Design answered:
Liebe Sabine, die Abnahmen werden am Anfang einer Hin-Reihe in jeder 2. Hin-Reihe (= jeder 4. Reihe) gearbeitet, und die Zunahmen am Ende einer Hin-Reihe in jeder 2. Reihe (jeder Hin-Reihe) gearbeitet. Also die rechte Seite der Arbeit = Anfang einer Hin-Reihe und die linke Seite der Arbeit = am Ende einer Hin-Reihe. Viel Spaß beim Stricken!
20.11.2024 - 16:25
![]() Lotte wrote:
Lotte wrote:
Hej, jeg er nybegynder og har brug for hjælp til en detalje i opskriften. Der står “Nu strikkes der hulrække således fra vrangen: 2 r sm, slå om”, og jeg er i tvivl om, hvorvidt jeg skal gå direkte fra, at strikkepinden vikles bag om garnet og over i at strikke 2 masker sammen i en ret. Eller om jeg skal vikle strikkepinden bag garnet og derefter strikke en ret (så jeg får 2 masker), og dernæst strikke 2 r sm.??
02.10.2024 - 14:34DROPS Design answered:
Hej Lotte. Du ska kun strikke 2 ret sammen och sedan slå om (ikke någon ret mellan). Mvh DROPS Design
14.10.2024 - 14:48
![]() Jeanette Hingebjerg wrote:
Jeanette Hingebjerg wrote:
Der står:videre tages der 1 m ind i højre side af arbejdet på hver 4 pind.(går ud fra at det er højre set fra retsiden, altså i slutningen) og 1 m ud i venstre side af arbejdet på hver 2.pind (Altså i starten) Men er det så de 2 første jeg tager ind på hver 2 pind? Og hvor tager jeg ud på hver 4 pind, er det før eller efter picokant?
03.08.2024 - 22:20DROPS Design answered:
Hej Jeanette, både ind og udtagningerne er beskrevet på samme pind, så bare følg pind 1 og 2 til arbejdet måler det som står i din størrelse :)
06.08.2024 - 14:19
![]() Martina wrote:
Martina wrote:
Ich würde gerne wissen wieviele Maschen man für den Picotrand anschlagen muss. Das steht nirgends in der Anleitung. Vielen Dank
28.08.2021 - 08:21DROPS Design answered:
Liebe Martina, die Maschen für den Picorand gehören zu der angeschlagenen Maschenanzahl, - der Picorand wird über die 4 Maschen auf der rechten Seite der Arbeit (Anfang den Hinreihen) gestrickt. Viel Spaß beim stricken!
30.08.2021 - 07:23
![]() Fourner Marie Louise wrote:
Fourner Marie Louise wrote:
Je voudrai le modéle du bonnet aviateur. Pour 3 mois
30.06.2020 - 22:38
![]() Bibbi wrote:
Bibbi wrote:
Var kommer hålraden innanför picotkanten runt ansiktet ifrån om man hela tiden ska sticka omslagen vridet rätt för att det inte ska bli hål?
08.09.2019 - 21:59DROPS Design answered:
Hej Bibbi, hålraden får du automatiskt när du stickar varv 2 i Picotkanten. Lycka till :)
12.09.2019 - 15:47Sumaira wrote:
Hi is there any complete video for this hat pattern.
15.02.2017 - 17:38DROPS Design answered:
Dear Sumeira, there is no video showing how to work the full hat, but you can find (under tab "Videos" on the right side of "Materials) some videos showing the techniques used in that pattern such as the picot edge and how to assembly the hat tog. Happy knitting!
16.02.2017 - 09:29Sumaira wrote:
After eyelet holesfrom WS pattern says"then increase 1st in every 4rows and dec 1. St in left side of piece every other row..I am not understanding this.every 4rows mean both right and wrong side...?
14.02.2017 - 14:04DROPS Design answered:
Dear Sumaira, you inc 1 st every 4th row = every other row worked from RS, and dec 1 st every other row = every row from RS. Happy knitting!
14.02.2017 - 15:02Jinky wrote:
Thanks for this beautiful pattern, love making it, was wondering if you have an adult size for this one?
09.12.2015 - 01:51DROPS Design answered:
Dear Jinky, what about this one - just add a picot edge as in the baby pattern. Happy knitting!
09.12.2015 - 09:54
|
|
Lullaby#lullabybonnet |
|
|
|
|
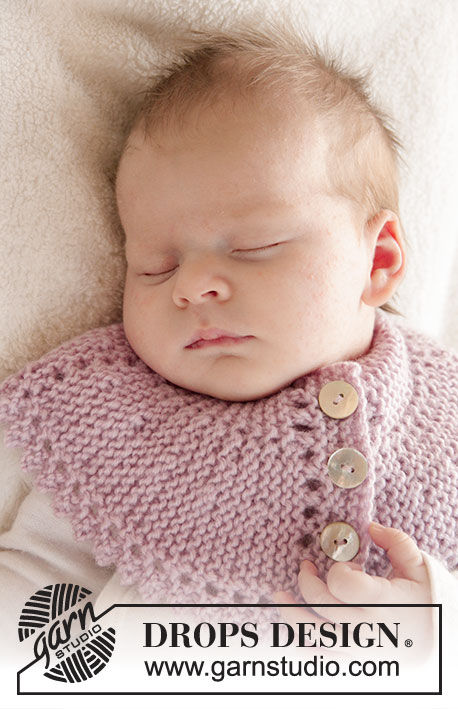
Knitted baby hat in garter st with picot edge in DROPS Karisma. Size 0 - 4 years.
DROPS Baby 25-3 |
|
|
GARTER ST (back and forth on needle): K all rows. 1 ridge = 2 rows K. PICOT EDGE (back and forth on needle): ROW 1 (= RS): K all sts. ROW 2 (= WS): K until 4 sts remain, work these sts as follows: K 2 tog, 1 YO, K 2 sts in each of the last 2 sts = 2 new sts on row. ROW 3 (= RS): Slip 1st st as if to K, K 1, psso, K 1 and slip the last st on right needle over the foremost st, 2 sts dec - then K the remaining sts. ROW 4 (= WS): K all sts. Repeat rows 1 to 4. ---------------------------------------------------------- HAT: Cast on 27-31-35-37 (41-43) sts on needles size 4 mm with Karisma. Insert 1 marker inside the outermost 4 sts in right side of piece (seen from RS), move the marker upwards when working. Work in GARTER ST - see explanation above, AT THE SAME TIME work PICOT EDGE over the outermost 4 sts before marker - see explanation above. AT THE SAME TIME inc 1 st in right side of piece (inside picot edge) and dec 1 st in left side of piece as follows: ROW 1 (= RS): 4 sts picot edge, K 1, 1 YO (= 1 inc), work until 3 sts remain, K 2 tog and K 1. ROW 2 (= WS): K until marker (K YO twisted to avoid holes) and finish with 4 sts picot edge. Repeat these 2 rows until piece measures 5-5½-6-6½ (7-8) cm. Then dec 1 st in the right side of piece and inc 1 st in the left side of piece as follows: ROW 1 (= RS): 4 sts picot edge, K 1, slip 1 st as if to K, K 1, psso, work until 1 st remains, make 1 YO and K 1. ROW 2 (= WS): K until marker (K YO twisted) and finish with 4 sts picot edge. Repeat these 2 rows until 1 row remains from WS before piece measures 10-11-12-13 (14-16) cm. Now work a row with eyelet holes from WS as follows: * K 2 tog, 1 YO *, repeat from *-* until 1 st remains before marker, K 1 and finish with 4 sts picot edge (K YOs on row with eyelet holes, not K twisted on next row). Then inc 1 st in right side of piece every 4 rows and dec 1 st in left side of piece every other row until piece measures 14½-15½-16½-17½ (18-19) cm from cast-on edge. Then dec 1 st in right side of piece every 4 rows and inc 1 st in left side of piece every other row until piece measures 19-20-21-22 (22-22) cm from cast-on edge. On next row from WS work eyelet holes as follows: * K 2 tog, 1 YO *, repeat from *-* until 1 st remains before marker, K 1 and finish with 4 sts picot edge (K YOs on row with eyelet holes, not K twisted on next row). Then inc 1 st in right side of piece every other row and dec 1 st in left side of piece every other row until piece measures 24-25½-27-28½ (29-30) cm. Now dec 1 st in the right side on every other row and inc 1 st in the left side on every other row until finished measurements = 29-31-33-35 (36-38) cm. Cast off. ASSEMBLY: Back of hat = one side of piece has 2 whole tips and 2 half tips. The 2nd of the 3 whole tips in the opposite side of the piece (= blunt tip) goes down to the forehead at the front. Sew the hat edge to edge with neat little stitches as follows: Sew tog on back of head by sewing first half tip tog with first half of first whole tip. Continue to sew second half of first whole tip tog with first half of second whole tip. Then sew the other half of the second whole tip tog with the last half tip. Finish by sewing the hat tog mid back. TIES: Cut 2 lengths of yarn of 150 cm. Twine them tog until they resist, thread the tie through one tip at the front of hat (from WS through a hole in row with eyelet holes) place the string double and let it twine again. Make a knot at the end. Make another tie in the other end of hat. |
|
Have you finished this pattern?Tag your pictures with #dropspattern #lullabybonnet or submit them to the #dropsfan gallery. Do you need help with this pattern?You'll find 15 tutorial videos, a Comments/Questions area and more by visiting the pattern on garnstudio.com. © 1982-2025 DROPS Design A/S. We reserve all rights. This document, including all its sub-sections, has copyrights. Read more about what you can do with our patterns at the bottom of each pattern on our site. |


With over 40 years in knitting and crochet design, DROPS Design offers one of the most extensive collections of free patterns on the internet - translated to 17 languages. As of today we count 314 catalogues and 11821 patterns translated into English (UK/cm). 11821
We work hard to bring you the best knitting and crochet have to offer, inspiration and advice as well as great quality yarns at incredible prices! Would you like to use our patterns for other than personal use? You can read what you are allowed to do in the Copyright text at the bottom of all our patterns. Happy crafting!
Post a comment to pattern DROPS Baby 25-3
We would love to hear what you have to say about this pattern!
If you want to leave a question, please make sure you select the correct category in the form below, to speed up the answering process. Required fields are marked *.