
Popular categories
Looking for a yarn?


Comments / Questions (26)
![]() Eva-Lisa Johnsson wrote:
Eva-Lisa Johnsson wrote:
Hej! Jag ska sticka den här halsvärmaren(155-29) och i mönstret ska man sticka fram och tillbaka,räta alla varv…då ser det inte ut som slätstickning som på bilden. Varvet mellan omslags/hoptagningar måste väl sticka avigt?
12.03.2023 - 22:41DROPS Design answered:
Hei Eva-Lisa Ja, er må det være en feil. Forklaringen til det øverste diagramikonet (blank firkant) burde være: = rett fra retten, vrang fra vragen. Da får du glattstrikk (slätstickning). Takk for at du gjorde oss oppmerksom på dette. mvh DROPS Design
14.03.2023 - 06:38
![]() Jutta wrote:
Jutta wrote:
Vilen Dank für die Antwort . Jetzt grhts los mit dem schulterwärmer😊
13.04.2021 - 08:47
![]() Jutta wrote:
Jutta wrote:
Wie stricke ich die rückreihen bei Schulterwärmer beatrice.
12.04.2021 - 21:36DROPS Design answered:
Liebe Jutta, die Rück-Reihen sind im Diagramm eingezeichnet, es zeigt alle Muster-Reihen. In Hin-Reihen wird gemustert, in Rück-Reihen wird links gestrickt. Viel Spaß beim Stricken!
12.04.2021 - 23:47
![]() Ingvill wrote:
Ingvill wrote:
Hei! Jeg lurer på hvorfor halsen skal strikkes fram og tilbake, er det ikke enklere å strikke den rundt? Hva må evt. endres for at den kan strikkes rundt?
10.03.2019 - 09:54DROPS Design answered:
Hej Ingvill, jo men du må gerne strikke halsen rundt på rundpind. God fornøjelse!
12.03.2019 - 14:57
![]() Francesca wrote:
Francesca wrote:
Buonasera, non riesco a capire questo passaggio :"sono state diminuite 4 m in ogni ripetizione (cioè 60-68-76 diminuzioni in totale sul f) = 236-266-296 m rimaste". Devo diminuire di 60m nell'ultimo ferro dello schema? Grazie
26.01.2019 - 22:20DROPS Design answered:
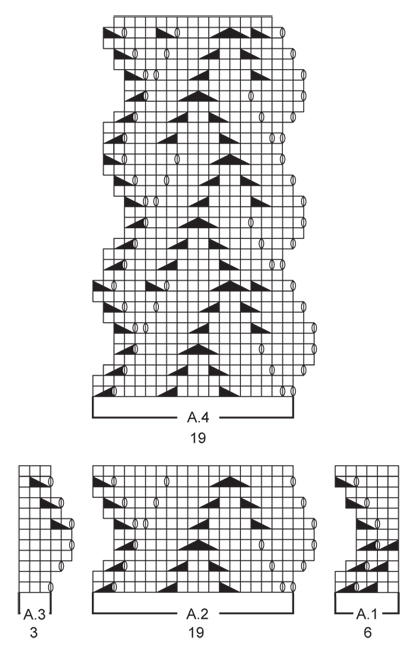
Buongiorno Francesca. Il diagramma A4, inizia con 19 maglie per ogni ripetizione e finisce con 15 maglie. Le diminuzioni sono nel diagramma stesso, alla riga 11 e alla penultima riga. Non ci sono diminuzioni da fare sull’ultima riga. Buon lavoro!
27.01.2019 - 09:31
![]() Ulrike wrote:
Ulrike wrote:
Hallo, ich möchte dieses Muster gerne in Runden stricken. Welchen Mustersatz muss ich dann nehmen? Vielen Dank
10.10.2018 - 23:43DROPS Design answered:
Liebe Ulrike, die "Hinreihen" wie im Diagram stricken, und die "Rückreihen" (= jede 2. Runde) einfach links (= rechts von der Vorderseite gesehen) stricken. Die Randmaschen brauchen Sie dann nicht anzuschlagen (= 2 M weniger anschlagen). Viel Spaß beim stricken!
11.10.2018 - 10:22
![]() Andrea wrote:
Andrea wrote:
Oh je... Lieben Dank 👍👍 wer lesen kann ist klar im Vorteil!!! Danke...
26.05.2016 - 20:38
![]() Andrea wrote:
Andrea wrote:
Oh je... Irgendwie scheitere ich schon am Anfang 😢😢 schon die erste Reihe in Größe xxl kommt bei mir nicht hin... Ich Ende nie auf den Punkt, bzw. kommt das Muster nicht auf. Ich stricke doch A1 und A2 im Wechsel und Ende mit A 3 und der Randmasche. Wenn ich jedoch A1 und A2 19mal wiederholen soll, kann das doch gar nicht passen... Hilfe... Was mache i h falsch??
21.05.2016 - 22:49DROPS Design answered:
Liebe Andrea, Sie stricken 1 x A.1, dann insgesamt 15-17-19 x A.2 und dann 1 x A.3 (und die Rand-Maschen). Also A.1 und A.2 wird nicht im Wechsel gestrickt.
23.05.2016 - 10:25
![]() Suk wrote:
Suk wrote:
Thank you very much.
02.11.2015 - 10:29
![]() Suk wrote:
Suk wrote:
A.1 Row 5 from 4 stitches(row 4) reduce to 3 stitches, how come there is 4 stitches in row 6? A.3 Row 5 increase from 5 stitches (row 4) to 6 stitches, how come there is only 5 stitches in row 6 ?
01.11.2015 - 23:47DROPS Design answered:
Dear Mrs Suk, on row 5 in A.1, you will work a yo at the beg of row 5 in A.2 => this yo will be included in A.1 on next row so that you have K4 on row 6 in A.1. After last A.2, make 1 YO (beg of A.3) to keep correct number of sts. On next row, there will be 1 dec in A.2 that will be worked with the previous yo. Just follow diagram as it is shown, add markers if necessary after correct number of sts on each row, pattern will then match tog. Happy knitting!
02.11.2015 - 09:44
|
||||||||||||||||
Beatrice#beatriceneckwarmer |
||||||||||||||||
|
|
||||||||||||||||
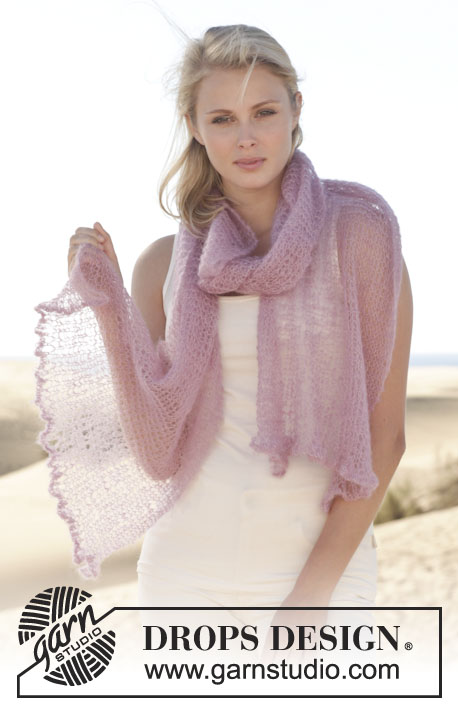
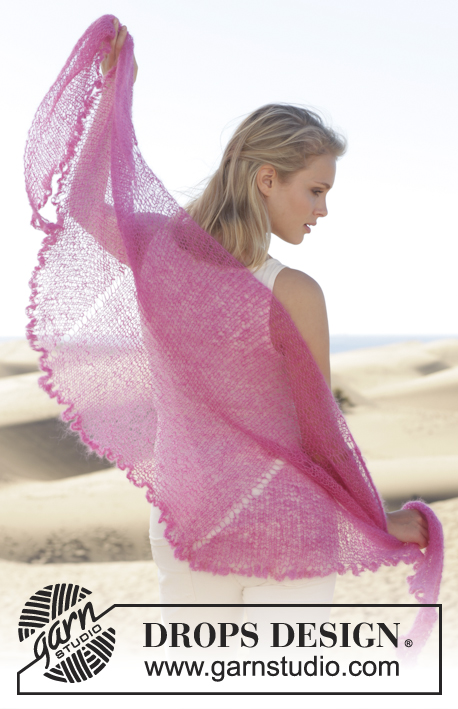
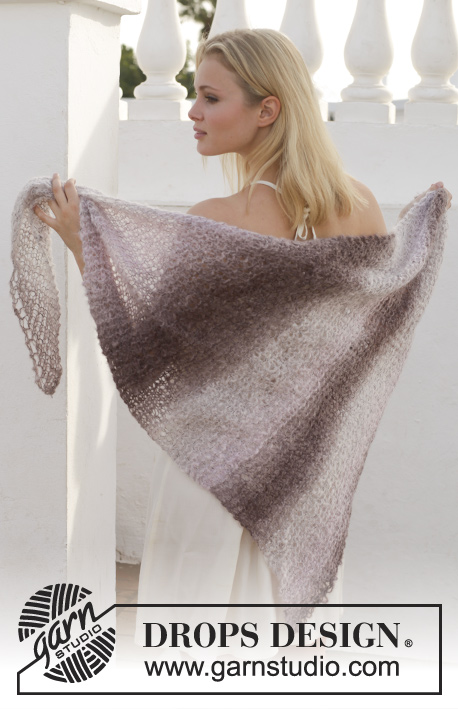
Knitted DROPS neck warmer with lace pattern in ”Alpaca”.
DROPS 155-29 |
||||||||||||||||
|
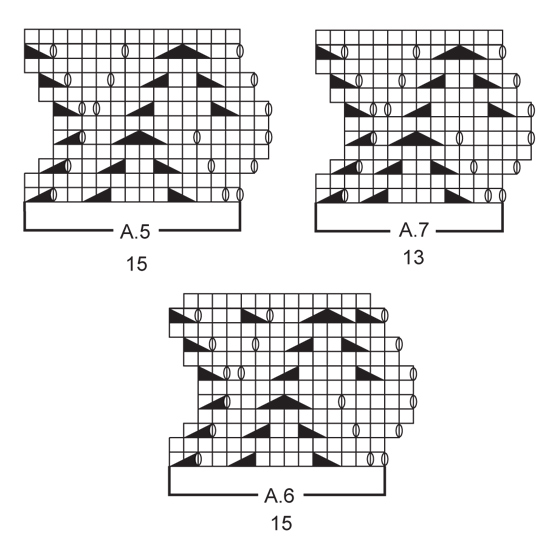
GARTER ST (back and forth on needle): K all rows. 1 ridge = 2 rows K. PATTERN: See diagrams A.1-A.7. The diagrams show all rows in pattern seen from RS. ---------------------------------------------------------- NECK WARMER: Worked back and forth on circular needle. Cast on 296-334-372 sts on circular needle size 3.5 mm with Alpaca. Work 2 ridges in GARTER ST - see explanation above. Then work as follows from RS: 1 edge st in garter st, A.1 (= 6 sts), A.2 (= 19 sts) 15-17-19 times in width in total, A.3 (= 3 sts), 1 edge st in garter st. Continue with this pattern back and forth until A.1, A.2 and A.3 have been worked 2-2-3 times vertically. REMEMBER THE KNITTING TENSION! Then continue the pattern the same way but now work A.4 instead of A.2 and the other sts as before. When A.4 has been worked 1 time vertically, 4 sts have been dec in every repetition (i.e. 60-68-76 sts dec in total on row) = 236-266-296 sts remain. Then work pattern as before but now work A.5 (= 15 sts) instead of A.4. Continue until A.5 has been worked 1-2-3 times vertically. Then work pattern as before but now work A.6 (= 15 sts) instead of A.5. When A.6 has been worked 1-1-1 time vertically, 2 sts have been dec in every repetition (i.e. 30-34-38 sts dec in total on row) = 206-232-258 sts remain. Then work pattern as before but now work A.7 (= 13 sts) instead of A.6. Continue until neck warmer measures 41-45-49 cm, work 2 ridges over all sts on row. K 1 row from RS, and loosely cast off from WS. ASSEMBLY: Sew neck warmer tog mid back inside 1 edge st in garter st. Cut and fasten the yarn. |
||||||||||||||||
Diagram explanations |
||||||||||||||||
|
||||||||||||||||
|
||||||||||||||||
|
||||||||||||||||
Have you finished this pattern?Tag your pictures with #dropspattern #beatriceneckwarmer or submit them to the #dropsfan gallery. Do you need help with this pattern?You'll find 12 tutorial videos, a Comments/Questions area and more by visiting the pattern on garnstudio.com. © 1982-2025 DROPS Design A/S. We reserve all rights. This document, including all its sub-sections, has copyrights. Read more about what you can do with our patterns at the bottom of each pattern on our site. |
||||||||||||||||


With over 40 years in knitting and crochet design, DROPS Design offers one of the most extensive collections of free patterns on the internet - translated to 17 languages. As of today we count 314 catalogues and 11821 patterns translated into English (UK/cm).
We work hard to bring you the best knitting and crochet have to offer, inspiration and advice as well as great quality yarns at incredible prices! Would you like to use our patterns for other than personal use? You can read what you are allowed to do in the Copyright text at the bottom of all our patterns. Happy crafting!
Post a comment to pattern DROPS 155-29
We would love to hear what you have to say about this pattern!
If you want to leave a question, please make sure you select the correct category in the form below, to speed up the answering process. Required fields are marked *.