


Komentáře / Otázky (53)
![]() Sowa napsala:
Sowa napsala:
Co to znaczy oś?
11.06.2025 - 17:44Odpověď DROPS Design :
Witaj, za chwilkę poprawię wzór. Zamiast oś (oczko ścisłe) powinien być psł (półsłupek). Miłej pracy!
12.06.2025 - 08:08
![]() Marjolijn napsala:
Marjolijn napsala:
Toer 21 haak tot midden buik? Is dit de kant van de snuit of de andere kant?
14.12.2024 - 19:04Odpověď DROPS Design :
Dag Marjolijn,
Excuses voor het late antwoord. De buik is inderdaad de kant waar ook de snuit zit.
21.01.2025 - 20:40
![]() Marjolijn napsala:
Marjolijn napsala:
Hallo, ik merk dat er hier al veel vragen gesteld zijn maar toch ook op de vraag waar ik vastloop geen antwoord dus hoop deze nu wel te krijgen. \r\nHey midden voor is de kant waar de snuit begint dat het ik goed gedaan. \r\nMaar als je dan de toeren volgt en gaat meerdere en overslaan komt de borst op de rug uit. \r\nZit er dan een foutje in het patroon? \r\nIk hoor het graag.
14.12.2024 - 19:02
![]() Märta napsala:
Märta napsala:
Hur vet jag vilken som är avigsida och rätsida? För jag fattar inte sista meningen på varv 3.
25.11.2024 - 17:01Odpověď DROPS Design :
Hej Märta, de 3 første omgange hækler du fra retsiden, sæt evt et mærke så du husker hvilken som er retsiden :)
27.11.2024 - 07:50
![]() Brenda napsala:
Brenda napsala:
I don’t understand what you mean in rows 4-6 => 1 sc for every sc back and forth. What does back and forth mean?
08.05.2024 - 03:49Odpověď DROPS Design :
Dear Brenda, working back and forth means to work in rows, ie from row 4 to row 6 you will turn at the end of each row to work alternately from RS and from WS, this will create an opening for you will work along these opening for the snout afterwards. Happy crocheting!
08.05.2024 - 08:19
![]() Zuzana napsala:
Zuzana napsala:
Ďakujem za milý návod. Trochu som sa potrápila, lebo sa mi to celé krútilo. Prvý dinosaurus mal hlavu vzadu a chrbát na boku. Bolo to zúfalé. Pri druhom som si dávla pozor, nesledovala som návod úplne presne na očko a bolo to lepšie. Obdivujem tieto nápady na hračky, je to ťažká práca.
13.10.2023 - 11:52
![]() Kleine Dino napsala:
Kleine Dino napsala:
Dag, Vind het een moeilijk patroon om te lezen.. Ben nu bij toer 17 en daar staat 14 vasten haken keer met 1 losse haak dan heen en weer de borst maar hoe vaak moet je heen en weer haken voor de borst??
13.03.2023 - 10:53Odpověď DROPS Design :
Dag,
De zin over dat je dan heen en weer haakt voor de borst is als extra informatie, dus je kunt gewoon verder gaan met toer 18. Bij toer 21 staat dat je weer verder gaat in de rondte.
14.03.2023 - 20:44
![]() Dfabgnehsragvc napsala:
Dfabgnehsragvc napsala:
Cxbgrsjngd
07.12.2022 - 18:06
![]() Elyas napsala:
Elyas napsala:
I am trying to complain about this poorly made tutorial but you cannot do that :) add pictures
07.12.2022 - 14:45
![]() Aaaaar napsala:
Aaaaar napsala:
Round 4-6 what does any of this mean
25.02.2022 - 22:28Odpověď DROPS Design :
Dear Aaaaar, after you have worked round 3, turn and work now row 4 from WS with 1 st in each st all the row, turn and work 1 st in each st from RS (row 5), turn and work 1 st in each st all the row from WS (row 6), turn and work now round 7 (= as explained, joining with a sl st at the end of this round). Happy crocheting!
28.02.2022 - 10:58
|
|
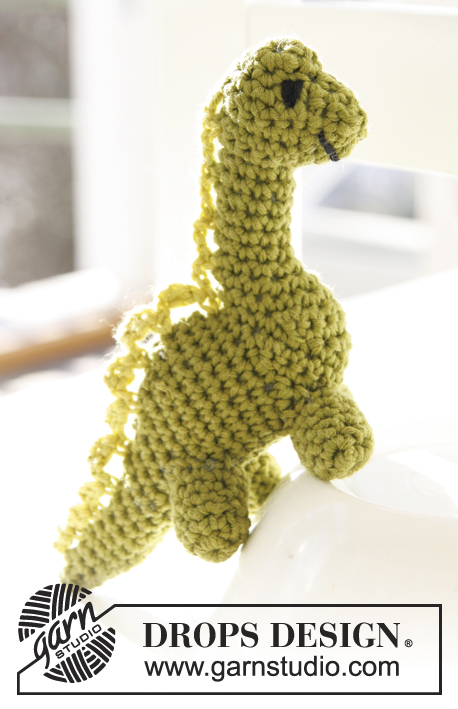
Dino#dropsdino |
|
 |
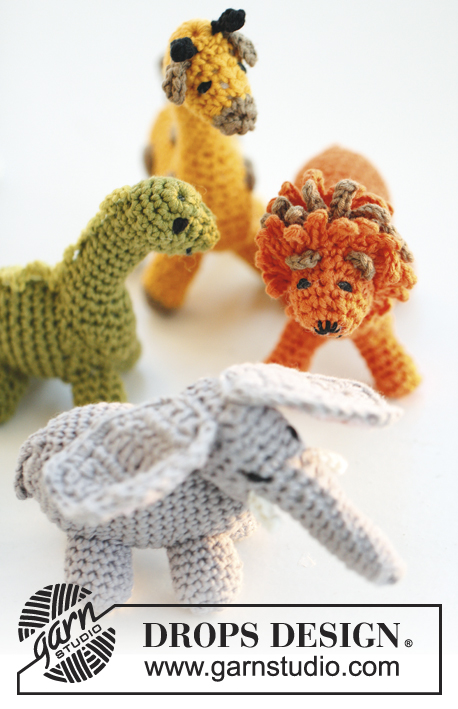 |
Malý a velký dinosaurus háčkovaný z příze DROPS Safran nebo DROPS Paris
DROPS Children 24-7 |
|
|
TIP: Každou kruhovou řadu KS začínáme 1 řo (toto oko NEnahrazuje první KS) a končíme ji 1 pevným okem do prvního KS ze začátku kruhové řady. Při otáčení každé řady KS uháčkujeme 1 řo – toto oko NEnahrazuje první KS v následující řadě, ale tvoří pouze přechod mezi řadami. TIP - VYCPÁVÁNÍ: Během háčkování a tvarování figurky ji postupně po trochách vycpáváme vatou nebo dutým vláknem. TIP - UJÍMÁNÍ: Ujímáme vždy 1 KS sháčkováním 2 KS dohromady, takto: háček vpíchneme do prvního oka, nabereme a protáhneme přízi, pak vpíchneme do následujícího oka, nabereme a protáhneme přízi, poté znovu nabereme přízi a protáhneme ji všemi 3 smyčkami na háčku. ---------------------------------------------------------- MALÝ DINOSAURUS: Háčkujeme od vrcholku hlavy, přes krk, podél těla až ke špičce ocasu. Nohy uháčkujeme zvlášť a k tělu přišijeme. Nakonec přiháčkujeme řadu hřbetních ostnů. Viz TIP - VYCPÁVÁNÍ! HLAVA, TĚLO a OCAS: Olivovou přízí uháčkujeme háčkem č.3 4 řo a spojíme je pevným okem do kroužku. Viz TIP! 1. KRUHOVÁ ŘADA: do kroužku z řo háčkujeme 6 KS. 2. KRUHOVÁ ŘADA: *1 KS do prvního KS, 2 KS do dalšího KS*, *-* opakujeme v průběhu celé kruhové řady = 9 KS. 3. KRUHOVÁ ŘADA: *po 1 KS do každého z prvních 2 KS, 2 KS do dalšího KS*, *-* opakujeme v průběhu celé kruhové řady = 12 KS. Práci otočíme a háčkujeme zpáteční, rubovou řadu. 4.-6. ŘADA: uháčkujeme 3 řady KS (= otvor pro čumák, který přiháčkujeme později). 7. KRUHOVÁ ŘADA: nyní háčkujeme opět v kruhových řadách – začátek kruhové řady si označíme. První 2 KS sháčkujeme dohromady – viz TIP - UJÍMÁNÍ, dále po 1 KS do každého z následujících 8 KS, poslední 2 KS sháčkujeme = 10 KS. 8.-14. KRUHOVÁ ŘADA: po 1 KS do každého KS - jednotlivé kruhové řady neukončujeme, ale háčkujeme plynule; pak pokračujeme 1 KS do každého z prvních 5 ok a končíme tak uprostřed horní strany krku – kruhová řada nyní začíná zde. 15. KRUHOVÁ ŘADA: po 1 KS do každého z prvních 3 KS, po 2 KS do každého z následujících 4 KS, po 1 KS do každého z posledních 3 KS = 14 KS. 16. KRUHOVÁ ŘADA: první 2 KS sháčkujeme, po 1 KS do každého z následujících 3 ok, po 2 KS do každého z dalších 4 ok, po 1 KS do každého z následujících 3 ok, poslední 2 KS sháčkujeme = 16 KS. 17. KRUHOVÁ ŘADA: po 1 KS do každého z prvních 14 KS, práci otočíme pomocí 1 řo. Nyní háčkujeme v řadách hruď. 18. ŘADA (rub): první 2 KS vynecháme, po 1 KS do každého z následujících 11 KS, práci otočíme pomocí 1 řo. 19. ŘADA (líc): první 2 KS vynecháme, po 1 KS do každého z následujících 8 KS, práci otočíme pomocí 1 řo. 20. ŘADA (rub): první 2 KS vynecháme, po 1 KS do každého z následujících 5 KS, práci otočíme pomocí 1 řo. 21. KRUHOVÁ ŘADA: nyní háčkujeme opět v kruhových řadách – kolem otvoru háčkujeme KS a SOUČASNĚ přidáváme rovnoměrně potřebný počet KS, abychom nakonec měli v kruhové řadě celkem 20 KS. Pak háčkujeme až do poloviny spodní strany břicha. 22. KRUHOVÁ ŘADA: 1 KS do každého KS, jen do 2. KS uprostřed horní strany zad uháčkujeme 2 KS = 22 KS – doprostřed těchto KS vložíme značku. 23.-25. KRUHOVÁ ŘADA: po 1 KS do každého KS. 26.-29. KRUHOVÁ ŘADA: 1 KS do každého KS, jen uprostřed horní strany zad ujmeme na každé straně značky 1 oko (tj. v každé kruhové řadě ujmeme 2 oka). Po dokončení 29. kruhové řady zbývá 14 KS. 30.-33. KRUHOVÁ ŘADA: 1 KS do každého oka, jen uprostřed horní strany zad ujmeme 1 oko (ujímáme střídavě před a za značkou). Po dokončení 33. kruhové řady zbývá 10 KS. 34.-36. KRUHOVÁ ŘADA: po 1 KS do každého KS. 37.-42. KRUHOVÁ ŘADA: 1 KS do každého KS, jen uprostřed dolní strany ocasu ujmeme v každé kruhové řadě 1 KS. Po dokončení 42. kruhové řady zbývají 4 oka. Přízi odstřihneme, protáhneme krajem otvoru, stáhneme a zapošijeme. ČUMÁK: Kolem otvoru na přední straně hlavy háčkujeme olivovou přízí 10 KS. Uháčkujeme 1 kruhovou řadu KS, v následující kruhové řadě sháčkujeme každé 2 KS dohromady. Přízi odstřihneme, čumák vycpeme trochou vaty nebo dutého vlákna, konec příze protáhneme okrajem otvoru, stáhneme a zapošijeme. NOHA: Olivovou přízí uháčkujeme 4 řo a spojíme je pevným okem do kroužku. 1. KRUHOVÁ ŘADA: do kroužku z řo háčkujeme 5 KS. 2. KRUHOVÁ ŘADA: po 2 KS do každého KS = 10 KS. 3.-6. KRUHOVÁ ŘADA: po 1 KS do každého KS, ukončíme. Stejným způsobem uháčkujeme všechny 4 nohy. Vycpeme je trochou vaty či dutého vlákna a přišijeme je na dolní stranu těla. HŘBETNÍ OSTNY: Hřbetní ostny háčkujeme jablkovou přízí háčkem č.3, takto: do špičky ocasu uháčkujeme 1 pevné oko, pokračujeme *3 řo, do prvního z nich uháčkujeme 1 DS, asi 1 cm vynecháme, 1 KS*, *-* opakujeme podél celého ocasu. Dále: *3 řo, asi 1 cm vynecháme, 1 KS*, *-* opakujeme až do poloviny hlavy a končíme 1 pevným okem. Přízi odstřihneme a zapošijeme. Zbytkem černé příze vyšijeme oči a pusu. ---------------------------------------------------------- VELKÝ DINOSAURUS: Háčkujeme jej stejně jako malého dinosaura, ale z příze Paris háčkem č.4. Hlavu, tělo a ocas háčkujeme přízí lila, ostatní části světlou starorůžovou. |
|
Dokončili jste tento model?Pak označte své fotky tagem #dropspattern #dropsdino nebo je pošlete do galerie #dropsfan. Potřebujete s tímto návodem poradit?Otevřete-li si návod na stránce garnstudio.com, najdete tam 6 výukových video-ukázek, Komentáře/Dotazy a další užitečné informace. © 1982-2025 DROPS Design A/S. Vyhrazujeme si veškerá práva. Tento dokument, včetně všech jeho dílčích částí, podléhá autorským právům. Podrobnější komentář k možnostem užití našich návodů najdete dole pod každým návodem na našich stránkách. |
|


V oblasti pletené a háčkované módy působí DROPS Design více než 40 let. Díky tomu vám můžeme nabídnout jednu z nejrozsáhlejších kolekcí modelů s bezplatnými návody dostupnými na internetu - navíc v 17 jazycích. K dnešnímu dni máme na 314 katalogů a 11822 návodů celkem - z nich je už 7048 dostupných v [češtině].
Přidejte komentář k návodu DROPS Children 24-7
Rádi bychom věděli, co si o tomto modelu myslíte!
Pokud se chcete na něco zeptat, dbejte prosím na to, abyste ve formuláři níže vybrali správnou kategorii - díky tomu se dříve dozvíte, co potřebujete vědět. Povinná pole jsou označena *.