
Popular categories
Looking for a yarn?


Comments / Questions (30)
![]() Agnes Jansen wrote:
Agnes Jansen wrote:
Ik brei de trui van maat 5/6 . Er staat lengte trui 48cm, is dat inclusief het boord van 4cm?
08.05.2025 - 15:34DROPS Design answered:
Dag Agnes,
Ja, dat is inclusief de boord.
14.05.2025 - 13:01
![]() Adele Woolley wrote:
Adele Woolley wrote:
In this patter you say "At the same time, when there are six rounds left of raglan dec, bind off for the neck". Could you please clarify what you mean by six rounds left? Do you mean 6 rounds (regardless of whether they are the rounds in which I decrease), or do you mean 6 rounds of the decreasing round (which happens every 3 rounds, so this would be 18)?? This is very confusing. It would be better if you gave a stitch number.
05.04.2024 - 08:52DROPS Design answered:
Dear Adele, we mean six round all together (regardless if they have decreases or not). I hope this helps. Happy Knitting!
05.04.2024 - 10:21
![]() Sarah wrote:
Sarah wrote:
I have 8 stitches on a thread for each arm and each side of the sweater. I don’t understand what to do with these stitches. I have all the arm and body stitches on a circular needle but have these other stitches left on threads. Thank you.
18.04.2023 - 04:03DROPS Design answered:
Dear Sarah, you slip 8 sts for each armhole on a thread when working body and then when working sleeve you also slip 8 sts on a thread, when yoke is done, the 8 sts on each sleeve will be sewn together to the 8 sts on the side of the body to close the hole. Happy knitting!
18.04.2023 - 10:13
![]() Kuyle wrote:
Kuyle wrote:
Bonjour, j'ai fait la taille 2 ans ,je suis au col , comment reprendre les 20 m en attente sans avoir un trou , un pli ? j'ai 5 cm de hauteur sur les 64 m tricotées en aller/retour et j'ai bien mes 20 m en attente ! Je ne comprends pas du tout ! Cordialement .
01.03.2023 - 17:25DROPS Design answered:
Bonjour Mme Kuyle, il ne doit pas y avoir de décalage entre les mailles en attente pour l'encolure e les mailles restantes du raglan car on forme l'encolure quand il reste 6 diminutions à faire (les 6 rangs nécessaires pour former l'encolure), vous avez donc bien 84 mailles au total, tricotez 1 tour en diminuant 8 m = 76 mailles, et tricotez en jersey pendant 3 cm et rabattez toutes les mailles pour former la bordure roulotée du col. Bon tricot!
02.03.2023 - 09:28
![]() Diane Lorello wrote:
Diane Lorello wrote:
I am confused about the stitch count at the neck edge. I am knitting size 2. The starting stitch count where sleeves and neck are joined is 212. Following instructions there are 8 decrease 2 rounds for a total of 64 stitches decreased. 212-64=148 stitches remaining. The instructions indicate 84 stitches are to be used at the start of the neck. How/where are the remaining 64 stitches decreased?
01.01.2023 - 05:36DROPS Design answered:
Dear Mrs Lorello, you should decrease 16 sts on each decrease round (2 sts on each side of each marker) a total of 8 times = 8x16= 128 sts will be decreased for raglan; there were 212 sts - 128 sts = 84 sts remain. Happy knitting!
03.01.2023 - 09:57
![]() Deb wrote:
Deb wrote:
Another Anton for children 9-9 sweater question here…. this has been such a confusing pattern to follow. After knitting in the round for 35 cm, pattern says to slip 8 stitches on either side for armhole onto a marking thread. Do I knit to the other marker to do the same thing on other side? Can’t slip stitches otherwise. Would this not be doing only another half round? Or do I continue to my first marker again? Never had issues knitting sweaters before!
05.10.2022 - 23:56DROPS Design answered:
Hi Deb, To avoid cutting the strand, work the first 8 stitches before placing them on a thread, work to the other side of the jumper and work the second 8 stitches before placing them on a thread, then finish the round. Happy knitting!
06.10.2022 - 07:00
![]() Debra wrote:
Debra wrote:
Another question on this pattern…what kind of increase is used on each side of marker? A KFB, a M1? It does not say on instructions. Thanks!
09.09.2022 - 15:28DROPS Design answered:
Dear Debra, feel free to use the technique you rather for the increases on the sides. Happy knitting!
09.09.2022 - 15:42
![]() Deb wrote:
Deb wrote:
On Anton sweater, size 9/10 it says to increase when piece measures 1 1/2 “ then increase on either side of marker 6 times on every 5 cm. Is this correct or should it be every 5th round?
03.09.2022 - 03:56DROPS Design answered:
Dear Deb, yes, it's correct, you increase every 5 cm. Happy knitting!
04.09.2022 - 23:12
![]() Debra wrote:
Debra wrote:
I am assuming this sweater is entirely knitted in the round? Also, the pattern says to knit 8 rows garter ( at the beginning) …..does it mean 8 rounds? Also it says insert a marking thread each side….each side of what? I am confused. Thank you!
30.08.2022 - 16:10DROPS Design answered:
Dear Debra, each side means the sides of the body (right and left sides, under armhole), so that you later on increase equally on the sides, the same amount of stitches for the front and back. You knit the whole sweater in the round, so the first "rows" are actually rounds, since you aren't turning the work. Happy knitting!
30.08.2022 - 23:14
![]() Adele Woolley wrote:
Adele Woolley wrote:
This pattern is the most confusingI have ever read. i have knitted all of the jersey (2 yr) and sleeves and have all stitches on the needle and am now about to start raglan decreases. What does it mean Note! After dec for neck the piece is finished back and forth (what does this mean? - I have it on circular needles!) ... and later on 'at the same time where there are 6 rounds left of raglan dec ... (how do I know how many are left???) this entire paragraph is totally confusing... please help,
18.04.2022 - 12:25DROPS Design answered:
Dear Mrs Woolley, the yoke is worked in the round but you will cast off stitches for neck and then continue back and forth on the circular needle. In 2 years you decrease for raglan at total of 3 times on every 4th row and then a total of 5 times on every 3rd row = after you have decreased 2 times on every 4th row (6 decrases remain for the raglan), slip the middle stitches on a thread and continue working in rows decreasing for raglan as explained, and cast off at the same time for neck 2 stitches 2 times on every 2nd row (= from RS as well as from WS). Happy knitting!
19.04.2022 - 11:36
|
|
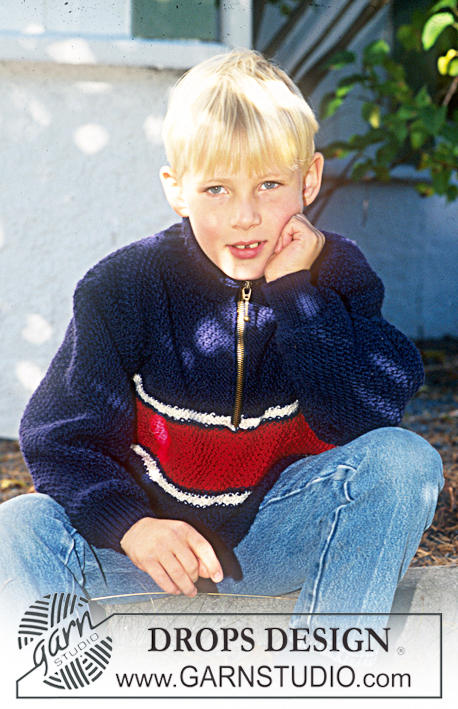
Anton#antonsweater |
|
|
|
|
Jersey in Karisma Uld-Tweed with Raglan finish
DROPS Children 9-9 |
|
|
Knitting tension: 20 sts x 26 rows on needle size 4 in stocking st = 10 x 10 cm. Remember the needle sizes are guidelines only! Rib edge: * K2, P2 *, repeat from *-*. Garter st (on circular needle): 1st round: P. 2nd round: K. Back and front pieces: Cast on 112-124-136-144 (152-164-172-184) sts on circular needle size 3 mm with deep red and knit 8 rows garter st. Insert a marking thread each side. Change to circular needle size 4 mm and continue in stocking sts – remember the knitting tension! At the same time inc each side as follows: Sizes 6/9 - 12/18 months: No inc for these two sizes. Size 2 years: When piece measures 15 cm inc1 st on each side of both marking threads (= 4 new sts). Size 3/4 years: When piece measures 8 and 18 cm inc1 st on each side of both marking threads (= 8 new sts). Sizes 5/6- 7/8- 9/10- 11/12 years: When the piece measures 4 cm inc1 st on each side of both marking threads. Repeat the inc 5-5-6-6 times on every 5-6-5-5 cm (= 4 new sts per increase). Now there are 112-124-140-152 (172-184-196-208) sts on needle. When piece measures 19-22-26-28 (30-34-35-35) cm slip 8 sts each side on a thread for armhole (= 4 sts on each side of the marking thread) = 96-108-124-136 (156-168-180-192) sts on the needle. Put the piece aside and knit the sleeves. Sleeve: Cast on 40-40-44-44 (48-48-52-52) sts on double pointed needles size 3 mm in deep red. Knit Rib - see explanation above - for 4-4-4-4 (5-5-5-5) cm. Change to double pointed needles size 4 mm and continue in stocking st. At the same time, inc 2 sts mid under arm: 4-6-4-8 (8-10-10-14) times on every 11-8-15-8 (9-8-9-6) rounds = 48-52-52-60 (64-68-72-80) sts. When piece measures 21-23-27-30 (33-37-40-42) cm slip 8 sts mid under arm on a thread = 40-44-44-52 (56-60-64-72) sts on needle. Yoke: Slip the sleeves onto the same circular needle as the jersey where 8 sts has been put on the thread for armhole = 176-196-212-240 (268-288-308-336) sts on needle. Insert a marking thread in all transitions between sleeves and jersey = 4 marking threads. Read all of the next section before knitting ! Continue in stocking sts, at the same time after 2-1-4-3 (3-3-3-3) rounds dec for raglan as follows: Dec for raglan on both sides of all 4 marking threads = 8 decreases of 2 sts per round (= 16 sts dec per round). There are 4 stocking sts between each dec (i.e. 2 sts on each side of MT). Dec 2 sts as follows from the RS: start 5 sts before the marking threads: Slip 1 st as if to knit, K2 tog, psso, K2. After the marking threads: K2, K3 tog. Note! After dec for neck the piece is finished back and forth on needle and dec are also made from thw WS. Dec 2 sts as follows from the WS: start 5 sts before the marking threads: P3 tog into back of sts, P2. After the marking threads: P2, P3 tog into back of st. Dec as follows: Size 6/9 - 12/18 months: Dec 2 sts each side of MT on every 4th round: 6-7 times. Size 2 - 3/4 (5/6- 7/8- 9/10- 11/12) years: Dec 2 sts each side of MT on every 4th round: 3-3 (3-3-2-1) times and then on every 3rd round 2 sts 5-7 (8-9-11-14) times. At the same time when there are 6 rounds left of raglan dec, cast off for neck on front piece and for slit on back piece (for the 2 smallest sizes) as follows: Slip the middle 8-10-12-12 (14-16-18-18) sts on front on a thread for neck and finish the piece back and forth on needle. At the same time (for the 2 smallest sizes) cast of the 2 middle sts on back piece for slit, cast on 3 new sts each side of the slit and knit these in garter sts until finished measurements. Continue slipping 2 sts on the thread at front to shape the neckline on every other row a total of 2 times. Now put all sts back on needle = 84-88-84-80 (92-96-100-96) sts. Change to double pointed needles size 3 mm and knit stocking sts – however, on the 2 smallest sizes knit back and forth from the slit mid back – at the same time dec 20-14-8-0 (10-8-8-0) sts evenly over the 1st round/row = 64-74-76-80 (82-88-92-96) sts. For the 2 smallest sizes: continue with 3 garter sts towards the slit mid back and cast off for 1 buttonhole after 0.5 cm and again after 2.5 cm - 1 button hole = cast off the middle of the 3 garter sts from RS and make a yo over the cast of st on the return row. When neck edge measures 3-3-3-3 (4-4-4-4) cm cast off – the neck will now roll. Assembly: Sew the openings under the arms with mattress sts to ensure the seam becomes elastic. On the 2 smallest sizes sew the bottom of the slit and sew on the buttons. |
|

|
|
Have you finished this pattern?Tag your pictures with #dropspattern #antonsweater or submit them to the #dropsfan gallery. Do you need help with this pattern?You'll find 27 tutorial videos, a Comments/Questions area and more by visiting the pattern on garnstudio.com. © 1982-2025 DROPS Design A/S. We reserve all rights. This document, including all its sub-sections, has copyrights. Read more about what you can do with our patterns at the bottom of each pattern on our site. |


With over 40 years in knitting and crochet design, DROPS Design offers one of the most extensive collections of free patterns on the internet - translated to 17 languages. As of today we count 314 catalogues and 11822 patterns translated into English (UK/cm).
We work hard to bring you the best knitting and crochet have to offer, inspiration and advice as well as great quality yarns at incredible prices! Would you like to use our patterns for other than personal use? You can read what you are allowed to do in the Copyright text at the bottom of all our patterns. Happy crafting!
Post a comment to pattern DROPS Children 9-9
We would love to hear what you have to say about this pattern!
If you want to leave a question, please make sure you select the correct category in the form below, to speed up the answering process. Required fields are marked *.