
Popular categories
Looking for a yarn?


Comments / Questions (29)
![]() Marie-Armelle AQUILINA wrote:
Marie-Armelle AQUILINA wrote:
Bonjour, Est-il possible d'avoir une grille du point ajouré ?
18.08.2019 - 13:29DROPS Design answered:
Bonjour Mme Aquilana, il n'y a pas de diagramme pour ce modèle seulement les explications écrites. Vous pouvez par exemple essayer sur un échantillon au préalable pour bien comprendre comment on le tricote. Bon tricot!
19.08.2019 - 10:27
![]() Cora wrote:
Cora wrote:
Da diese Wolle so zart ist, wird der Faden hier doppelt genommen? Also stricke ich gleichzeitig mit 2 Fäden (Knäulen)? LG Cora
28.03.2019 - 15:58DROPS Design answered:
Liebe Cora, ja genau, diese Jacke wird mit doppeltem Kid-Silk gestrickt (= mit 2 Fäden). Viel Spaß beim stricken!
01.04.2019 - 09:52
![]() Céline wrote:
Céline wrote:
Pouvez vous m expliquer davantage le montage du à partir 5 cm de la hauteur totale. Je fais la taille xxx merci
18.03.2019 - 20:32DROPS Design answered:
Bonjour Céline, vous tricotez d'abord au point mousse pendant 5 cm, puis continuez en jersey avec 1 m lis au point mousse. À 6 cm (XXXL), vous diminuez 3 fois 1 m de chaque côté (cf DIMINUTIONS-1) tous les 4 cm = 106 m. À 22 cm, vous augmentez 3 fois à 1 m du bord de chaque côté (cf AUGMENTATIONS) tous les 7 cm = 112 m. À 44 cm, vous rabattez pour les manches de chaque côté: 2x3m, 4x2m et 5x1m = 74 m. À64 cm, vous rabattez les 26 m centrales puis 1 m pour l'encolure = 23 m pour chaque épaule. Rabattez à 66 cm. Bon tricot!
19.03.2019 - 10:24
![]() Laura wrote:
Laura wrote:
Buongiorno,l'ho rifatto un'altra volta ed ora viene.Grazie mille per l'aiuto!
24.01.2015 - 13:43
![]() Laura wrote:
Laura wrote:
Non rimane neancora...ma nessuno ha già fatto questo modello?
19.01.2015 - 21:34DROPS Design answered:
Buongiorno Laura. Per poterla aiutare, le chiediamo se gentilmente ci può spiegare meglio in quale punto il motivo non viene più eseguito correttamente. Può scrivere qui, sul nostro forum, oppure può mandare una mail, eventualmente con una foto allegata, all’indirizzo italy@garnstudio.com. Buon lavoro!
20.01.2015 - 08:43
![]() Laura wrote:
Laura wrote:
Buongiorno, è possibile che ci sia un errore nel motivo a pizzo? non mi trovo con la spiegazione a partire dal ferro 8...seguendo i vari passaggi dopo il segnapunti mi rimangono 17 maglie. Andando avanti coi ferri il motivo a pizzo non rimane...se potete darmi un aiuto...Grazie mille
19.01.2015 - 08:43DROPS Design answered:
Buongiorno Laura. Abbiamo corretto le spiegazioni del ferro 7 del davanti sinistro e del ferro 8 del davanti destro. Adesso dovrebbe riuscire a lavorare correttamente il motivo a pizzo. La ringraziamo per la segnalazione. Buon lavoro!
19.01.2015 - 11:04
![]() Marsci wrote:
Marsci wrote:
Si je veux tricoter avec 1 fil Kid Silk et 1 fil Alpaca, combien de pelotes de chaque faut-il pour un Pull T 42 ? Je suppose que le fil Kid Silk améliore la tenue de la laine Alpaca (qui a tendance à se détendre)? Merci pour votre réponse. Bien cordialement
20.01.2014 - 13:36DROPS Design answered:
Bonjour Mme Marsci, vous devez d'abord calculez le métrage total nécessaire pour votre taille, ex. en taille M 8 pelotes (8x25=200g). La moitié (fil tricoté en double) représente 4 pelotes et 800 m env. Divisez 800/167 m (longueur Alpaca)= 4.8, soit 5 pelotes. En taille M, il vous faudrait 4 pelotes Kid-Silk et 5 Alpaca. Bon tricot!
21.01.2014 - 08:45
![]() Ineke Kroon wrote:
Ineke Kroon wrote:
Het tweede voorpand, de rechterkant van het vestje, wordt het tegenovergestelde gebreid van de linkerkant. Waar in het linkerpatroon gezegd wordt een extra steek op te zetten, wordt in het rechterpand gezegd dat een steek afgehaald moet worden. Dit klopt niet, ook in het rechter patroon moet een extra steek extra opgezet worden. (zie patroon rechterpand o.a. naald 2, naald 4 , naald 6 en 10 etc.)
19.10.2012 - 21:49
![]() Elena Vieth wrote:
Elena Vieth wrote:
Hallo, eine dehr schöne Jacke! Ich bin nur etwas verwundert über die Materialangabe. Sind 200g für größe M tatsächlich ausreichend? Vielen dank und liebe Grüße Elena Vieth
13.09.2012 - 11:49DROPS Design answered:
Hallo Frau Vieth, ja Kid Silk jäuft sehr weit. 25 g haben eine Lauflänge von 200 m. Achten Sie darauf, dass Sie für Grösse M 8 Knäuel à 25 g brauchen.
13.09.2012 - 13:20
![]() Marie Danneels wrote:
Marie Danneels wrote:
U spreekt voor het kantpatroon steeds over 1 steek afhalen; is het niet 1 nieuwe steek opzetten ? Kan zijn dat ik totaal verkeerd ben maar dan snap ik het helemaal niet -))) Groetjes !
08.08.2012 - 11:56DROPS Design answered:
Hoi Marie. Je hebt gelijk, het moet 1 st opzetten zijn. Wij zullen het patroon aanpassen.
31.08.2012 - 16:35
|
|
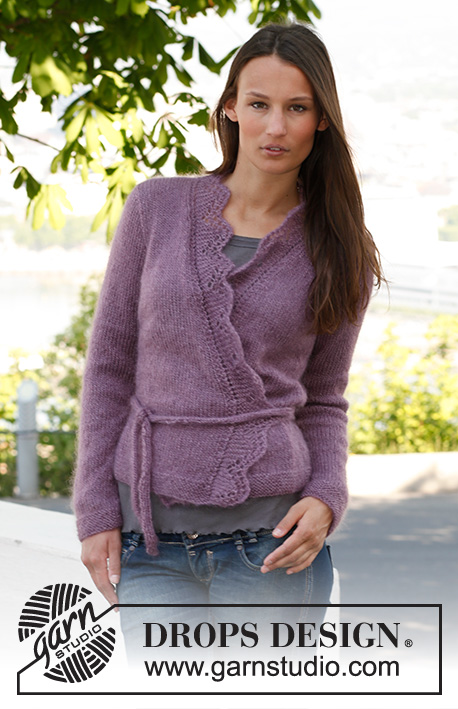
Meredith#meredithcardigan |
|
 |
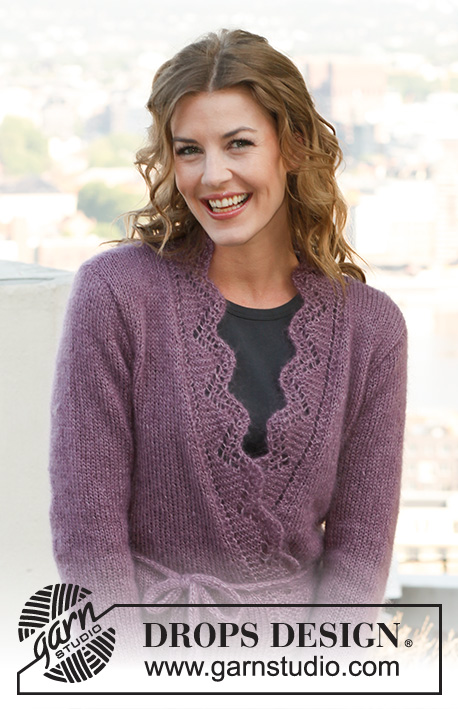 |
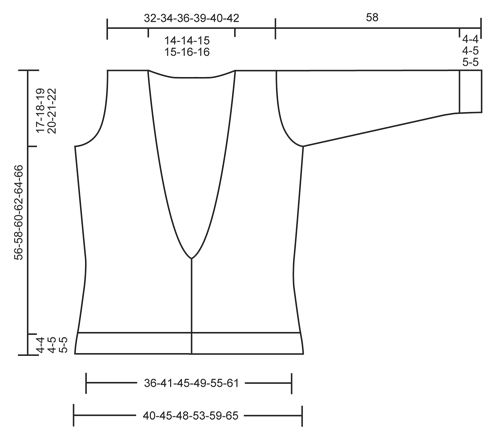
Knitted DROPS jacket with edge in lace pattern in 2 threads ”Kid-Silk”. Size: S - XXXL.
DROPS 141-20 |
|
|
GARTER ST (back and forth on needle): K all rows. 1 ridge = 2 rows K. DECREASE TIP 1 (applies to dec in the sides): All dec are done from RS. Dec 1 st at beg of row as follows: 1 edge st in garter st, slip 1 st as if to K, K 1, psso. Dec 1 st at end of row as follows: Work until 3 sts remain on needle, K the next 2 sts tog, 1 edge st in garter st. INCREASE TIP: Inc 1 st by making 1 YO, on next row work YO twisted (i.e. work in back loop of st instead front) to avoid holes. DECREASE TIP 2 (applies to dec on neckline): All dec are done from RS. Dec 1 st before marker on left front piece as follows: Work until 3 sts remain before marker, K the next 2 sts tog, K 1 (marker), work band sts. Dec 1 st after marker on right front piece as follows: Work band sts, (marker), then K 1, slip 1 st as if to K, K 1, psso, work the rest of row. TUBE KNITTING: K 1 row = 6 sts on needle, now the thread is on the left side of needle. Then work as follows: * Slide all sts to the right side of double pointed needle without turning the piece, tighten thread and K over all sts *, repeat from *-*. When tube has been worked, do not cast off but cut the threads and pull thread ends through all sts, fasten the threads. -------------------------------------------------------- BACK: Worked back and forth on needle. Cast on 70-78-84-92-102-112 sts (incl 1 edge st in each side) with 2 threads Kid-Silk on needle size 4.5 mm. Work in GARTER ST - see explanation above - for 4-4-4-5-5-5 cm (1st row = RS). On next row from RS, switch to needle size 5 mm and continue in stocking st with 1 edge st in garter st in each side. NOTE! Edge sts in the sides are worked in garter st until finished measurements. REMEMBER THE KNITTING TENSION! When piece measures 5-5-5-6-6-6 cm, dec 1 st inside 1 edge st in each side - Read DECREASE TIP 1. Repeat dec every 4 cm 2 more times (= 3 dec in total) = 64-72-78-86-96-106 sts. Continue until piece measures 17-18-19-20-21-22 cm. On next row from RS, inc 1 st inside 1 edge st in each side - READ INCREASE TIP. Repeat inc every 7 cm 2 more times (= 3 inc in total) = 70-78-84-92-102-112 sts. Continue until piece measures 39-40-41-42-43-44 cm. Then cast off for armholes at the beg of every row in each side as follows: Cast off 3 sts 1-1-1-2-2-2 times, 2 sts 1-1-2-2-3-4 times and 1 st 2-4-3-2-4-5 times = 56-60-64-68-70-74 sts. Continue until piece measures 54-56-58-60-62-64 cm. Then cast off the middle 22-22-24-24-26-26 sts for neck and finish each shoulder separately. On next row from neck, cast off 1 st = 16-18-19-21-21-23 sts remain on shoulder. Loosely cast off all sts when piece measures 56-58-60-62-64-66 cm. LEFT FRONT PIECE: Worked back and forth on needle. Cast on 45-49-52-56-61-66 sts (incl 1 edge st) with 2 threads Kid-Silk on needle size 4.5 mm. K 2 rows (1st row = RS). Insert 1 marker before the last 10 sts seen from RS (= 10 band sts towards mid front), move the marker upwards when working. READ ALL OF THE FOLLOWING SECTION FOR LEFT FRONT PIECE BEFORE CONTINUING. Then work lace pattern over the 10 band sts towards mid front, and in garter st over the other sts for 4-4-4-5-5-5 cm as follows: Row 1 (= RS): Work until 10 sts remain on row, (marker), K 1, K the next 2 tog, 1 YO, K 3, * 1 YO, K the next 2 tog *, repeat from *-* 1 more time, cast on 1 st = 11 sts from marker. Row 2 (= WS): K 2, 1 YO, K the next 2 tog, 1 YO, K 7 = 12 sts from marker, work the rest of row. Row 3: Work until 12 sts remain on row, (marker), K 1, K the next 2 tog, 1 YO, K 5, * 1 YO, K the next 2 tog *, repeat from *-* 1 more time, cast on 1 st = 13 sts from marker. Row 4: K 2, 1 YO, K the next 2 tog, 1 YO, K 9 = 14 sts from marker, work the rest of row. Row 5: Work until 14 sts remain on row, (marker), K 1, K the next 2 tog, 1 YO, K 7, * 1 YO, K the next 2 tog *, repeat from *-* 1 more time, cast on 1 st = 15 sts from marker. Row 6: K 2, 1 YO, K the next 2 tog, 1 YO, K 11 = 16 sts from marker, work the rest of row. Row 7: Work until 16 sts remain on row, (marker), K 1, K the next 2 tog, 1 YO, K 9, * 1 YO, K the next 2 tog *, repeat from *-* 1 more time = 16 sts from marker. Row 8 (= WS): K 1, 1 YO, K the next 2 tog, K 13 = 16 sts from marker - NOTE! Turn piece, work short rows here. Row 9 (= short row from RS): K 1, K the next 2 tog, 1 YO, K 9, * 1 YO, K the next 2 tog *, repeat from *-* 1 more time, cast on 1 st = 17 sts from marker. Row 10: K 1, K the next 2 tog, * 1 YO, K the next 2 tog *, repeat from *-* 1 more time, K 10 = 16 sts from marker, work the rest of row. Row 11: Work until 16 sts remain on row, (marker), K 1, K the next 2 tog, 1 YO, K 6, * K the next 2 tog, 1 YO *, repeat from *-* 1 more time, slip next st as if to K, K the next 2 tog, psso, cast on 1 st = 15 sts from marker. Row 12: K 1, K the next 2 tog, * 1 YO, K the next 2 tog *, repeat from *-* 1 more time, K 8 = 14 sts from marker, work the rest of row. NOTE! Remember to switch to needle size 5 mm when piece measures 4-4-4-5-5-5 cm, then continue with lace pattern over band sts and work in stocking st over the other sts with 1 edge st in garter st in the side until finished measurements. Row 13: Work until 14 sts remain on row, (marker), K 1, K the next 2 tog, 1 YO, K 4, * K the next 2 tog, 1 YO *, repeat from *-* 1 more time, slip next st as if to K, K the next 2 tog, psso, cast on 1 st = 13 sts from marker. Row 14: K 1, K the next 2 tog, * 1 YO, K the next 2 tog *, repeat from *-* 1 more time, K 6 = 12 sts from marker, work the rest of row. Row 15: Work until 12 sts remain on row, (marker), K 1, K the next 2 tog, 1 YO, K 2, * K the next 2 tog, 1 YO *, repeat from *-* 1 more time, slip next st as if to K, K the next 2 tog, psso, cast on 1 st = 11 sts from marker. Row 16: K 1, K the next 2 tog, * 1 YO, K the next 2 tog *, repeat from *-* 1 more time, K 4 = 10 sts from marker - NOTE! Turn piece, work short rows here. Row 17 (= short row from RS): K 1, K the next 2 tog, 1 YO, K 3, * 1 YO, K the next 2 tog *, repeat from *-* 1 more time, cast on 1 st = 11 sts from marker. Repeat row 2 to 17. AT THE SAME TIME dec and inc in the side as on back piece. When piece measures 18-19-20-21-22-23 cm, dec 1 st before marker - READ DECREASE TIP 2 - for neckline. Repeat dec every 6th row a total of 12-12-13-13-14-14 times. When piece measures 39-40-41-42-43-44 cm, cast off for armhole in the side as on back piece. After all dec and cast offs are done, there are 16-18-19-21-21-23 sts before marker (= shoulder). When piece measures 56-58-60-62-64-66 cm, cast off the first 16-18-19-21-21-23 sts on next row from RS. LEFT BAND: Continue with lace pattern as before over band sts on left front piece until band measures approx. 9-9-10-10-10-10 cm from shoulder (finish with 2nd row), K 1 row while at the same time casting off. RIGHT FRONT PIECE: Worked back and forth on needle. Cast on 45-49-52-56-61-66 sts (incl 1 edge st) with 2 threads Kid-Silk on needle size 4.5 mm. K 2 rows (1st row = RS). Insert 1 marker after the first 10 sts seen from RS (= 10 band sts towards mid front), move the marker upwards when working. READ ALL OF THE FOLLOWING SECTION FOR RIGHT FRONT PIECE BEFORE CONTINUING. Then work lace pattern over the 10 band sts towards mid front, and in garter st over the other sts for 4-4-4-5-5-5 cm as follows: Row 1 (= RS): K all sts. Row 2 (= WS): Work until 10 sts remain on row, (marker), K 1, K the next 2 tog, 1 YO, K 3, * 1 YO, K the next 2 tog *, repeat from *-* 1 more time, cast on 1 st = 11 sts from marker. Row 3: K 2, 1 YO, K the next 2 tog, 1 YO, K 7 = 12 sts from marker, work the rest of row. Row 4: Work until 12 sts remain on row, (marker), K 1, K the next 2 tog, 1 YO, K 5, * 1 YO, K the next 2 tog *, repeat from *-* 1 more time, cast on 1 st = 13 sts from marker. Row 5: K 2, 1 YO, K the next 2 tog, 1 YO, K 9 = 14 sts from marker, work the rest of row. Row 6: Work until 14 sts remain on row, (marker), K 1, K the next 2 tog, 1 YO, K 7, * 1 YO, K the next 2 tog *, repeat from *-* 1 more time, cast on 1 st = 15 sts from marker. Row 7: K 2, 1 YO, K the next 2 tog, 1 YO, K 11 = 16 sts from marker, work the rest of row. Row 8: Work until 16 sts remain on row, (marker), K 1, K the next 2 tog, 1 YO, K 9, * 1 YO, K the next 2 tog *, repeat from *-* 1 more time = 16 sts from marker. Row 9 (= RS): K 1, 1 YO, K the next 2 tog, K 13 = 16 sts from marker - NOTE! Turn piece, work short rows here. Row 10 (= short row from WS): K 1, K the next 2 tog, 1 YO, K 9, * 1 YO, K the next 2 tog *, repeat from *-* 1 more time, cast on 1 st = 17 sts from marker. Row 11: K 1, K the next 2 tog, * 1 YO, K the next 2 tog *, repeat from *-* 1 more time, K 10 = 16 sts from marker, work the rest of row. Row 12: Work until 16 sts remain on row, (marker), K 1, K the next 2 tog, 1 YO, K 6, * K the next 2 tog, 1 YO *, repeat from *-* 1 more time, slip next st as if to K, K the next 2 tog, psso, cast on 1 st = 15 sts from marker. NOTE! Remember to switch to needle size 5 mm when piece measures approx. 4-4-4-5-5-5 cm, then continue with lace pattern over band sts and work in stocking st over the other sts with 1 edge st in garter st in the side until finished measurements. Row 13: K 1, K the next 2 tog, * 1 YO, K the next 2 tog *, repeat from *-* 1 more time, K 8 = 14 sts from marker, work the rest of row. Row 14: Work until 14 sts remain on row, (marker), K 1, K the next 2 tog, 1 YO, K 4, * K the next 2 tog, 1 YO *, repeat from *-* 1 more time, slip next st as if to K, K the next 2 tog, psso, cast on 1 st = 13 sts from marker. Row 15: K 1, K the next 2 tog, * 1 YO, K the next 2 tog *, repeat from *-* 1 more time, K 6 = 12 sts from marker, work the rest of row. Row 16: Work until 12 sts remain on row, (marker), K 1, K the next 2 tog, 1 YO, K 2, * K the next 2 tog, 1 YO *, repeat from *-* 1 more time, slip next st as if to K, K the next 2 tog, psso, cast on 1 st = 11 sts from marker. Row 17 (= RS): K 1, K the next 2 tog, * 1 YO, K the next 2 tog *, repeat from *-* 1 more time, K 4 = 10 sts from marker - NOTE! Turn piece, work short rows here. Row 18 (= short row from WS): K 1, K the next 2 tog, 1 YO, K 3, * 1 YO, K the next 2 tog *, repeat from *-* 1 more time, cast on 1 st = 11 sts from marker. Repeat row 3 to 18. AT THE SAME TIME dec and inc in the side as on back piece. When piece measures 18-19-20-21-22-23 cm, dec 1 st after marker - READ DECREASE TIP 2. Repeat dec every 6th row a total of 12-12-13-13-14-14 times. When piece measures 39-40-41-42-43-44 cm, cast off for armhole in the side as on back piece. After all dec and cast offs are done, there are 16-18-19-21-21-23 sts after marker (= shoulder). When piece measures 56-58-60-62-64-66 cm, cast off the first 16-18-19-21-21-23 sts on last row from WS. RIGHT BAND: Continue with lace pattern as before over band sts on right front piece until band measures approx. 9-9-10-10-10-10 cm from shoulder (finish with 3rd row), K 1 row while at the same time casting off. SLEEVE: Worked back and forth on needle. Cast on 38-40-42-44-46-48 sts (incl 1 edge st in each side) with 2 threads Kid-Silk on needle size 4.5 mm. Work in garter st for 4-4-4-5-5-5 cm. On next row from RS, switch to needle size 5 mm and continue in stocking st with 1 edge st in garter st in each side. When piece measures 7-7-7-6-6-6 cm, inc 1 st inside 1 edge st in each side. Repeat inc every 5-5-4½-4-3½-3½ cm 7-7-8-9-10-10 more times (= 8-8-9-10-11-11 times in total) = 54-56-60-64-68-70 sts. When piece measures 47-47-46-46-45-45 cm (shorter measurements in the larger sizes because of longer sleeve cap) cast off for sleeve cap at beg of every row in each side as follows: 3 sts 1-1-1-2-2-2 times, 2 sts 2 times. Then cast off 1 st in each side until piece measures approx. 57 cm, then cast off in each side as follows: 2 sts 1 time, 3 sts 1 time. Cast off the remaining sts, the piece measures approx. 58 cm. ASSEMBLY: Sew shoulder seams and sew in sleeves inside 1 edge st. Sew sleeve and side seams in one inside 1 edge st. ASSEMBLY: Sew bands tog mid back and sew them along neckline at the back of neck. TIE: Cast on 6 sts with 2 threads Kid-Silk on double pointed needles size 5 mm and work TUBE KNITTING - read explanation above - for approx. 72-75-78-81-84-87 cm. Sew it on to the middle of side seam on the left side outside the jacket, approx. 17-18-19-20-21-22 cm from bottom edge. Work another tie the same way but for approx. 100-102-104-106-109-112 cm, sew it to a tip on band on right front piece. |
|
|
|
Have you finished this pattern?Tag your pictures with #dropspattern #meredithcardigan or submit them to the #dropsfan gallery. Do you need help with this pattern?You'll find 11 tutorial videos, a Comments/Questions area and more by visiting the pattern on garnstudio.com. © 1982-2025 DROPS Design A/S. We reserve all rights. This document, including all its sub-sections, has copyrights. Read more about what you can do with our patterns at the bottom of each pattern on our site. |
|


With over 40 years in knitting and crochet design, DROPS Design offers one of the most extensive collections of free patterns on the internet - translated to 17 languages. As of today we count 314 catalogues and 11822 patterns translated into English (UK/cm).
We work hard to bring you the best knitting and crochet have to offer, inspiration and advice as well as great quality yarns at incredible prices! Would you like to use our patterns for other than personal use? You can read what you are allowed to do in the Copyright text at the bottom of all our patterns. Happy crafting!
Post a comment to pattern DROPS 141-20
We would love to hear what you have to say about this pattern!
If you want to leave a question, please make sure you select the correct category in the form below, to speed up the answering process. Required fields are marked *.