
Popular categories
Looking for a yarn?


Comments / Questions (35)
![]() GABRIELLA wrote:
GABRIELLA wrote:
SALVE ,STO LAVORANDO A QUESTO PROGETTO E ADESSO SONO ARRIVATA A LLA FINE DELLE DIMINUZIONI VICINO AI SEGNAPUNTI E LEGGO CHE DEVO LAVORARE UN'ALZATA SUL DIETRO LAVORANDO 51m (CENTRALI?)GIRARE IL LAVORO E LAVORARE 16m POI GIRARE E LAVORARE 24m POI GIRARE E 8m IN PIU 'OGNI VOLTA ANCORA FINO A LAVORARE 48m .NON CAPISCO COSA SIGNIFICA STRINGERE IL FILO E SE L'ALZATA DIETRO RISULTERA' PIU' ALTA NELLA PARTE CENTRALE DEL COLLO DIETRO RISPETTO A TUTTO LO SPRONE.GRAZIE
21.10.2019 - 00:17DROPS Design answered:
Buongiorno Gabriella, in questa sezione si lavorano i ferri accorciati per dare una maggiore vestibilità al capo: ciò vuol dire che non si lavora su tutte le maglie ma solo su una parte. In particolare, lavorare 51 maglia diritto poi deve girare il lavoro e lavorare 16 maglie, poi deve girare il lavoro e lavorare 24 maglie e così via con 8 maglie in più ad ogni giro fino a quando arriva a lavorare 48 maglie con questa tecnica. A questo punto riprende a lavorare su tutte le maglie. Si ricordi di tirare bene il filo ad ogni giro per non creare buchi. Buon lavoro!
21.10.2019 - 09:02
![]() Jeanet Vegter wrote:
Jeanet Vegter wrote:
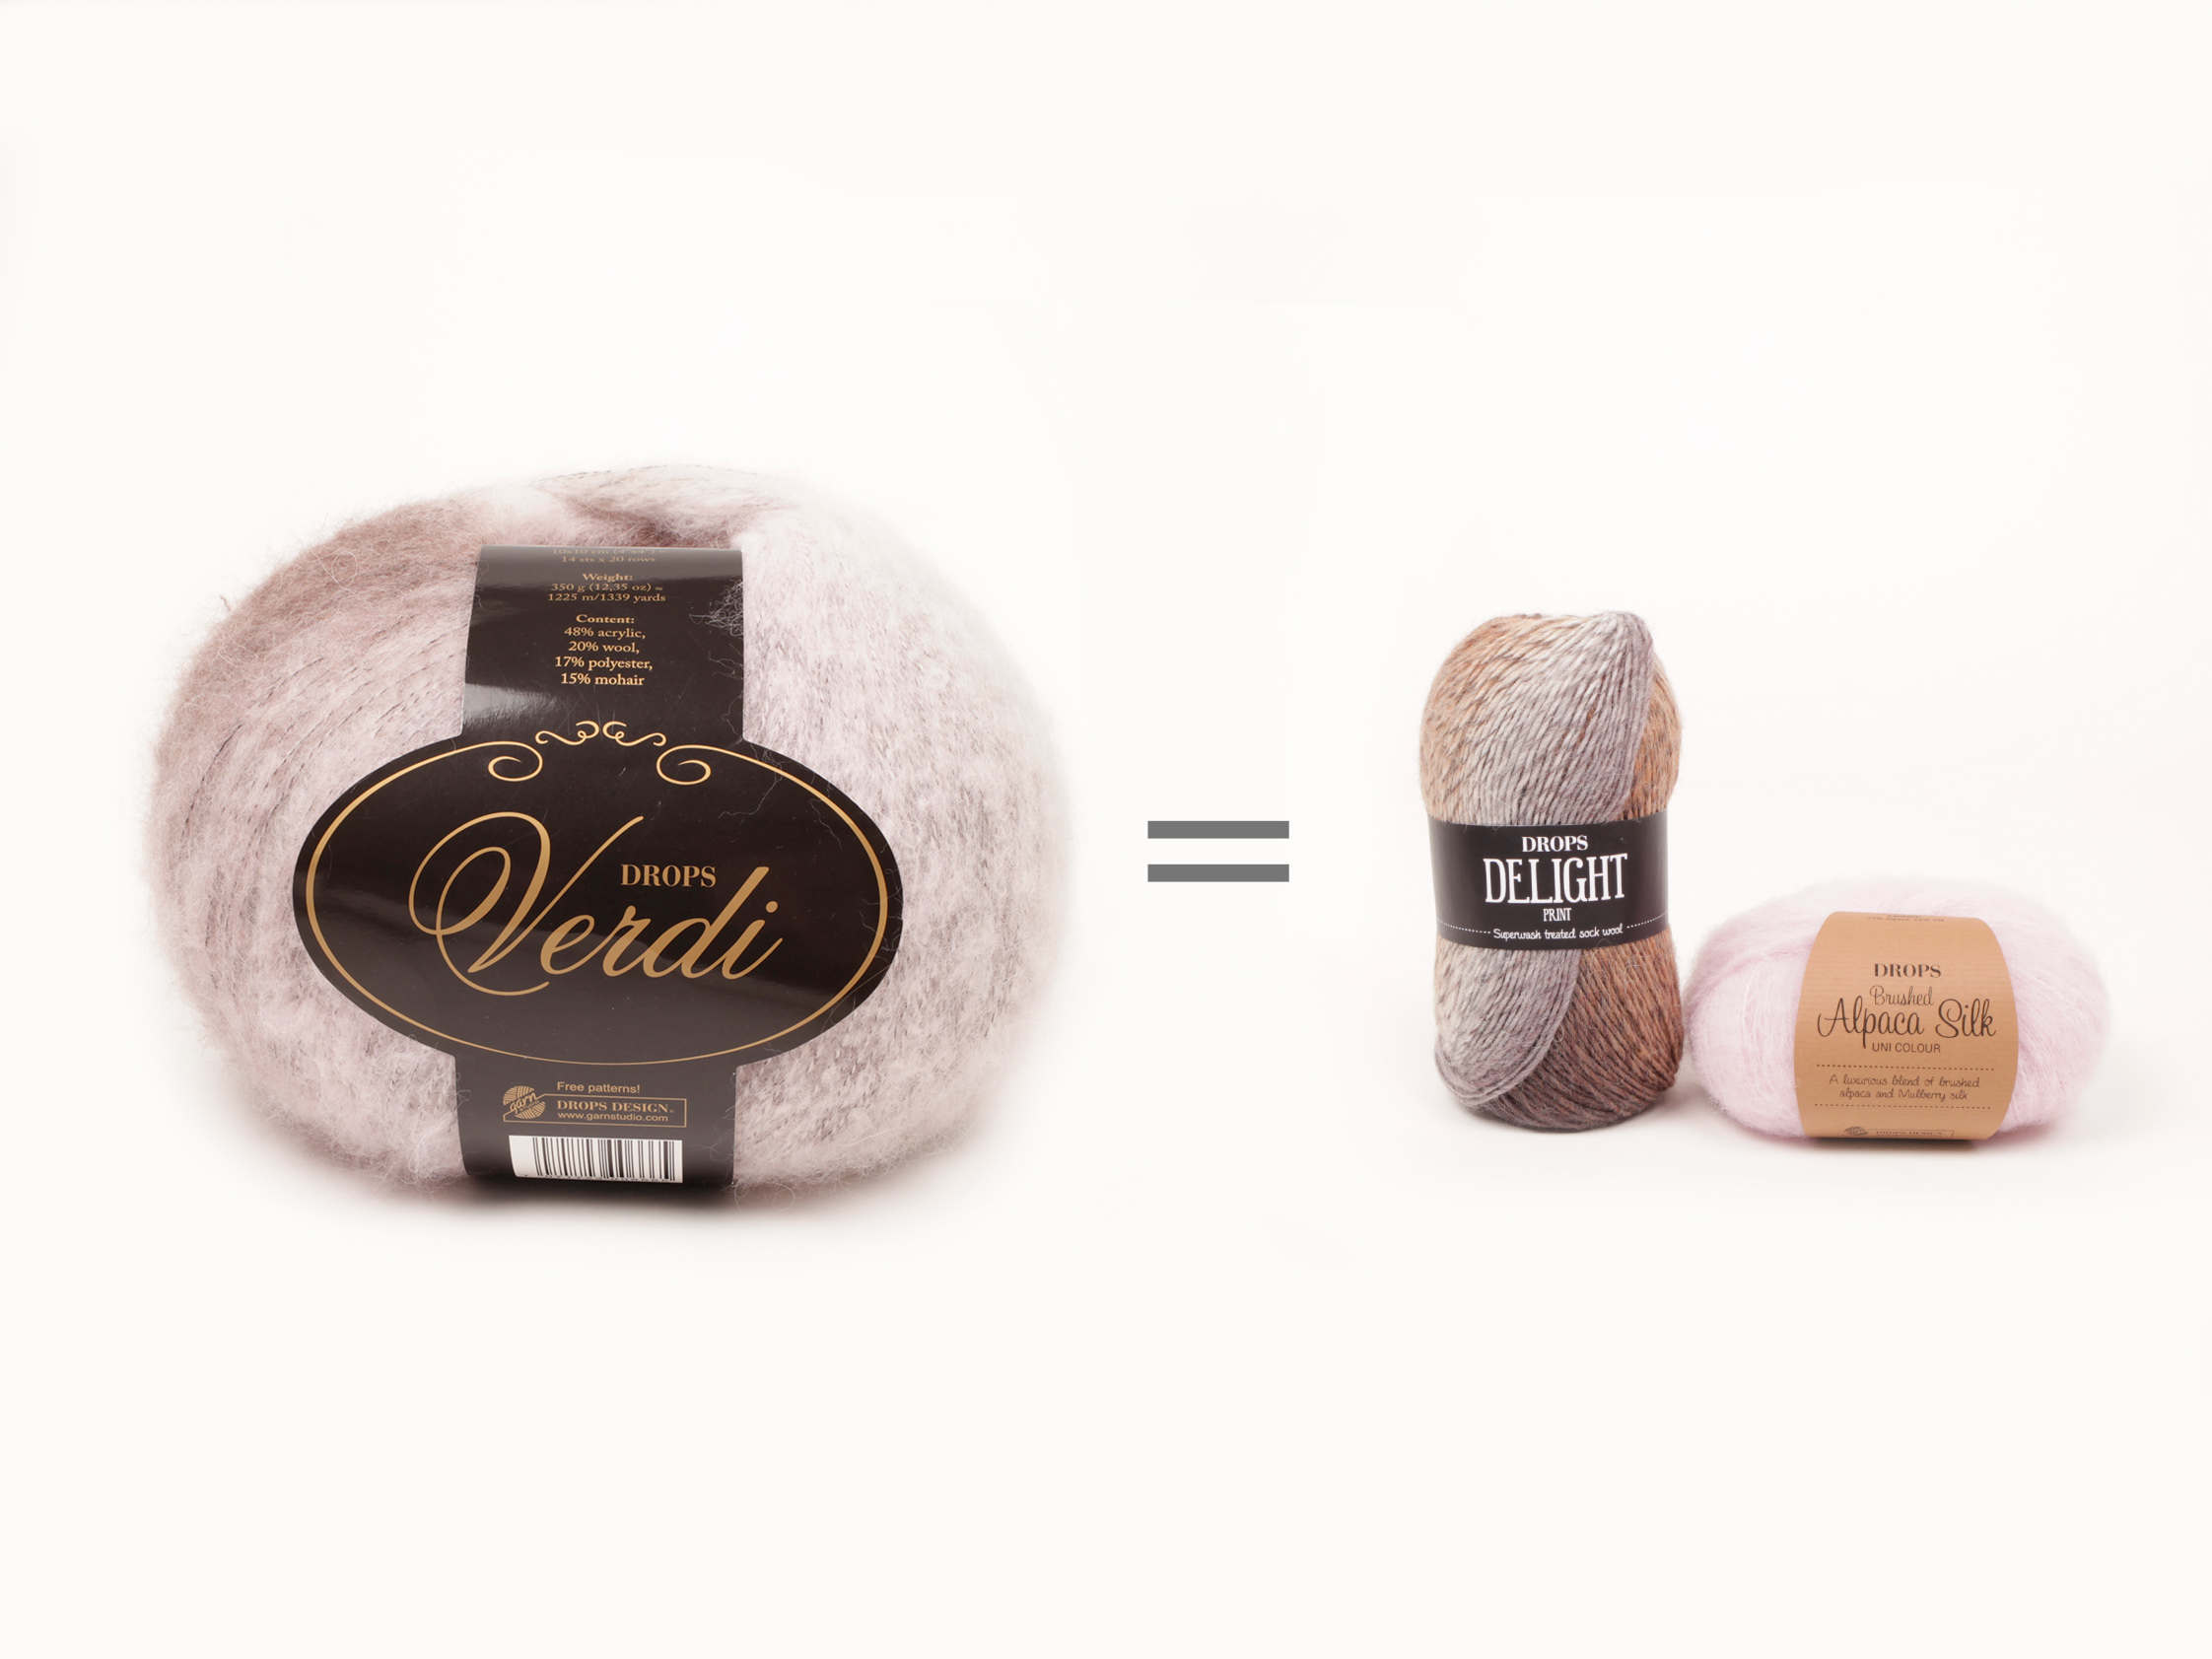
Graag wil ik dit vest gaan maken. Het is gemaakt in wol categorie D, maar is niet meer leverbaar. Er is maar één ander D garen beschikbaar. Welk garen/wol adviseert u mij voor dit vest met eenzelfde uitstraling, mogen wel andere kleuren zijn.
06.01.2017 - 10:56DROPS Design answered:
Hoi Jeanet. Je kan Verdi vervangen door 1 draad Brushed Alpaca Silk met 1 draad Delight. Kijk hier voor een voorbeeld. Dan krijg je dezelfde uitstraling - en je kan kiezen van meerdere kleurcombinaties :)
09.01.2017 - 15:12
![]() Sabine Bürg wrote:
Sabine Bürg wrote:
Ich habe dieses Modell schon mehrfach gestrickt. auch mit anderen Garnen.Ist mein Lieblingsmodell. Bei anderen Garnen muß man nur eine Maschenprobe nehmen!!!!
13.07.2015 - 12:37DROPS Design answered:
Vielen Dank für Ihr Lob. Eine kleine Bemerkung: Auch beim Originalgarn sollten Sie immer vorher eine Maschenprobe machen, denn jeder strickt individuell, daher müssen Sie stets prüfen, ob die Maschenprobe stimmt, egal, mit welchem Garn Sie stricken.
20.07.2015 - 11:55
![]() Aukje wrote:
Aukje wrote:
Ik zit met het probleem om wanneer de mpouwen en en lijf de pas te breien. De afgekante steken voor het armsgat hoe verwerk ik die met het breien van de pas? Er wordt toch gesproken te breien over alle steken de pas te breien?
26.04.2015 - 22:32DROPS Design answered:
Hoi Aukje. Je breit de pas over de st van de rechter voorpand - mouw - achterpand - mouw - linker voorpand. Je breit niet over de afgekante st in het armsgat. Bij het afwerken sluit je deze kleine opening onder de mouwen.
27.04.2015 - 14:48
![]() Eva wrote:
Eva wrote:
Dana- taky jsem svetr už upletla :-). Když jsem četla váš komentář a byla jste nadšená, tak jste mě nadchla taky! Díky :-)
28.12.2014 - 11:09
![]() Manoupulls wrote:
Manoupulls wrote:
Merci beaucoup Manou
29.07.2014 - 19:30
![]() Manoupulls wrote:
Manoupulls wrote:
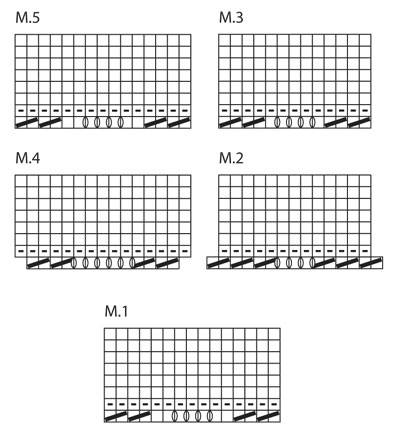
Bonjour, Je suis à tricoter ce gilet un petit souci ce pendant comment se fait-il que les grilles ne soient pas toutes sur 15 mailles grille 4 ns arrivons à 17 mailles alors que grille 3 : 13 mailles ???? je suis un peu désemparée Cordialement Manou
29.07.2014 - 16:05DROPS Design answered:
Bonjour Manoupulls, les diagrammes ont un nbe de mailles différents car ils se tricotent sur un nombre de mailles différents: on va tricoter en hauteur d'abord M1 puis M2 puis M3 puis M4, puis M5. Au 1er rang de M2 et M4, on diminue 2 m par rapport du diagramme à répéter. Bon tricot!
29.07.2014 - 17:07
![]() Dana wrote:
Dana wrote:
Hi Sabine, aus 350 gr. habe ich 2 Jacke gestrickt. 1x Große M + 1x Gr. S.
14.06.2013 - 10:08Karin wrote:
350 g in allen Grössen.
10.05.2013 - 18:23
![]() Sabine wrote:
Sabine wrote:
Wieviel garn braucht man in etwa für die Jacke in Größe S oder M? Ich habe vom Schultertuch noch ca. 150g übrig..
10.05.2013 - 14:50DROPS Design answered:
Liebe Sabine, leider haben wir die Jacke nicht mehr da zum Nachwiegen, daher kann ich Ihnen nicht sagen, ob Ihr Rest reicht. Vielleicht können andere Strickerinnen Auskunft geben?
13.05.2013 - 06:48
|
|||||||||||||
Moonlight Serenade#moonlightserenadecardigan |
|||||||||||||
 |
 |
||||||||||||
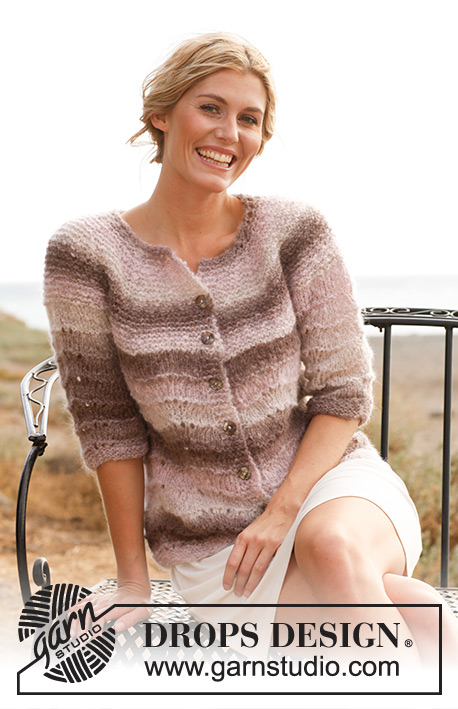
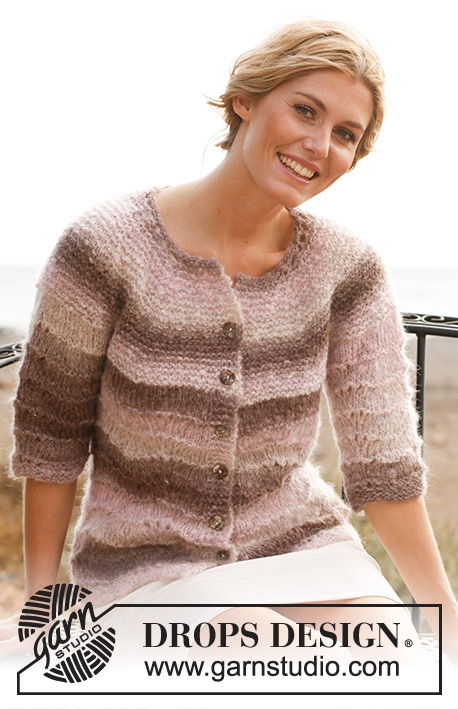
Knitted DROPS jacket with ¾ sleeves, wavy pattern and round yoke in ”Verdi”. Size: S - XXXL
DROPS 137-23 |
|||||||||||||
|
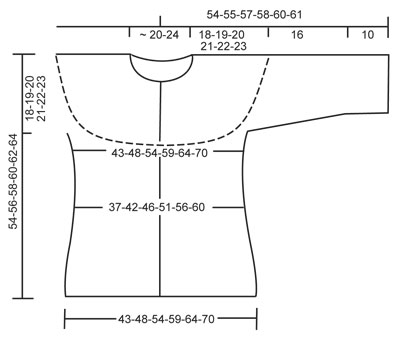
PATTERN: See diagrams M.1 to M.5, diagrams show pattern from RS. GARTER ST (back and forth on needle): K all rows. BUTTON HOLES: Cast off for button holes on right band from RS. 1 BUTTON HOLE = K tog third and fourth st and make 1 YO. Cast off for button holes when piece measures: SIZE S: 4, 11, 18, 25, 32, 39, 46 and 53 cm SIZE M: 4, 11, 19, 26, 33, 41, 48 and 55 cm SIZE L: 4, 12, 19, 27, 34, 42, 50 and 57 cm SIZE XL: 4, 12, 20, 27, 35, 43, 51 and 59 cm SIZE XXL: 4, 12, 20, 28, 36, 45, 53 and 61 cm SIZE XXXL: 4, 12, 21, 29, 38, 46, 54 and 63 cm NOTE: Cast off for last button hole after working an elevation at the back of neck. DECREASE TIP (applies to round yoke): All dec are done from RS by K 2 tog. Dec alternately before and after all markers. Dec 10 sts per dec. -------------------------------------------------------- BODY: Worked back and forth on circular needle. Loosely cast on 130-145-160-175-190-205 sts (incl 5 band sts in each side) on circular needle size 6 mm with Verdi. Switch to circular needle size 5.5 mm and K 7 rows back and forth (1st row = WS). Switch back to circular needle size 6 mm. Then work as follows: 5 band sts in GARTER ST - see explanation above, diagram M.1 8-9-10-11-12-13 times and 5 band sts in garter st. REMEMBER THE KNITTING TENSION! When piece measures 4 cm, beg to cast off for BUTTON HOLES – see explanation above. When piece measures approx. 12 cm (adjust after 1 whole repetition of diagram M.1), work diagram M.2 one time vertically over diagram M.1 = 114-127-140-153-166-179 sts. Continue with diagram M.3 over diagram M.2. When piece measures approx. 22 cm (adjust after 1 whole repetition of diagram M.3), work diagram M.4 one time vertically over diagram M.3 = 130-145-160-175-190-205 sts. Continue with M.5 over M.4. When piece measures approx. 36-37-38-39-40-41 cm (adjust after 1 whole repetition of diagram M.5), work next row as follows from RS: K 31-35-39-42-46-50 sts (= right front piece), cast off 8 sts for armhole, K 52-59-66-75-82-89 sts (= back piece), cast off 8 sts for armhole and K the rest of row (= K 31-35-39-42-46-50 sts for left front piece). Put piece aside and work the sleeves. SLEEVE: Worked back and forth on circular needle. LOOSELY cast on 41-41-41-47-47-47 sts (incl 1 edge st in each side) on circular needle size 6 mm with Verdi. Switch to circular needle size 5.5 mm and K 7 rows back and forth (1st row = WS). Switch back to circular needle size 6 mm. Then work diagram M.3 in the 3 smaller sizes and diagram M.5 in the 3 larger sizes with 1 edge st in garter st in each side. When piece measures 10 cm, inc 1 st in each side which is worked in stocking st. Repeat inc every 6-4-3-4-3-2½ cm a total of 3-4-5-4-5-6 times = 47-49-51-55-57-59 sts (work the inc sts in stocking st). When piece measures approx. 26 cm (adjust after 1 whole repetition of diagram M.3/M.5), K 1 row while at the same time casting off 5 sts both at the beg and end of row = 37-39-41-45-47-49 sts remain, cut the thread. Put piece aside and knit another sleeve. YOKE: Slip sleeves and body on to same circular needle size 5.5 mm = 188-207-226-249-268-287 sts. Insert 10 markers in the piece as follows: First marker after 13-18-19-21-22-22 sts, then 18-19-21-23-25-27 sts between the markers, 13-18-18-21-21-22 sts remain after last marker. Then work in garter st back and forth over all sts. When 4 rows in garter st have been worked, start dec – SEE DECREASE TIP! Repeat dec every 4th row a total of 9-8-8-8-8-7 times and then every other row 2-5-6-8-9-12 times = 78-77-86-89-98-97 remain on needle. K 1 row from WS. Then work an elevation in the back as follows: K 47-47-51-52-57-57 sts, turn, tighten thread and work 16 sts back, turn, tighten thread and work 24 sts, turn, continue like this by working 8 sts more on every turn until a total of 48-48-48-48-64-64 sts have been worked. Turn and K until mid front. K 1 row back over all the sts while at the same time dec 8-5-10-11-16-11 sts evenly = 70-72-76-78-82-86 sts. Work next row as follows: K 5 sts (cast off for last button hole now), * K 2 tog, 1 YO *, repeat from *-* until 7 sts remain, K these sts. K 1 row back from WS, then LOOSELY cast off. ASSEMBLY: Sew the sleeve seams inside 1 edge st. Sew tog the openings under the sleeves and sew on buttons. |
|||||||||||||
Diagram explanations |
|||||||||||||
|
|||||||||||||
|
|||||||||||||
|
|||||||||||||
Have you finished this pattern?Tag your pictures with #dropspattern #moonlightserenadecardigan or submit them to the #dropsfan gallery. Do you need help with this pattern?You'll find 12 tutorial videos, a Comments/Questions area and more by visiting the pattern on garnstudio.com. © 1982-2025 DROPS Design A/S. We reserve all rights. This document, including all its sub-sections, has copyrights. Read more about what you can do with our patterns at the bottom of each pattern on our site. |
|||||||||||||


With over 40 years in knitting and crochet design, DROPS Design offers one of the most extensive collections of free patterns on the internet - translated to 17 languages. As of today we count 314 catalogues and 11822 patterns translated into English (UK/cm).
We work hard to bring you the best knitting and crochet have to offer, inspiration and advice as well as great quality yarns at incredible prices! Would you like to use our patterns for other than personal use? You can read what you are allowed to do in the Copyright text at the bottom of all our patterns. Happy crafting!
Post a comment to pattern DROPS 137-23
We would love to hear what you have to say about this pattern!
If you want to leave a question, please make sure you select the correct category in the form below, to speed up the answering process. Required fields are marked *.