DROPS Baby 21-4
DROPS design: Pattern no BS-004-by/BS-005-by
Yarn group A
----------------------------------------------------------
Size: 1/3 - 6/9 - 12/18 months (2 - 3/4) years

Materials: DROPS BABYALPACA SILK from Garnstudio
Color no 1760, light gray purple: 50-50-50 (100-100) g
Color no 4314, gray purple: 50-50-50 (50-50) g

DROPS STRAIGHT NEEDLES size 2.5 mm / US 1or2 - or size needed to get 26 sts x 34 rows in stockinette st = 10 x 10 cm / 4" x 4".
------------------------------------------------------

JUMPSUIT:
Size: 1/3 - 6/9 - 12/18 months (2 - 3/4) years
Finished measurements:
Bust: 48-54-60 (66-72) cm / 19"-21¼"-23½" (26"-28½")
Full length: 53-61-69 (77-85) cm / 21"-24"-27⅛" (30⅜"-33½")

Materials: DROPS BABYALPACA SILK from Garnstudio
Color no 1760, light gray purple: 150-150-150 (200-200) g
Color no 4314, gray purple: 50-50-50 (100-100) g

DROPS CIRCULAR NEEDLE size 2.5 mm / US 1or2 (60 cm / 24") - or size needed to get 26 sts x 34 rows in stockinette st = 10 x 10 cm / 4" x 4".
DROPS DOUBLE POINTED NEEDLES size 2.5 mm / US 1or2 - for sleeves and legs.

DROPS MOTHER-OF-PEARL BUTTON, #521 (15 mm): 6-6-6 (7-7) pieces

-------------------------------------------------------

Alternative Yarn – See how to change yarns here
Yarn Groups A to F – Use the same pattern and change the yarn here
Yarn usage using an alternative yarn – Use our yarn converter here

-------------------------------------------------------

Pattern instructions

NOTE: This pattern is written in American English. All measurements in charts are in cm. For conversion from inches to cm - click here. There are different terms for crocheting in American and British English. If this pattern includes crochet, click for "crochet terms" here. For this pattern in British English, please click here.
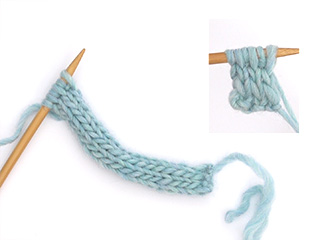
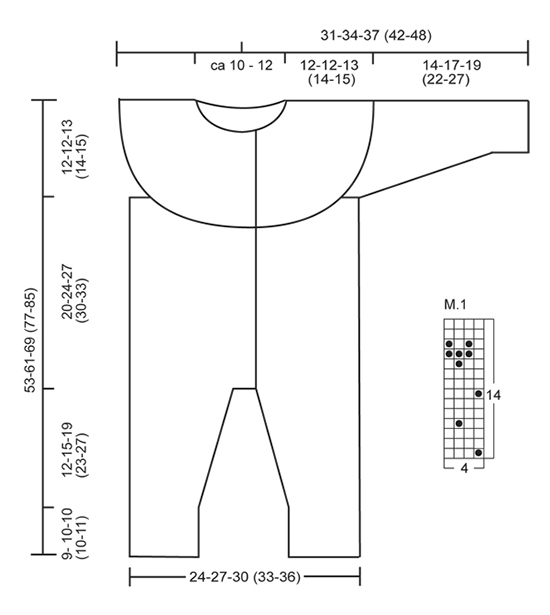
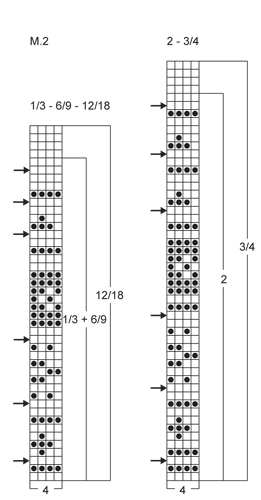
HAT:
INCREASE TIP:
Inc 1 st by making 1 YO, on next row K YO twisted (i.e. work in back loop of st instead front) to avoid holes.

GARTER ST (back and forth on needle): K all rows.

TUBE KNITTING:
* K 1, place yarn in front of piece (towards you), slip 1 st as if to P, place yarn behind piece (from you) *, repeat from *-* on all rows. This becomes a ribbon worked in the round.
----------------------------------------------------------

HAT:
The piece is worked sideways from mid back. Cast on 33-38-42 (46-50) sts with light gray purple on needle size 2.5 mm / US 1or2. Work in garter st - Read explanation above - While at the same time inc 1 st in the right side and dec 1 st in the left side as follows:
Row 1 (= RS): K 2, inc 1 st - Read INCREASE TIP above, work until 4 sts remain and K 2 tog, K 2.
Row 2 (= WS): K all sts.
Repeat these 2 rows until piece measures 5½-6-6½ (7-8) cm / 2¼"-2⅜"-2½" (2¾"-3⅛"). Insert a marker in the right side = right ear flap. REMEMBER THE GAUGE!
Then dec 1 st in the right side and inc 1 st in the left side as follows:
Row 1 (= RS): K 1, slip 1 st as if to K, K 1, psso, work until 2 sts remain, inc 1 st, K 2.
Row 2 (= WS): K all sts.
Repeat these 2 rows until piece measures a total of 11-12-13 (14-16) cm / 4⅜"-4¾"-5⅛" (5½"-6¼") (i.e another = 5½-6-6½ (7-8) cm / 2¼"-2⅜"-2½" (2¾"-3⅛").
Then switch to gray purple and continue in garter st as follows: Inc 1 st in the right side every 4 rows and dec 1 st in the left side every other row until piece measures 15½-16½-17½ (18-19) cm / 6⅛"-6½"-6⅞" (7"-7½") (= the middle tip that goes down the forehead mid front).
Then continue in garter st as follows: Dec 1 st in the right side every 4 rows and inc 1 st in the left side every other row until piece measures 20-21-22 (22-22) cm / 8"-8¼"-8¾" (8¾"-8¾").
Then switch back to light gray purple and continue in garter st as follows: Dec 1 st in the left side every other row and inc 1 st in the right side every other row until piece measures 25½ -27-28½ (29-30) cm / 9⅞"-10⅝"-11¼" (11⅜"-11¾"). Insert a marker in the right side = left ear flap.
Then dec 1 st in the right side on every other row and inc 1 st in the left side on every other row until finished measurements = 31-33-35 (36-38) cm / 12¼"-13"-13¾" (14¼"-15"). Bind off.

ASSEMBLY:
Sew the tips at the top of the hat (on opposite side of markers) tog edge to edge with little stitches. Sew cast on edge and bind off edge tog mid back.

TIES:
Cast on 4 sts with light gray purple on needle size 2.5 mm / US 1or2. Work tube knitting - Read explanation above. Bind off when the tie measures approx. 16-18-20 (22-24) cm / 6 1/7"-7"-8" (8¾"-9½"). Knit a similar tie. Fasten one tie in each ear flap.
______________________________________________________________________

JUMPSUIT:
SEED ST (in the round on double pointed needles):
ROUND 1: * K 1, P 1 *, repeat from *-*.
ROUND 2: K over P and P over K. Repeat 2nd round.

INCREASE TIP:
Inc 1 st by working 2 sts in 1 st before and after the marker.

GARTER ST (back and forth on needle): K all rows.

PATTERN: See diagrams M.1 and M.2.

BUTTON HOLES:
Bind off for button holes by K 4th and 5th st from edge tog, then make 1 YO.
Bind off for 5-5-5 (6-6) button holes on right band when piece measures from where legs were placed tog:
1/3 months: 6, 12, 17, 22, 27 cm / 2⅜", 4¾", 6¾", 8¾", 10⅝".
6/9 months: 6, 12, 18, 24, 30 cm / 2⅜", 4¾",7", 9½", 11¾".
12/18 months: 7, 14, 21, 28, 34 cm / 2¾", 5½", 8¼", 11", 13⅜".
2 years: 7, 14, 20, 26, 32, 38 cm / 2¾", 5½", 8", 10¼", 12½", 15".
3/4 years: 7, 14, 21, 28, 35, 42 cm / 2¾", 5½", 8¼", 11", 13¾", 16½".
----------------------------------------------------------

LEG:
Worked in the round on double pointed needles. Cast on 38-44-50 (54-60) sts on double pointed needles size 2.5 mm / US 1or2 with gray purple, work seed st for 9-10-10 (10-10) cm / 3½"-4"-4" (4"-4") - Read explanation above. Insert a marker at beg of round (= inside of leg) and move the marker upwards. Then switch to light gray purple and then continue in stockinette st - while at the same time inc 1 st on next round on each side of marker - Read INCREASE TIP above. Repeat inc every 2-3-4 (4-4) rounds a total of 14-15-16 (18-19) times = 66-74-82 (90-98) sts.
When piece measures 21-25-29 (33-37) cm / 8¼"-9¾"-11⅜" (13"-14½"), bind off 2 sts on each side of marker (= 4 sts bind off) = 62-70-78 (86-94) sts. Put piece aside and knit another leg the same way.

BODY:
Slip both legs in on same circular needle size 2.5 mm / US 1or2 with bound off sts towards each other = 124-140-156 (172-188) sts. Now measure piece from here. Continue to work back and forth from mid front with light gray purple as follows (1st row = RS): Cast on 5 new sts on needle, K over all sts and cast on 5 new sts at the end of row = 134-150-166 (182-198) sts. Insert a marker 36-40-44 (48-52) sts in from each side (= 62-70-78 (86-94) sts between markers on back piece). Move the markers upwards when working. Then work in stockinette st but work the 5 outermost sts in each side towards mid front in garter st until finished measurements (= front bands). AT THE SAME TIME when piece measures 6-6-7 (7-7) cm / 2⅜"-2⅜"-2¾" (2¾"-2¾"), bind off for first button hole on right band - Read explanation above.
When piece measures 16-20-23 (26-29) cm / 6¼"-8"-9" (10¼"-11⅜"), work diagram M.1 on next row from RS with 5 band sts in each side. NOTE: On last row in diagram M.1 (= WS), bind off 4-4-4 (5-5) sts on each side of every marker for armholes (= 8-8-8 (10-10) dec sts in each side) = 118-134-150 (162-178) sts.
Now the piece measures approx. 20-24-27 (30-33) cm / 8"-9½"-10⅝" (11¾"-13") from where legs were placed tog. Put piece aside and knit the sleeves.

SLEEVE:
Worked in the round on double pointed needles. Cast on 38-40-42 (44-46) sts on double pointed needles size 2.5 mm / US 1or2 with gray purple, work seed st for 5-5-5 (6-6) cm / 2"-2"-2" (2½"-2½"). Insert a marker at beg of round (= mid under sleeve) and move the marker upwards. Then switch to light gray purple and then continue in stockinette st - while at the same time inc 1 st on next round on each side of marker. Repeat inc every 2-3-3 (4-5) rounds a total of 7-8-9 (10-11) times = 52-56-60 (64-68) sts.
When piece measures 10-13-15 (18-23) cm / 4"-5⅛"-6" (7"-9"), work diagram M.1 - On last round in diagram M.1, bind off 4-4-4 (5-5) sts on each side of marker for armhole (= 8-8-8 (10-10) sts bind off) = 44-48-52 (54-58) sts.
Put piece aside and knit another sleeve the same way.

YOKE:
Slip sleeves on to same circular needle as body where armholes were bind off = 206-230-254 (270-294) sts. Then work diagram M.2 back and forth with 5 band sts in garter st in each side towards mid front (1st row = RS). NOTE: Dec 20-20-24 (24-28) sts evenly on row which is marked with an arrow in diagram M.2.
REMEMBER TO CONTINUE TO BIND OFF FOR BUTTON HOLES ON RIGHT BAND!
When diagram M.2 has been worked, there are 86-110-110 (126-126) sts on needle and piece measures approx. 12-12-13 (14-15) cm / 4¾"-4¾"-5⅛" (5½"-6") from where sleeves were placed tog (i.e. 1st row in diagram M.2).

NECK EDGE:
Then work back and forth in seed st with gray purple as follows: K from RS while at the same time dec 4-20-16 (30-26) sts evenly on 1st row (= RS) = 82-90-94 (96-100) sts. Then work 1 row in seed st. On next row from RS, bind off for last button hole on right band. Continue in seed st until neck edge measures 2-2-2 (3-3) cm / ¾"-¾"-¾" (1⅛"-1⅛"). Loosely bind off all sts.

ASSEMBLY:
Sew tog the openings under the sleeves and between the legs, sew on buttons.


Diagram

All measurements in charts are in cm.

symbols = light gray purple
symbols = gray purple
symbols = decrease
diagram
diagram
Do you have a question? See a list of frequently asked questions (FAQ)

Knitting tension is what determines the final measurements of your work, and is usually measured per 10 x 10 cm. It is provided like so: number of stitches in width x number of rows in height - eg: 19 stitches x 26 rows = 10 x 10 cm.

The knitting tension is very individual; some people knit/crochet loosely while others work tightly. You adjust the knitting tension with the needle size, which is why the suggested needle size only serve as a guide! You need to adjust this (up or down) to ensure that YOUR knitting tension matches the knitting tension provided in the pattern. If you work with a different knitting tension than provided you will have a different yarn consumption, and your work will have different measurements than what the pattern suggests.

The knitting tension also determines which yarns can replace each other. As long as you achieve the same knitting tension you can replace one yarn with another.

See DROPS lesson: How to measure your tension/gauge

See DROPS video: How to make a gauge tension swatch

The required amount of yarn is provided in grams, eg: 450 g. To calculate how many balls you’ll need you first need to know how many grams are in 1 ball (25g, 50g or 100g). This information is available if you click on the individual yarn quality on our pages. Divide the amount required with the amount of each ball. For example, if each ball is 50g (the most common amount), the calculation will be as follows: 450 / 50 = 9 balls.

The important thing when changing from one yarn to another is that the knitting/crochet tension remains the same. This is so that the measurements of the finished piece will be the same as on the sketch provided. It is easier to achieve the same knitting tension using yarns from the same yarn group. It is also possible to work with multiple strands of a thinner yarn to achieve the knitting tension of a thicker one. Please try our yarn converter. We recommend you to always work a test swatch.

Please NOTE: when changing yarn the garment might have a different look and feel to the garment in the photo, due to individual properties and qualities of each yarn.

See DROPS lesson: Can I use a different yarn than the one mentioned in the pattern?

All our yarns are categorised into yarn groups (from A to F) according to thickness and knitting tension – group A contains the thinnest yarns and group F the thickest. This makes it easier for you to find alternative yarns to our patterns, should you wish to switch yarn. All yarns within the same group have a similar knitting tension and can easily replace each other. However, different yarn qualities have different structures and properties which will give the finished work a unique look and feel.

Click here for an overview of the yarns in each yarn group

At the top of all our patterns you’ll find a link to our yarn converter, which is a helpful tool should you wish to use a different yarn than suggested. By filling in the yarn quality you wish to replace, the amount (in your size) and number of strands, the converter will present good alternative yarns with the same knitting tension. Additionally it will tell you how much you’ll require in the new qualities and whether you’ll need to work with multiple strands. Most skeins are 50g (some are 25g or 100g).

If the pattern is worked with multiple colours, every colour will have to be converted separately. Similarly, if the pattern is worked with several strands of different yarns (for example 1 strand Alpaca and 1 strand Kid-Silk) you will have to find alternatives for each, individually.

Click here to see our yarn converter

Since different yarns have different qualities and textures we have chosen to keep the original yarn in our patterns. However, you can easily find options among our available qualities by using our yarn converter, or simply pick a yarn from the same yarn group.

It is possible that some retailers still have discontinued yarns in stock, or that someone has a few skeins at home that they would like to find patterns for.

The yarn converter will provide both alternative yarn as well as required amount in the new quality.

If you think it's hard to decide what size to make, it can be a good idea to measure a garment you own already and like the size of. Then you can pick the size by comparing those measures with the ones available in the pattern's size chart.

You'll find the size chart at the bottom of the pattern.

See DROPS lesson: How to read size chart

The needle size provided in the pattern serves only as a guide, the important thing is to follow the knitting tension. And since knitting tension is very individual, you will have to adjust the needle size to ensure that YOUR tension is the same as in the pattern – maybe you’ll have to adjust 1, or even 2 needle sizes, up or down to achieve the correct tension. For this, we recommend that you work test swatches.

Should you work with a different knitting tension than the one provided, the measurements of the finished garment might deviate from the measurement sketch.

See DROPS lesson: How to measure your tension/gauge

See DROPS video: How to make a gauge tension swatch

Working a garment top-down provides more flexibility and room for personal adjustment. For example it is easier to try the garment on while working, as well as making adjustments to length of yoke and shoulder caps.

The instructions are carefully explaining every step, in the correct order. Diagrams are adjusted to the knitting direction and are worked as usual.

The diagram depicts all rows/rounds, and every stitch seen from the right side. It is read from bottom to top, from right to left. 1 square = 1 stitch.

When working back and forth, every other row is worked from the right side and every other row is worked from the wrong side. When working from the wrong side, the diagram will have to be worked reversed: from left to right, knit stitches are purled, purl stitches are knit etc.

When working in the round every round is worked from the right side and the diagram are worked from right to left on all rounds.

See DROPS lesson: How to read knitting diagrams

The diagram depicts all rows/rounds, and every stitch seen from the right side. It is worked from bottom to top, from right to left.

When working back and forth every other row is worked from the right side: from right to left and every other row is worked from the wrong side: from left to right.

When working in the round, every row in the diagram are worked from the right side, from right to left.

When working a circular diagram you start in the middle and work your way outwards, counter clockwise, row by row.

The rows usually start with a given number of chain stitches (equivalent to the height of the following stitch), this will either be depicted in the diagram or explained in the pattern.

See DROPS lesson: How to read crochet diagrams

Instructions for working several diagrams after each other on the same row/round, will often be written like so: “work A.1, A.2, A.3 a total of 0-0-2-3-4 times". This means you work A.1 once, then A.2 is worked once, and A.3 is repeated (in width) the number of times provided for your size – in this case like so: S = 0 times, M = 0 times, L=2 times, XL= 3 times and XXL = 4 times.

The diagrams are worked as usual: begin with the first row in A.1, then work the first row in A.2 etc.

See DROPS lesson: How to read knitting diagrams

See DROPS lesson: How to read crochet diagrams

The total width of the garment (from wrist-to-wrist) will be larger in the larger sizes, despite the actual sleeves being shorter. The larger sizes have longer sleeve caps and wider shoulders, so there will be a good fit in all sizes.

The measurement sketch/schematic drawing provides information regarding the full length of the garment. If it’s a jumper or a jacket the length is measured from the highest point on the shoulder (usually closest to the neckline), and straight down to the bottom of the garment. It is NOT measured from the tip of shoulder. Similarly, the length of yoke is measured from the highest point on the shoulder and down to where yoke is split into body and sleeves.

See DROPS lesson: How to read a schematic drawing

Diagrams are often repeated on the round or in height. 1 repeat is the diagram the way it appears in the pattern. If it says to work 5 repeats of A.1 in the round, then you work A.1 a total of 5 times after/next to each other in the round. If it says to work 2 repeats of A.1 vertically/in height you work the entire diagram once, then begin again at the start and work the entire diagram one more time.

Chain stitches are slightly narrower than other stitches and to avoid working the cast-on edge too tight, we simply chain more stitches to begin with. The stitch count will be adjusted on the following row to fit the pattern and measurement sketch.

The rib edge is more elastic and will contract slightly compared to, for example, stocking stitch. By increasing before the rib edge, you avoid a visible difference in width between the rib edge and the rest of the body.

It’s very easy to cast off too tightly, and by making yarn overs while casting off (and simultaneously casting these off) you avoid a too tight cast off edge.

See DROPS video: How to bind off with yarn overs (yo)

To achieve an even increase (or decrease) you can increase on, for example: every 3rd and 4th row alternately, like so: work 2 rows and increase on the 3rd row, work 3 rows and increase on the 4th. Repeat this until the increase is complete.

See DROPS lesson: Increase or decrease 1 st on every 3rd and 4th row alternately

Should you prefer to work in the round instead of back and forth, you may of course adjust the pattern. You’ll need to add steeks mid-front (usually 5 stitches), and follow the instructions. When you would normally turn and work from the wrong side, simply work across the steek and continue in the round. At the end you’ll cut the piece open, pick up stitches to work bands, and cover the cut edges.

See DROPS video: How to knit steeks and cut open

Should you prefer to work back and forth instead of in the round, you may of course adjust the pattern so you work the pieces separately and then assemble them at the end. Divide the stitches for the body in 2, add 1 edge stitch in each side (for sewing) and work the front and back pieces separately.

See DROPS lesson: Can I adapt a pattern for circular needles into straight needles?

Pattern repeats can vary slightly in the different sizes, in order to get the correct proportions. If you’re not working the exact same size as the garment in the photo, yours might deviate slightly. This has been carefully developed and adjusted so that the complete impression of the garment is the same in all sizes.

Make sure to follow instructions and diagrams for your size!

If you have found a pattern you like which is available in women’s size it’s not very difficult to convert it to men’s size. The biggest difference will be the length of sleeves and body. Start working on the women size that you think would fit across the chest. The additional length will be worked right before you cast off for the armhole/sleeve cap. If the pattern is worked top-down you can add the length right after the armhole or before the first decrease on sleeve.

Regarding additional yarn amount, this will depend on how much length you add, but it is better with a skein too many than too few.

All yarns will have excess fibres (from production) that might come off as lint or shedding. Brushed yarns (ie hairier yarns) have more of these loose, excess fibres, causing more shedding.

Shedding also depends on what is worn under or over the garment, and whether this pulls at the yarn fibres. It’s therefore not possible to guarantee that there will be no shedding

Below are some tips on how to get the best result when working with hairier yarns:

1. When the garment is finished (before you wash it) shake it vigorously so the looser hairs come off. NOTE: do NOT use a lint roller, brush or any method that pulls at the yarn.

2. Place the garment in a plastic bag and put it in your freezer - the temperature will cause the fibres to become less attached to each other, and excess fibres will come off easier.

3. Leave in the freezer for a few hours before taking it out and shaking it again.

4. Wash the garment according to the instructions on the yarn label.

Pilling is a natural process that happens to even the most exclusive of fibers. It's a natural sign of wear and tear that is hard to avoid, and that is most visible in high friction areas of your garment like a sweater's arms and cuffs.

You can make your garment look as new by removing the pilling, using a fabric comb or a pill/lint remover.

Still can't find the answer you need? Then scroll down and leave your question so one of our experts can try to help you. This will be done normally within 5 to 10 working days.
In the meantime, you can read the questions and answers that others have left to this pattern or join the DROPS Workshop on Facebook to get help from fellow knitters/crocheters!

You might also like...

Post a comment to pattern DROPS Baby 21-4

We would love to hear what you have to say about this pattern!

If you want to leave a question, please make sure you select the correct category in the form below, to speed up the answering process. Required fields are marked *.

Comments / Questions (54)

country flag Thea Lüddecke wrote:

Ich weiß leider auch nicht wie ich die Mütze zusammennähen soll. ich habe auch weniger spitzen als in dem video angezeigt. lg

05.07.2014 - 15:44

country flag KIM wrote:

Bonjour pour nouveau né combien de laine dois-je commander

26.05.2014 - 15:19

DROPS Design answered:

Bonjour Kim, les explications de cet ensemble commencent à partir du 1/3 mois, les fournitures nécessaires à la réalisation figurent à droite de la photo, pour le bonnet 1 pelote de chacun des 2 coloris en Baby Alpaca Silk pour le bonnet et 3 pelotes gris mauve clair + 1 pelote gris mauve pour le combi-pantalon. Bon tricot!

26.05.2014 - 15:38

country flag Satu wrote:

Hej! Ny har jag stickat färdigt mössan men jG förstår inte hur jag ska montera ihop den.

09.04.2014 - 13:24

DROPS Design answered:

Hej Satu. Pröv at se denne video, der ser du praecis hvad du skal göre:

09.04.2014 - 16:27

country flag Christiane wrote:

Hallo ! Ich habe die Mütze gestrickt und kapiere überhaupt nicht wie ich sie zusammen nähen soll. Bei dem Video zur Teufelsmütze sind es mehr Spitzen als bei meiner hier. Habe ich falsch gestrickt?

07.04.2014 - 19:25

country flag Isa wrote:

Hey Drops Team, bedankt voor de reactie! Ik vrees dat ik het nog steeds niet snap! Volgens mijn telpatroon ben ik met naalden 1 en 3 aan de goede kant, met 2 en 4 aan de verkeerde kant. Dus meerder ik bij naald 1 en 4 en minder bij 2 en 4?! Bedankt nogmaals!

28.02.2014 - 21:25

DROPS Design answered:

Hoi Isa. Je moet minderen in iedere 4 nld en meerderen in elke 2 nld. Dus je breit: 1 nld op de goede kant waar je mindert en meerdert. Brei de verkeerde kant = nld 1. Volgende nld, goede kant = nld 2. Hier meerder je aan de linkerkant. Volgende nld, verkeerde kant = nld 3. En de volgende nld, goede kant = nld 4 = je mindert en je meerdert. Begin opnieuw met nld 1 = verkeerde kant.

03.03.2014 - 14:25

country flag Isa wrote:

Ik heb het patroon tot 11cm gebreid, nu moet ik van kleur wisselen, dat snap ik nog - maar wat is precies de bedoeling met meerderen iedere 4e naald? En is met rechterkant de goede kant bedoeld, of de rechterkant van de naald(dus begin van de naald)? Als ik iedere 4e naald meerder dan doe ik dat dus aan de goede en verkeerde kant. Dezelfde vragen gelde natuurlijk voor het minderen iedere 2e naald. Dank!

27.02.2014 - 17:27

DROPS Design answered:

Hoi Isa. Als je meerdert in elke 4e of elke 2e nld, dan minder je niet op de verkeerde kant: Je meerdert aan de goede kant, dan brei je nld 1 og de verkeerde kant, nld 2 op de goede kant, nld 3 op de verkeerde kant - en 4e nld: goede kant en meerder nog een keer. Enzovoort. Je meerdert aan de rechterkant (dus begin van de nld) en mindert aan de linkerkant (dus eind van de nld).

28.02.2014 - 16:49

country flag Ariane Kosick-Albitz wrote:

Liebes Team, ich meine die letzte Ohrenklappe: es heißt erst, dass auf der rechten Seite zugenommen und auf der linken abgenommen werden soll. Dann steht weiterhin, dass wieder rechts zugenommen und links abgenommen wird, um die Klappe fertig zu stellen, das passt allerdings nicht - es müsste doch rechts ab- und links zugenommen werden?! So stricke ich jedenfalls, damit sich die Klappe ausbildet. Liebe Grüße

18.02.2014 - 13:35

DROPS Design answered:

Liebe Ariane, ja, Sie haben Recht, ganz am Ende der Anleitung waren rechts und links vertauscht. Der Fehler wurde nun korrigiert. Vielen Dank für den Hinweis!

18.02.2014 - 14:08

country flag Ariane Kosick-Albitz wrote:

Bei der letzten Zacke der Mütze ist ein Fehler drin! Aufnahme und Abnahme an der rechten und linken Kante wurden vertauscht. So, wie es jetzt da steht, bildet sich keine letzte Zacke (Ohrenklappe), sondern es wird ein langgezogenes Stück.

12.02.2014 - 19:41

DROPS Design answered:

Lieeb Ariane, bitte schreiben Sie uns ganz genau die Stelle, an der Sie einen Fehler vermuten, auf den ersten Blick konnte ich nichts erkennen.

13.02.2014 - 18:07

country flag Camilla wrote:

Hei!! Jeg er ganske fersk på strikking,og syns denne luen i utgangspunktet så enkel ut å strikke. Men det stokker seg når det står sett merket i høyere side (=høyre øreklaff), for meg er det starten på pinnen, og det er jo midt bak slik jeg har forstått det. Må jeg tenke motsatt høyre og venstre i oppskriften? Håper noen skjønner hva jeg mener, for luen var så søt :-) mvh Camilla

26.10.2013 - 07:51

DROPS Design answered:

Ja jeg tror du må tænke modsat. Højre side af arbejdet er den side med mærketråde og det er den side som vender mod ansigtet. Så det er bare at følge ud og indtagninger ifølge opskriften! God fornøjelse!

30.10.2013 - 09:33

country flag Sara wrote:

Hej! Jag undrar lite över varven när man byter till den mörkare färgen. I instruktionen står det "Sedan byts det till grålila och det forsätts i rätst så här: öka 1 m i höger sida på vart 4:e v och minska 1 m i vänster sida på vartannat v". På vilket sätt ska det minskas? Ska jag sticka två maskor tillsammans eller lyfta en maska? Och när under varvet ska jag göra minskningen?

23.08.2013 - 21:47

DROPS Design answered:

Du minskar vid att sticka ihop 2 maskor.

03.10.2013 - 10:27