DROPS Alpaca
DROPS Alpaca
100% Alpaca
from 3.40 £ /50g
Get the yarn to make this pattern from 30.60£.

The yarn cost is calculated from the pattern’s smallest size and the yarn’s cheapest product type. Looking for an even better price? You might find it on the DROPS Deals!

DROPS SS24

Jolie Fleur

Knitted cardigan with round yoke and multi-coloured pattern in DROPS Alpaca. Size children 3 to 12 years.

DROPS Children 22-4
DROPS design: Pattern no Z-029-bn
Yarn group A
--------------------------------------------------------
Size: 3/4 - 5/6 - 7/8 - 9/10 - 11/12 years
Size in cm: 98/104 - 110/116 - 122/128 - 134/140 - 146/152

Materials: DROPS ALPACA from Garnstudio
150-200-200-250-300 g colour no 100, off white
50 g for all sizes in colour no 2921, pink
50 g for all sizes in colour no 2915, orange
50 g for all sizes in colour no 3140, light pink
50 g for all sizes in colour no 3720, medium pink
50 g for all sizes in colour no 3770, dark pink
50 g for all sizes in colour no 3800, old pink

DROPS DOUBLE POINTED NEEDLES AND CIRCULAR NEEDLE SIZE 3 mm (80 cm) - or size needed to get 24 sts x 32 rows in stocking st = 10 x 10 cm. NOTE: Make sure that the knitting tension is the same when working pattern.
DROPS DOUBLE POINTED NEEDLES AND CIRCULAR NEEDLE size 2.5 mm (80 cm) – for garter st and rib.

DROPS MOTHER-OF-PEARL BUTTONS w/holes, NO 521: 7-7-7-8-8 pieces

-------------------------------------------------------

Alternative Yarn – See how to change yarns here
Yarn Groups A to F – Use the same pattern and change the yarn here
Yarn usage using an alternative yarn – Use our yarn converter here

-------------------------------------------------------

DROPS Alpaca
DROPS Alpaca
100% Alpaca
from 3.40 £ /50g
Get the yarn to make this pattern from 30.60£.

The yarn cost is calculated from the pattern’s smallest size and the yarn’s cheapest product type. Looking for an even better price? You might find it on the DROPS Deals!

Pattern instructions

NOTE: This pattern is written in British English. All measurements in charts are in cm. For conversion from cm to inches - click here. There are different terms for crocheting in British and American English. If this pattern includes crochet, click for "crochet terms" here. For this pattern in American English, please click here.
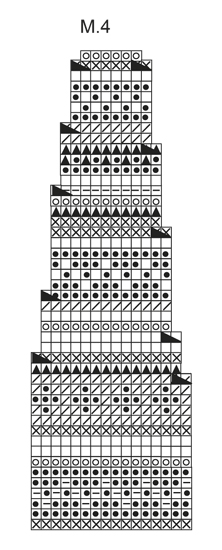
GARTER ST (back and forth on needle): K all rows.

PATTERN:
See diagram M.1 to M.4. All diagrams are worked in stocking st. NOTE: When working diagram M.2, pull up the pattern thread to next row when working dots. Do not cut the thread because the thread fastening might shine through.
--------------------------------------------------------

BODY:
Worked back and forth on circular needle from mid front. Cast on 164-176-192-208-220 sts (incl 1 edge st in each side towards mid front) on circular needle size 2.5 mm with off white. P 1 row from WS. Then work rib as follows (seen from RS): 1 edge st in GARTER ST - see explanation above, * K 2, P 2 *, repeat from *-*, finish with K 2 and 1 edge st in garter st. When rib measures approx. 4 cm (adjust so that next row is worked from RS), switch to circular needle size 3 mm. K 1 row while AT THE SAME TIME dec 25-25-29-33-33 sts evenly = 139-151-163-175-187 sts. Work 3 rows in stocking st. Continue to work as follows: 1 edge st in garter st, diagram M.1A until 6 sts remain, diagram M.1B and 1 edge st in garter st. When diagram M.1 has been worked 1 time vertically, work 3 rows in stocking st with off white. Continue as follows (from RS): 1 edge st, diagram M.2A until 6 sts remain, diagram M.2B and 1 edge st. Continue working like this until piece measures approx. 20-23-25-27-29 cm (adjust so that 3 rows with one colour have been worked after 1 row with dots).
REMEMBER THE KNITTING TENSION!
Work next row as follows with off white: Work 32-35-38-41-44 sts, cast off 6 sts for armhole, work 63-69-75-81-87 sts, cast off 6 sts for armhole, work the rest of row (= 32-35-38-41-44 sts). Put piece aside and work the sleeves.

SLEEVE:
Worked in the round on double pointed needles.
Cast on 52-56-60-60-64 sts on double pointed needles size 2.5 mm with off white. K 1 round. Continue in rib = K 2/P 2 for 4 cm. Switch to double pointed needles size 3 mm. K 1 round while AT THE SAME TIME dec 8-10-12-10-12 sts evenly = 44-46-48-50-52 sts. K 2 rounds. Then work diagram M.3 one time vertically, then K 1 round with off white. Insert a marker at beg of round = mid under sleeve. Continue as follows: 4-5-0-1-2 sts in off white, diagram M.2A over 36-36-48-48-48 sts, 4-5-0-1-2 sts with off white. AT THE SAME TIME when piece measures 8-8-8-8-9 cm, inc 1 st on each side of marker. Repeat inc every 7th-9th-9th-9th-9th round a total of 8-8-10-11-12 times = 60-62-68-72-76 sts. Work the inc sts gradually in diagram M.2A. When piece measures approx. 27-32-36-39-43 cm (adjust so that 3 rounds with one colour have been worked after 1 round with pattern), work 1 round with off white while at the same time casting off 6 sts mid under sleeve (i.e. 3 sts on each side of marker) = 54-56-62-66-70 sts remain on needle.
Put piece aside and knit another sleeve.

YOKE:
Slip sleeves on to same circular needle as body where armholes were cast off = 235-251-275-295-315 sts. P 1 row from WS with off white while AT THE SAME TIME dec 8-8-0-4-8 sts evenly = 227-243-275-291-307 sts. Work 0-0-2-6-10 more rows with off white back and forth.
Continue to work as follows: 1 edge st in garter st, diagram M.4 until 2 sts remain, work the first st as the first st in diagram M.4 (so that the pattern is the same on each side of mid front), then 1 edge st in garter st. When diagram M.4 has been worked vertically, 87-93-105-111-117 sts remain on needle. K 1 row from RS with off white while AT THE SAME TIME casting off 1 edge st in each side and while at the same time dec 17-19-27-27-29 sts evenly = 68-72-76-82-86 sts, cut the thread. Slip the sts on a stitch holder.

LEFT BAND:
Worked back and forth on circular needle.
Knit up on circular needle size 2.5 mm with off white, approx. 90 to 120 sts inside 1 edge st along left front piece. K 1 row from WS while at the same time adjusting no of sts to 109-117-125-133-141. Then work rib as follows (from the top, seen from RS): 1 st in garter st, * K 2, P 2 *, repeat from *-* until 4 sts remain which are worked K 2 and 2 sts in garter st. Continue like this until rib measures approx. 2.5 cm. Loosely cast off with K over K and P over P.

RIGHT BAND:
Work as left band – AT THE SAME TIME when band measures approx. 1.5 cm, cast off for 7-7-7-8-8 button holes evenly. 1 BUTTON HOLE = cast off 2 P sts and cast on 2 new sts on next row over these sts. Upper button hole should be in first P-section. Bottom hole should be approx. 2 cm from bottom edge.

NECK EDGE:
Worked back and forth on circular needle.
Knit up on circular needle size 2.5 mm with off white (from RS) as follows: 6 sts at the top along band on right front piece (inside 1 st in garter st), then work the sts from body on the needle = 68-72-76-82-86 sts and knit up 6 sts at the top along band on left front piece = 80-84-90-94-98 sts. Then work an elevation at the back as follows in garter st: K 45-47-50-52-54 sts, turn, K 10 sts, turn, K 20 sts, turn, continue to work 10 sts more on every turn until a total of 50-50-70-70-70 sts have been worked (= 3-3-4-4-4 ridges (1 ridge = 2 rows), turn and work the rest of row. Work 1 row over all sts before casting off.

ASSEMBLY:
Sew the openings under the sleeves tog. Sew on buttons.

This pattern has been corrected.

Updated online: 24.01.2013
Under YOKE, change 60 into 68 (= 68-72-76-82-86 sts,): ..... AT THE SAME TIME casting off 1 edge st in each side and while at the same time dec 17-19-27-27-29 sts evenly = 68-72-76-82-86 sts, cut the thread. Slip the sts on a stitch holder.

Diagram

symbols = off white 0100
symbols = pink 2921
symbols = orange 2915
symbols = light pink 3140
symbols = medium pink 3720
symbols = old pink 3800
symbols = dark pink 3770
symbols = K 2 tog
diagram
diagram
Do you have a question? See a list of frequently asked questions (FAQ)

Knitting tension is what determines the final measurements of your work, and is usually measured per 10 x 10 cm. It is provided like so: number of stitches in width x number of rows in height - eg: 19 stitches x 26 rows = 10 x 10 cm.

The knitting tension is very individual; some people knit/crochet loosely while others work tightly. You adjust the knitting tension with the needle size, which is why the suggested needle size is only meant as a guide! You need to adjust this (up or down) to ensure that YOUR knitting tension matches the knitting tension provided in the pattern. If you work with a different knitting tension than provided you will have a different yarn consumption, and your work will have different measurements than what the pattern suggests.

The knitting tension also determines which yarns can replace each other. As long as you achieve the same knitting tension you can replace one yarn with another.

See DROPS lesson: How to measure your tension/gauge

See DROPS video: How to make a gauge tension swatch

The required amount of yarn is provided in grams, eg: 450 g. To calculate how many balls you’ll need you first need to know how many grams are in 1 ball (25g, 50g or 100g). This information is available if you click on the individual yarn quality on our pages. Divide the amount required with the amount of each ball. For example, if each ball is 50g (the most common amount), the calculation will be as follows: 450 / 50 = 9 balls.

The important thing when changing from one yarn to another is that the knitting/crochet tension remains the same. This is so that the measurements of the finished piece will be the same as on the sketch provided. It is easier to achieve the same knitting tension using yarns from the same yarn group. It is also possible to work with multiple strands of a thinner yarn to achieve the knitting tension of a thicker one. Please try our yarn converter. We recommend you to always work a test swatch.

Please NOTE: when changing yarn the garment might have a different look and feel to the garment in the photo, due to individual properties and qualities of each yarn.

See DROPS lesson: Can I use a different yarn than the one mentioned in the pattern?

All our yarns are categorised into yarn groups (from A to F) according to thickness and knitting tension – group A contains the thinnest yarns and group F the thickest. This makes it easier for you to find alternative yarns to our patterns, should you wish to switch yarn. All yarns within the same group have a similar knitting tension and can easily replace each other. However, different yarn qualities have different structures and properties which will give the finished work a unique look and feel.

Click here for an overview of the yarns in each yarn group

At the top of all our patterns you’ll find a link to our yarn calculator, which is a helpful tool should you wish to use a different yarn than suggested. By filling in the yarn quality you wish to replace, the amount (in your size) and number of strands, the calculator will present good alternative yarns with the same knitting tension. Additionally it will tell you how much you’ll require in the new qualities and whether you’ll need to work with multiple strands. Most skeins are 50g (some are 25g or 100g).

If the pattern is worked with multiple colours, every colour will have to be calculated separately. Similarly, if the pattern is worked with several strands of different yarns (for example 1 strand Alpaca and 1 strand Kid-Silk) you will have to find alternatives for each, individually.

Click here to see our yarn calculator

Since different yarns have different qualities and textures we have chosen to keep the original yarn in our patterns. However, you can easily find options among our available qualities by using our yarn calculator, or simply pick a yarn from the same yarn group.

It is possible that some retailers still have discontinued yarns in stock, or that someone has a few skeins at home that they would like to find patterns for.

The yarn calculator will provide both alternative yarn as well as required amount in the new quality.

If you think it's hard to decide what size to make, it can be a good idea to measure a garment you own already and like the size of. Then you can pick the size by comparing those measures with the ones available in the pattern's size chart.

You'll find the size chart at the bottom of the pattern.

See DROPS lesson: How to read size chart

The needle size provided in the pattern serves only as a guide, the important thing is to follow the knitting tension. And since knitting tension is very individual, you will have to adjust the needle size to ensure that YOUR tension is the same as in the pattern – maybe you’ll have to adjust 1, or even 2 needle sizes, up or down to achieve the correct tension. For this, we recommend that you work test swatches.

Should you work with a different knitting tension than the one provided, the measurements of the finished garment might deviate from the measurement sketch.

See DROPS lesson: How to measure your tension/gauge

See DROPS video: How to make a tension/gauge swatch

Working a garment top-down provides more flexibility and room for personal adjustment. For example it is easier to try the garment on while working, as well as making adjustments to length of yoke and shoulder caps.

The instructions are carefully explaining every step, in the correct order. Diagrams are adjusted to the knitting direction and are worked as usual.

The diagram depicts all rows/rounds, and every stitch seen from the right side. It is read from bottom to top, from right to left. 1 square = 1 stitch.

When working back and forth, every other row is worked from the right side and every other row is worked from the wrong side. When working from the wrong side, the diagram will have to be worked reversed: from left to right, knit stitches are purled, purl stitches are knit etc.

When working in the round every round is worked from the right side and the diagram are worked from right to left on all rounds.

See DROPS lesson: How to read knitting diagrams

The diagram depicts all rows/rounds, and every stitch seen from the right side. It is worked from bottom to top, from right to left.

When working back and forth every other row is worked from the right side: from right to left and every other row is worked from the wrong side: from left to right.

When working in the round, every row in the diagram are worked from the right side, from right to left.

When working a circular diagram you start in the middle and work your way outwards, counter clockwise, row by row.

The rows usually start with a given number of chain stitches (equivalent to the height of the following stitch), this will either be depicted in the diagram or explained in the pattern.

See DROPS lesson: How to read crochet diagrams

Instructions for working several diagrams after each other on the same row/round, will often be written like so: “work A.1, A.2, A.3 a total of 0-0-2-3-4 times". This means you work A.1 once, then A.2 is worked once, and A.3 is repeated (in width) the number of times provided for your size – in this case like so: S = 0 times, M = 0 times, L=2 times, XL= 3 times and XXL = 4 times.

The diagrams are worked as usual: begin with the first row in A.1, then work the first row in A.2 etc.

See DROPS lesson: How to read knitting diagrams

See DROPS lesson: How to read crochet diagrams

The total width of the garment (from wrist-to-wrist) will be larger in the larger sizes, despite the actual sleeves being shorter. The larger sizes have longer sleeve caps and wider shoulders, so there will be a good fit in all sizes.

The measurement sketch/schematic drawing provides information regarding the full length of the garment. If it’s a jumper or a jacket the length is measured from the highest point on the shoulder closest to the neckline, and straight down to the bottom of the garment. It is NOT measured from the tip of shoulder. Similarly, the length of yoke is measured from the highest point on the shoulder and down to where yoke is split into body and sleeves.

On a jacket measures are never taken along bands, unless specifically stated. Always measure inside band stitches when measuring the length.

See DROPS lesson: How to read a schematic drawing

Diagrams are often repeated on the round or in height. 1 repeat is the diagram the way it appears in the pattern. If it says to work 5 repeats of A.1 in the round, then you work A.1 a total of 5 times after/next to each other in the round. If it says to work 2 repeats of A.1 vertically/in height you work the entire diagram once, then begin again at the start and work the entire diagram one more time.

Chain stitches are slightly narrower than other stitches and to avoid working the cast-on edge too tight, we simply chain more stitches to begin with. The stitch count will be adjusted on the following row to fit the pattern and measurement sketch.

The rib edge is more elastic and will contract slightly compared to, for example, stocking stitch. By increasing before the rib edge, you avoid a visible difference in width between the rib edge and the rest of the body.

It’s very easy to cast off too tightly, and by making yarn overs while casting off (and simultaneously casting these off) you avoid a too tight cast off edge.

See DROPS video: How to bind off with yarn overs (yo)

To achieve an even increase (or decrease) you can increase on, for example: every 3rd and 4th row alternately, like so: work 2 rows and increase on the 3rd row, work 3 rows and increase on the 4th. Repeat this until the increase is complete.

See DROPS lesson: Increase or decrease 1 st on every 3rd and 4th row alternately

Should you prefer to work in the round instead of back and forth, you may of course adjust the pattern. You’ll need to add steeks mid-front (usually 5 stitches), and follow the instructions. When you would normally turn and work from the wrong side, simply work across the steek and continue in the round. At the end you’ll cut the piece open, pick up stitches to work bands, and cover the cut edges.

See DROPS video: How to knit steeks and cut open

Should you prefer to work back and forth instead of in the round, you may of course adjust the pattern so you work the pieces separately and then assemble them at the end. Divide the stitches for the body in 2, add 1 edge stitch in each side (for sewing) and work the front and back pieces separately.

See DROPS lesson: Can I adapt a pattern for circular needles into straight needles?

Pattern repeats can vary slightly in the different sizes, in order to get the correct proportions. If you’re not working the exact same size as the garment in the photo, yours might deviate slightly. This has been carefully developed and adjusted so that the complete impression of the garment is the same in all sizes.

Make sure to follow instructions and diagrams for your size!

If you have found a pattern you like which is available in women’s size it’s not very difficult to convert it to men’s size. The biggest difference will be the length of sleeves and body. Start working on the women size that you think would fit across the chest. The additional length will be worked right before you cast off for the armhole/sleeve cap. If the pattern is worked top-down you can add the length right after the armhole or before the first decrease on sleeve.

Regarding additional yarn amount, this will depend on how much length you add, but it is better with a skein too many than too few.

All yarns will have excess fibres (from production) that might come off as lint or shedding. Brushed yarns (ie hairier yarns) have more of these loose, excess fibres, causing more shedding.

Shedding also depends on what is worn under or over the garment, and whether this pulls at the yarn fibres. It’s therefore not possible to guarantee that there will be no shedding

Below are some tips on how to get the best result when working with hairier yarns:

1. When the garment is finished (before you wash it) shake it vigorously so the looser hairs come off. NOTE: do NOT use a lint roller, brush or any method that pulls at the yarn.

2. Place the garment in a plastic bag and put it in your freezer - the temperature will cause the fibres to become less attached to each other, and excess fibres will come off easier.

3. Leave in the freezer for a few hours before taking it out and shaking it again.

4. Wash the garment according to the instructions on the yarn label.

Pilling is a natural process that happens to even the most exclusive of fibers. It's a natural sign of wear and tear that is hard to avoid, and that is most visible in high friction areas of your garment like a sweater's arms and cuffs.

You can make your garment look as new by removing the pilling, using a fabric comb or a pill/lint remover.

Still can't find the answer you need? Then scroll down and leave your question so one of our experts can try to help you. This will be done normally within 5 to 10 working days.
In the meantime, you can read the questions and answers that others have left to this pattern or join the DROPS Workshop on Facebook to get help from fellow knitters/crocheters!

You might also like...

Post a comment to pattern DROPS Children 22-4

We would love to hear what you have to say about this pattern!

If you want to leave a question, please make sure you select the correct category in the form below, to speed up the answering process. Required fields are marked *.

Comments / Questions (27)

country flag Mia Merethe Bye wrote:

Stemmer det at ermene i str 3/4år skal være 27 cm før felling midt under erme. (på tegningen viser det 23)synes det virker så langt.

14.03.2018 - 09:14

DROPS Design answered:

Hej Mia, ja det stemmer, du har 4 cm rib + 23 cm glatstrik ialt 27 cm ærme. God fornøjelse!

14.03.2018 - 15:40

country flag Josephine Shelton wrote:

I don’t understand the instructions for the yoke. Can I get an easier explanation. I have done lots of faire Isle but this is baffling me!

01.11.2017 - 23:53

DROPS Design answered:

Dear Mrs Shelton, purl first a row from WS over all sts dec some sts evenly in some size. Then work 0-2-6-10 rows with off-white. Now work diagram: 1 edge st in garter st, repeat M.4 in width (starting on the bottom corner on the right side and read from right to left from RS and from left to right from WS) until 2 sts remain on needle, work the 1st st in A.4 (so that pattern is symetrical on both front piece, but when dec in M.4 do not dec these st, just work it with the color stated) and finish with 1 st in garter st. Happy knitting!

02.11.2017 - 09:24

country flag Birthe Nyborg wrote:

Bærestykket bliver alt for stort i Jolie Fleur! Hvad har jeg gjort forkert? Det er som om, det skulle have været strikket rundt og ikke frem og tilbage? Størrelse 5/6.

17.09.2016 - 11:42

DROPS Design answered:

Hej Birthe. Har du den rette strikkefasthed, saa burde det vaere i orden. Du har 251 masker naar du har sat alle ind paa rundpinden = forstk+aerme+rygstk+forstk. Med den rette strikkefasthed (24 m) har du en omkreds - hen over skuldrene paa ca. 104-105 cm. For for/rygstk har du ca. 73 cm / 2 =36 cm per del (fladt maalt inden du saetter aermerne ind)

28.09.2016 - 14:09

country flag Ida Goedhart wrote:

Hoe kom ik bij het breien van de pas van 243 naar 93 steken? ik brei telpatroon M.4 maar begrijp niet waar en hoe ik moet minderen

21.10.2015 - 22:45

DROPS Design answered:

Hoi Ida. Bij het breien van M.4 minder je ook (zie bijvoorbeeld rij 15 en 17 in het telpatroon).

22.10.2015 - 12:05

country flag Janeche wrote:

Hei, Jeg strikker str. 110/116. Når jeg har strikket M4 ferdig har jeg 115 masker igjen, ikke 105 som det står i oppskriften. Jeg har felt på riktig antall pinner og det har hele tiden gått opp med mønstret så jeg antar det er gjort rett. Kan det være feil i oppskriften?

07.07.2015 - 09:49

DROPS Design answered:

Ifølge opskriften skal du kun have 93 m tilbage i den størrelse. Du har 243 m, strikker diagrammet 15 gange rundt på omgangen og tager 10 m ind i hvert diagram 15x10=150 m. = 243-150=93 m tilbage. Held og lykke!

08.07.2015 - 15:07

country flag Monika Wanzelius wrote:

Smådrops 22-4. Fram-och bakst: Rad 8 - Fortsätt så tills Arb mäter 20-23-25-27-29. Stämmer det? Eller ska det vara 35-38-41-47?

21.04.2015 - 11:36

DROPS Design answered:

Hej Monika. Ja, det stemmer. Herefter skal du strikke ermer og öket som saa til slut bliver 35-38-41-47 total höjde.

21.04.2015 - 13:16

country flag Christiane wrote:

Wie werden die Rückreihen im Muster gestrickt? In der gleichen Farbe/Muster wie die Hinreihe oder einfach gleich mit der nächsten Musterreihe zurückstricken?

22.07.2014 - 12:11

DROPS Design answered:

Liebe Christiane, in den Diagrammen sind alle Muster-R eingezeichnet, also Hin- und Rück-R.

22.07.2014 - 21:33

country flag Liesbet Vanierschot wrote:

Ik begrijp niet goed hoe de mouwen te breien. Worden deze steken verdeeld over 4 breinaalden zonder knop (en dus in het rond gebreid) of op 1 naald en daarna aan elkaar gezet (dus met een naad)? Dank je wel!

21.05.2013 - 12:56

Rita answered:

Liesbet,het is enkel het stukje onder de mouw dat je moet dichtnaaien de rest is in 1 stuk gebreid.

21.05.2013 - 15:57

country flag Heinke Vogel wrote:

Hallo, Ich stricke Jolie Fleur u. Verstehe den Text S. 3, 1Absatz, vorletzte Reihe nicht. Fehlt etwas?

07.04.2013 - 07:05

DROPS Design answered:

Hallo, könnten Sie die Stelle etwas genauer beschreiben? Dann versuchen wir, Ihnen weiterzuhelfen.

07.04.2013 - 10:50

country flag Anita wrote:

Hej, Det är väldigt svårt att få ihop ärmarna med fram och bakstycket eftersom de är stickade på strumpstickor. Föreslår att man kanske kan sticka de sista varven innan avmaskningen fram och tillbaka. Då blir det nog inte så svårt med de första varven när alla maskor är på plats tillsamman. Fick ihop det med ganska mycket möda men nu är koftan färdig och väldigt fin. Hälsningar Anit

26.01.2013 - 11:57