
Popular categories
Looking for a yarn?


|
||||||||||||||||||||||||||||
DROPS 125-29 |
||||||||||||||||||||||||||||
 |
 |
|||||||||||||||||||||||||||
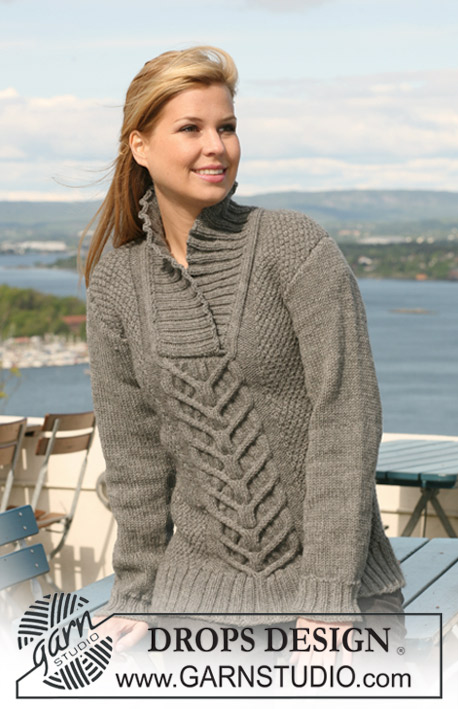
DROPS jacket with cables knitted from side to side in 2 strands ”Alpaca”. Size S - XXXL.
DROPS 125-29 |
||||||||||||||||||||||||||||
|
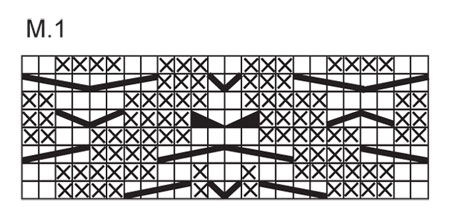
GARTER ST (back and forth on circular needle): K all rows. PATTERN: See diagram M.1. Diagram shows the pattern from RS. Row 1 = from RS. -------------------------------------------------------- JACKET: Worked from side to side in 4 parts which are sewn tog afterwards. RIGHT FRONT PIECE: Worked back and forth on needle, begin by sleeve edge. Cast on 54-54-58-58-62-62 sts on circular needle size 4.5 mm with 2 strands Alpaca. K 1 row and continue in rib K2/P2 with 1 edge st each side. When piece measures 4 cm change to circular needle size 5 mm. Work 2 rows garter st, beg from RS, AT THE SAME TIME on first row dec 10-8-10-8-10-8 sts evenly = 44-46-48-50-52-54 sts. Continue as follows from RS: 1 edge st, 9-10-11-12-13-14 sts in reverse stocking st, M.1 (= 24 sts), 9-10-11-12-13-14 sts in reverse stocking st, 1 edge st. Continue like this. AT THE SAME TIME inc each side as follows: On right side of piece (at beg of row): Inc 2 st by working 2 sts in the 2 outermost sts, repeat the inc on every 4th row a total of 14-13-12-11-9-7 times and then on every other row a total of 9-10-11-12-14-16 times. On left side of piece (at the end of row): Inc 1 st by working 2 sts in the outermost st, repeat the inc on every 6th row a total of 3-0-0-0-0-0 times, then on every 4th row a total of 23-26-26-26-24-24 times and then on every other row a total of 0-2-2-4-8-8 times. Work inc sts in reverse stocking st. Continue like this. When inc on right side of piece are complete (piece now measures approx 37-36-35-34-32-30 cm) dec 1 edge st on right side of piece, continue as before, but now work the first 5 sts on needle in garter st. When inc on left side of piece are complete (piece now measure approx 52-52-53-53-54-54 cm) there are 115-119-121-125-129-131 sts on needle. Now cast off for neck at beg of every row from WS as follows: 10 sts 1 time, 2 sts 2 times, 1 st 3 times = 98-102-104-108-112-114 sts. Continue until piece measures 59-60-61-62-63-64 cm, now dec 6 sts evenly on M.1 = 92-96-98-102-106-108 sts. Work 4 rows garter st, on next row from RS make buttonholes as follows: work 24-28-30-34-22-24 sts, * K2 tog, 1 YO, work 14 sts *, repeat from *-* a total of 4-4-4-4-5-5 times, finish with K2 tog, 1 YO and K2 tog. Continue in garter st until piece measures 63-64-65-66-67-68 cm, cast off. LEFT FRONT PIECE: Like right front piece, but inc and dec at the opposite sides. LEFT BACK PIECE: Cast on and work like right front piece. When piece measures approx 52-52-53-53-54-54 cm (adjust to where neck beg on front piece) cast off 5 sts for neck at beg of row from WS = 110-114-116-120-124-126 sts on needle. Continue until piece measures 59-60-61-62-63-64 cm, cast off. RIGHT BACK PIECE: Like left back piece, but inc and dec at the opposite sides. ASSEMBLY: Sew back pieces tog mid back. Sew shoulder/over arm seams inside 1 edge st. Sew under arm seam inside 1 edge st. NECK: Pick up approx 70 to 90 sts round neck (also on front bands). Work 4 rounds garter st and cast off. |
||||||||||||||||||||||||||||
Diagram explanations |
||||||||||||||||||||||||||||
|
||||||||||||||||||||||||||||
|
||||||||||||||||||||||||||||

|
||||||||||||||||||||||||||||
|
Have you made this or any other of our designs? Tag your pictures in social media with #dropsdesign so we can see them! Do you need help with this pattern?You'll find tutorial videos, a Comments/Questions area and more by visiting the pattern on garnstudio.com. © 1982-2024 DROPS Design A/S. We reserve all rights. This document, including all its sub-sections, has copyrights. Read more about what you can do with our patterns at the bottom of each pattern on our site. |
||||||||||||||||||||||||||||


With over 40 years in knitting and crochet design, DROPS Design offers one of the most extensive collections of free patterns on the internet - translated to 17 languages. As of today we count 304 catalogues and 11422 patterns - 11422 of which are translated into English (UK/cm).
We work hard to bring you the best knitting and crochet have to offer, inspiration and advice as well as great quality yarns at incredible prices! Would you like to use our patterns for other than personal use? You can read what you are allowed to do in the Copyright text at the bottom of all our patterns. Happy crafting!
Comments / Questions (49)
Hallo, sind in dem Diagramm M1 Hin- und Rückreihen gezeichnet oder sind das nur die Hinreihen? Wie werden die Rückreihen gestrickt. Danke.
18.12.2018 - 13:13DROPS Design answered:
Liebe Susi, alle Reihen sind im Diagram gezeigt, dh die Hin- sowie die Rückreihen - Hinreihen lesen Sie rechts nach links und Rückreihen links nach rechts. Viel Spaß beim stricken!
18.12.2018 - 13:19Bonjour, si je comprends bien , pour la taille S on diminue deux mailles à droite d’abord 14 fois tous les 4 rangs et seulement après avoir terminé ses augmentations on diminuera 9 fois tous les 2 rangs? Merci pour votre aide.
18.02.2018 - 08:17DROPS Design answered:
Bonjour Mme Da Silva, Pour le devant droit en taille S, on augmente: à droite 14 x tous les 4 rangs puis (quand ces 14 augmentations sont faites) 9 x tous les 2 rangs et en même temps, on augmente à gauche 3 x tous les 6 rangs et (quand les 3 augmentations sont faites) 23 x tous les 4 rangs. Bon tricot!
19.02.2018 - 09:44Bonjour, Quand les augmentations de droite sont terminées (hauteur d'environ 37 cm), on diminue d'une maille à droite et on tricote les cinq 1ères mailles du rang en point mousse mais faut-il continuer les augmentations tous les 2 rangs ? Sur le schéma, on a l'impression que c'est le cas. Ou alors faut-il continuer tout droit sur le coté droit ? Merci
22.10.2017 - 09:21DROPS Design answered:
Bonjour Nadette, continuez les augmentations à gauche comme avant, quand elles seront faites, vous aurez 115-131 m et l'ouvrage mesure env. 52-54 cm (cf taille). Bon tricot!
23.10.2017 - 10:17Hallo Was bedeutet mit 2 Fäden? 2 Knäuel gleichzeitig? Kann man dann nicht gleich dickere Wolle nehmen? Ich habe hier noch geschenkte Wolle. 22 Reihen 16 Maschen =10*10 Könnte ich diese benutzen? Danke für die Hilfe.
27.08.2017 - 17:52DROPS Design answered:
Liebe Edda, mit 2 Fäden bedeutet Sie stricken with 2 Knäuel oder mit die 2 Fäden einer einzigen Knäuel gleichzeitig. Sie können auch mit nur 1 Knäuel stricken da 2 Fäden Garngruppe A wie Alpaca hier können mit 1 Faden Garngruppe C erszetzt werden, lesen Sie mehr hier. Viel Spaß beim stricken!
29.08.2017 - 09:35On row 3 of the m.1 diagram the middle cable, looks like an upside down v, it is over 8 stitches however it uses only 4 stitches to make it. It says slip 2 on cable needle k2 and k2 from cable. Where are the other 4 stitches? What do I do here
08.01.2017 - 07:26DROPS Design answered:
Dear Mrs Braccia, diagrams are read starting from the bottom corner on the right side towards the left (from RS) and from the left towards the right from WS. Read more about diagrams here. Happy knitting!
09.01.2017 - 09:22Sanna wrote:
I knit left handed (from left to right on the RS). I guess I need to switch so that I read the RS rows in M1 from left to right. Do I need to change anything else, for example the order of the cable stitches?
22.05.2016 - 16:21DROPS Design answered:
Dear Sanna, you may have to work a swatch with M.1 to be sure how you would have to read diagram and cables. Our diagrams are supposed to be read from right to left from RS and from left to right from WS. Happy knitting!
23.05.2016 - 09:23I would like to make this pattern with yarn from group c, drops Air for example. Do I need half of the mentioned quantity of yarn then? For example, for size Medium, 325g?
19.11.2015 - 21:29DROPS Design answered:
Dear Bianca, you will find here all relevant informations about alternative and how to calculate the new amount of yarn. Remember your DROPS store will also help you with tips & advices. Happy knitting!
20.11.2015 - 09:57Hola se podria hacer con agujas recta, esque no se me dan bien las circulares
26.09.2015 - 18:35DROPS Design answered:
Hola Yolanda. Este modelo se trabaja con agujas circulares debido a que el elevado nº de pts lo hace incómodo para las ag rectas.
29.09.2015 - 11:18Bonjour, le nombre de maille après augmentations (115) ne cadre pas avec le nombre d augmentation à droite (46) et gauche (26) plus les 24 mailles du dessin. Comment interpréter vos explications ? Ou est ce que je me trompe?
18.03.2014 - 21:24DROPS Design answered:
Bonjour Mme Magnin, avez-vous vu la réponse ci-dessous ? Merci de bien vouloir détailler votre question si la réponse ne correspond pas. Bon tricot !
19.03.2014 - 08:55Bonjour, le nombre de maille après augmentations (115) ne cadre pas avec le nombre d augmentation à droite (46) et gauche (26) plus les 24 mailles du dessin. Comment interpréter vos explications ? Ou est ce que je me trompe?
16.03.2014 - 21:48DROPS Design answered:
Bonjour Mme Magnin, en taille S, on a 54 m - 10 m au 1er rang point mousse après les côtes = 44 m + 46 augm à droite + 26 augm à gauche = 116 m, on diminue ensuite 1 m à droite, il reste 115 m. Bon tricot!
17.03.2014 - 09:33