DROPS Delight
DROPS Delight
75% Wool, 25% Polyamide
Discontinued
find alternatives
DROPS SS24

Theodora

Knitted DROPS fitted, long jacket in 2 strands ”Delight”. Size S to XXXL.

DROPS 124-16
DROPS design: Pattern no DE-017
--------------------------------------------------------
Size: S - M - L - XL - XXL - XXXL
Materials: DROPS DELIGHT from Garnstudio
600-650-750-800-900-950 g colour no 05, beige/grey/pink mix

DROPS CIRCULAR NEEDLE (80 cm) size 5 mm - or size needed to get 17 sts x 22 rows in stocking st with 2 strands = 10 x 10 cm.
DROPS CIRCULAR NEEDLE size 4.5 mm - for rib.
DROPS BUFFALO HORN BUTTON, no 538:
4-4-4-5-5-5 pcs.

-------------------------------------------------------

Alternative Yarn – See how to change yarns here
Yarn Groups A to F – Use the same pattern and change the yarn here
Yarn usage using an alternative yarn – Use our yarn converter here

-------------------------------------------------------

DROPS Delight
DROPS Delight
75% Wool, 25% Polyamide
Discontinued
find alternatives

Pattern instructions

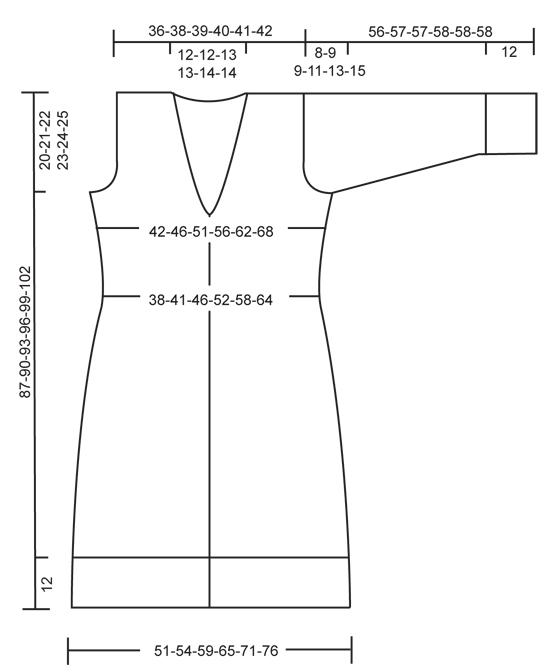
GARTER ST (back and forth on circular needle): K all rows.
KNITTING TIP:
To avoid front band tightening in the height due to the garter st work extra rows on the front bands only with regular intervals:
* Beg from mid front and K the 9 front band sts, turn piece, slip first st as if to K, tighten thread and work return row on front band *. Continue on all sts as before. Repeat from *-* with regular intervals.
DECREASING TIP (applies to neckline):
Dec for neck inside the 9 front band sts.
Make all dec from RS!
Dec as follows after 9 front band sts: Slip 1 st as if to K, K1, psso.
Dec as follows before 9 front band sts: K2 tog.
BUTTONHOLES:
Make buttonholes on right front piece.
1 BUTTONHOLE = K tog 4th and 5th st from mid front and make 1 YO.
Make buttonholes when piece measures:
SIZE S: 24, 36, 48 and 60 cm.
SIZE M: 24, 36, 48 and 60 cm.
SIZE L: 24, 36, 48 and 60 cm.
SIZE XL: 22, 32, 42, 52 and 62 cm.
SIZE XXL: 22, 33, 43, 54 and 64 cm.
SIZE XXXL: 23, 33, 44, 54 and 65 cm.
--------------------------------------------------------

JACKET:

BACK PIECE:
Worked back and forth on circular needle.
Cast on 134-142-150-166-174-190 sts (includes 1 edge st each side) on circular needle size 4.5 mm with 2 strands Delight. P 1 row from WS, then work next row as follows from RS:
SIZE S + L + XL: 1 edge st in GARTER ST, * K4, P4 *, repeat from *-* until 5 sts remain and finish with K4 and 1 edge st in GARTER ST.
SIZE M + XXL + XXXL: 1 edge st in GARTER ST, * P4, K4 *, repeat from *-* until 5 sts remain and finish with P4 and 1 edge st in GARTER ST.
Continue in rib like this until piece measures 12 cm. Change to circular needle size 5 mm and work stocking st (edge st continues in garter st) – AT THE SAME TIME on first row dec 46-48-48-54-52-58 sts evenly = 88-94-102-112-122-132 sts. When piece measures 13 cm dec 1 st each side, repeat the dec each side on every 3.5 cm a total of 11 times = 66-72-80-90-100-110 sts. REMEMBER THE KNITTING TENSION! When piece measures 53 cm inc 1 st each side, repeat the inc each side on every 4 cm a total of 4 times = 74-80-88-98-108-118 sts. When piece measures 67-69-71-73-75-77 cm cast off for armhole at the beg of every row each side: 3 sts 1-1-1-1-2-3 times, 2 sts 0-1-2-3-4-5 times and 1 st 3-3-4-6-5-4 times = 62-64-66-68-70-72 sts. When piece measures 85-88-91-94-97-100 cm cast off the middle 18-18-20-20-22-22 sts for neck and complete each shoulder separately. Cast off 1 st on neckline on next row = 21-22-22-23-23-24 sts left on shoulder. Cast off when piece measures 87-90-93-96-99-102 cm.

RIGHT FRONT PIECE:
Cast on 74-78-82-90-94-102 sts (includes 9 front band sts towards front edge and 1 edge st at the side) on circular needle size 4.5 mm with 2 strands Delight. P 1 row from WS, then work next rows as follows from RS – See KNITTING TIP:
SIZE S + L + XL: 9 front band sts in GARTER ST - see above – (worked in garter st throughout), * K4, P4 *, repeat from *-* until 1 st remain and finish with 1 edge st in garter st.
SIZE M + XXL + XXXL: 9 front band sts in GARTER ST – see above - (worked in garter st throughout), * K4, P4 *, repeat from *-* until 5 sts remain and finish with K4 and 1 edge st in garter st. Continue in rib like this until piece measures 12 cm. Change to circular needle size 5 mm and work stocking st (front band and edge st in garter st as before) – AT THE SAME TIME on first row dec 21-22-22-25-24-27 sts evenly on the rib = 53-56-60-65-70-75 sts. REMEMBER BUTTONHOLES ON FRONT BAND – see above.
When piece measures 13 cm dec at the side as described for back piece = 42-45-49-54-59-64 sts. When piece measures 53 cm inc at the side as described for back piece.
AT THE SAME TIME when piece measures 62-62-62-64-66-67 cm work 2 rows garter st back and forth on only the 9 front band sts (do not work remaining sts), then continue on all sts again. AT THE SAME TIME on first row from RS dec for neck – See DECREASING TIP: 1 st on every 4th row (i.e. on every other row from RS) a total of 8-8-8-8-9-9 times and then on every 6th row a total of 2-2-3-3-3-3 times.
AT THE SAME TIME when piece measures 67-69-71-73-75-77 cm cast off for armhole at the side as described for back piece (cast off at the beg of every row from the side).
When all dec are complete there are 30-31-31-32-32-33 sts left on needle. Continue in stocking st and front band in garter st until piece measures 87-90-93-96-99-102 cm. On next row from WS cast off 21-22-22-23-23-24 sts from shoulder towards the neck = 9 front band sts left on needle, work these 9 sts and turn piece. Now continue in garter st on these 9 sts from mid front as follows: * 2 rows garter st back and forth on the first 7 sts, 2 rows garter st back and forth on all sts *, repeat from *-* until neckline measures approx 8-8-8.5-8.5-9-9 cm where shortest, cast off.

LEFT FRONT PIECE:
Cast on and work like right front piece, but mirrored. NOTE: Do not make buttonholes on left front band!

SLEEVE:
Worked back and forth on circular needle.
Cast on 58-58-58-66-66-66 sts (includes 1 edge st each side) on circular needle size 4.5 mm with 2 strands Delight. P 1 row from WS, then continue in rib, K4/ P4, with 1 edge st in garter st each side. When piece measures 12 cm change to circular needle size 5 mm. Work stocking st back and forth on needle (edge st continues in garter st) - AT THE SAME TIME on first row dec 14-13-11-15-13-10 sts evenly = 44-45-47-51-53-56 sts. When piece measures 13 cm inc 1 st each side, repeat the inc on every 4-3.5-3-3-2.5-2 cm a total of 9-10-12-12-13-14 times = 62-65-71-75-79-84 sts. When piece measures 48-48-48-47-45-43 cm - NOTE! Less for the larger sizes because of longer sleeve cap and wider shoulder- cast off for sleeve cap at the beg of every row each side as follows: 3 sts 1 time, 2 sts 3 times and 1 st 1-2-2-4-6-8 times, then cast off 2 sts at the beg of every row each side until piece measures 55-56-56-57-57-57 cm, now cast off 3 sts at the beg of the next 2 rows. Cast off remaining sts, piece measures approx 56-57-57-58-58-58 cm.

ASSEMBLY:
Sew shoulder seams. Sew neckline tog mid back using fake grafting (sew inside cast of row) and sew neckline to neck on back piece – sew edge to edge with neat sts. Set in sleeves. Sew sleeve and side seams inside 1 edge st. Sew buttons on left front piece.

Diagram

diagram measurements

Each of our patterns has specific tutorial videos to help you.

Do you have a question? See a list of frequently asked questions (FAQ)

Knitting tension is what determines the final measurements of your work, and is usually measured per 10 x 10 cm. It is provided like so: number of stitches in width x number of rows in height - eg: 19 stitches x 26 rows = 10 x 10 cm.

The knitting tension is very individual; some people knit/crochet loosely while others work tightly. You adjust the knitting tension with the needle size, which is why the suggested needle size is only meant as a guide! You need to adjust this (up or down) to ensure that YOUR knitting tension matches the knitting tension provided in the pattern. If you work with a different knitting tension than provided you will have a different yarn consumption, and your work will have different measurements than what the pattern suggests.

The knitting tension also determines which yarns can replace each other. As long as you achieve the same knitting tension you can replace one yarn with another.

See DROPS lesson: How to measure your tension/gauge

See DROPS video: How to make a gauge tension swatch

The required amount of yarn is provided in grams, eg: 450 g. To calculate how many balls you’ll need you first need to know how many grams are in 1 ball (25g, 50g or 100g). This information is available if you click on the individual yarn quality on our pages. Divide the amount required with the amount of each ball. For example, if each ball is 50g (the most common amount), the calculation will be as follows: 450 / 50 = 9 balls.

The important thing when changing from one yarn to another is that the knitting/crochet tension remains the same. This is so that the measurements of the finished piece will be the same as on the sketch provided. It is easier to achieve the same knitting tension using yarns from the same yarn group. It is also possible to work with multiple strands of a thinner yarn to achieve the knitting tension of a thicker one. Please try our yarn converter. We recommend you to always work a test swatch.

Please NOTE: when changing yarn the garment might have a different look and feel to the garment in the photo, due to individual properties and qualities of each yarn.

See DROPS lesson: Can I use a different yarn than the one mentioned in the pattern?

All our yarns are categorised into yarn groups (from A to F) according to thickness and knitting tension – group A contains the thinnest yarns and group F the thickest. This makes it easier for you to find alternative yarns to our patterns, should you wish to switch yarn. All yarns within the same group have a similar knitting tension and can easily replace each other. However, different yarn qualities have different structures and properties which will give the finished work a unique look and feel.

Click here for an overview of the yarns in each yarn group

At the top of all our patterns you’ll find a link to our yarn calculator, which is a helpful tool should you wish to use a different yarn than suggested. By filling in the yarn quality you wish to replace, the amount (in your size) and number of strands, the calculator will present good alternative yarns with the same knitting tension. Additionally it will tell you how much you’ll require in the new qualities and whether you’ll need to work with multiple strands. Most skeins are 50g (some are 25g or 100g).

If the pattern is worked with multiple colours, every colour will have to be calculated separately. Similarly, if the pattern is worked with several strands of different yarns (for example 1 strand Alpaca and 1 strand Kid-Silk) you will have to find alternatives for each, individually.

Click here to see our yarn calculator

Since different yarns have different qualities and textures we have chosen to keep the original yarn in our patterns. However, you can easily find options among our available qualities by using our yarn calculator, or simply pick a yarn from the same yarn group.

It is possible that some retailers still have discontinued yarns in stock, or that someone has a few skeins at home that they would like to find patterns for.

The yarn calculator will provide both alternative yarn as well as required amount in the new quality.

If you think it's hard to decide what size to make, it can be a good idea to measure a garment you own already and like the size of. Then you can pick the size by comparing those measures with the ones available in the pattern's size chart.

You'll find the size chart at the bottom of the pattern.

See DROPS lesson: How to read size chart

The needle size provided in the pattern serves only as a guide, the important thing is to follow the knitting tension. And since knitting tension is very individual, you will have to adjust the needle size to ensure that YOUR tension is the same as in the pattern – maybe you’ll have to adjust 1, or even 2 needle sizes, up or down to achieve the correct tension. For this, we recommend that you work test swatches.

Should you work with a different knitting tension than the one provided, the measurements of the finished garment might deviate from the measurement sketch.

See DROPS lesson: How to measure your tension/gauge

See DROPS video: How to make a tension/gauge swatch

Working a garment top-down provides more flexibility and room for personal adjustment. For example it is easier to try the garment on while working, as well as making adjustments to length of yoke and shoulder caps.

The instructions are carefully explaining every step, in the correct order. Diagrams are adjusted to the knitting direction and are worked as usual.

The diagram depicts all rows/rounds, and every stitch seen from the right side. It is read from bottom to top, from right to left. 1 square = 1 stitch.

When working back and forth, every other row is worked from the right side and every other row is worked from the wrong side. When working from the wrong side, the diagram will have to be worked reversed: from left to right, knit stitches are purled, purl stitches are knit etc.

When working in the round every round is worked from the right side and the diagram are worked from right to left on all rounds.

See DROPS lesson: How to read knitting diagrams

The diagram depicts all rows/rounds, and every stitch seen from the right side. It is worked from bottom to top, from right to left.

When working back and forth every other row is worked from the right side: from right to left and every other row is worked from the wrong side: from left to right.

When working in the round, every row in the diagram are worked from the right side, from right to left.

When working a circular diagram you start in the middle and work your way outwards, counter clockwise, row by row.

The rows usually start with a given number of chain stitches (equivalent to the height of the following stitch), this will either be depicted in the diagram or explained in the pattern.

See DROPS lesson: How to read crochet diagrams

Instructions for working several diagrams after each other on the same row/round, will often be written like so: “work A.1, A.2, A.3 a total of 0-0-2-3-4 times". This means you work A.1 once, then A.2 is worked once, and A.3 is repeated (in width) the number of times provided for your size – in this case like so: S = 0 times, M = 0 times, L=2 times, XL= 3 times and XXL = 4 times.

The diagrams are worked as usual: begin with the first row in A.1, then work the first row in A.2 etc.

See DROPS lesson: How to read knitting diagrams

See DROPS lesson: How to read crochet diagrams

The total width of the garment (from wrist-to-wrist) will be larger in the larger sizes, despite the actual sleeves being shorter. The larger sizes have longer sleeve caps and wider shoulders, so there will be a good fit in all sizes.

The measurement sketch/schematic drawing provides information regarding the full length of the garment. If it’s a jumper or a jacket the length is measured from the highest point on the shoulder closest to the neckline, and straight down to the bottom of the garment. It is NOT measured from the tip of shoulder. Similarly, the length of yoke is measured from the highest point on the shoulder and down to where yoke is split into body and sleeves.

On a jacket measures are never taken along bands, unless specifically stated. Always measure inside band stitches when measuring the length.

See DROPS lesson: How to read a schematic drawing

Diagrams are often repeated on the round or in height. 1 repeat is the diagram the way it appears in the pattern. If it says to work 5 repeats of A.1 in the round, then you work A.1 a total of 5 times after/next to each other in the round. If it says to work 2 repeats of A.1 vertically/in height you work the entire diagram once, then begin again at the start and work the entire diagram one more time.

Chain stitches are slightly narrower than other stitches and to avoid working the cast-on edge too tight, we simply chain more stitches to begin with. The stitch count will be adjusted on the following row to fit the pattern and measurement sketch.

The rib edge is more elastic and will contract slightly compared to, for example, stocking stitch. By increasing before the rib edge, you avoid a visible difference in width between the rib edge and the rest of the body.

It’s very easy to cast off too tightly, and by making yarn overs while casting off (and simultaneously casting these off) you avoid a too tight cast off edge.

See DROPS video: How to bind off with yarn overs (yo)

To achieve an even increase (or decrease) you can increase on, for example: every 3rd and 4th row alternately, like so: work 2 rows and increase on the 3rd row, work 3 rows and increase on the 4th. Repeat this until the increase is complete.

See DROPS lesson: Increase or decrease 1 st on every 3rd and 4th row alternately

Should you prefer to work in the round instead of back and forth, you may of course adjust the pattern. You’ll need to add steeks mid-front (usually 5 stitches), and follow the instructions. When you would normally turn and work from the wrong side, simply work across the steek and continue in the round. At the end you’ll cut the piece open, pick up stitches to work bands, and cover the cut edges.

See DROPS video: How to knit steeks and cut open

Should you prefer to work back and forth instead of in the round, you may of course adjust the pattern so you work the pieces separately and then assemble them at the end. Divide the stitches for the body in 2, add 1 edge stitch in each side (for sewing) and work the front and back pieces separately.

See DROPS lesson: Can I adapt a pattern for circular needles into straight needles?

Pattern repeats can vary slightly in the different sizes, in order to get the correct proportions. If you’re not working the exact same size as the garment in the photo, yours might deviate slightly. This has been carefully developed and adjusted so that the complete impression of the garment is the same in all sizes.

Make sure to follow instructions and diagrams for your size!

If you have found a pattern you like which is available in women’s size it’s not very difficult to convert it to men’s size. The biggest difference will be the length of sleeves and body. Start working on the women size that you think would fit across the chest. The additional length will be worked right before you cast off for the armhole/sleeve cap. If the pattern is worked top-down you can add the length right after the armhole or before the first decrease on sleeve.

Regarding additional yarn amount, this will depend on how much length you add, but it is better with a skein too many than too few.

All yarns will have excess fibres (from production) that might come off as lint or shedding. Brushed yarns (ie hairier yarns) have more of these loose, excess fibres, causing more shedding.

Shedding also depends on what is worn under or over the garment, and whether this pulls at the yarn fibres. It’s therefore not possible to guarantee that there will be no shedding

Below are some tips on how to get the best result when working with hairier yarns:

1. When the garment is finished (before you wash it) shake it vigorously so the looser hairs come off. NOTE: do NOT use a lint roller, brush or any method that pulls at the yarn.

2. Place the garment in a plastic bag and put it in your freezer - the temperature will cause the fibres to become less attached to each other, and excess fibres will come off easier.

3. Leave in the freezer for a few hours before taking it out and shaking it again.

4. Wash the garment according to the instructions on the yarn label.

Pilling is a natural process that happens to even the most exclusive of fibers. It's a natural sign of wear and tear that is hard to avoid, and that is most visible in high friction areas of your garment like a sweater's arms and cuffs.

You can make your garment look as new by removing the pilling, using a fabric comb or a pill/lint remover.

Still can't find the answer you need? Then scroll down and leave your question so one of our experts can try to help you. This will be done normally within 5 to 10 working days.
In the meantime, you can read the questions and answers that others have left to this pattern or join the DROPS Workshop on Facebook to get help from fellow knitters/crocheters!

You might also like...

Post a comment to pattern DROPS 124-16

We would love to hear what you have to say about this pattern!

If you want to leave a question, please make sure you select the correct category in the form below, to speed up the answering process. Required fields are marked *.

Comments / Questions (16)

country flag Wilma wrote:

Op de afbeelding is een knoopsgat gemaakt vlak boven de boord op 12 cm, terwijl het patroon aangeeft dat er pas bij 22 cm het 1e knoopsgat gebreid moet worden? Klopt de beschrijving van het patroon dan wel?

23.12.2023 - 17:23

DROPS Design answered:

Dag Wilma,

Je hebt gelijk, ik zie ook nog een 5e knoopsgat. Zo te zien is naderhand besloten om het onderste knoopsgat weg te laten. Deze zou dan op 12 cm van de onderkant moeten komen, dus ter hoogte van waar de boordsteek ophoudt.

07.01.2024 - 13:54

country flag Aleksandra wrote:

Moje pytanie dotyczy WSKAZÓWKI wykonania obszycia przodów: ile wynoszą "regularne odstępy" w jakich trzeba robić rzędy skrócone ponad tymi obszyciami?

13.09.2021 - 22:29

DROPS Design answered:

Witaj Aleksandro, jak będziesz robiła próbkę dżersejem to z boku przerób kilka oczek ściegiem francuskim i popróbuj. Ja w takim przypadku robię dodatkowe 2 rzędy (rzędy skrócone) co jakieś 4 rzędy. Pozdrawiamy!

14.09.2021 - 09:35

country flag Sandra wrote:

Hallo, die Jacke wird ja mit 2 Fäden gestrickt. Muss ich bei der Wolle dann aufpassen, dass ich immer den gleichen Farbverlauf habe bzw. fängt die Wolle immer mit der gleichen Farbe an?

04.01.2021 - 21:45

DROPS Design answered:

Liebe Sandra, das können Sie sofar es möglich ist, aber beachten Sie, daß es mit Delight nicht möglich wird - wie auf dem Foto und wie erklärt unter der Farbkarte: Der handgesponnene Charakter mit kleinen Variationen in der Fadenstärke und der "Magic print" für die Farbgebung ergeben ein einmaliges Strickbild mit sanften Farbverläufen - auch innerhalb einer Farbpartie kann es dunklere und hellere Varianten geben. Viel Spaß beim stricken!

05.01.2021 - 11:18

country flag Renate wrote:

Zijn het niet enorm veel steken voor de boord? Ben namelijk bezig met de boord achterpand 142 st. Maar dit is veel meer cm dan de uiteindelijke 54cm d ie jullie ervoor aangeven

12.03.2018 - 15:44

DROPS Design answered:

Hallo Renate, De boordsteek is heel elastisch en trekt bij elkaar, vandaar dat je zoveel steken op moet zetten. Als je klaar bent met de boordsteek minder je weer naar 94 steken op het achterpand.

13.03.2018 - 16:08

country flag Patricia wrote:

Wil dit breien maar voorste en rug aan elkaar

26.05.2014 - 13:42

country flag Bella wrote:

Warum muss in der ersten reihe nach dem Bündchen soviel maschen abnehmen? Bei Größe L 48 Maschen. Kommt mir sehr viel vor.

16.03.2014 - 18:28

DROPS Design answered:

Liebe Bella, das Rippenmuster zieht sich stark zusammen, daher werden nach dem Rippenmuster Maschen abgenommen.

17.03.2014 - 13:22

country flag Anette wrote:

Jag tycker inte om det här! Gillar varken garn eller modell!!!

12.07.2010 - 09:50

country flag Inger wrote:

Dejlig cardigan

06.07.2010 - 19:49

country flag Christina wrote:

Love the colours. A great design for autumn.

27.06.2010 - 10:05

country flag Beauchet wrote:

J'aime beaucoup ce modele et ces laines changeantes de vrai sucre d'orge

22.06.2010 - 16:18