
Popular categories
Looking for a yarn?


Comments / Questions (60)
![]() Joanna Gibowska wrote:
Joanna Gibowska wrote:
Sukienka jest piękna, ale mimo, że mam spory biust, to góra sukienki jest bardzo obszerna. Następnym razem dodawała bym oczka tylko z przodu. Super 👍🏻 dziękuję 😊
10.08.2024 - 22:23
![]() Shirley J Dwyer wrote:
Shirley J Dwyer wrote:
Am I supposed to chain all 364 stitches in the same chain or as I start each section?
19.07.2024 - 19:34DROPS Design answered:
Dear Shirley, the dress is worked in a section, then continue in the paragraph for your specific size. You work 1 single chain of 364 stitches for the bottom edge, over which you start working tr (UK)/dc (US) and work upwards, then work the last section for your size, the left and right sides separately, with the straps as indicated at the end. Happy crochetting!
21.07.2024 - 19:59
![]() Gigout wrote:
Gigout wrote:
Bonjour Je commence ce modèle mais en faisant les 394 mailles levées de départ je peux faire 2,5 fois mon tour de taille. Allors que j'ai fait l échantillon pour avoir le bon crochet. Je ne comprends donc pas pourquoi autant de mailles
24.06.2024 - 06:52DROPS Design answered:
Bonjour Mme Gigout, la chaînette de base est souvent trop serrée, on va donc ici monter plus de mailles en l'air (394) que l'on a besoin de mailles au 1er rang = 314, et, au 1er rang, on va sauter des mailles à intervalles réguliers comme indiqué, vous avez ainsi bien 314 brides soit 68 cm quand la robe est posée à plat (et cousue) - cf schéma. Bon crochet!
24.06.2024 - 10:09
![]() Astrid wrote:
Astrid wrote:
Kun je de knopen ook weglaten? Of wordt het dan onmogelijk om aan te trekken?
10.06.2024 - 19:17
![]() Astrid wrote:
Astrid wrote:
Kun je de knopen ook weglaten? Of wordt het dan onmogelijk om aan te trekken?
10.06.2024 - 19:16DROPS Design answered:
Dag Astrid,
Ja, ik denk dat dat wel kan, het garen rekt genoeg mee en de knoopjes beginnen toch pas na het breedste deel van de heupen, dus ik denk dat ze meer als decoratie zijn bedoeld. (Ook makkelijker in je eentje aan te trekken dan ☺)
12.06.2024 - 16:27
![]() Bianka wrote:
Bianka wrote:
Hallo, Noch ein Anhang, warum unterscheiden sich die Muster von M2A und M2B am hals/ Dekolleté? Müssten diese nicht identisch nur spiegelverkehrt sein? Liebe Grüße
27.04.2024 - 13:11DROPS Design answered:
Liebe Bianka, eine Seite wird für das Dekolleté und das andere Seite vom Diagram für das Armloch, deshalb sind beide M.2A und M.2B verschieden (für jede Seite). Viel Spaß beim Häkeln!
29.04.2024 - 09:06
![]() Bianka wrote:
Bianka wrote:
Hallo, Ich verstehe die Abnahme am Hals leider nicht. Ich häkel M2A. Die Reihe endet mit einer festen Masche. Wie komme ich nun in die nächste Reihe und überspringe dabei Maschen, damit ich eine Abnahme habe? Liebe Grüße
27.04.2024 - 12:49DROPS Design answered:
Liebe. Bianka, die nächste Reihe beginnt mit 1 Luftmasche, 1 feste Masche in die nächste feste Masche, 1 feste Masche in die nächsten 3 Maschen, usw.. Viel Spaß beim Häkeln!
29.04.2024 - 09:05
![]() Kristina wrote:
Kristina wrote:
Virkar man klänningen nerifrån o upp? Eller virkas den i delar?
15.05.2023 - 21:08
![]() Sandra wrote:
Sandra wrote:
Bonjour, Pouuriez-vous me dire combien il y a t'il de rangs entre le début (où il y a les marqueurs) et la fin des diminutions? A 50cm de hauteur totale c'est depuis le début de l'ouvrage ou là où sont les marqueurs? Merci beaucoup pour votre réponse. Sandra
13.03.2022 - 09:26DROPS Design answered:
Bonjour Sandra, vous devez crocheter ainsi: *1 tour de diminutions, 3 tours sans*, vous répétez de *-* 11 fois au total (= 44 tours) et vous diminuez encore 1 fois au tour suivant = 45 tours au total. Bon crochet!
14.03.2022 - 11:06
![]() Samantha Williams wrote:
Samantha Williams wrote:
Hi, I'm on the 2nd row of the M1 chart. It’s so confusing. It’s says ch1 then tr in second tr but if I did that I wouldn’t be able the finish the 3rd row at the end. So how do you work it. You say to ch3 at beg of rows but there is no stitch at the beg of row just a ch1. Please help
03.06.2021 - 20:11DROPS Design answered:
Hi Mrs Williams, at the beg of the row you work 3 chains to start but these 3 chains do not count as first treble, so that you chain 3 then work 1 treble in first treble, and now work M.1 beg with 1 ch, skip 1 tr, 1 tr in next tr, and repeat M.1 a total of 10-11-12-13-14-15 times (= over the next 240-264-288-312-336-360 tr), and end the row with 1 tr in the last tr. Hope this helps, happy crocheting!
10.06.2021 - 08:37
|
|||||||||||||
Diamonds in the Sun#diamondsinthesundress |
|||||||||||||
 |
 |
||||||||||||
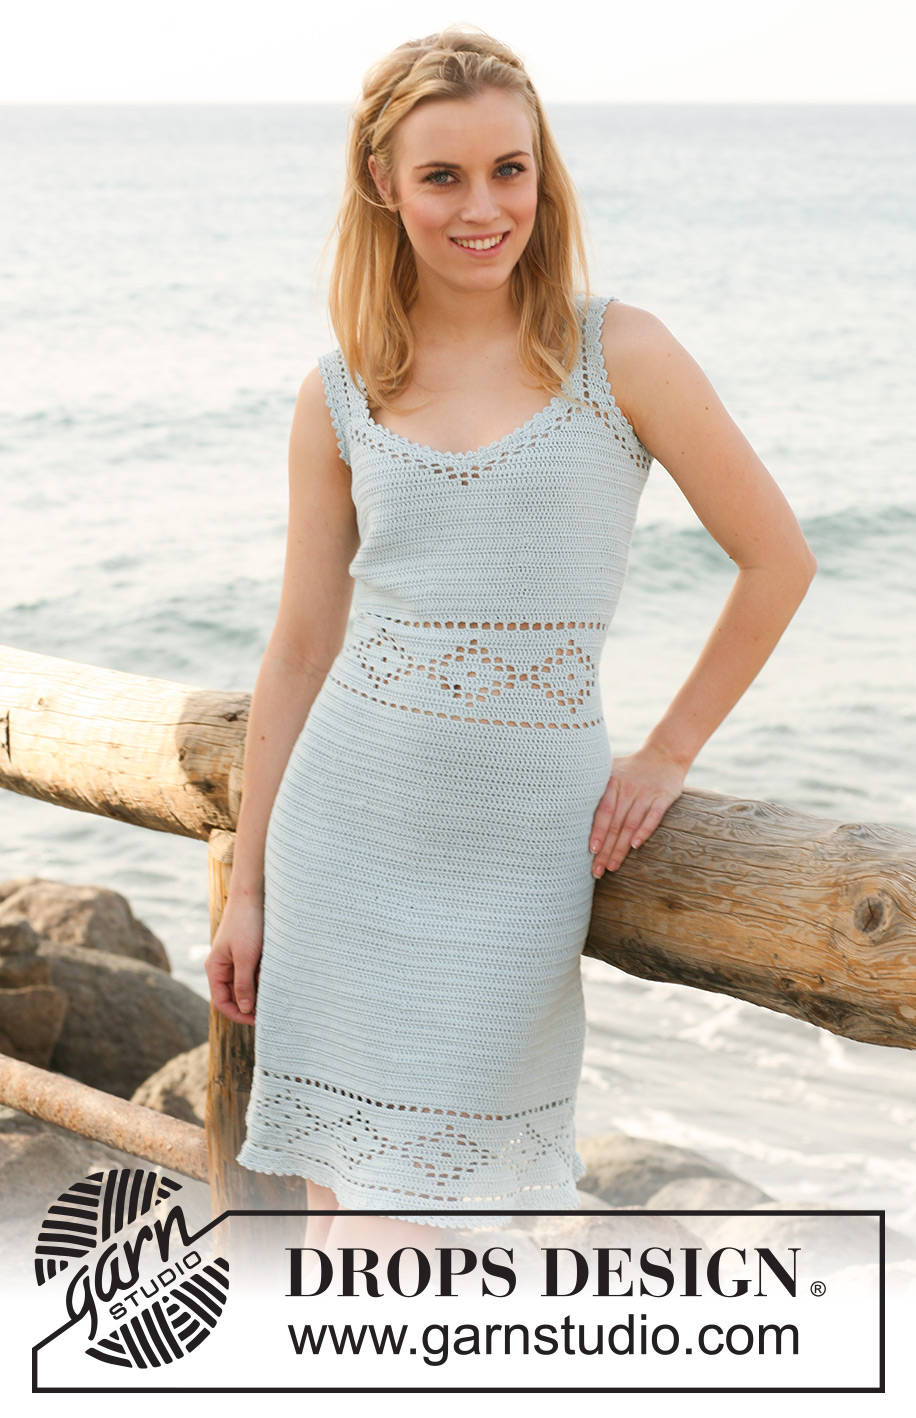
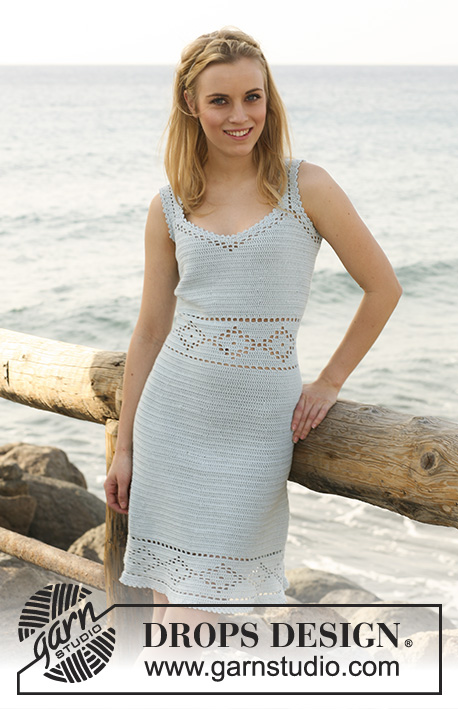
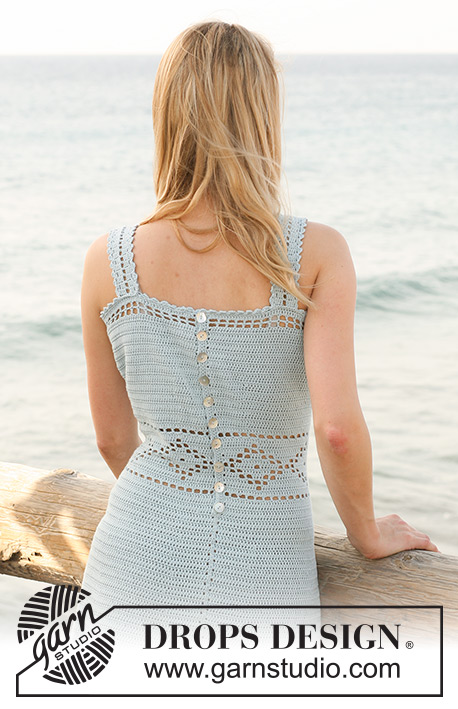
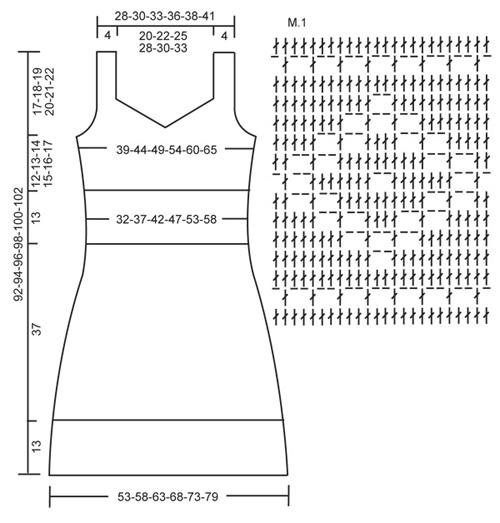
Crochet DROPS dress in ”Safran” with lace pattern and buttons at the back. Size: XS to XXL
DROPS 120-30 |
|||||||||||||
|
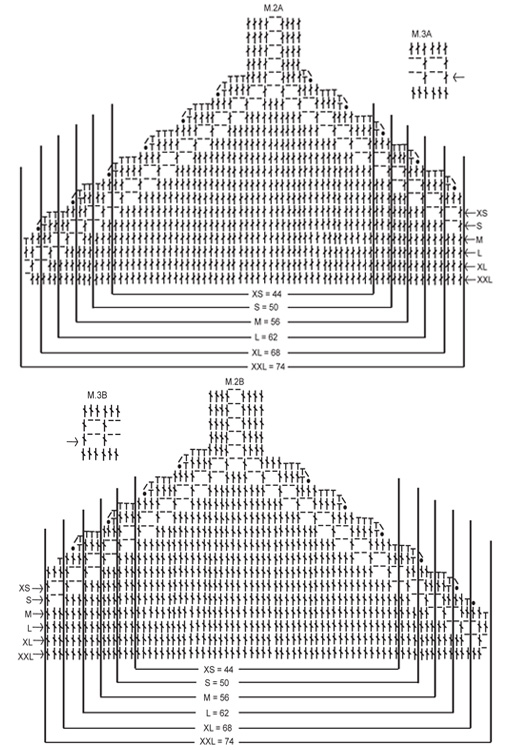
CROCHET TIP: Turn each row with 3 ch – NOTE: These 3 ch do not replace the first tr but are additional sts. PATTERN: See diagram M.1 to M.3 – NOTE: Make sure length of 1 ch is the same as width of 1 tr, otherwise the pattern won’t be even. DECREASING TIP: Dec 1 tr by crochet 2 tr tog as follows: Crochet 1 tr in first st but wait with the last pull-through, crochet 1 tr in next st and when doing the last pull-through pull thread through all 3 sts on hook. -------------------------------------------------------- -------------------------------------------------------- DRESS: Crochet back and forth from mid back and sewn tog at the back. Crochet 304-334-364-394-424-454 ch (includes 3 ch to turn with) with Safran and crochet hook size 3 mm. Crochet first row as follows: 1 tr in 4th ch, 1 tr in each of the next 4 ch, * skip 1 ch, 1 tr in each of the next 4 ch *, repeat from *-* and finish with 1 tr in last ch = 242-266-290-314-338-362 tr (+ 3 ch). See CROCHET TIP! Continue as follows: 1 tr, M.1 10-11-12-13-14-15 times across the row and 1 tr in last tr. REMEMBER THE CROCHET TENSION! After M.1 continue with 1 tr in each tr – AT THE SAME TIME insert 8 markers in piece as follows: First marker after 16-18-19-20-22-23 tr, then 30-33-36-39-42-45 tr between each marker, = 16-17-19-21-22-24 tr after the last marker. AT THE SAME TIME on row 2 after M.1 dec 1 tr to the right of all markers – SEE DECREASING TIP! Repeat the dec on every 4th row a total of 12 times – NOTE: Dec to the right and to the left alternately of markers = 146-170-194-218-242-266 tr. When piece measures 50 cm (dec are now complete, leave markers in piece) crochet M.1 again (= 6-7-8-9-10-11 repeats across the row) with 1 tr each side. After M.1 continue with 1 tr in each tr – AT THE SAME TIME on row 1 after M.1 inc 1 tr to the right of all markers – inc by working 2 tr in 1 tr. Repeat the inc on every 2-2-2-3-3-3 row a total of 4 times – NOTE: Inc to the right and to the left alternately of markers = 178-202-226-250-274-298 tr. When piece measures approx 70-71-72-73-74-75 cm crochet next row as follows (adjust so that next row is from WS in size XS, M and XL and from RS in size S, L and XXL): SIZE XS: First row, from WS: 1 tr in each of the first 45 tr, M.2B - beg on left side of diagram, see arrow for size (= 44 sts, last st = 1 ch, skip 1 tr), M.2A – beg on left side of diagram, see arrow for size (= 44 sts, first st = 1 ch, skip 1 tr) and then 1 tr in each of the last 45 tr. Crochet another 3 rows in the same way. RIGHT SIDE: Crochet next row as follows (from WS): M.3B on the first 45 sts (beg on row marked by arrow), then continue in M.2B, at the same time dec for neck as shown in diagram. After M.3B continue in M.2B until there are 10 sts left at the top (= strap). Crochet back and forth on these sts as shown in diagram until strap measures approx 29 cm – try on the dress to see if strap is long enough. Cut the thread. LEFT SIDE: Crochet like the right side but mirrored, i.e. crochet from mid front (= WS) as follows: M.2A on the first 44 sts and then M.3A on the last 45 sts. After M.3A crochet sl sts on these sts to M.2A, complete diagram and crochet strap like on right side. SIZE S: First row, from RS: 1 tr in each of the first 51 tr, M.2A – beg on right side of diagram, see arrow for size (= 50 sts, last st = 1 ch, skip 1 tr), M.2B – beg on right side of diagram, see arrow for size (= 50 sts, first st = 1 ch, skip 1 tr) and then 1 tr in each of the last 51 tr. Crochet another 3 rows in the same way. LEFT SIDE: Crochet next row as follows (from RS): M.3A on the first 51 tr, then continue in M.2A at the same time dec for neck as shown in diagram. After 3 rows M.3A is completed. Now continue in M.2A until there are 10 sts left at the top (= strap). Crochet back and forth on these sts as shown in diagram until strap measures approx 31 cm – try on the dress to see if strap is long enough. Cut the thread. RIGHT SIDE: Crochet like the left side but mirrored, i.e. crochet from mid front (= RS) as follows: M.2B on the first 50 sts and then M.3B on the last 51 sts. After M.3B crochet sl sts on these sts to M.2B, complete diagram and crochet strap like on right side. SIZE M: First row, from WS: 1 tr in each of the first 57 tr, M.2B – beg on left side of diagram, see arrow for size (= 56 sts, last st = 1 ch, skip 1 tr), M.2A – beg on left side of diagram, see arrow for size (= 56 sts, first st = 1 ch, skip 1 tr) and then 1 tr in each of the last 57 tr. Crochet another 3 rows in the same way. RIGHT SIDE: Crochet next row as follows (from WS): M.3B on the first 57 tr, then continue in M.2B at the same time dec for neck as shown in diagram. After M.3B continue in M.2A until there are 10 sts left at the top (= strap). Crochet back and forth on these sts as shown in diagram until strap measures approx 33 cm – try on the dress to see if strap is long enough. Cut the thread. LEFT SIDE: Crochet like the right side but mirrored, i.e. crochet from mid front (= WS) as follows: M.2A on the first 56 sts and then M.3A on the last 57 sts. After M.3A crochet sl sts on these sts to M.2A, complete diagram and crochet strap like on right side. SIZE L: First row, from RS: 1 tr in each of the first 63 tr, M.2A – beg on right side of diagram, see arrow for size (= 62 sts, last st = 1 ch, skip 1 tr), M.2B – beg on right side of diagram, see arrow for size (= 62 sts, first st = 1 ch, skip 1 tr) and then 1 tr in each of the last 63 tr. Crochet another 3 rows in the same way. LEFT SIDE: Crochet next row as follows (from RS): M.3A on the first 63 tr, then continue in M.2A at the same time dec for neck as shown in diagram. After M.3A continue in M.2A until there are 10 sts left at the top (= strap). Crochet back and forth on these sts as shown in diagram until strap measures approx 33 cm – try on the dress to see if strap is long enough. Cut the thread. RIGHT SIDE: Crochet like the left side but mirrored, i.e. crochet from mid front (= RS) as follows: M.2B on the first 62 sts and then M.3B on the last 63 sts. After M.3B crochet sl sts on these sts to M.2B, complete diagram and crochet strap like on right side. SIZE XL: First row, from WS: 1 tr in each of the first 69 tr, M.2B – beg on left side of diagram, see arrow for size (= 68 sts, last st = 1 ch, skip 1 tr), M.2A – beg on left side of diagram, see arrow for size (= 68 sts, first st = 1 ch, skip 1 tr) and then 1 tr in each of the last 69 tr. Crochet another 3 rows in the same way. RIGHT SIDE: Crochet next row as follows (from WS): M.3B on the first 69 tr, then continue in M.2B at the same time dec for neck as shown in diagram. After M.3B continue in M.2A until there are 10 sts left at the top (= strap). Crochet back and forth on these sts as shown in diagram until strap measures approx 35 cm – try on the dress to see if strap is long enough. Cut the thread. LEFT SIDE: Crochet like the right side but mirrored, i.e. crochet from mid front (= WS) as follows: M.2A on the first 68 sts and then M.3A on the last 69 sts. After M.3A crochet sl sts on these sts to M.2A, complete diagram and crochet strap like on right side. SIZE XXL: First row, from RS: 1 tr in each of the first 75 tr, M.2A – beg on right side of diagram, see arrow for size (= 74 sts, last st = 1 ch, skip 1 tr), M.2B – beg on right side of diagram, see arrow for size (= 74 sts, first st = 1 ch, skip 1 tr) and then 1 tr in each of the last 75 tr. Crochet another 3 rows in the same way. LEFT SIDE: Crochet next row as follows (from RS): M.3A on the first 75 tr, then continue in M.2A at the same time dec for neck as shown in diagram. After 3 rows M.3A is complete and now continue in M.2A until there are 10 sts left at the top (= strap). Crochet back and forth on these sts as shown in diagram until strap measures approx 35 cm – try on the dress to see if strap is long enough. Cut the thread. RIGHT SIDE: Crochet like the left side but mirrored, i.e. crochet from mid front (= RS) as follows: M.2B on the first 74 sts and then M.3B on the last 75 sts. After M.3B crochet sl sts on these sts to M.2B, complete diagram and crochet strap like on right side. ALL SIZES - ASSEMBLY: Sew dress tog mid back, edge to edge in outer loops of sts – beg at bottom and leave an opening of approx 33 cm at the top. Sew shoulder straps, edge to edge, to back piece, approx 9-10-11-12-13-14 cm from mid back. BUTTON EDGE: Crochet 3 rows with dc along left side of the opening mid back. BUTTONHOLE LOOPS: Crochet as follows along right side of opening mid back – beg at the top: 1 dc in first st, 3 ch, skip 1 cm, 1 dc in next st, * crochet dc for 2.5 cm, 3 ch, skip 1 cm, 1 dc in next st *, repeat from *-* a total of 9 times = 10 buttonhole loops. PICOT BORDERS: Crochet round neckline as follows – beg mid back: 1 dc in first st, * 4 ch, 1 tr in the first ch (= 1 picot), skip approx 1 cm, 1 dc in next st *, repeat from *-*. Crochet in the same way round the armholes and along bottom edge. |
|||||||||||||
Diagram explanations |
|||||||||||||
|
|||||||||||||
|
|||||||||||||
|
|||||||||||||
Have you finished this pattern?Tag your pictures with #dropspattern #diamondsinthesundress or submit them to the #dropsfan gallery. Do you need help with this pattern?You'll find 7 tutorial videos, a Comments/Questions area and more by visiting the pattern on garnstudio.com. © 1982-2025 DROPS Design A/S. We reserve all rights. This document, including all its sub-sections, has copyrights. Read more about what you can do with our patterns at the bottom of each pattern on our site. |
|||||||||||||


With over 40 years in knitting and crochet design, DROPS Design offers one of the most extensive collections of free patterns on the internet - translated to 17 languages. As of today we count 314 catalogues and 11822 patterns translated into English (UK/cm).
We work hard to bring you the best knitting and crochet have to offer, inspiration and advice as well as great quality yarns at incredible prices! Would you like to use our patterns for other than personal use? You can read what you are allowed to do in the Copyright text at the bottom of all our patterns. Happy crafting!
Post a comment to pattern DROPS 120-30
We would love to hear what you have to say about this pattern!
If you want to leave a question, please make sure you select the correct category in the form below, to speed up the answering process. Required fields are marked *.