
Popular categories
Looking for a yarn?


Comments / Questions (95)
![]() Asyli wrote:
Asyli wrote:
Bonjour, est-il possible de tricoter ce modèle en associant 1 fil Alpaca et 1 fil Fabel de couleurs assorties ? Faut-il compter alors 200g d'Alpaca et 200g de Fabel au lieu des 400g d'Alpaca ? Merci :)
30.10.2023 - 13:34DROPS Design answered:
Bonjour Asyli, vous pouvez utiliser le convertisseur pour connaître la quantité équivalente à la moitié Alpaca en Fabel (les 2 fils n'ont pas le même métrage, donc la quantité sera différente); en revanche, notez que le point froncé ne se tricote qu'avec un seul fil, pas avec les 2, il vous faudra donc choisir une des 2 qualités et il vous faudra par conséquent plus de laine de cette qualité pour l'empiècement froncé. Bon tricot!
30.10.2023 - 18:11
![]() Isabell wrote:
Isabell wrote:
Undskyld det er ikke noget fejl i opskrift der er mig der har set forkert på størrelse
17.10.2022 - 17:20
![]() Isabell wrote:
Isabell wrote:
Hej I skal nok se på opskriften igen for der er fejl i mønster størlse xl der er for mange masker
16.10.2022 - 16:37DROPS Design answered:
Hei Isabell. Om du mener det er noe feil, er det fint om du skriver nøyaktig hvor du mener det er feil (maske antallet av opplegg av bolen, ermene, bærestykket osv? ), så skal vi ta en dobbeltsjekk. mvh DROPS Design
17.10.2022 - 14:04
![]() Åshild wrote:
Åshild wrote:
Hei! Eg lurte på om det der det står "Bytt til rundp 5 og 1 tråd. Strikk 2 r i alle m omg rundt" (frå masker med dobbel tråd), om det går an å strikka éi maske i den eine tråden i maska, og éi maske med den andre tråden i maska? Eller vil det sjå veldig dårleg/feil ut?
25.03.2021 - 09:20DROPS Design answered:
Hei Åshild. Usikker på hvordan resultatet blir, kan hende det blir noe tykkere, men du kan jo fint teste det ut på en prøvelapp og se om du syns det er OK. mvh DROPS design
07.04.2021 - 12:09
![]() Seyns Greet wrote:
Seyns Greet wrote:
Beste, hoe plaats je verschillende gebreide delen op één naald? Hoe doe je dat het best?
18.02.2021 - 11:05DROPS Design answered:
Dag Greet,
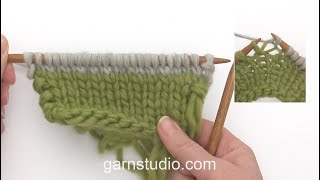
In deze video wordt uitgelegd hoe je dat het beste kunt doen.
21.02.2021 - 11:19
![]() Jacqueline wrote:
Jacqueline wrote:
Buenos días . Es un lindo patrón . Pero No tengo claro lo del fruncido al comenzar dice : comenzar tejiendo 2 puntos derecho en toda la vuelta . Agradezco resuelvan mi duda . Gracias !!
20.08.2020 - 08:11DROPS Design answered:
Hola Jacqueline, tienes que tejer cada 2 puntos juntos (tejer todos los puntos juntos, de 2 en 2) en toda la vuelta. En la vuelta siguiente hay dos veces menos puntos. Buen trabajo!
20.11.2020 - 16:57
![]() Francesca wrote:
Francesca wrote:
Merci pour le lien de la vidéo, c'est beaucoup plus clair, peut-être la traduction en français de vos explications était-elle un peu ambigüe, car çà ne disait pas de tricoter chaque fil d ela maille séparément.....bon comme çà en fait c'est facile...merci
21.12.2019 - 00:11
![]() Francesca wrote:
Francesca wrote:
Bonjour, Je cosntate que le doublement des mailles au premier rang de fronces crée une sort de "jours" et les mailles de ce rang sont beaucoup plus grosses que celles des rang suivants. Pourtant sur la photo de près du modèle, il n'y a pas çà. Comment faites-vous pour ne pas avoir cet effet ?
20.12.2019 - 15:13DROPS Design answered:
Bonjour Francesca, cette vidéo montre comment tricoter séparément les fils d'une même maille, autrement dit, comme on le fait ici pour les bordures froncées, peut-être pourrez-vous mieux voir comment faire? De petites irrégularités s'estompent également lors du 1er lavage/blocage, en cas de doute, n'hésitez pas à essayer sur un échantillon. Votre magasin saura également vous aider, même par mail ou téléphone. Bon tricot!
20.12.2019 - 16:29
![]() Marie wrote:
Marie wrote:
Hei. Kan jeg strikke denne i to tråder flora og gå ned en halv pinnestørrelse? Strikker i str small. På forhånd takk! Hilsen marie
08.01.2019 - 10:52DROPS Design answered:
Hei Marie. Alpaca og Flora har i utgangspunktet samme strikkefasthet så det skal gå helt fint å bruke Flora til denne genseren. Når det gjelder pinnestørrelse må du bruke de pinnene som gir deg den samme strikkefastheten som angitt i oppskriften. Pinnestørrelsene vi oppgir er kun veiledende, og du må selv justere størrelsen opp eller ned ved behov slik at du har den riktige strikkefastheten. Hvis du har feil strikkefasthet vil målene på plagget bli feil i forhold til målskissen. Strikk en prøvelapp med de pinnene du tror passer og se om det stemmer med oppskriften. God fornøyelse
11.01.2019 - 14:37
![]() Tina wrote:
Tina wrote:
Hei, jeg lurer på om rettelsen på oppskriften gjelder der man skal strikke med en tråd for å få boble effekten.
23.10.2018 - 10:51DROPS Design answered:
Hei Tina. Alle rettelser som står oppgitt er allerede endret i oppskriftsteksten så den er korrekt slik den står. Strikk med 1 og 2 tråder som anvist. God fornøyelse.
23.10.2018 - 15:51
|
|
Eloise#eloisesweater |
|
 |
 |
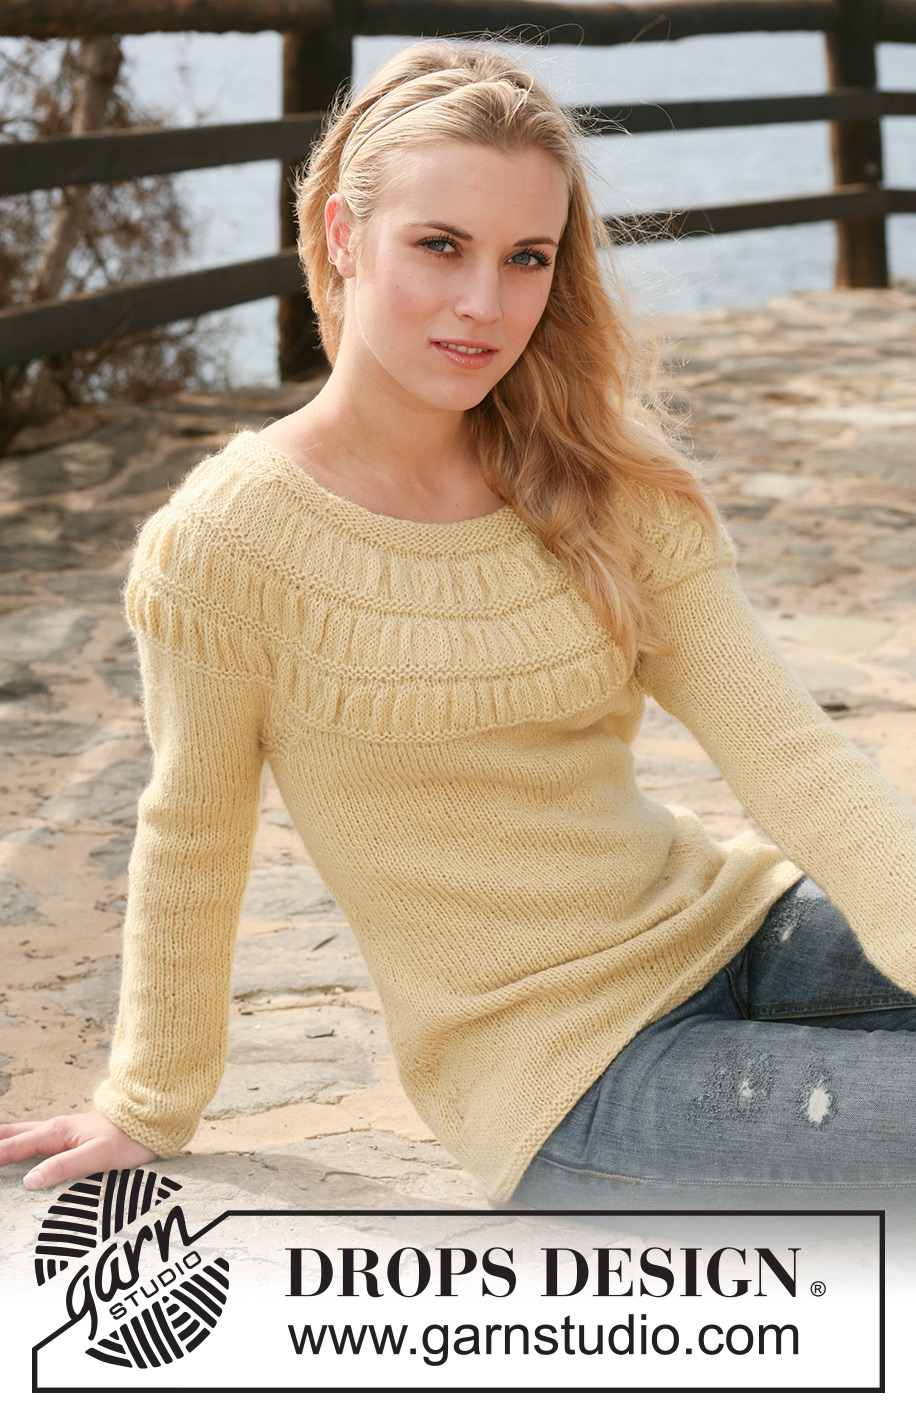
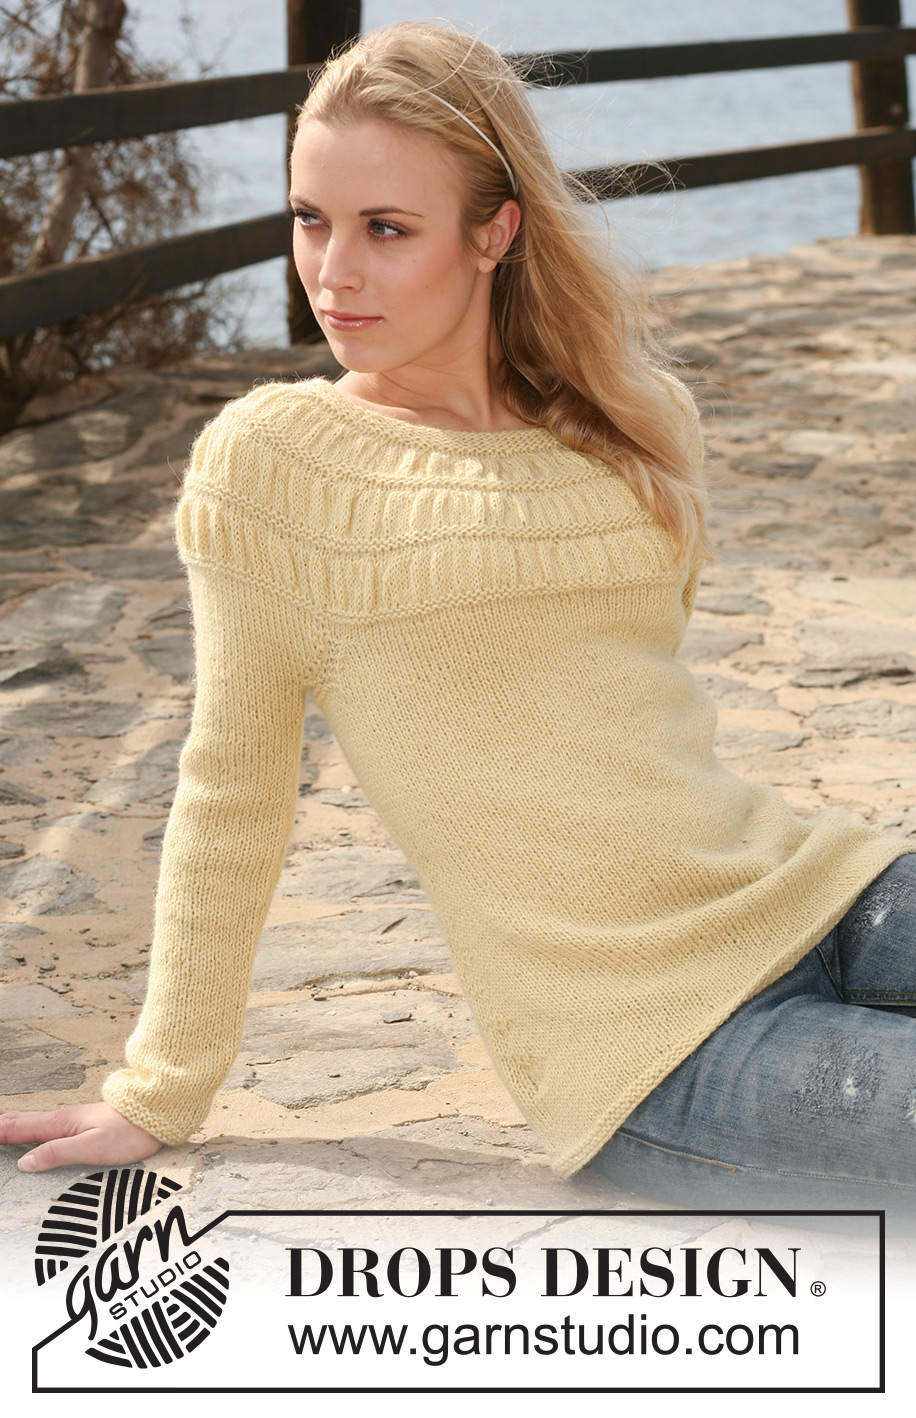
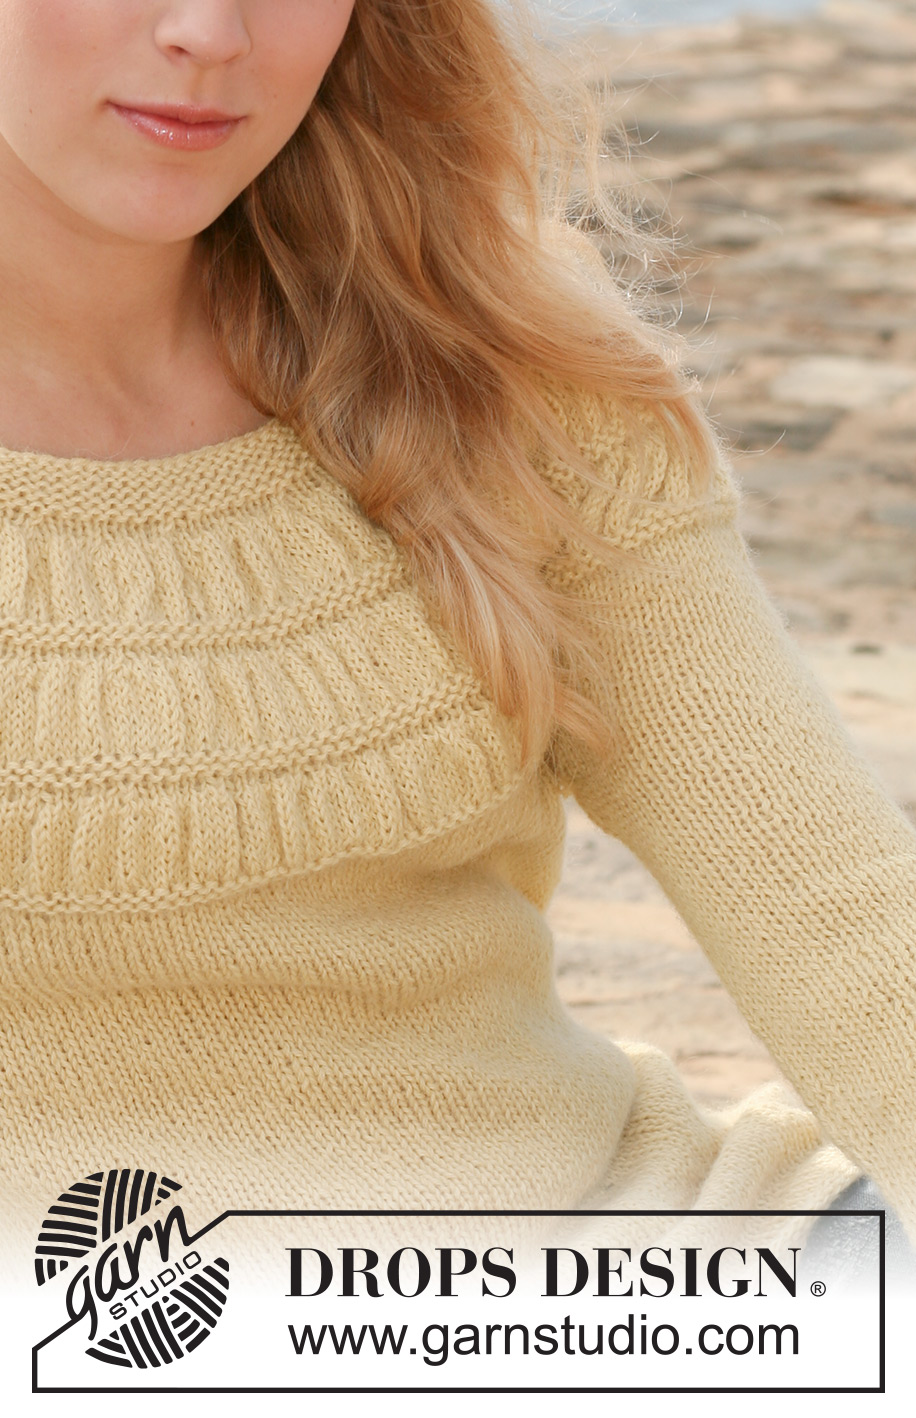
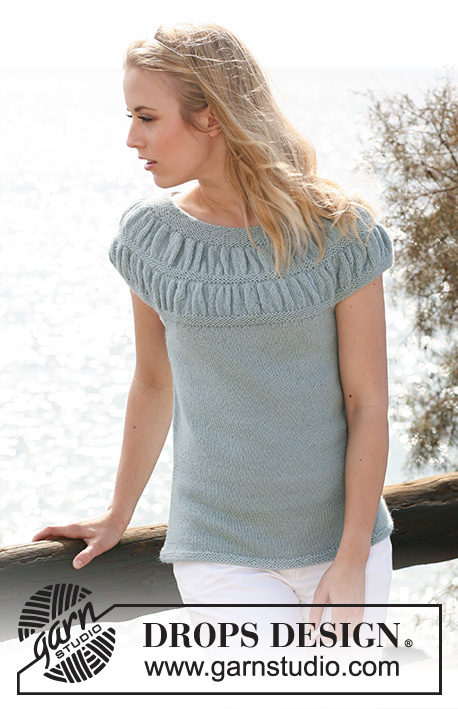
DROPS jumper in ”Alpaca” with shirred pattern on yoke. Size S - XXXL
DROPS 119-2 |
|
|
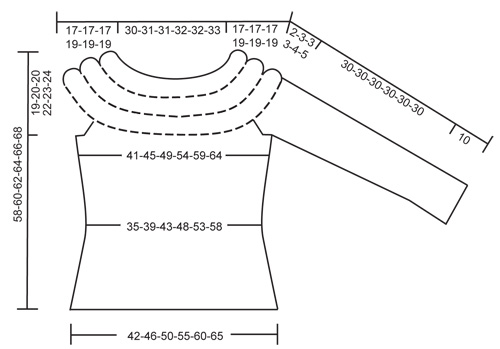
GARTER ST (in the round) K 1 round, P 1 round. DECREASING TIP (applies to body piece): Dec as follows before marker: K2 tog. Dec as follows after marker: slip 1 st as if to K, K1, psso. RAGLAN: Dec each side of 3 garter sts. Dec as follows BEFORE 3 sts: K2 tog. Dec as follows AFTER 3 sts: slip 1 st as if to K, K1, psso. -------------------------------------------------------- -------------------------------------------------------- BODY PIECE: Worked in the round on circular needle. Cast on 142-156-170-188-204-220 sts on circular needle size 4 mm with 2 threads Alpaca. Insert 1 marker at beg of round and 1 marker after 71-78-85-94-102-110 sts (the sides). READ ALL OF THE FOLLOWING SECTION BEFORE CONTINUING! Work 6 rounds GARTER ST – see above. Change to circular needle size 5 mm and continue in stocking st. REMEMBER THE KNITTING TENSION! When piece measures 7 cm dec 1 st each side of both markers – SEE DECREASING TIP, and repeat the dec on every 2.5 cm a total of 6 times = 118-132-146-164-180-196 sts. When piece measures 23-24-25-26-27-28 cm inc 1 st each side of both markers by K2 in 1 st, repeat the inc on every 3 cm a total of 5 times = 138-152-166-184-200-216 sts. When piece measures 38-39-41-41-42-43 cm work 4 rounds garter st on 14 sts each side (= 7 sts each side of marker) with remaining sts as before. On next round cast off the middle 8 sts each side for armhole = 122-136-150-168-184-200 sts left on needle. Put piece aside and knit the sleeves. SLEEVE: Worked in the round on double pointed needles. Cast on 38-40-42-44-46-48 sts on double pointed needles size 4 mm with 2 threads Alpaca. Work 6 rounds garter st. Change to double pointed needles size 5 mm. Insert a marker at beg of round (= mid under sleeve). Continue in stocking st, AT THE SAME TIME when piece measures 10 cm inc 1 st each side of marker, and repeat the inc on every 4-3.5-3-3-2.5-2.5 cm a total of 8-9-10-10-11-12 times = 54-58-62-64-68-72 sts. When piece measures 40 cm (for all sizes) cast off 8 sts mid under sleeve (i.e. 4 sts each side of marker) = 46-50-54-56-60-64 sts left on needle. Put piece aside and knit the other sleeve. YOKE: Slip sleeves on the same circular needle as body piece where cast off for armholes = 214-236-258-280-304-328 sts. Insert a marker in all transitions between sleeves and body piece (= 4 markers). Continue in stocking st in the round with 3 sts each side on front piece and 3 sts each side on back piece in garter st, AT THE SAME TIME on round 2 dec for RAGLAN – see above! Repeat the dec on every other round a total of 2-3-3-3-4-5 times = 198-212-234-256-272-288 sts. Change to circular needle size 4 mm and work 4 rounds garter st. Now continue in shirred pattern as follows: Change to circular needle size 5 mm and 1 thread. K2 in all sts across the round = 396-424-468-512-544-576 sts. Work 8-8-8-9-9-9 rounds stocking st. Change to circular needle size 4 mm and 2 threads. K2 tog across the round = 198-212-234-256-272-288 sts. Work next round as follows: K 2-2-3-4-2-0, * K2 tog, K 5-5-5-4-4-4 *, repeat from *-* = 170-182-201-214-227-240 sts. P 1 round, K 1 round and P 1 round. Change to circular needle size 5 mm and 1 thread. K2 in all sts across the round = 340-364-402-428-454-480 sts. Work 7-7-8-8-9-9 rounds stocking st. Change to circular needle size 4 mm and 2 threads. K2 tog across the round = 170-182-201-214-227-240 sts. Work next round as follows: K 2-2-3-4-2-0, * K2 tog, K 4-4-4-4-3-3 *, repeat from *-* = 142-152-168-177-184-192 sts. P 1 round, K 1 round and P 1 round. Change to circular needle size 5 mm and 1 thread. K2 in all sts across the round = 284-304-336-354-368-384 sts. Work 7-7-8-8-9-9 rounds stocking st. Change to circular needle size 4 mm and 2 threads. K2 tog across the round = 142-152-168-177-184-192 sts. Work next round as follows: SIZE S: K2, * K2 tog, K2 *, repeat from *-* = 107 sts. SIZE M: K5, * K2 tog, K2, K2 tog, K1 *, repeat from *-* = 110 sts. SIZE L: * K2 tog, K1 *, repeat from *-* = 112 sts. SIZE XL: * K2 tog, K1 *, repeat from *-* = 118 sts. SIZE XXL and XXXL: * K2 tog, K2 tog, K1, K2 tog, K1 *, repeat from *-* = 115-120 sts. ALL SIZES: P 1 round and work 8 rounds garter st. Cast off, piece measures approx 58-60-62-64-66-68 cm. ASSEMBLY: Sew tog openings under sleeves. |
|
|
|
Have you finished this pattern?Tag your pictures with #dropspattern #eloisesweater or submit them to the #dropsfan gallery. Do you need help with this pattern?You'll find 23 tutorial videos, a Comments/Questions area and more by visiting the pattern on garnstudio.com. © 1982-2025 DROPS Design A/S. We reserve all rights. This document, including all its sub-sections, has copyrights. Read more about what you can do with our patterns at the bottom of each pattern on our site. |
|


With over 40 years in knitting and crochet design, DROPS Design offers one of the most extensive collections of free patterns on the internet - translated to 17 languages. As of today we count 314 catalogues and 11822 patterns translated into English (UK/cm).
We work hard to bring you the best knitting and crochet have to offer, inspiration and advice as well as great quality yarns at incredible prices! Would you like to use our patterns for other than personal use? You can read what you are allowed to do in the Copyright text at the bottom of all our patterns. Happy crafting!
Post a comment to pattern DROPS 119-2
We would love to hear what you have to say about this pattern!
If you want to leave a question, please make sure you select the correct category in the form below, to speed up the answering process. Required fields are marked *.