
Popular categories
Looking for a yarn?


|
||||||||||||||||||||||||||||||||||
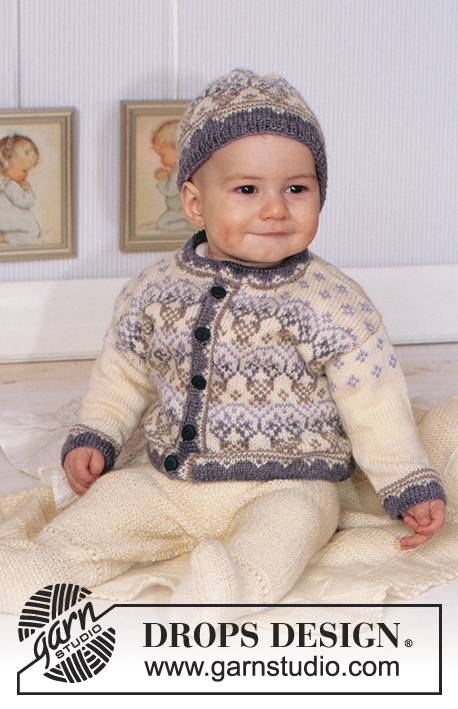
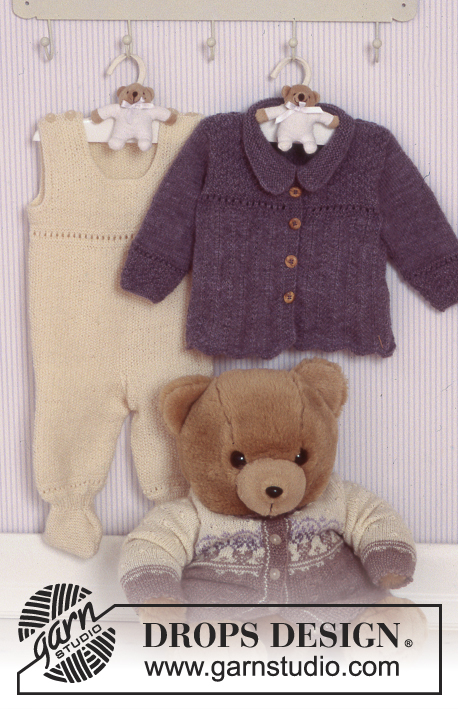
Sweet Rosie |
||||||||||||||||||||||||||||||||||
|
|
||||||||||||||||||||||||||||||||||
DROPS Dress and socks with pattern in BabyMerino.
DROPS Baby 11-4 |
||||||||||||||||||||||||||||||||||
|
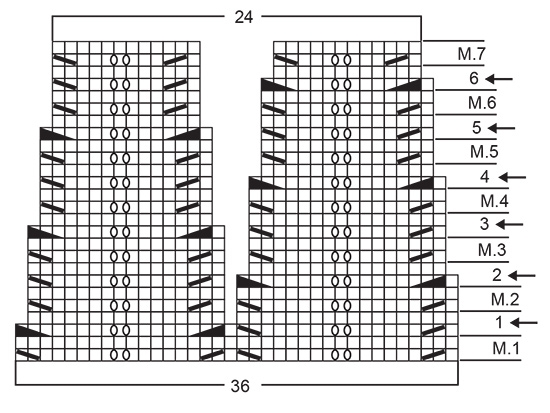
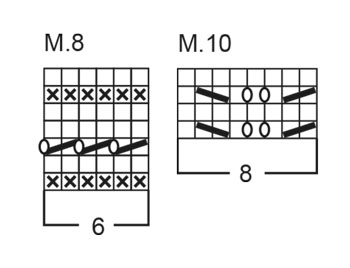
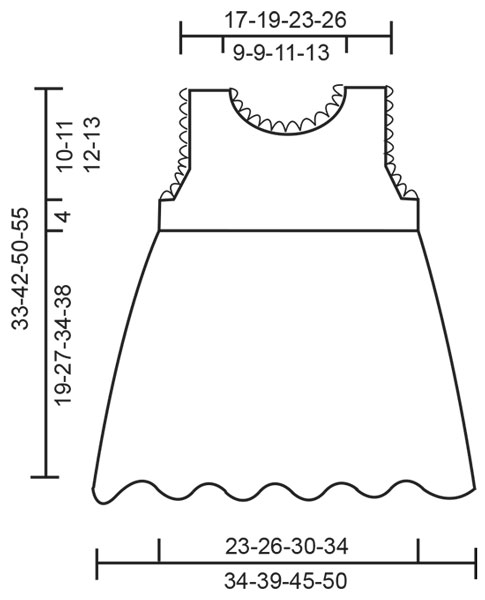
Knitting gauge: M.1 to M.7 and M.9: 32 sts x 34 rows on needle size 2.5 mm / US 1.5 = 10 x 10 cm / 4" x 4". Stockinette sts: 25 sts x 34 rows on needle size 2.5 mm / US 1.5 = 10 x 10 cm / 4" x 4". Garter sts (back and forth on needle: knit all rows. Garter sts (on circular needle): knit 1 round, purl 1 round. Pattern: See diagrams M.1 to M10. The diagrams are seen from the RS. -------------------------------------------------------------------- DRESS: Buttonhole: Make buttonholes on the right edge mid back from the RS. 1 buttonhole = bind off the 3rd and 4th sts from the edge and cast on 2 new sts in the same place on the return row. Make buttonholes as follows: Size 1/3 months: 2, 5, 8 and 11 cm Size 6/9 months: 2, 5, 9 and 12 cm Size 12/18 months: 2, 6, 10 and 13 cm Size 24 months: 2, 6, 10 and 14 cm Dec tips (apply to armhole and neckline): Dec inside 2 edge sts in garter sts from the RS. Dec as follows after 2 edge sts: slip 1 st as if to knit, K1, psso. Dec as follows before 2 edge sts: K2 tog. -------------------------------------------------------------------- Back and front piece: The dress is knitted round on circular needle from bottom edge up. Cast on 216-252-288-324 sts on circular needle size 2.5 mm / US 1.5 with pink. Knit 2 rounds in garter sts and continue in M.1. When piece measures 8-10-13-17 cm begin the dec. Dec 12-14-16-18 sts per round, i.e. dec 2 sts on every 2nd repeat across – see arrows in diagram. This means the size of the zig-zags in the pattern will decrease as you go along. Dec as follows: When piece measures 8-10-13-17 cm knit first 1 round with dec = 204-238-272-306 sts, continue in M.2. When piece measures 10-14-17-21 cm knit second round with dec = 192-224-256-288 sts, continue in M.3. When piece measures 12-17-21-25 cm knit third round with dec = 180-210-240-270 sts, continue in M.4. When piece measures 14-20-25-29 cm knit fourth round with dec = 168-196-224-252 sts, continue in M.5. When piece measures 16-23-29-33 cm knit fifth round with dec = 156-182-208-234 sts, continue in M.6. When piece measures 18-26-33-37 cm knit sixth round with dec = 144-168-192-216 sts, continue in M.7. When piece measures 19-27-34-38 cm knit M.8 (= row with holes), at the same time on the last round of M.8 dec 2 sts evenly = 142-166-190-214 sts. Now carry on measuring piece from the first round of M.8. Divide the piece mid back and finish the dress back and forth on circular needle. Cast on 2 new sts each side = 146-170-194-218 sts. Knit next row as follows form the RS: 5 edge sts in garter sts, M.9A (= 8 sts), M.9B over 120-144-168-192 sts, M.9C (= 8 sts) and 5 edge sts in garter sts. Continue in pattern whilst making buttonholes on right edge – see explanation above. When piece measures 3 cm / 1⅛" (from 1st round of M.8) knit next row as follows from the RS: 5 edge sts in garter sts, 28-34-40-46 sts of M.9, 10 sts in garter sts, 60-72-84-96 sts of M.9, 10 sts in garter sts, 28-34-40-46 sts of M.9, 5 edge sts in garter sts. Continue in pattern until there are 4 rows in garter sts over 10 sts each side. On the next row bind off 6 sts each side for armhole and finish each piece separately. Front piece: = 64-76-88-100 sts. Continue in M.9 with 2 sts in garter sts each side. At the same time dec 1 st for armhole – see Dec tips – on every other row a total of 5-8-8-8 times = 54-60-72-84 sts. P the sts (seen from the RS) not fitting into M.9. After the dec for armhole continue with 2 sts in garter sts + 1 st in stockinette st each side (i.e. 1 st in stockinette sts along armhole). When piece measures approx 9-10-10-11 cm – adjust after 1 full repeat of M.9 – knit 4 rows with garter sts over the middle 22-22-28-34 sts (M.9 over remaining sts). Now bind off the middle 18-18-24-30 sts for neck and dec 1 st towards neckline on every other row a total of 6 times – see Dec Tips = 12-15-18-21 sts left on each shoulder. Continue in M.9 with 2 sts in garter sts + 1 st in stockinette st towards the neckline. When piece measures approx 14-15-16-17 cm (= 33-42-50-55 cm full length) bind off remaining sts – adjust after a full pattern repeat. Left back piece: = 35-41-47-53 sts. Continue in M.9 with 2 sts in garter sts towards armhole and 5 edge sts in garter sts towards mid back. At the same time dec for armhole as described for front piece = 30-33-39-45 sts. When piece measures approx 12-13-14-15 cm – adjust after a full pattern repeat – knit 4 rows with garter sts over 18-18-21-24 sts towards mid back. Now bind off 16-16-19-22 sts towards mid back for neck and dec 1 st towards neckline on every other row 2 times – see Dec Tips = 12-15-18-21 sts left on shoulder. Continue in M.9 with 2 sts in garter sts + 1 st in stockinette st towards the neckline. When piece measures approx 14-15-16-17 cm (= 33-42-50-55 cm full length) bind off remaining sts – adjust after a full pattern repeat. Right back piece: = 35-41-47-53 sts. Knit as left back piece, but mirrored. Remember buttonholes! Assembly: Sew shoulder seams. Place right edge over left edge on back piece and sew at bottom. Sew on buttons. Crochet borders: Crochet round armholes and neckline with crochet hook size 2.5 mm /C with pink as follows (crochet round the 2 outermost sts in garter sts): 1 sc, *ch 3, 1 sc in first ch, skip 1 st, 1 sc in next st* , repeat from *-*. ------------------------------------------------------------------ SOCKS: Foot length: 10-11-12-14 cm Cast on 56-56-64-64 sts on double pointed needles size 2.5 mm / US 1.5 with white Alpaca. Knit 1 round and knit 2 cm / ¾" of diagram M.10. Knit 1 round, at the same time dec 16-16-20-20 sts evenly on round = 40-40-44-44 sts. Knit M.8. Now knit heel as follows: Knit 3-3.5-3.5-4 cm stockinette sts back and forth on needles over 18 sts mid back. Heel dec (1st row = RS): 1st row: Knit 10 sts, K2 tog into back of st, K1, turn. 2nd row: slip 1 st as if to P, P4, P2 tog, P1, turn. 3rd row: slip 1 st as if to K, K5, K2 tog into back of st, K1, turn. 4th row: slip 1 st as if to P, P6, P2 tog, P1, turn. 5th row: slip 1 st as if to K, K7, K2 tog into back of st, K1, turn. 6th row: slip 1 st as if to P, P8, P2 tog, P1, turn. 7th row: K2 tog, K8, K2 tog into back of st = 10 sts on needle (= total 32-32-36-36 sts). Now pick up 7-8-8-9 sts on each side of the heel = 46-48-52-54 sts. Continue in stockinette sts over all sts and dec 1 st on each side of the upper 18-20-22-24 sts on every other row a total of 7 times = 32-34-38-40 sts. When foot measures 8-9-11-12 cm (from the start of the heel dec) insert a marking thread each side and dec 1 st on each side of both threads on every round (4 dec per round) a total of 7-7-8-8 times. Cut the thread and pull through remaining sts. Sew tight. Crochet a chain with pink , approx 35 cm long, and pull through row with holes. |
||||||||||||||||||||||||||||||||||
Diagram explanations |
||||||||||||||||||||||||||||||||||
|
||||||||||||||||||||||||||||||||||
|
||||||||||||||||||||||||||||||||||
|
||||||||||||||||||||||||||||||||||

|
||||||||||||||||||||||||||||||||||
|
||||||||||||||||||||||||||||||||||
|
Have you made this or any other of our designs? Tag your pictures in social media with #dropsdesign so we can see them! Do you need help with this pattern?You'll find tutorial videos, a Comments/Questions area and more by visiting the pattern on garnstudio.com. © 1982-2024 DROPS Design A/S. We reserve all rights. This document, including all its sub-sections, has copyrights. Read more about what you can do with our patterns at the bottom of each pattern on our site. |
||||||||||||||||||||||||||||||||||


With over 40 years in knitting and crochet design, DROPS Design offers one of the most extensive collections of free patterns on the internet - translated to 17 languages. As of today we count 304 catalogs and 11422 patterns - 11417 of which are translated into English (US/in).
We work hard to bring you the best knitting and crochet have to offer, inspiration and advice as well as great quality yarns at incredible prices! Would you like to use our patterns for other than personal use? You can read what you are allowed to do in the Copyright text at the bottom of all our patterns. Happy crafting!
Comments / Questions (69)
Buon giorno Quando devo incominciare a lavorare avanti e indietro dopo aver messo a nuovo due maglie a ogni lato? Grazie
10.04.2019 - 09:41DROPS Design answered:
Buongiorno Anna. Inizia a lavorare avanti e indietro da quel ferro. Buon lavoro!
10.04.2019 - 10:04Buongiorno Sto lavorando la prima misura,arrivata a 8 cm Non ho capito come come fare le diminuzione Il lavoro non risulta allineato con i precedente Grazie
09.04.2019 - 07:07DROPS Design answered:
Buongiorno Anna. Deve lavorare la prima delle due righe indicate dalla freccia 1. Lavora le prime 18 maglie come fatto fino ad adesso, poi lavora 1 m diritto, 3 maglie insieme a diritto, prosegue con il diagramma verificando che i gettati siano allineati con quelli della riga precedente, e finisce la ripetizione passando 1 m dir senza lavorarla, 2 m insieme a dir e accavalla la maglia passata sulle 2 lavorate insieme. Buon lavoro!
09.04.2019 - 09:02Buon pomeriggio Guardando il grafico M1 io sto lavorando il primo giro con i simboli,il secondo giro tutto a diritto Dopo aver raggiunto gli 8 cm devo fare le diminuzione el giro dove lavoro tutto a diritto? Grazie mille
08.04.2019 - 15:15DROPS Design answered:
Buongiorno Anna, quando raggiunge gli 8 cm deve lavorare seguendo la parte del diagramma con la freccia 1, in cui lavorerà le diminuzioni, poi un giro a diritto e poi presegue con M.2. Buon lavoro!
08.04.2019 - 15:51Buongiorno Non capisco il diagramma M 1 Ho avviato 216 mg
08.04.2019 - 11:32DROPS Design answered:
Buongiorno Anna. Deve lavorare il diagramma M1 sei volte sulle maglie del giro, lavorando le maglie come indicato nella legenda dei simboli. Ripete il diagramma in verticale finché il lavoro non misura 8 cm e poi lavora le due righe successive, quelle indicate dalla freccia 1. Buon lavoro!
08.04.2019 - 12:06Buongiorno Sto facendo la prima misura ,sono arrivata a M1 devo continuare fino alla fine Grazie
08.04.2019 - 11:02DROPS Design answered:
Buogniorno Anna. Deve lavorare il diagramma M1 finchè il lavoro non misura 8 cm. Lavora poi le due righe indicate dalla freccia 1. Prosegue con il diagramma M2 finché il lavoro non misura 10 cm e così via. Buon lavoro!
08.04.2019 - 12:03The last 3 rows in diagram m9 does not knit up nice. On ws you would normally knit pearl over pearl and knit over knit. I have now given up and are using another pattern, but thought it would be nice to know where I'm going wrong. Have used plenty of your patterns before with no problems. As I'm danish I even checked the danish version still no joy. Thanks
13.01.2019 - 15:19DROPS Design answered:
Dear Kirsten, the diagram should work nicely, you first work M.9A, then repeat M.9B and finish with M.9C. When some rows are worked at the transition with 2 diagrams, ex. row 5 and 7, work the last 2 sts/last st in M.9A/M.9B with the first 2 sts/first st in M.9B/M.9C. Happy knitting!
14.01.2019 - 13:11Forstår ikke forklaringen vedrørende 1 felling. Iflg diagrammet ska det fremdeles være 6 masker før midtmasken etter å ha felt 3 masker rett sammen? Ser av kommentarene at det er feil i diagrammet, men forstår ikke hvordan det skal løses
25.10.2018 - 22:13DROPS Design answered:
Hei Liesbeth. Det er ikke noe feil i diagrammet. Du strikker 3 masker sammen, og har da felt 1 maske, fordi du også lager 1 kast per felling på samme omgang (slik du har gjort i de tidligere omgangene). Du kan se at for hver felling blir diagrammet 1 maske mindre i hver side, og fellingene flytter seg 1 hakk nærmere midten. God fornøyelse.
30.11.2018 - 09:19Hei. På venstre bakstykke står det: «Når arbeidet måler ca 12 cm - avpass etter 1 hel rapport - strikkes det riller over 18 m mot midt bak.» Hva gjør jeg med de resterende 12 maskene? Fortsette med M.9?
28.05.2018 - 16:53DROPS Design answered:
Hei Irmelin, Ja, du fortsetter med M.9 over de resterende maskene. God fornøyelse!
31.05.2018 - 11:31I mönstret Sweet Rosie , Drops Baby 11-4 i mönstret för strumpor är de återstående maskorna felaktigt angivna, i st. 6/8 mån.står det 14 m. men det blir endast 6 maskor kvar som man drar tråden genom.
24.01.2018 - 21:42Hei. I felling 1 etter M1 (i mønster-rubrikkene) står den ene fellingen som 3 r sm. Men dette vises over "to masker" i rutemønsteret. Hvis man strikker 3 r sm fører vel dette til felling av to masker på ett sted? Og at det blir for få masker igjen etter mønsteret? Er det noe jeg ikke forstår her?
26.01.2017 - 13:42DROPS Design answered:
Hej Kristine. Nej, du tager 6 m ind (ved at strikke sammen), men du laver ogsaa 4x slaa om. Saa du mindsker 2 m i alt, som ogsaa angives i diagrammet.
07.02.2017 - 14:52