


Komentáře / Otázky (21)
![]() Cottet -Dumoulin Sylvie napsala:
Cottet -Dumoulin Sylvie napsala:
Bonjour, J’aurais besoin d’une petite précision concernant les instructions: —> à partir de quel rang doit-on augmenter dans la ml centrale ( passer de 4 groupes de B au lieu de 2 tous les 3 rgs) sachant que ces augmentations ne dépasseront pas le 12 ème rang. Merci d’avance de votre réponse ! Cordialement
17.05.2021 - 12:42Odpověď DROPS Design :
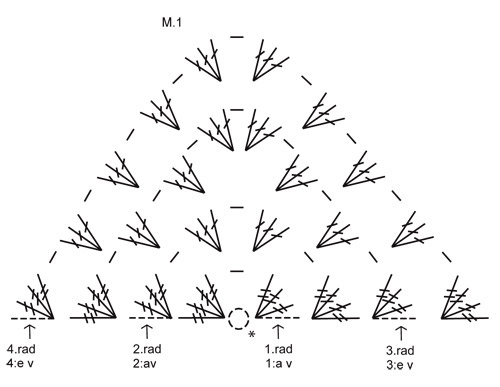
Bonjour Mme Cottet -Dumoulin, vous augmentez ainsi à partir du 3ème rang (comme le montre le diagramme M.1) et tous les 3 rangs (= 2 rangs en augmentant avec 2 groupes de brides dans la maille en l'air du milieu, et au rang suivant, on augmente avec 4 groupes de brides dans cette maille en l'air) et ce jusqu'au 12ème rang (autrement dit on va augmenter 4 groupes de brides aux rangs 3, 6, 9 et 12, puis on augmente toujours avec 2 groupes de brides. Bon crochet!
17.05.2021 - 14:19
![]() Sylvie Cottet-Dumoulin napsala:
Sylvie Cottet-Dumoulin napsala:
Bonjour, Je souhaite réaliser ce modèle de châle mais je n’ai pas réussi à trouver la signification des abréviations figurant sous le diagramme M1, juste au-dessous des flèches ( 4 rad 4 ev / 2 rad 2av.....??) Auriez-vous l’amabilité de me renseigner. Merci d’avance !
05.05.2021 - 19:49Odpověď DROPS Design :
Bonjour Mme Cottet-Dumoulin, ces nombres correspondent aux rangs en norvégien/suédois, autrement dit 1. rad, 1:a = 1er rang etc. bon crochet!
06.05.2021 - 07:19
![]() Sietske napsala:
Sietske napsala:
Ik begrijp dat je moet beginnen met circel van lossen, maar die zit in het midden. Hoe kom ik dan bij de andere kant? Als ik aan het einde ben van de tier heb ik slechts 1 kant gehaakt... Leg ik het zo goed uit?Ik begrijp het niet zo goed.
16.09.2014 - 10:42Odpověď DROPS Design :
Hoi Sietske. Je begint in het midden van de sjaal bovenaan in de nek (kijk eventueel op de foto). De 1e toer (1. rad op de teltekening) haak je dan 4 dstk 1 l (waarvan de 1e dstk 4 l zijn), 1 dstk om deze ring, keer het werk en haak de tweede toer: 4 dstk in de laatste dstk van de vorige toer, 1 l, 4 dstk + 1 l + 4 dstk in om de losse van de vorige toer enzovoort. Ga je zo door vorm je automatisch een driehoekje.
16.09.2014 - 16:27
![]() Dina napsala:
Dina napsala:
Hallo, kann man dieses Tuch auch als rechteckiges häkeln?
14.05.2013 - 11:36Odpověď DROPS Design :
Liebe Dina, Sie können selbstverständlich auch einen grossen Granny Square aus dem Material häkeln. Beachten Sie aber den grösseren Materialverbrauch wenn das Tuch doppelt liegt. Hier finden Sie eine Anleitung für Granny Squares:
14.05.2013 - 14:05
![]() Alexa Weidner-Reinhardt napsala:
Alexa Weidner-Reinhardt napsala:
In der Anleitung steht: "Bei der 3. R. werden in die mittlere Lm 4 Stb-Gruppen gehäkelt nicht 2. Nach der 12. R wird nicht mehr aufgenommen, jetzt werden bis zur fertigen Länge 2 Stb in die mittlere Lm gehäkelt." Im Diagramm sieht es aber so aus, als wäre es bereits ab der 4. Reihe so, dass nur 2 Stäbchengruppen in die mittlere Lm gehäkelt werden. Verstehe ich da etwas falsch oder ist da eine Unstimmigkeit in der Anleitung?
24.01.2013 - 08:33Odpověď DROPS Design :
Hallo Frau Weidner-Reinhardt, von R 4-11 werden 2 Stäbchengruppen in die mittlere Lm gehäkelt, ab R 12 nur 2 Stäbchen.
24.01.2013 - 11:47
![]() Karen Becher napsala:
Karen Becher napsala:
Hvordan kan jeg skaffe garnet, i de rigtige farver, til denne model? Det kan vel ikke passe at farverne er udgået når modellen stadig er tilgængelig?? Håber i kan hjælpe. Vh Karen Becher
04.06.2012 - 21:02Odpověď DROPS Design :
Jo, det kan godt. DROPS filosofien er jo netop at holde alle vores mønstre tilgængelige helt tilbage fra firsene. Men kan du ikke få lige præcis de farver eller i Vienna, så kan din butik sikkert hjælpe dig med et alternativ.
25.12.2012 - 17:43
![]() Joanna napsala:
Joanna napsala:
Såå snygg, såg den uppvirkad i en affär, såå mycket läckrare i verkligheten! Rosa & orange var hur smaskigt som helst :P
29.01.2008 - 12:32
![]() Barbro Anderson napsala:
Barbro Anderson napsala:
Helt underbar! Vill ha möntret NU!!!!! Hur länge måste jag vänta?
08.01.2008 - 07:41
![]() Sidsel napsala:
Sidsel napsala:
Rigtig flot. Kan godt lide det lidt hippieagtige look. Det ville jeg helt klart lave!
05.01.2008 - 11:48
![]() DROPS Design NL napsala:
DROPS Design NL napsala:
Dit patroon is helemaal nieuw. DROPS Design zal volgende week de teltekening bij plaatsen.
05.01.2008 - 11:46
|
|||||||||||||
Fiesta |
|||||||||||||
|
|
|||||||||||||
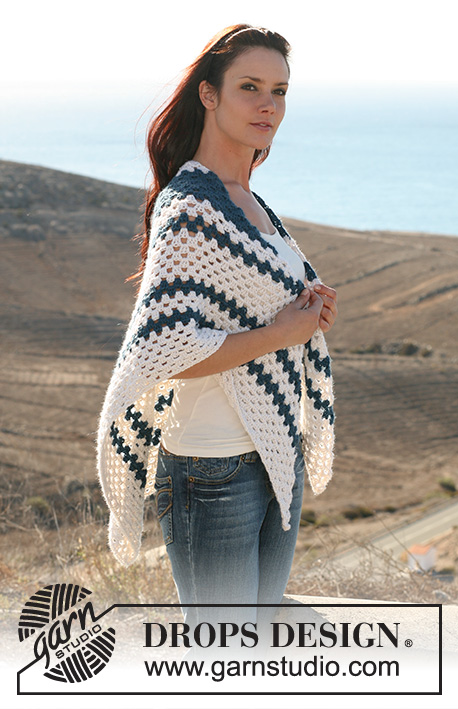
DROPS pruhovaný pestrobarevný šátek háčkovaný z příze "Vienna".
DROPS 106-39 |
|||||||||||||
|
TIP: Při změně barvy přidáváme přízi nové barvy k prvním 5 řo. VZOR: Viz schéma M.1. SLED PRUHŮ: Barvy střídáme v tomto rozvržení: Poprvé háčkujeme: 2 řady barvou avokádo, 1 řada tyrkysovou, 1 řada džínově modrou, 1 řada smetanovou, 1 řada hnědou, 1 řada světle hnědou, 1 řada žluto-oranžovou, 1 řada fuchsiovou, 1 řada světle vínovou, 1 řada hráškově zelenou. Tento sled pruhů opakujeme, ale při opakování háčkujeme už jen 1 řadu barvou avokádo. Nakonec uháčkujeme 1 řadu barvou avokádo, 1 řadu tyrkysovou, 1 řadu džínově modrou, 1 řadu smetanovou, 1 řadu hnědou, 1 řadu světle hnědou = celkem 27 řad. -------------------------------------------------------- -------------------------------------------------------- ŠÁTEK: Viz TIP. Háčkem č.9 uháčkujeme avokádovou přízí 6 řo a spojíme je pevným okem do kroužku. Pokračujeme vzorem M.1 dle SLEDU PRUHŮ – viz výše. POZOR! V každé 3. řadě háčkujeme do středového řo místo 2 skupinek DS 4 skupinky DS (= 2 skupinky přidáme). Přidávání ukončíme ve 12. řadě, dále pak háčkujeme do středového řo jen 2 skupinky DS, a to až do ukončení práce. Přízi odstřihneme a zapošijeme = celkem 27 řad. LEM: Obě boční strany šátku obháčkujeme světle hnědou přízí, takto: 1 KS, 3 řo, následující skupinku DS vynecháme, 2 KS do dalšího řo, *2 řo, následující skupinku DS vynecháme, 2 KS do dalšího řo*, *-* opakujeme a končíme 3 řo, 1 skupinku DS vynecháme, 1 KS. |
|||||||||||||
Vysvětlivky ke schématu |
|||||||||||||
|
|||||||||||||
|
|||||||||||||
Dokončili jste tento model?Pak označte své fotky tagem #dropspattern nebo je pošlete do galerie #dropsfan. Potřebujete s tímto návodem poradit?Otevřete-li si návod na stránce garnstudio.com, najdete tam 6 výukových video-ukázek, Komentáře/Dotazy a další užitečné informace. © 1982-2025 DROPS Design A/S. Vyhrazujeme si veškerá práva. Tento dokument, včetně všech jeho dílčích částí, podléhá autorským právům. Podrobnější komentář k možnostem užití našich návodů najdete dole pod každým návodem na našich stránkách. |
|||||||||||||


V oblasti pletené a háčkované módy působí DROPS Design více než 40 let. Díky tomu vám můžeme nabídnout jednu z nejrozsáhlejších kolekcí modelů s bezplatnými návody dostupnými na internetu - navíc v 17 jazycích. K dnešnímu dni máme na 314 katalogů a 11822 návodů celkem - z nich je už 7048 dostupných v [češtině].
Přidejte komentář k návodu DROPS 106-39
Rádi bychom věděli, co si o tomto modelu myslíte!
Pokud se chcete na něco zeptat, dbejte prosím na to, abyste ve formuláři níže vybrali správnou kategorii - díky tomu se dříve dozvíte, co potřebujete vědět. Povinná pole jsou označena *.