
Popular categories
Looking for a yarn?


|
|
Country Charm |
|
 |
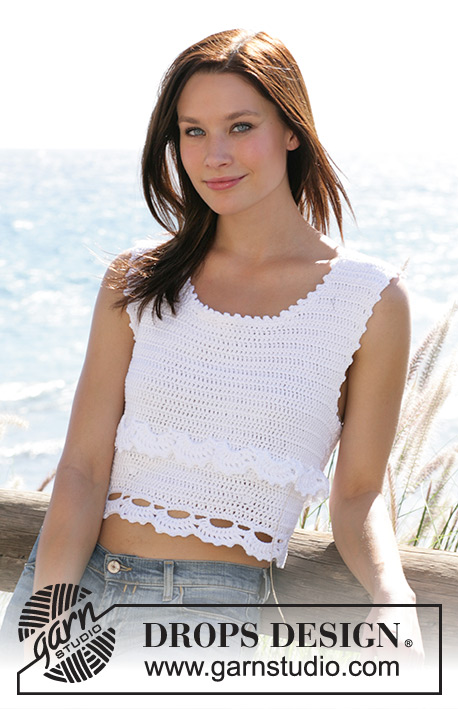 |
DROPS crochet top with mussel shaped border in Muskat.
DROPS 99-15 |
|
|
Crochet tension: 17 tr x 10 rows using hook size 4 mm with Muskat = 10 x 10 cm Crochet info: At the beg of each row replace the 1st tr with 3 ch. At the end of row crochet the last tr in 3rd ch from beg of previous row. Decreasing tip (apply to armhole and neckline): Dec as follows at the beg of row: replace 1 tr with 1 sl st. Dec as follows at the end of row: Turn the piece when number of tr to be dec are left on row. Front piece: Crochet 88-97-109-124-139 ch (incl 3 ch to turn with) on crochet hook size 4 mm. Crochet first row as follows: 1 tr in 4th ch from crochet hook, *skip 1 ch, 1 tr in each of the next 2 ch*, repeat from *-* = 58-64-72-82-92 tr, turn the piece. Read all of the following section before continuing! Crochet 1 tr in each tr from pervious row – read Crochet info. Shaping: Insert 2 marking threads MT 15-18-21-25-29 tr in from each side = 28-28-30-32-34 tr between each MT. On next row inc to shape the top by crocheting 2 tr in each of the 2 tr with MT. Repeat the inc on every 2-2-2-3-3 rows a total of 4-4-4-3-3 times – inc inside each MT so that number of sts between the MT increases. At the same time when piece measures 6 cm inc 1 tr each side (crochet 2 tr in the penultimate tr). After all inc are complete = 68-74-82-90-100 tr. When piece measures 16-17-18-19-20 cm cast off for armhole each side – see Casting off tip: 4 tr 1-1-1-1-2 times, 2 tr 1-2-3-4-4 times and 1 tr 1-1-1-2-2 times = 54-56-60-62-64 tr. When piece measures 26-27-28-29-30 cm crochet 1 row on 19-20-21-22-23 tr each side only (do not crochet on the middle 16-16-18-18-18 tr = neckline). Now cast off each side towards neckline – see Casting off tip: 2 tr 2 times and 1 tr 3 times = 12-13-14-15-16 tr left on each shoulder. Cut the thread when piece measures 43-45-47-49-51 cm. Back piece: Crochet like front piece = 58-64-72-82-92 sts after first row. NB! No shaping in the middle of back piece. On second row inc 1 tr each side (crochet 2 tr in the penultimate tr) and repeat the inc on every other row a total of 5-5-5-4-4 times = 68-74-82-90-100 tr. When piece measures 16-17-18-19-20 cm cast off for armhole each side as described for front piece = 54-56-60-62-64 tr. When piece measures 31-33-35-37-39 cm crochet 1 row on 13-14-15-16-17 tr each side only (do not crochet on the middle 28-28-30-30-30 tr = neckline). Cast off 1 tr each side towards neckline – see Casting off tip =12-13-14-15-16 tr left on each shoulder. Cut the thread when piece measures 43-45-47-49-51 cm. Assembly: Sew shoulder seams in the outer loops with neat sts. Sew side seams in the same way. Mussel shaped border: Crochet a border along bottom edge with crochet hook size 4 mm as follows: Round 1: crochet 120-130-150-170-190 dc round bottom edge of front and back piece, i.e. 1 dc in each tr, but crochet 2 dc in 4-2-6-6-6 tr evenly distributed. Finish round with a sl st in first dc from beg of round. Round 2: 1 ch, 1 dc in first dc, *5 ch, skip 3 dc, 1 dc in next dc, 7 ch, skip 5 dc, 1 dc in next dc*, repeat from *-* a total of 12-13-15-17-19 times, but replace the last dc with a sl st in the first dc from beg of round (= 12-13-15-17-19 large ch-loops + 12-13-15-17-19 small ch-loops). Round 3: Crochet sl sts to the middle of the first small ch-loop, 1 dc in the same small ch-loop, *10 tr in next ch-loop (large ch-loop), 1 dc in next ch-loop (small ch-loop)*, repeat from *-* a total of 11-12-14-16-18 times and finish with 10 tr in the last ch-loop and a sl st in the first dc from beg of round. Round 4: 1 sl st in between the first 2 tr in the tr-group, 4 ch (= 1 tr + 1 ch), *1 tr in between the next 2 tr in the tr-group, 1 ch*, repeat from *-* a total of 8 times (= 9 tr in the tr group). Repeat in all the tr-groups on row and finish with a sl st in 3rd ch from beg of round. Round 5: 1 picot = 3 ch, 1 sl st in 3rd ch from crochet hook. *1 dc in first ch, 1 dc in next ch, (1 picot, 1 dc in next ch, 1 dc in next ch), repeat from (-) a total of 3 times, 1 dc in between tr-groups*, repeat from *-* a total of 12-13-15-17-19 times and finish with a sl st in first dc from beg of round. Crochet a similar border in the 10th row from bottom edge (after all inc. are completed). Crochet the same way as bottom edge. Beg with Round 2 (don’t crochet Round 1). Because of the increased no of tr the number of repeats are as follows: Round 2: repeat from *-* a total of 14-15-17-18-20 times (= 14-15-17-18-20 large ch-loops + 14-15-17-18-20 small ch-loops. NB! No of tr on top do not fit the border pattern. Compensate for this by skipping 4 tr instead of 5 tr 4-2-6-0-0 times evenly distributed on round. Round 3: Repeat from *-* a total of 13-14-16-17-19 times. Round 4: Same as border along bottom edge. Round 5: Repeat from *-* a total of 14-15-17-18-20 times. Crochet border: Crochet a border round armholes and neckline as follows: 1 dc in the first tr, 1 dc in next tr, *1 picot, 1 dc in next tr, 1 dc in next tr*, repeat from *-* and finish round with a sl st in first dc. |
|

|
|
|
Have you made this or any other of our designs? Tag your pictures in social media with #dropsdesign so we can see them! Do you need help with this pattern?You'll find tutorial videos, a Comments/Questions area and more by visiting the pattern on garnstudio.com. © 1982-2024 DROPS Design A/S. We reserve all rights. This document, including all its sub-sections, has copyrights. Read more about what you can do with our patterns at the bottom of each pattern on our site. |
|


With over 40 years in knitting and crochet design, DROPS Design offers one of the most extensive collections of free patterns on the internet - translated to 17 languages. As of today we count 304 catalogues and 11422 patterns - 11422 of which are translated into English (UK/cm).
We work hard to bring you the best knitting and crochet have to offer, inspiration and advice as well as great quality yarns at incredible prices! Would you like to use our patterns for other than personal use? You can read what you are allowed to do in the Copyright text at the bottom of all our patterns. Happy crafting!
Comments / Questions (38)
Vorrei sapere se dopo la prima riga del lavoro occorre lasciare sempre una catenella dopo le due maglie alte oppure se bisogna lavorare solo le maglie alte. Grazie
05.08.2017 - 17:27DROPS Design answered:
Buonasera Maria Lucia. Dopo la prima riga lavora 1 maglia alta in ogni maglia della riga precedente, senza nessuna catenella. Buon lavoro!
05.08.2017 - 22:47Buon giorno. Non ho capito.come iniziare bordo inferiore..130.m.b. sul davanti e sul dietro ma poi parla di fare 2 m.basse per due volte _ taglia m _ ma quando ? Quindi alla fine del giro si avranno 262 m.basse? Grazie e cordiali saluti laura
22.07.2017 - 14:02DROPS Design answered:
Buongiorno Laura. Quando inizia il bordo deve lavorare 1 maglia bassa in ogni maglia alta della prima riga del davanti/dietro, ma solo in due maglie alte a sua scelta (p.es nella maglia alta ai lati) deve lavorare 2 maglie basse e non una. In tutto devono esserci 130 maglie basse, per la taglia M. Buon lavoro!
22.07.2017 - 14:14Buon giorno. Una domanda. Per cucire le.spalle e i lati si fa sul rovescio e con ago prendendo un punto a sx e uno a dx e poi tornando a sx e a dx e così via? Grazie e cordiali saluti laura
21.07.2017 - 07:21DROPS Design answered:
Buongiorno Laura. Sì, si unisce con l'ago. L'importante è che la parte più spessa della cucitura sia sul rovescio del lavoro. Può eventualmente guardare anche questo video. Buon lavoro!
21.07.2017 - 08:30Buon giorno. Non ho capito bene le diminuxioni. Arrivata a 17 cm devo fare 4 diminuzioni per ogni lato 1 volta..Quindi tutte insieme e poi proseguire al ritorno altre 2 maglie x lato e poi al terzo giro un altra maglia x lato..e corretto?Grazie!Laura
16.07.2017 - 15:16DROPS Design answered:
Buongiorno Laura. Per la taglia M, le diminuzioni sono, per ogni lato: 4 maglie una volta, 2 maglie due volte e 1 maglia una volta. Buon lavoro!
16.07.2017 - 16:20Vraag patroon 99-15. Ik haak deze in maat xxl. In de omschrijving van de 2e rand (in de 10e toer) staat bij toer 2 het volgende: "Het aantal stk van deze toer van de panden komt niet overeen met het aantal van de golfjesrand. Compenseer dit als volgt: sla 4 stk over i.p.v. 5 stk 0 keer" Mijn maat, onderrand 190 steken, de beide panden 200. Volgens jullie beschrijving moet ik 0x (?) de 5 stk vervangen door 4 stk maar met 0x verandert er niets. Wat doe ik verkeerd?
09.06.2017 - 19:15DROPS Design answered:
Hallo Ruby, In jouw maat inderdaad nul keer en hoef je dus niets te doen. (Bij de maten waar wel een getal staat moet het aantal wel gecompenseerd worden). Veel haakplezier!
12.06.2017 - 16:02Hej,jag förstår inte hur jag ska tolka ökningarna. Varv två förstog jag men inte resten. Ska jag sätta markering varje ökningsvarv och i vilken stolpe ska ökningen göras innanför markeringarna?
23.08.2016 - 19:37DROPS Design answered:
Hej Maria. Du öker 2 st i de 2 st med merketråd i. Du lader markeringen fölge med op saa du hele tiden öker i samme st. Du gentager ökningen i hver 2. rad totalt 4-4-4-3-3 ganger
07.09.2016 - 14:05Ik kom steeds op 44 stokjes I.v.p 58 wat doenlijk fout
08.06.2016 - 10:01DROPS Design answered:
Hoi Ineke. Sla je misschien te veel lossen over? Je begint met 88 l en haakt: 1 stk in de 4e l vanaf de haaknld, *sla 1 l over, 1 stk in elk van de volgende 2 l* = 1 stk in 4e l = 2 stk, 84 l / 3 st (1 l overslaan, 2 stk) = 28 keer 2 stk = 56+2 = 58
08.06.2016 - 16:06Bonjour Y a-t-il ne erreur dans les explications j'ai commencé ce modèle en taille S et j'ai 47cm en largeur au lieu des 40cm des explications .
08.06.2015 - 16:14DROPS Design answered:
Bonjour Mme Broux, pensez à bien vérifier et conserver la tension indiquée (17 B = 10 cm) pour avoir 54 B = 34 cm en bas du top et 68 B = 40 cm avant les emmanchures. Bon crochet!
08.06.2015 - 16:42Heb een vraag oven patroon 99-15 Er staan op een gegeven moment herhaal deze meerdering elke 2 toeren 4x bedoelen ze dan om de toer? Als ik de foto inzoem is het van de onderkant naar de rand van de oksel 17 toeren moet ik dat aan houden of moet ik niet naar het plaatje kijken? En gewoon het patroon op papier volgen?
10.04.2014 - 12:37DROPS Design answered:
Hoi Dieneke. Ja, elke 2 toeren is hetzelfde als om de toer (elke 2e toer). En volg het patroon op papier. Het kan zijn dat het model op de foto een andere maat draagt dan wat je maakt - veel plezier mee.
10.04.2014 - 14:37Martina Lehner wrote:
Ich habe gerade angefangen, das Top zu haekeln, bin jedoch sofort auf ein Problem gestossen, ich habe 88 LF gehaekelt und nach der ersten Reihe habe ich 44 Staebchen, das Muster spricht aber von 58 Staebchen, was habe ich da falsch gemacht? Danke fuer Ihre Hilfe. Ich habe seit langer Zeit mal wieder mit Haekeln angefangen und mit den Anleitungen hatte ich schon immer Probleme. Sorry! Viele Gruesse
18.07.2013 - 23:56DROPS Design answered:
Liebe Martina, wie es klingt haben Sie die 1. R nicht richtig gearbeitet. man überspringt nicht jede 2. sondern jede 3. Masche: "* 1 Lm überspringen, 1 Stb in jede der 2 nächsten Lm *"
19.07.2013 - 08:27