DROPS Alpaca
DROPS Alpaca
100% Alpaca
from 4.85 $ /50g
DROPS Kid-Silk
DROPS Kid-Silk
75% Mohair, 25% Silk
from 6.75 $ /25g
Get the yarn to make this pattern from 46.40$.

The yarn cost is calculated from the pattern’s smallest size and the yarn’s cheapest product type. Looking for an even better price? You might find it on the DROPS Deals!

DROPS SS24

Provence Purple Cardigan

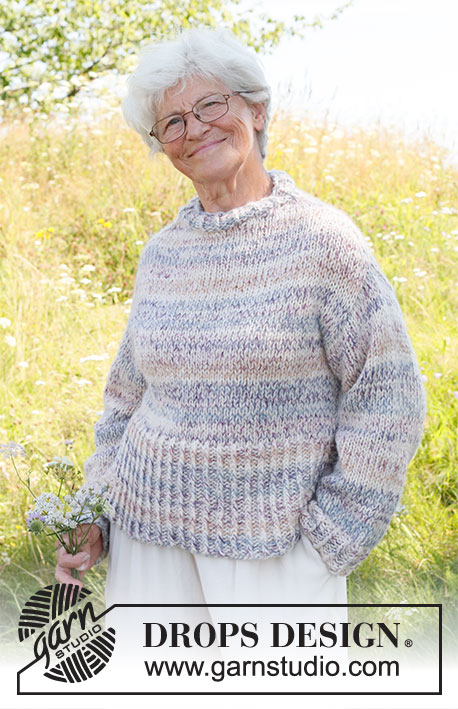
Knitted jacket in DROPS Alpaca and DROPS Kid-Silk. The piece is worked bottom up, with short sleeves and double neck. Sizes S - XXXL.

DROPS 232-52
DROPS Design: Pattern z-959
Yarn group A + A or C
-------------------------------------------------------

SIZES:
S - M - L - XL - XXL – XXXL

Finished measurements:
Chest measurements: 88-96-104-112-128-138 cm = 34⅝"-37¾"-41"-44"-50⅜"-54¼"
Full length: 48-50-52-54-56-58 cm = 19"-19¾"-20½"-21¼"-22"-22¾"
All measurements in charts are in cm.

DROPS ALPACA from Garnstudio (belongs to yarn group A)
200-250-250-300-300-350 g color 4010, light lavender
And use:
DROPS KID-SILK from Garnstudio (belongs to yarn group A)
100-100-100-125-125-150 g color 09, light lavender

DROPS BUTTONS NO 609: 5 items in all sizes

NEEDLES:
DROPS CIRCULAR NEEDLE SIZE 5 MM = US 8: Length 40 cm = 16" and 80 cm = 32".
DROPS CIRCULAR NEEDLE SIZE 4 MM = US 6: Length 80 cm = 32".
DROPS DOUBLE POINTED NEEDLES SIZE 5 MM = US 8.
DROPS DOUBLE POINTED NEEDLES SIZE 4 MM = US 6.
DROPS CABLE NEEDLE – for cables.
The technique MAGIC LOOP can be used – you then only need circular needle of 80 cm = 32" in each size.

KNITTING GAUGE:
17 stitches in width and 22 rows in height with stockinette stitch and 1 strand of each quality = 10 x 10 cm = 4" x 4".
NOTE: Needle size is only a guide. If you get too many stitches on 10 cm = 4", change to a larger needle size. If you get too few stitches on 10 cm = 4", change to a smaller needle size.

-------------------------------------------------------

Alternative Yarn – See how to change yarns here
Yarn Groups A to F – Use the same pattern and change the yarn here
Yarn usage using an alternative yarn – Use our yarn converter here

-------------------------------------------------------

DROPS Alpaca
DROPS Alpaca
100% Alpaca
from 4.85 $ /50g
DROPS Kid-Silk
DROPS Kid-Silk
75% Mohair, 25% Silk
from 6.75 $ /25g
Get the yarn to make this pattern from 46.40$.

The yarn cost is calculated from the pattern’s smallest size and the yarn’s cheapest product type. Looking for an even better price? You might find it on the DROPS Deals!

Pattern instructions

NOTE: This pattern is written in American English. All measurements in charts are in cm. For conversion from inches to cm - click here. There are different terms for crocheting in American and British English. If this pattern includes crochet, click for "crochet terms" here. For this pattern in British English, please click here.
-------------------------------------------------------

EXPLANATIONS FOR THE PATTERN:

-------------------------------------------------------

RIDGE/GARTER STITCH (worked back and forth):
Knit all rows.
1 ridge = knit 2 rows.

PATTERN:
See diagrams A.1 to A.4. The diagrams show all rows in the pattern from the right side.

BUTTONHOLES:
Work the buttonholes on the right band. 1 BUTTONHOLE = knit together the 3rd and 4th stitch from the edge and make 1 yarn over. On the next row knit the yarn over to leave a hole.
Work the buttonholes when the piece measures:
S: 10, 17, 25, 33 and 41 cm = 4", 6¾", 9¾", 13" and 16⅛"
M: 10, 18, 26, 34 and 43 cm = 4", 7", 10¼", 13⅜" and 17"
L: 10, 18, 26, 35 and 44 cm = 4", 7", 10¼", 13¾" and 17¼"
XL: 10, 19, 28, 37 and 46 cm = 4", 7½", 11", 14½" and 18"
XXL: 10, 19, 28, 37 and 47 cm = 4", 7½", 11", 14½" and 18½"
XXXL: 10, 19, 29, 39 and 49 cm = 4", 7½", 11⅜", 15¼" and 19¼"

DECREASE TIP (armholes and neck):
Decrease inside 2 stitches:
At the end of each row from the right side:
Work until there are 4 stitches left, knit 2 together, 1 stockinette stitch and 1 garter stitch.
At the beginning of each row from the right side:
1 garter stitch, 1 stockinette stitch, slip 1 stitch as if to knit, knit 1 and pass the slipped stitch over the knitted stitch, work to the end of the row as before.

INCREASE TIP (sleeves):
Work until there is 1 stitch left before the marker, 1 yarn over, knit 2 (marker sits between these 2 stitches), 1 yarn over. On the next round knit the yarn overs twisted to avoid holes. Then work the new stitches in stockinette stitch.

-------------------------------------------------------

START THE PIECE HERE:

-------------------------------------------------------

JACKET – SHORT OVERVIEW OF THE PIECE:
The piece is worked back and forth with circular needle, bottom up as far as the armholes, then divided and the front and back pieces finished separately. The sleeves are worked bottom up in the round, with double pointed needles/short circular needle as far as the sleeve cap and finished back and forth.
JACKET:
Cast on 299-327-355-383-425-453 stitches with circular needle size 4 MM = US 6 and 1 strand DROPS Alpaca and 1 strand DROPS Kid-Silk. Purl 1 row from the wrong side, then work as follows from the right side: 5 band stitches in GARTER STITCH – read description above, * knit 2, purl 5 *, work from *-* until there are 7 stitches left, knit 2 and 5 band stitches in garter stitch. Continue this rib for 3 cm = 1⅛". Decrease 1 stitch in each purled section by purling the first 2 stitches together (from the right side). Repeat this decrease when the rib measures 4 cm = 1½", but now purling together the last 2 stitches in each purled section = 217-237-257-277-307-327 stitches.
Work as follows from the right side: 5 band stitches in garter stitch, A.1A, 20-22-24-26-29-31 times, A.1B and 5 band stitches in garter stitch. When A.1 is finished in height there are 175-191-207-223-247-263 stitches and the piece measures approx. 9 cm = 3½". Purl 1 row from the wrong side where you decrease 17-17-21-21-21-17 stitches evenly spaced (do not decrease over the bands) = 158-174-186-202-226-246 stitches. REMEMBER THE BUTTONHOLES – see description above. Work A.2 over all stitches(bands knitted) – on the 7 th row in A.2, work as follows from right side: 5 band stitches in garter stich, knit 1-1-1-0-0-1, repeat A.2 until it remains 5-6-6-5-5-6 stitches, knit 0-1-1-0-0-1 stitches and 5 band stitches in garter stitch.
Change to circular needle size 5 MM = US 8 and continue with stockinette stitch and 5 band stitches in garter stitch on each side.
REMEMBER THE KNITTING GAUGE.
When the piece measures 29-30-31-32-33-34 cm = 11⅜"-11¾"-12¼"-12½"-13"-13⅜", bind off for the armholes on the next row as follows: Work 39-43-46-50-56-61 stitches, bind off 6 stitches, work 68-76-82-90-102-112 stitches, bind off 6 stitches, work the last 39-43-46-50-56-61 stitches. Each section is finished separately. Place the first and last 39-43-46-50-56-61 stitches on a thread and work the back piece over the remaining 68-76-82-90-102-112 stitches.

BACK PIECE:
= 68-76-82-90-102-112 stitches. Continue with stockinette stitch, AT THE SAME TIME decrease for the armholes on each side – read DECREASE TIP: 1 stitch 2-4-5-8-12-15 times = 64-68-72-74-78-82 stitches. When the piece measures 45-47-49-51-53-55 cm = 17¾"-18½"-19¼"-20"-21"-21⅝", bind off the middle 24-26-28-30-32-34 stitches for the neck and finish each shoulder separately. Then bind off 1 stitch on the next row from the neck = 19-20-21-21-22-23 stitches. Continue with stockinette stitch until the piece measures 48-50-52-54-56-58 cm = 19"-19¾"-20½"-21¼"-22"-22¾" (armhole = 19-20-21-22-23-24 cm = 7½"-8"-8¼"-8¾"-9"-9½"), bind off. Work the other shoulder in the same way.

RIGHT FRONT PIECE:
Place the first 39-43-46-50-56-61 stitches back on circular needle size 5 MM = US 8. Continue with stockinette stitch and 5 band stitches in garter stitch mid-front and decrease for the armhole in the side – remember DECREASE TIP: 1 stitch 2-4-5-8-12-15 times = 37-39-41-42-44-46 stitches. When the piece measures 42-44-45-47-48-50 cm = 16½"-17¼"-17¾"-18½"-19"-19¾", place the 14-15-16-17-18-19 stitches mid-front on a thread for the neck. Then decrease 1 stitch 4 times by the neck every 2nd row – remember DECREASE TIP = 19-20-21-21-22-23 stitches on the shoulder. Continue with stockinette stitch until the piece measures 48-50-52-54-56-58 cm = 19"-19¾"-20½"-21¼"-22"-22¾" (armhole = 19-20-21-22-23-24 cm = 7½"-8"-8¼"-8¾"-9"-9½"). Bind off.
LEFT FRONT PIECE:
Place the last 39-43-46-50-56-61 stitches back on circular needle size 5 MM = US 8. Continue with stockinette stitch and 5 band stitches in garter stitch mid-front and decrease for the armhole in the side – remember DECREASE TIP: 1 stitch 2-4-5-8-12-15 times = 37-39-41-42-44-46 stitches. When the piece measures 42-44-45-47-48-50 cm = 16½"-17¼"-17¾"-18½"-19"-19¾", place the 14-15-16-17-18-19 stitches mid-front on a thread for the neck. Then decrease 1 stitch 4 times by the neck, every 2nd row – remember DECREASE TIP = 19-20-21-21-22-23 stitches on the shoulder. Continue with stockinette stitch until the piece measures 48-50-52-54-56-58 cm = 19"-19¾"-20½"-21¼"-22"-22¾" (armhole = 19-20-21-22-23-24 cm = 7½"-8"-8¼"-8¾"-9"-9½"). Bind off.
SLEEVES:
Cast on 44-46-48-50-52-54 stitches with double pointed needles size 4 MM = US 6 and 1 strand DROPS Alpaca and 1 strand DROPS Kid-Silk (= 2 strands). Work A.3 in the round. When A.3 is finished in height continue with stockinette stitch, AT THE SAME TIME on the first round increase 8 stitches evenly spaced = 52-54-56-58-60-62 stitches. Change to double pointed needles size 5 MM = US 8. Insert 1 marker at the beginning of the round = mid-under sleeve. When the sleeve measures 6 cm = 2⅜" (measured from the folding edge), increase 1 stitch on each side of the marker – read INCREASE TIP. Increase like this every 10-6-4-3-1½-1 cm = 4"-2⅜"-1½"-1⅛"-½"-⅜" a total of 2-3-4-6-7-9 times = 56-60-64-70-74-80 stitches. When the piece measures 21-20-20-20-19-17 cm = 8¼"-8"-8"-8"-7½"-6¾", bind off 3 stitches on each side of the marker (6 stitches bind off), then finish the sleeve-cap back and forth. Bind off at the beginning of each row as follows: 2 stitches 3-3-3-3-3-4 times and 1 stitch 1-2-2-2-3-3 times on each side. Then bind off 2 stitches on each side until the sleeve measures 28 cm = 11" in all sizes, 3 stitches 1 time on each side and bind off the remaining stitches. The sleeve measures 29 cm = 11⅜" in all sizes. Work the other sleeve in the same way.

ASSEMBLY:
Sew the shoulder seams. Sew in the sleeves. Sew the buttons onto the left band.

NECK:
Start from the right side and knit up 76 to 106 stitches (including the stitches on the threads and divisible by 2) using 1 strand DROPS Alpaca and 1 strand DROPS Kid-Silk and circular needle size 4 MM = US 6. Knit 1 row from the wrong side, knit 1 row from the right side and knit 1 row from the wrong side. Then work as follows:
ROW 1 (right side): 1 edge stitch in garter stitch, knit until there is 1 stitch left, 1 edge stitch in garter stitch.
ROW 2 (wrong side): 1 edge stitch in garter stitch, A.4 until there is 1 stitch left, 1 edge stitch in garter stitch.
Work A.4 1 time in height. Then purl 1 row from the wrong side with 1 edge stitch in garter stitch on each side. Bind off a little loosely. Fold the neck double to the wrong side, at the folding edge in A.4 and sew down to the top ridge.

This pattern has been corrected.

Updated online: 04.04.2022
Correction 7th symbol: = place 2 stitches on cable needle in front of piece, purl 1, knit 2, knit 2 from cable needle

Diagram

All measurements in charts are in cm.

symbols = knit from right side, purl from wrong side
symbols = purl from right side, knit from wrong side
symbols = 1 yarn over between 2 stitches; on the next row knit the yarn over
symbols = knit 2 together
symbols = place 2 stitches on cable needle in front of piece, purl 1, knit 2 from cable needle
symbols = place 1 stitch on cable needle behind the piece, knit 2, purl 1 from cable needle
symbols = place 2 stitches on cable needle in front of piece, purl 1, knit 2, knit 2 from cable needle
symbols = place 2 stitches on cable needle in front of piece, knit 2 together, knit 2 twisted together from cable needle
symbols = work this round as follows: Fold the row of holes (= 4th row in diagram) to the wrong side. Place the first stitch on the cast-on edge outermost on the left needle, knit together the first 2 stitches (first stitch on needle + first stitch from cast-on edge). Place the next stitch from the cast-on edge on the left needle, knit together the first 2 stitches (second stitch on needle + second stitch from cast-on edge). Continue knitting the cast-on edge together with the stitches along the whole row.
symbols = folding edge
diagram
diagram

Each of our patterns has specific tutorial videos to help you.

Do you have a question? See a list of frequently asked questions (FAQ)

Knitting tension is what determines the final measurements of your work, and is usually measured per 10 x 10 cm. It is provided like so: number of stitches in width x number of rows in height - eg: 19 stitches x 26 rows = 10 x 10 cm.

The knitting tension is very individual; some people knit/crochet loosely while others work tightly. You adjust the knitting tension with the needle size, which is why the suggested needle size only serve as a guide! You need to adjust this (up or down) to ensure that YOUR knitting tension matches the knitting tension provided in the pattern. If you work with a different knitting tension than provided you will have a different yarn consumption, and your work will have different measurements than what the pattern suggests.

The knitting tension also determines which yarns can replace each other. As long as you achieve the same knitting tension you can replace one yarn with another.

See DROPS lesson: How to measure your tension/gauge

See DROPS video: How to make a gauge tension swatch

The required amount of yarn is provided in grams, eg: 450 g. To calculate how many balls you’ll need you first need to know how many grams are in 1 ball (25g, 50g or 100g). This information is available if you click on the individual yarn quality on our pages. Divide the amount required with the amount of each ball. For example, if each ball is 50g (the most common amount), the calculation will be as follows: 450 / 50 = 9 balls.

The important thing when changing from one yarn to another is that the knitting/crochet tension remains the same. This is so that the measurements of the finished piece will be the same as on the sketch provided. It is easier to achieve the same knitting tension using yarns from the same yarn group. It is also possible to work with multiple strands of a thinner yarn to achieve the knitting tension of a thicker one. Please try our yarn converter. We recommend you to always work a test swatch.

Please NOTE: when changing yarn the garment might have a different look and feel to the garment in the photo, due to individual properties and qualities of each yarn.

See DROPS lesson: Can I use a different yarn than the one mentioned in the pattern?

All our yarns are categorised into yarn groups (from A to F) according to thickness and knitting tension – group A contains the thinnest yarns and group F the thickest. This makes it easier for you to find alternative yarns to our patterns, should you wish to switch yarn. All yarns within the same group have a similar knitting tension and can easily replace each other. However, different yarn qualities have different structures and properties which will give the finished work a unique look and feel.

Click here for an overview of the yarns in each yarn group

At the top of all our patterns you’ll find a link to our yarn converter, which is a helpful tool should you wish to use a different yarn than suggested. By filling in the yarn quality you wish to replace, the amount (in your size) and number of strands, the converter will present good alternative yarns with the same knitting tension. Additionally it will tell you how much you’ll require in the new qualities and whether you’ll need to work with multiple strands. Most skeins are 50g (some are 25g or 100g).

If the pattern is worked with multiple colours, every colour will have to be converted separately. Similarly, if the pattern is worked with several strands of different yarns (for example 1 strand Alpaca and 1 strand Kid-Silk) you will have to find alternatives for each, individually.

Click here to see our yarn converter

Since different yarns have different qualities and textures we have chosen to keep the original yarn in our patterns. However, you can easily find options among our available qualities by using our yarn converter, or simply pick a yarn from the same yarn group.

It is possible that some retailers still have discontinued yarns in stock, or that someone has a few skeins at home that they would like to find patterns for.

The yarn converter will provide both alternative yarn as well as required amount in the new quality.

If you think it's hard to decide what size to make, it can be a good idea to measure a garment you own already and like the size of. Then you can pick the size by comparing those measures with the ones available in the pattern's size chart.

You'll find the size chart at the bottom of the pattern.

See DROPS lesson: How to read size chart

The needle size provided in the pattern serves only as a guide, the important thing is to follow the knitting tension. And since knitting tension is very individual, you will have to adjust the needle size to ensure that YOUR tension is the same as in the pattern – maybe you’ll have to adjust 1, or even 2 needle sizes, up or down to achieve the correct tension. For this, we recommend that you work test swatches.

Should you work with a different knitting tension than the one provided, the measurements of the finished garment might deviate from the measurement sketch.

See DROPS lesson: How to measure your tension/gauge

See DROPS video: How to make a gauge tension swatch

Working a garment top-down provides more flexibility and room for personal adjustment. For example it is easier to try the garment on while working, as well as making adjustments to length of yoke and shoulder caps.

The instructions are carefully explaining every step, in the correct order. Diagrams are adjusted to the knitting direction and are worked as usual.

The diagram depicts all rows/rounds, and every stitch seen from the right side. It is read from bottom to top, from right to left. 1 square = 1 stitch.

When working back and forth, every other row is worked from the right side and every other row is worked from the wrong side. When working from the wrong side, the diagram will have to be worked reversed: from left to right, knit stitches are purled, purl stitches are knit etc.

When working in the round every round is worked from the right side and the diagram are worked from right to left on all rounds.

See DROPS lesson: How to read knitting diagrams

The diagram depicts all rows/rounds, and every stitch seen from the right side. It is worked from bottom to top, from right to left.

When working back and forth every other row is worked from the right side: from right to left and every other row is worked from the wrong side: from left to right.

When working in the round, every row in the diagram are worked from the right side, from right to left.

When working a circular diagram you start in the middle and work your way outwards, counter clockwise, row by row.

The rows usually start with a given number of chain stitches (equivalent to the height of the following stitch), this will either be depicted in the diagram or explained in the pattern.

See DROPS lesson: How to read crochet diagrams

Instructions for working several diagrams after each other on the same row/round, will often be written like so: “work A.1, A.2, A.3 a total of 0-0-2-3-4 times". This means you work A.1 once, then A.2 is worked once, and A.3 is repeated (in width) the number of times provided for your size – in this case like so: S = 0 times, M = 0 times, L=2 times, XL= 3 times and XXL = 4 times.

The diagrams are worked as usual: begin with the first row in A.1, then work the first row in A.2 etc.

See DROPS lesson: How to read knitting diagrams

See DROPS lesson: How to read crochet diagrams

The total width of the garment (from wrist-to-wrist) will be larger in the larger sizes, despite the actual sleeves being shorter. The larger sizes have longer sleeve caps and wider shoulders, so there will be a good fit in all sizes.

The measurement sketch/schematic drawing provides information regarding the full length of the garment. If it’s a jumper or a jacket the length is measured from the highest point on the shoulder (usually closest to the neckline), and straight down to the bottom of the garment. It is NOT measured from the tip of shoulder. Similarly, the length of yoke is measured from the highest point on the shoulder and down to where yoke is split into body and sleeves.

See DROPS lesson: How to read a schematic drawing

Diagrams are often repeated on the round or in height. 1 repeat is the diagram the way it appears in the pattern. If it says to work 5 repeats of A.1 in the round, then you work A.1 a total of 5 times after/next to each other in the round. If it says to work 2 repeats of A.1 vertically/in height you work the entire diagram once, then begin again at the start and work the entire diagram one more time.

Chain stitches are slightly narrower than other stitches and to avoid working the cast-on edge too tight, we simply chain more stitches to begin with. The stitch count will be adjusted on the following row to fit the pattern and measurement sketch.

The rib edge is more elastic and will contract slightly compared to, for example, stocking stitch. By increasing before the rib edge, you avoid a visible difference in width between the rib edge and the rest of the body.

It’s very easy to cast off too tightly, and by making yarn overs while casting off (and simultaneously casting these off) you avoid a too tight cast off edge.

See DROPS video: How to bind off with yarn overs (yo)

To achieve an even increase (or decrease) you can increase on, for example: every 3rd and 4th row alternately, like so: work 2 rows and increase on the 3rd row, work 3 rows and increase on the 4th. Repeat this until the increase is complete.

See DROPS lesson: Increase or decrease 1 st on every 3rd and 4th row alternately

Should you prefer to work in the round instead of back and forth, you may of course adjust the pattern. You’ll need to add steeks mid-front (usually 5 stitches), and follow the instructions. When you would normally turn and work from the wrong side, simply work across the steek and continue in the round. At the end you’ll cut the piece open, pick up stitches to work bands, and cover the cut edges.

See DROPS video: How to knit steeks and cut open

Should you prefer to work back and forth instead of in the round, you may of course adjust the pattern so you work the pieces separately and then assemble them at the end. Divide the stitches for the body in 2, add 1 edge stitch in each side (for sewing) and work the front and back pieces separately.

See DROPS lesson: Can I adapt a pattern for circular needles into straight needles?

Pattern repeats can vary slightly in the different sizes, in order to get the correct proportions. If you’re not working the exact same size as the garment in the photo, yours might deviate slightly. This has been carefully developed and adjusted so that the complete impression of the garment is the same in all sizes.

Make sure to follow instructions and diagrams for your size!

If you have found a pattern you like which is available in women’s size it’s not very difficult to convert it to men’s size. The biggest difference will be the length of sleeves and body. Start working on the women size that you think would fit across the chest. The additional length will be worked right before you cast off for the armhole/sleeve cap. If the pattern is worked top-down you can add the length right after the armhole or before the first decrease on sleeve.

Regarding additional yarn amount, this will depend on how much length you add, but it is better with a skein too many than too few.

All yarns will have excess fibres (from production) that might come off as lint or shedding. Brushed yarns (ie hairier yarns) have more of these loose, excess fibres, causing more shedding.

Shedding also depends on what is worn under or over the garment, and whether this pulls at the yarn fibres. It’s therefore not possible to guarantee that there will be no shedding

Below are some tips on how to get the best result when working with hairier yarns:

1. When the garment is finished (before you wash it) shake it vigorously so the looser hairs come off. NOTE: do NOT use a lint roller, brush or any method that pulls at the yarn.

2. Place the garment in a plastic bag and put it in your freezer - the temperature will cause the fibres to become less attached to each other, and excess fibres will come off easier.

3. Leave in the freezer for a few hours before taking it out and shaking it again.

4. Wash the garment according to the instructions on the yarn label.

Pilling is a natural process that happens to even the most exclusive of fibers. It's a natural sign of wear and tear that is hard to avoid, and that is most visible in high friction areas of your garment like a sweater's arms and cuffs.

You can make your garment look as new by removing the pilling, using a fabric comb or a pill/lint remover.

Still can't find the answer you need? Then scroll down and leave your question so one of our experts can try to help you. This will be done normally within 5 to 10 working days.
In the meantime, you can read the questions and answers that others have left to this pattern or join the DROPS Workshop on Facebook to get help from fellow knitters/crocheters!

You might also like...

Post a comment to pattern DROPS 232-52

We would love to hear what you have to say about this pattern!

If you want to leave a question, please make sure you select the correct category in the form below, to speed up the answering process. Required fields are marked *.

Comments / Questions (10)

country flag Ramona wrote:

Guten Tag, ich möchte diese zauberhafte Jacke bzw. den Pullover mit einer anderen Wolle stricken, für die ich Nadeln in der Stärke drei benötige - Baunwollgarn von Drops. Wie kann ich das Ganze umrechnen, denn Teile mit kurzen Ärmeln kann ich im Winter nicht tragen. Und diese Wolle ist mir im Sommer viel zu warm. Ich lebe im Süden Europas ..... Hoffentlich können Si Emir helfen. (Maschenprobe bei Nadelstärke 3 sind 24 Maschen in der Breite.)

04.01.2023 - 11:10

DROPS Design answered:

Liebe Ramona, leider können wir nicht jede Anleitung nach jeder Anfrage bzw jeder Maschenprobe umrechnen, aber hier finden Sie alle Jacken mit 25-23 Maschen für 10 cm - davon können Sie sich sicher inspirieren. Viel Spaß beim stricken!

04.01.2023 - 14:03

country flag Guillaumond wrote:

Ne tenez pas compte de ma question, je viens de comprendre mon erreur. Désolé

26.09.2022 - 16:01

country flag Guillaumond wrote:

Je me demande s'il n y a pas une erreur dans les explications, car sur la partie diminution emmanchure on tricote 39 mailles , on rabat 6m, on tricote 68 mailles on rabat 6 mailles et on tricote les 39 mailles finales, le problème pour les explications suivantes on se retrouve avec le même nombres de mailles 39 m 68 m 39 mailles où sont passé les 12 mailles diminuées ?

26.09.2022 - 15:51

country flag Sandra wrote:

In the diagram instructions there is a * after the last instruction then a left arrow folding line. I think this instruction should not be in this pattern.

06.06.2022 - 15:39

DROPS Design answered:

Dear Sandra, when you work A.3 on the sleeve edge, you will work this row together with the stitches on cast on edge, see diagram key to the 8th symbol. Happy knitting!

07.06.2022 - 10:33

country flag Carole wrote:

Après avoir effectuer A.1A etA.1B, il devrait rester 191m en gr. M Les diminutions se font au 11e rang pour les 2 diagrammes, ma question les 2 m qui étaient en attente sur l’aiguille à torsade doit-on aussi les tricoter ENSEMBLES torse? Sinon où se fait l’autre diminution ? Merci de votre aide

06.06.2022 - 04:17

DROPS Design answered:

Bonjour Carole, tout à fait, vous diminuez 2 mailles dans chacune des torsades; glissez 2 mailles sur l'aiguille à torsades devant l'ouvrage, tricotez 2 mailles ensemble torse à l'endroit (= on diminue 1 m), reprenez les 2 mailles sur l'aiguille à torsades et tricotez-les ensemble torse à l'endroit (mention ajoutée de suite, merci pour votre retour). Bon tricot!

07.06.2022 - 09:48

country flag Kerry Hullett wrote:

I believe the seventh symbol on your list is incorrect. It is worked over five stitches but only accounts for three stitches

03.04.2022 - 17:06

DROPS Design answered:

Dear Mrs Hullett, thanks for your feedback, diagram text has been fixed. Happy knitting!

04.04.2022 - 10:54

country flag Birgitte Graven wrote:

Hurra! I viser præcis de billeder, der skal til, for at man får det bedste indtryk af det strikkede. Man ser det forfra, fra siden og fra ryggen. Masser det på en ung slank model og en ældre, som er mere fyldig. Der er nærbillede af mønstret. Det er super. Kan ikke gøres bedre. Gør gerne det noget mere. Det er meget bedre end alle de strikketøjer, hvor I viser flere næsten identiske billeder som regel skråt forfra.

30.03.2022 - 15:34

country flag Gabriele wrote:

Wunderschön! Die Jacke wird auf alle Fälle genadelt!

20.02.2022 - 10:39

country flag Josephine wrote:

Lilac lady

18.01.2022 - 19:36

country flag Au Fil De Lau wrote:

Sans chichis

17.01.2022 - 14:14