DROPS Alpaca Bouclé
DROPS Alpaca Bouclé
80% Alpaca, 15% Wool, 5% Polyamide
from 3.85 € /50g
DROPS Kid-Silk
DROPS Kid-Silk
75% Mohair, 25% Silk
from 5.05 € /25g
Get the yarn to make this pattern from 43.30€.

The yarn cost is calculated from the pattern’s smallest size and the yarn’s cheapest product type. Looking for an even better price? You might find it on the DROPS Deals!

DROPS SS24

Mist Cover

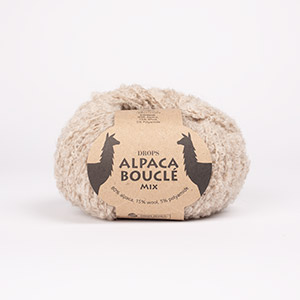
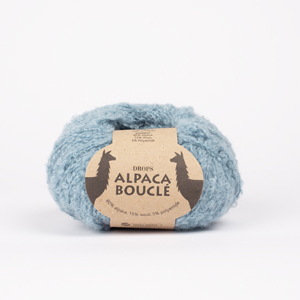
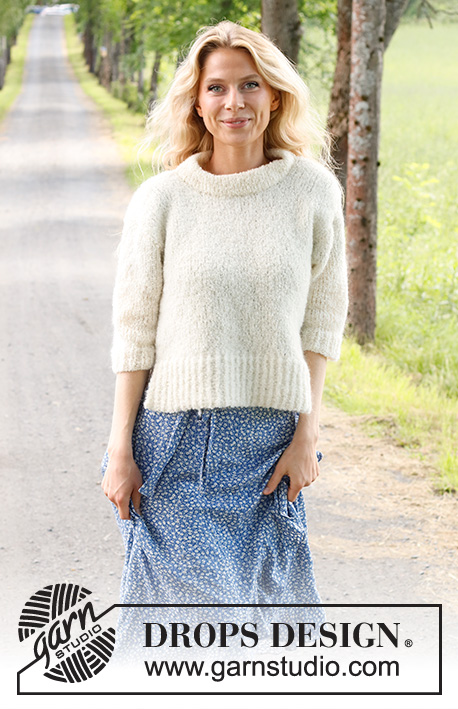
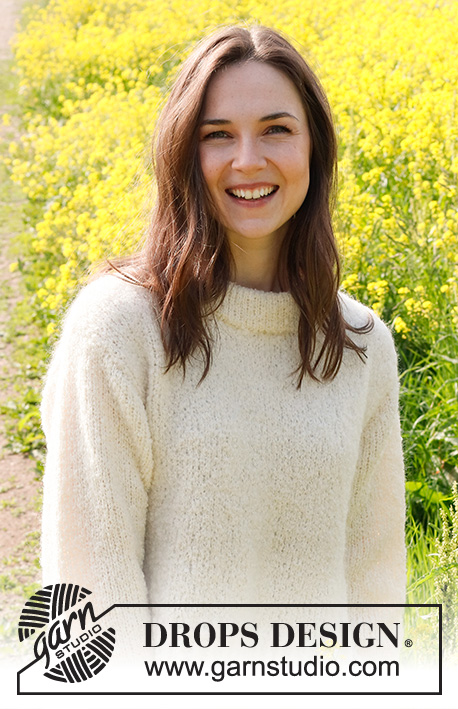
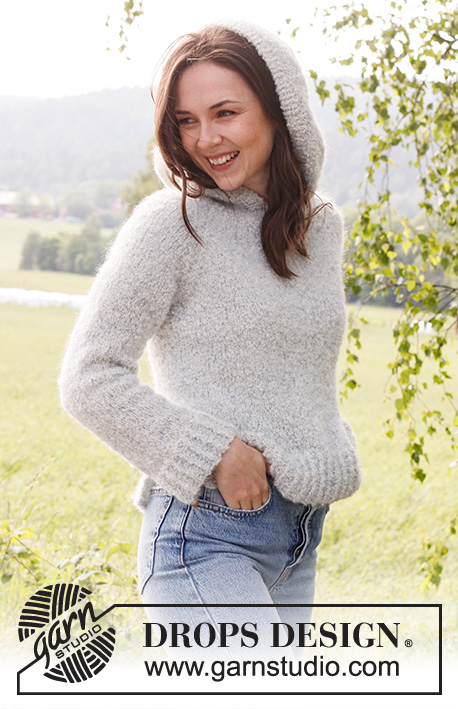
Knitted jumper in DROPS Alpaca Bouclé and DROPS Kid-Silk. Piece is knitted bottom up, in stocking stitch with raglan, hood and vents in the sides. Size: S - XXXL

DROPS 230-5
DROPS design: Pattern ab-126
Yarn group C and A
----------------------------------------------------------

SIZE:
S - M - L - XL - XXL - XXXL

MATERIALS:
DROPS ALPACA BOUCLÉ from Garnstudio (belongs to yarn group C)
300-350-400-400-450-500 g colour 100, off white
And use:
DROPS KID-SILK from Garnstudio (belongs to yarn group A)
100-125-125-150-150-175 g colour 08, light jeans blue

NEEDLES:
DROPS CIRCULAR NEEDLE SIZE 6 mm: Length 40 and 80 cm.
DROPS CIRCULAR NEEDLE SIZE 4.5 mm: Length: 80 cm
DROPS DOUBLE POINTED NEEDLES SIZE 6 mm
DROPS DOUBLE POINTED NEEDLES SIZE 4.5 mm
The technique MAGIC LOOP can be used – you then only need circular needle of 80 cm in each size.

KNITTING TENSION:
14 stitches in width and 16 rows vertically in stocking stitch and 1 strand of each quality = 10 x 10 cm.
NOTE! Remember that needle size is only a suggestion. If you have too many stitches on 10 cm switch to larger needles. If you have too few stitches on 10 cm switch to smaller needles.

-------------------------------------------------------

Alternative Yarn – See how to change yarns here
Yarn Groups A to F – Use the same pattern and change the yarn here
Yarn usage using an alternative yarn – Use our yarn converter here

-------------------------------------------------------

DROPS Alpaca Bouclé
DROPS Alpaca Bouclé
80% Alpaca, 15% Wool, 5% Polyamide
from 3.85 € /50g
DROPS Kid-Silk
DROPS Kid-Silk
75% Mohair, 25% Silk
from 5.05 € /25g
Get the yarn to make this pattern from 43.30€.

The yarn cost is calculated from the pattern’s smallest size and the yarn’s cheapest product type. Looking for an even better price? You might find it on the DROPS Deals!

Pattern instructions

----------------------------------------------------------

EXPLANATION FOR THE PATTERN:

----------------------------------------------------------

GARTER STITCH (back and forth):
Knit all rows.
1 ridge vertically = knit 2 rows.

GARTER STITCH (in the round):
1 ridge in height = 2 rounds, i.e. Knit 1 round and purl 1 round.

PATTERN:
See diagram A.1. Diagrams show all rows in pattern seen from the right side.

DECREASE TIP (evenly):
To calculate how to decrease evenly, use the total number of stitches on row (e.g. 79 stitches) minus stitches in garter stitch (6 stitches), and divide the remaining 73 stitches by number of decreases to be done (e.g. 15) = 4.8.
In this example decrease by knitting approx. every 4th and 5th stitch together and do not decrease over stitches in garter stitch.

INCREASE TIP-1 (applies to sleeves):
Work until 2 stitches remain before marker thread, make 1 yarn over, knit 4 (marker thread is in the middle of these 4 stitches), make 1 yarn over. On next round knit yarns over twisted to avoid holes. Then work the new stitches in stocking stitch.

INCREASE TIP-2 (applies to hood):
Work until 2 stitches remain before marker thread, make 1 yarn over, knit 4 (marker thread is in the middle of these 4 stitches), make 1 yarn over. On next row work yarn overs twisted to avoid holes. Then work the new stitches in stocking stitch.

RAGLAN:
Decrease 1 stitch on each side of each marker thread as follows:
Work until 3 stitches remain before marker thread, knit 2 together (= 1 stitch decreased), knit 2 stitches (marker thread is in the middle of these 2 stitches), slip 1 stitch knitwise, knit 1, pass slipped stitch over stitch worked (= 1 stitch decreased).

----------------------------------------------------------

START THE PIECE HERE:

----------------------------------------------------------

JUMPER - SHORT OVERVIEW OF THE PIECE:
Work front and back piece back and forth separately until vent is done. Then work body in the round on circular needle up to armholes. Sleeves are worked in the round on double pointed needles/a short circular needle up to armhole. Then slip sleeves on to same circular needle as body and work the yoke in the round.
Then work hood back and forth on circular needle.

FRONT PIECE:
Cast on 79-88-94-103-112-124 stitches on circular needle size 4.5 mm with 1 strand of each quality (= 2 strands). Work rib as follows: 3 stitches in GARTER STITCH - read explanation above, A.1 until 4 stitches remain, work first stitch in A.1 so that pattern begins and ends the same, work 3 stitches in garter stitch.
Continue back and forth like this until piece measures 8 cm. Work next row from right side as follows: 3 stitches in garter stitch, knit the next 73-82-88-97-106-118 stitches and decrease at the same time 15-18-18-21-22-26 stitches evenly – read DECREASE TIP, work 3 stitches in garter stitch = 64-70-76-82-90-98 stitches.
Switch to circular needle size 6 mm. Work next row from wrong side as follows: 3 edge stitches in garter stitch, purl until 3 stitches remain, 3 edge stitches in garter stitch. Continue back and forth with stocking stitch with 3 stitches in garter stitch in each side. When piece measures 15 cm – adjust so that next row is worked from right side, put piece aside.

BACK PIECE:
Work as on front piece.

BODY:
Slip stitches on front piece and back piece on to same circular needle size = 128-140-152-164-180-196 stitches. Insert a marker thread in transition between front and back piece (= sides).
Work in stocking stitch in the round with 6 stitches in garter stitch in each side (i.e. over the 3 stitches in garter stitch in each side of front and back piece). When 2 ridges have been worked over these 6 stitches in each side, work in stocking stitch over all stitches. When piece measures 31 cm from cast-on edge, cast off 6-6-8-8-10-10 stitches for armhole in each side (= 3-3-4-4-5-5 stitches on each side of marker threads) = 58-64-68-74-80-88 stitches on front piece and 58-64-68-74-80-88 stitches on back piece. Put piece aside and work the sleeves.

SLEEVES:
Cast on 48-48-48-51-51-54 stitches on double pointed needles size 4.5 mm with 1 strand of each quality (= 2 strands). Work A.1 in the round for 6 cm. Knit 1 round while decreasing 10-8-8-9-9-10 stitches evenly = 38-40-40-42-42-44 stitches.
Switch to double pointed needles size 6 mm.
Insert a marker thread at beginning of round (= mid under sleeve). Work in stocking stitch in the round. When piece measures 10-10-8-8-8-8 cm, increase 1 stitch on each side of marker thread - read INCREASE TIP-1. Increase like this every 6½-4½-3½-3-3-2½ cm 6-8-10-10-11-12 times in total = 50-56-60-62-64-68 stitches. Continue until sleeve measures 47-46-44-43-41-40 cm (shorter measurements in the larger sizes because of wider neck and longer yoke). Now cast off the middle 6-6-8-8-10-10 stitches mid under sleeve, i.e. 3-3-4-4-5-5 stitches on each side of marker thread = 44-50-52-54-54-58 stitches. Put piece aside. Work another sleeve the same way.

YOKE:
Slip sleeves on to same circular needle size 6 mm as body, where armholes were cast off = 204-228-240-256-268-292 stitches. Now insert 4 marker threads in the piece.
In size S, M, L and XL insert marker threads 1-2-2-1 stitch in on each sleeve, and in XXL and XXXL insert marker threads in transition between body and sleeves. I.e. there are 60-68-72-76-80-88 stitches between marker threads on front and back piece and there are 42-46-48-52-54-58 stitches between marker threads on each sleeve.
Begin round mid back and work in stocking stitch in the round, AT THE SAME TIME on 1st-1st-1st-1st-2nd-1st round begin decrease for RAGLAN – read explanation above. Decrease like this every other round 15-17-18-20-21-23 times in total = 84-92-96-96-100-108 stitches.
Piece should now measure 19-21-23-25-27-29 cm from where body and sleeves were put together. Knit 1 round while decreasing 20-24-26-24-24-30 stitches evenly = 64-68-70-72-76-78 stitches.

HOOD:
Work with 1 strand of each quality (= 2 strands) and circular needle size 6 mm.
Knit 1 round while increasing 10-6-6-4-4-2 stitches evenly = 74-74-76-76-80-80 stitches.
Insert a marker thread mid front and 1 marker thread mid back to have the same number of stitches between marker threads.
Work until 3 stitches remain before marker thread mid front (this is now the beginning of row) - work back and forth.
ROW 1 (= right side): Knit over de 74-74-76-76-80-82, cast on 5 stitches at end of row = 79-79-81-81-85-85 stitches. The 5 new stitches should later be fastened on the inside of piece, to get an overlap mid front.
ROW 2 (= wrong side): Work 5 stitches in garter stitch, purl until 5 stitches remain, work 5 stitches in garter stitch.
Now work back and forth in stocking stitch with 5 stitches in garter stitch in each side, AT THE SAME TIME increase 1 stitch on each side of marker thread mid back - read INCREASE TIP-2. Increase like this on every row from right side 5 times in total = 89-89-91-91-95-95. Work until hood measures approx. 37-37-38-38-39-39 cm or desired length. Cast off.
Fold the hood double mid back and sew together at the top of hood. Place the 5 stitches cast on at the beginning of hood on the inside of piece to make an overlap of 5 stitches mid front. Fasten with neat little stitches.

ASSEMBLY:
Sew the openings under sleeves.

Diagram

symbols = knit twisted from right side, purl twisted from wrong side
symbols = purl from the right side, knit from the wrong side
diagram

Each of our patterns has specific tutorial videos to help you.

Do you have a question? See a list of frequently asked questions (FAQ)

Knitting tension is what determines the final measurements of your work, and is usually measured per 10 x 10 cm. It is provided like so: number of stitches in width x number of rows in height - eg: 19 stitches x 26 rows = 10 x 10 cm.

The knitting tension is very individual; some people knit/crochet loosely while others work tightly. You adjust the knitting tension with the needle size, which is why the suggested needle size is only meant as a guide! You need to adjust this (up or down) to ensure that YOUR knitting tension matches the knitting tension provided in the pattern. If you work with a different knitting tension than provided you will have a different yarn consumption, and your work will have different measurements than what the pattern suggests.

The knitting tension also determines which yarns can replace each other. As long as you achieve the same knitting tension you can replace one yarn with another.

See DROPS lesson: How to measure your tension/gauge

See DROPS video: How to make a gauge tension swatch

The required amount of yarn is provided in grams, eg: 450 g. To calculate how many balls you’ll need you first need to know how many grams are in 1 ball (25g, 50g or 100g). This information is available if you click on the individual yarn quality on our pages. Divide the amount required with the amount of each ball. For example, if each ball is 50g (the most common amount), the calculation will be as follows: 450 / 50 = 9 balls.

The important thing when changing from one yarn to another is that the knitting/crochet tension remains the same. This is so that the measurements of the finished piece will be the same as on the sketch provided. It is easier to achieve the same knitting tension using yarns from the same yarn group. It is also possible to work with multiple strands of a thinner yarn to achieve the knitting tension of a thicker one. Please try our yarn converter. We recommend you to always work a test swatch.

Please NOTE: when changing yarn the garment might have a different look and feel to the garment in the photo, due to individual properties and qualities of each yarn.

See DROPS lesson: Can I use a different yarn than the one mentioned in the pattern?

All our yarns are categorised into yarn groups (from A to F) according to thickness and knitting tension – group A contains the thinnest yarns and group F the thickest. This makes it easier for you to find alternative yarns to our patterns, should you wish to switch yarn. All yarns within the same group have a similar knitting tension and can easily replace each other. However, different yarn qualities have different structures and properties which will give the finished work a unique look and feel.

Click here for an overview of the yarns in each yarn group

At the top of all our patterns you’ll find a link to our yarn calculator, which is a helpful tool should you wish to use a different yarn than suggested. By filling in the yarn quality you wish to replace, the amount (in your size) and number of strands, the calculator will present good alternative yarns with the same knitting tension. Additionally it will tell you how much you’ll require in the new qualities and whether you’ll need to work with multiple strands. Most skeins are 50g (some are 25g or 100g).

If the pattern is worked with multiple colours, every colour will have to be calculated separately. Similarly, if the pattern is worked with several strands of different yarns (for example 1 strand Alpaca and 1 strand Kid-Silk) you will have to find alternatives for each, individually.

Click here to see our yarn calculator

Since different yarns have different qualities and textures we have chosen to keep the original yarn in our patterns. However, you can easily find options among our available qualities by using our yarn calculator, or simply pick a yarn from the same yarn group.

It is possible that some retailers still have discontinued yarns in stock, or that someone has a few skeins at home that they would like to find patterns for.

The yarn calculator will provide both alternative yarn as well as required amount in the new quality.

If you think it's hard to decide what size to make, it can be a good idea to measure a garment you own already and like the size of. Then you can pick the size by comparing those measures with the ones available in the pattern's size chart.

You'll find the size chart at the bottom of the pattern.

See DROPS lesson: How to read size chart

The needle size provided in the pattern serves only as a guide, the important thing is to follow the knitting tension. And since knitting tension is very individual, you will have to adjust the needle size to ensure that YOUR tension is the same as in the pattern – maybe you’ll have to adjust 1, or even 2 needle sizes, up or down to achieve the correct tension. For this, we recommend that you work test swatches.

Should you work with a different knitting tension than the one provided, the measurements of the finished garment might deviate from the measurement sketch.

See DROPS lesson: How to measure your tension/gauge

See DROPS video: How to make a tension/gauge swatch

Working a garment top-down provides more flexibility and room for personal adjustment. For example it is easier to try the garment on while working, as well as making adjustments to length of yoke and shoulder caps.

The instructions are carefully explaining every step, in the correct order. Diagrams are adjusted to the knitting direction and are worked as usual.

The diagram depicts all rows/rounds, and every stitch seen from the right side. It is read from bottom to top, from right to left. 1 square = 1 stitch.

When working back and forth, every other row is worked from the right side and every other row is worked from the wrong side. When working from the wrong side, the diagram will have to be worked reversed: from left to right, knit stitches are purled, purl stitches are knit etc.

When working in the round every round is worked from the right side and the diagram are worked from right to left on all rounds.

See DROPS lesson: How to read knitting diagrams

The diagram depicts all rows/rounds, and every stitch seen from the right side. It is worked from bottom to top, from right to left.

When working back and forth every other row is worked from the right side: from right to left and every other row is worked from the wrong side: from left to right.

When working in the round, every row in the diagram are worked from the right side, from right to left.

When working a circular diagram you start in the middle and work your way outwards, counter clockwise, row by row.

The rows usually start with a given number of chain stitches (equivalent to the height of the following stitch), this will either be depicted in the diagram or explained in the pattern.

See DROPS lesson: How to read crochet diagrams

Instructions for working several diagrams after each other on the same row/round, will often be written like so: “work A.1, A.2, A.3 a total of 0-0-2-3-4 times". This means you work A.1 once, then A.2 is worked once, and A.3 is repeated (in width) the number of times provided for your size – in this case like so: S = 0 times, M = 0 times, L=2 times, XL= 3 times and XXL = 4 times.

The diagrams are worked as usual: begin with the first row in A.1, then work the first row in A.2 etc.

See DROPS lesson: How to read knitting diagrams

See DROPS lesson: How to read crochet diagrams

The total width of the garment (from wrist-to-wrist) will be larger in the larger sizes, despite the actual sleeves being shorter. The larger sizes have longer sleeve caps and wider shoulders, so there will be a good fit in all sizes.

The measurement sketch/schematic drawing provides information regarding the full length of the garment. If it’s a jumper or a jacket the length is measured from the highest point on the shoulder closest to the neckline, and straight down to the bottom of the garment. It is NOT measured from the tip of shoulder. Similarly, the length of yoke is measured from the highest point on the shoulder and down to where yoke is split into body and sleeves.

On a jacket measures are never taken along bands, unless specifically stated. Always measure inside band stitches when measuring the length.

See DROPS lesson: How to read a schematic drawing

Diagrams are often repeated on the round or in height. 1 repeat is the diagram the way it appears in the pattern. If it says to work 5 repeats of A.1 in the round, then you work A.1 a total of 5 times after/next to each other in the round. If it says to work 2 repeats of A.1 vertically/in height you work the entire diagram once, then begin again at the start and work the entire diagram one more time.

Chain stitches are slightly narrower than other stitches and to avoid working the cast-on edge too tight, we simply chain more stitches to begin with. The stitch count will be adjusted on the following row to fit the pattern and measurement sketch.

The rib edge is more elastic and will contract slightly compared to, for example, stocking stitch. By increasing before the rib edge, you avoid a visible difference in width between the rib edge and the rest of the body.

It’s very easy to cast off too tightly, and by making yarn overs while casting off (and simultaneously casting these off) you avoid a too tight cast off edge.

See DROPS video: How to bind off with yarn overs (yo)

To achieve an even increase (or decrease) you can increase on, for example: every 3rd and 4th row alternately, like so: work 2 rows and increase on the 3rd row, work 3 rows and increase on the 4th. Repeat this until the increase is complete.

See DROPS lesson: Increase or decrease 1 st on every 3rd and 4th row alternately

Should you prefer to work in the round instead of back and forth, you may of course adjust the pattern. You’ll need to add steeks mid-front (usually 5 stitches), and follow the instructions. When you would normally turn and work from the wrong side, simply work across the steek and continue in the round. At the end you’ll cut the piece open, pick up stitches to work bands, and cover the cut edges.

See DROPS video: How to knit steeks and cut open

Should you prefer to work back and forth instead of in the round, you may of course adjust the pattern so you work the pieces separately and then assemble them at the end. Divide the stitches for the body in 2, add 1 edge stitch in each side (for sewing) and work the front and back pieces separately.

See DROPS lesson: Can I adapt a pattern for circular needles into straight needles?

Pattern repeats can vary slightly in the different sizes, in order to get the correct proportions. If you’re not working the exact same size as the garment in the photo, yours might deviate slightly. This has been carefully developed and adjusted so that the complete impression of the garment is the same in all sizes.

Make sure to follow instructions and diagrams for your size!

If you have found a pattern you like which is available in women’s size it’s not very difficult to convert it to men’s size. The biggest difference will be the length of sleeves and body. Start working on the women size that you think would fit across the chest. The additional length will be worked right before you cast off for the armhole/sleeve cap. If the pattern is worked top-down you can add the length right after the armhole or before the first decrease on sleeve.

Regarding additional yarn amount, this will depend on how much length you add, but it is better with a skein too many than too few.

All yarns will have excess fibres (from production) that might come off as lint or shedding. Brushed yarns (ie hairier yarns) have more of these loose, excess fibres, causing more shedding.

Shedding also depends on what is worn under or over the garment, and whether this pulls at the yarn fibres. It’s therefore not possible to guarantee that there will be no shedding

Below are some tips on how to get the best result when working with hairier yarns:

1. When the garment is finished (before you wash it) shake it vigorously so the looser hairs come off. NOTE: do NOT use a lint roller, brush or any method that pulls at the yarn.

2. Place the garment in a plastic bag and put it in your freezer - the temperature will cause the fibres to become less attached to each other, and excess fibres will come off easier.

3. Leave in the freezer for a few hours before taking it out and shaking it again.

4. Wash the garment according to the instructions on the yarn label.

Pilling is a natural process that happens to even the most exclusive of fibers. It's a natural sign of wear and tear that is hard to avoid, and that is most visible in high friction areas of your garment like a sweater's arms and cuffs.

You can make your garment look as new by removing the pilling, using a fabric comb or a pill/lint remover.

Still can't find the answer you need? Then scroll down and leave your question so one of our experts can try to help you. This will be done normally within 5 to 10 working days.
In the meantime, you can read the questions and answers that others have left to this pattern or join the DROPS Workshop on Facebook to get help from fellow knitters/crocheters!

You might also like...

Post a comment to pattern DROPS 230-5

We would love to hear what you have to say about this pattern!

If you want to leave a question, please make sure you select the correct category in the form below, to speed up the answering process. Required fields are marked *.

Comments / Questions (19)

country flag Irene Steiner wrote:

Hallo, Die Angabe von 15 cm Länge beim VORDERTEIL - ist das ZUSAMMEN mit den 8 cm Rippenmuster gemeint, oder ab dem Teil wo rechts gestrickt wird? Ich habe den Absatz kopiert - damit es klarer wird was ich meine..... -----Bei einer Länge von 15 cm – daran angepasst, dass die nächste Reihe eine Hin-Reihe ist – die Arbeit zur Seite legen.---- GLG Irene Steiner

18.03.2024 - 16:03

DROPS Design answered:

Liebe Frau Steiner, diese 15 cm messen Sie ab der Anschlagskante. Viel Spaß beim Stricken!

19.03.2024 - 10:57

country flag Maria wrote:

Kan man godt bare strikke den rundt, hvis man ikke vil have slidser i siderne?

28.02.2024 - 19:59

DROPS Design answered:

Hei Maria. Det kan man fint gjøre, bare huskå tilpass maskeantallet. mvh DROPS Design

04.03.2024 - 13:11

country flag Angela Abbot wrote:

I'm just a little confused. At the top of the yoke, the last row has a decrease the number of stitches then one is told to cut the yarn. Then for the hood ones works on the same stitches and the first row of the hood has a increase. There is no indication on should start at a different point to where one stopped knitting so why the need to cut the yarn and join it again

19.01.2024 - 22:03

DROPS Design answered:

Dear Mrs Abbot, it looks you are right, our design team will check this one more time, thanks for noticing. I wouldn't cut the yarn just continue working hood just as explained. Happy knitting!

22.01.2024 - 08:12

country flag Marilyn J Denlinger wrote:

I downloaded and printed your Drops 230-5 knittted sweater pattern entitled"Mist Cover". I'm looking for an alternative yarn from what the pattern calls for-Drops Alpaca Boucle and Drops Kid-Silk because I'm a little concerned about knitting with a boucle yarn-too many loops, but I want a yarn that you can't see through. Can you please make some recommendations for an alternative yarn to replace the Alpaca Boucle with something else, yet textured enough not to be see through? Thank you.

05.01.2024 - 22:54

DROPS Design answered:

Dear Marilyn, you could change it for other Group C yarns, such as Air. You can also work with 2 threads of a Group A yarn, like Alpaca. You will need to check the amount of yarn required, since it will depend on the yardage of the yarn; follow the steps indicated in the following lesson: https://www.garnstudio.com/lesson.php?id=14&cid=19. Happy knitting!

07.01.2024 - 23:42

country flag Josée Laberge wrote:

Bonjour, je suis rendue à tricoter en rond les mailles du devant et du dos. On me dit de tricoter au point mousse les 6 mailles de chaque côté. Les indications du début pour le point mousse sont pour quand on tricoter en aller retour et non en rond. Est-ce que je dois tricoter ces 6 mailles en jersey sur tous les rangs comme les autres ou les tricoter un rang sur l'endroit et l'autre sur l'envers pour réaliser 2 côtes mousse? Merci!

24.11.2023 - 16:56

DROPS Design answered:

Bonjour Mme Laberge, effectivement, pour tricoter au point mousse, on doit alterner 1 tour endroit, 1 tour envers, autrement dit tricotez 1 tour tout à l'endroit, puis 1 tour avec ces 6 mailles de chaque côté à l'envers, et tricoter ces 2 tours encore 1 fois pour les 2 côtes mousse sous les manches. Bon tricot!

27.11.2023 - 07:42

country flag Justyna wrote:

Prosze o informację na jakich drutach (4,5 czy 6) została zrobiona próbka. Zgodnie z nią dla rozmiaru M 50 cm szerokość wychodzi 70 oczek, a podanych jest 88

30.09.2023 - 17:15

DROPS Design answered:

Witaj Justyno, próbka dżersejem jest wykonywana na drutach nr 6. Jeżeli próbka będzie zgodna, szerokość swetra w rozmiarze M wyniesie 50 cm (jest 70 oczek na przód). Co do 88 oczek na początku to ściągacz ściąga lekko robótkę, poza tym jest wykonywany na mniejszych drutach. Tak więc szerokość swetra będzie podobna na ściągaczu i na dalszej części przodu/tyłu. Pozdrawiamy!

02.10.2023 - 09:29

country flag Lovisa wrote:

Hur ska luvan stickas på? Ska man lägga upp nya maskor till den eller plocka upp från bakstycket?

24.09.2023 - 21:49

country flag Melody wrote:

Totally Casual

19.01.2022 - 12:05

country flag Kiki wrote:

Cuddly Comfort

18.01.2022 - 20:21

country flag Heini wrote:

Outlander

17.01.2022 - 21:34