DROPS Air
DROPS Air
65% Alpaca, 28% Polyamide, 7% Wool
from 8.95 CAD /50g
Get the yarn to make this pattern from 53.70CAD.

The yarn cost is calculated from the pattern’s smallest size and the yarn’s cheapest product type. Looking for an even better price? You might find it on the DROPS Deals!

DROPS Super Sale

Bronze Summer

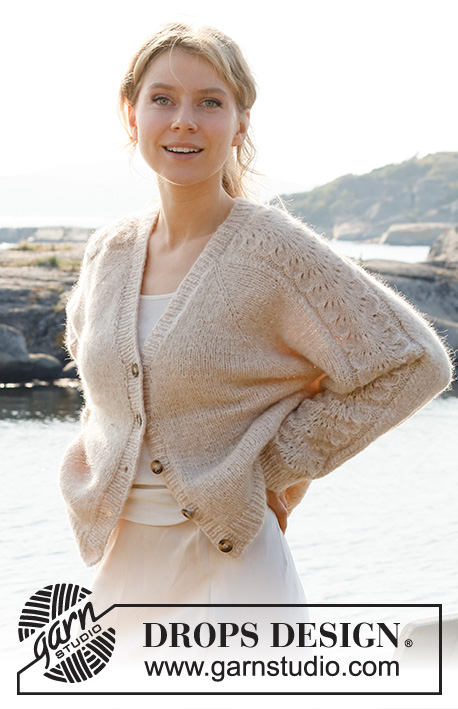
Knitted jacket in DROPS Air. Piece is knitted top down with raglan, lace pattern and V-neck. Size: S - XXXL

DROPS 221-4
DROPS design: Pattern ai-315
Yarn group C or A + A
-------------------------------------------------------

SIZE:
S - M - L - XL - XXL – XXXL

Finished measurements:
Chest measurements: 88-96-104-112-128-138 cm = 34⅝"-37¾"-41"-44"-50⅜"-54¼"
Full length: 56-58-60-62-64-66 cm = 22"-22¾"-23⅝"-24⅜"-25¼"-26"
All measurements in charts are in cm.

MATERIALS:
DROPS AIR from Garnstudio (belongs to yarn group C)
300-350-400-400-450-500 g color no 02, wheat

KNITTING GAUGE:
17 stitches in width and 22 rows vertically in stockinette stitch = 10 x 10 cm = 4" x 4".

NEEDLES:
DROPS DOUBLE POINTED NEEDLES SIZE 5 mm = US 8
DROPS CIRCULAR NEEDLE SIZE 5 mm = US 8: Length 60 = 16" or 80 cm = 32" for edges in stockinette stitch.
DROPS DOUBLE POINTED NEEDLES SIZE 4 mm = US 6
DROPS CIRCULAR NEEDLE SIZE 4 mm = US 6: Length 80 cm = 32" for rib.
DROPS CABLE NEEDLE - for cables.
Needle size is only a suggestion! If you have too many stitches on 10 cm = 4" switch to a larger needle size. If you have too few stitches on 10 cm = 4" switch to a smaller needle size.

DROPS BUTTON, Marble NR 629: 5-5-5-5-5-5 pieces

-------------------------------------------------------

Alternative Yarn – See how to change yarns here
Yarn Groups A to F – Use the same pattern and change the yarn here
Yarn usage using an alternative yarn – Use our yarn converter here

-------------------------------------------------------

DROPS Air
DROPS Air
65% Alpaca, 28% Polyamide, 7% Wool
from 8.95 CAD /50g
Get the yarn to make this pattern from 53.70CAD.

The yarn cost is calculated from the pattern’s smallest size and the yarn’s cheapest product type. Looking for an even better price? You might find it on the DROPS Deals!

Pattern instructions

NOTE: This pattern is written in American English. All measurements in charts are in cm. For conversion from inches to cm - click here. There are different terms for crocheting in American and British English. If this pattern includes crochet, click for "crochet terms" here. For this pattern in British English, please click here.
-------------------------------------------------------

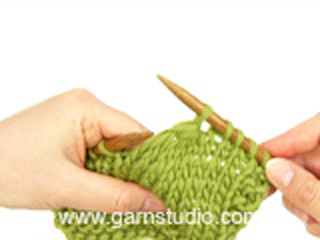
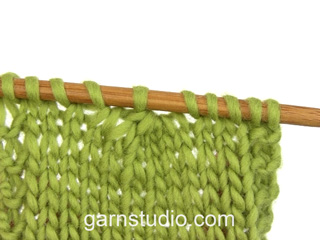
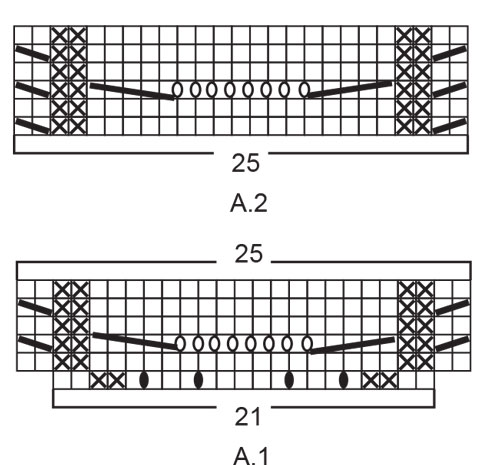
EXPLANATION FOR THE PATTERN:

-------------------------------------------------------

GARTER STITCH (back and forth):
Knit all rows.
1 ridge vertically = knit 2 rows.

PATTERN:
See diagrams A.1 and A.2.

RAGLAN:
Increase 1 stitch on each side of 1 stitch in stockinette stitch (stitch with marker thread) in every transition between body and sleeves (= 8 stitches increased on row). Increase 1 stitch by making 1 yarn over. On next row purl yarn overs twisted to avoid holes. Then work the new stitches in stockinette stitch.

V-NECK:
All increases are done from the right side.
Make 1 yarn over inside 1 edge stitch in garter stitch (= 1 stitch increased) in each side. On next row (wrong side) purl yarn over twisted to avoid holes. Then work the new stitches in stockinette stitch. Increase 2 stitches in total on every increase row (1 stitch in each side).

DECREASE TIP (applies to sleeves):
Decrease 1 stitch on each side of marker thread as follows: Work until 3 stitches remain before marker thread and knit 2 together, knit 2 (marker thread is between these stitches), slip 1 stitch knitwise, knit 1, pass slipped stitch over stitch worked.

BIND-OFF TIP:
To avoid a tight bind-off edge you may use a larger needle size. If this also is too tight, work a 1 yarn over after approx. every 4th stitch while binding off (bind off yarn overs as regular stitches).

BUTTONHOLES (applies to right band when garment is worn):
Decrease for 5 buttonholes on right band.
1 buttonhole = work 2 stitches together and make 1 yarn over. On next row knit yarn over to make holes.
Bottom buttonhole should be approx. 2 cm = ¾" from bottom edge and top buttonhole where V-neck begins. Place the remaining 3 buttonholes evenly, approx. 8-8-8-7½-7½-7½ cm = 3⅛"-3⅛"-3⅛"-2⅞"-2⅞"-2⅞" between each buttonhole.

-------------------------------------------------------

START THE PIECE HERE:

-------------------------------------------------------

JACKET - SHORT OVERVIEW OF THE PIECE:
Work yoke back and forth on circular needle from mid front, work top down. AT THE SAME TIME increase V-neck and raglan. Now divide yoke for body and sleeves. Work body back and forth on circular needle, top down. Work sleeves in the round on double pointed needles/short circular needle, top down. At the end work a neck edge/band around the opening on jacket.

YOKE:
Cast on 70-72-74-76-78-80 stitches (including 1 edge stitch in each side towards mid front) on circular needle size 5 mm = US 8 with Air. Purl 1 row from wrong side.

OVERSVIEW OF THE NEXT SECTION:
Now start the pattern on the sleeves, at the same time increase for raglan and V-neck – therefore read the entire next section before starting.
Insert 4 marker threads in piece as follows (without working the stitches): Count 3 stitches (= front piece), insert 1 marker thread in next stitch, count 21 stitches (= sleeve), insert 1 marker thread in next stitch, count 18-20-22-24-26-28 stitches (= back piece), insert 1 marker thread in next stitch, count 21 stitches (= sleeve), insert 1 marker thread in next stitch, 3 stitches remain on row after last marker thread (= front piece). Then work in stockinette stitch on stitches on front pieces and on back piece, and A.1 (= 21 stitches) over stitches on each sleeve, AT THE SAME TIME on first row from right side increase for RAGLAN in every transition between body and sleeves – read explanation above. When A.1 has been worked 1 time vertically continue with A.2 (= 25 stitches) over stitches in A.1 and continue increase for raglan every other row (i.e. on every row from right side) until increase has been done 22-25-27-29-33-36 times in total on each side of the 4 stitches with marker threads. Now continue increase on back piece and on front pieces 2 more times (do not increase on sleeves, increase has been done 24-27-29-31-35-38 times on back piece/front pieces). AT THE SAME TIME on 6th row (i.e. on 3rd row from right side) increase for V-NECK in each side towards mid front – read explanation above, as follows: Increase every 6th row 4-5-6-7-8-9 times, every 4th row 3 times in total (= 7-8-9-10-11-12 stitches in total increased in each side towards mid front). REMEMBER THE KNITTING GAUGE!
After last increase for raglan continue without increases until piece measures 22-25-27-29-33-36 cm = 8¾"-9¾"-10⅝"-11⅜"-13"-14¼", increases for V-neck should now be finished. There are now 276-304-324-344-380-408 stitches on needle.

Work next row as follows:
Work the first 35-39-42-45-50-54 stitches (= front piece), slip the next
69-75-79-83-91-97 stitches on a stitch holder for sleeve, cast on 6-6-6-8-10-12 new stitches on row (= in the side under sleeve), work the next 68-76-82-88-98-106 stitches (= back piece), slip the next 69-75-79-83-91-97 stitches on a stitch holder for sleeve, cast on 6-6-6-8-10-12 new stitches on needle (= in the side under sleeve), and work the remaining 35-39-42-45-50-54 stitches (= front piece). NOW MEASURE PIECE FROM HERE!

BODY:
= 150-166-178-194-218-238 stitches. Continue with stockinette stitch and 1 edge stitch in garter stitch in each side. When piece measures 25-24-24-24-22-21 cm = 9¾"-9½"-9½"-9½"-8¾"-8¼" from division, knit 1 row from right side while increasing 1 stitch = 151-167-179-195-219-239 stitches.
Switch to circular needle size 4 mm = US 6. Work next row as follows from wrong side: 1 edge stitch in garter stitch, * purl 1, knit 1 *, repeat from *-* until 2 stitches remain on needle, purl 1 and finish with 1 edge stitch in garter stitch. Continue rib like this for 4 cm = 1½". Loosely bind off with knit over knit and purl over purl, read BIND-OFF TIP. Jacket measures approx. 56-58-60-62-64-66 cm = 22"-22¾"-23⅝"-24⅜"-25¼"-26" from shoulder.

SLEEVE:
Slip the 69-75-79-83-91-97 stitches from stitch holder in one side of piece on a short circular needle/double pointed needles size 5 mm = US 8 and pick in addition up 1 stitch in each of the 6-6-6-8-10-12 stitches cast on in the side under sleeve = 75-81-85-91-101-109 stitches. Insert 1 marker thread in the middle of the 6-6-6-8-10-12 stitches under sleeve and move the marker thread upwards when working, it is used for decrease later. Begin round at the marker thread and continue with A.2 and stockinette stitch in the round. When piece measures 3 cm = 1⅛" from division, decrease 2 stitches mid under sleeve - read DECREASE TIP. Decrease like this every 3½-3-2-1½-1-1 cm = 1¼"-1⅛"-¾"-½"-⅜"-⅜" 10-11-13-16-19-21 times in total = 55-59-59-59-63-67 stitches. Continue until piece measures 38-36-34-33-29-26 cm = 15"-14¼"-13⅜"-13"-11⅜"-10¼" from division - or desired length (shorter measurements in the larger sizes because of longer yoke). Work 1 round while decreasing 11 stitches evenly over stitches in A.2 = 44-48-48-48-52-56 stitches. Switch to double pointed needles size 4 mm = US 6 and work rib in the round = knit 1/purl 1 for 4 cm = 1½". Loosely bind off with knit over knit and purl over purl – remember BIND-OFF TIP. Work the other sleeve the same way.

BAND + NECK EDGE:
Insert 1 marker mid back of neck on back piece, marker should be used to calculate half the stitches on band/neck edge. Pick up band inside 1 edge stitch in garter stitch on front pieces, and in the 1st row worked around the neck.
Begin at the bottom on right front piece from right side and pick up approx. 119-125-131-137-143-149 stitches along the entire front edge up to marker in the neck, on circular needle size 4 mm = US 6 – leave the marker here. Continue to pick up approx. 120-126-132-138-144-150 stitches along the entire front edge on left front piece, total number of stitches should be divisible by 2 + 1 = approx. 239-251-263-275-287-299 stitches. It is important that the rib is not too loose with too many stitches but it should not be too tight either with tight front edges.
Work next row as follows from wrong side: 2 stitches in garter stitch, * purl 1, knit 1 *, repeat from *-* until 3 stitches remain, purl 1 and finish with 2 stitches in garter stitch. Continue rib like this. When piece measures 1 ½ cm = ½" decrease for BUTTONHOLES on right band - read explanation above. Continue like this until rib measures 3 cm = 1⅛". Loosely bind off with knit over knit and purl over purl, remember bind-off tip.

ASSEMBLY
Sew the buttons on to the left band.

This pattern has been corrected.

Updated online: 16.04.2021
YOKE: ... When A.1 has been worked 1 time vertically continue with A.2 (= 25 stitches) over stitches in A.1 ...
Updated online: 19.08.2021
BUTTONHOLES:... Place the remaining 3 buttonholes evenly, approx. 8-8-8-7½-7½-7½ cm = 3 1/8"-3 1/8"-3 1/8"-2 7/8"-2 7/8"-2 7/8" between each buttonhole.

Diagram

symbols = knit from the right side, purl from the wrong side
symbols = purl from the right side, knit from the wrong side
symbols = between 2 stitches make 1 yarn over, on next row purl yarn over twisted. It should not make a hole.
symbols = between 2 stitches make 1 yarn over, on next row purl yarn over It should make a hole.
symbols = KNIT 5 STITCHES TOGETHER AS FOLLOWS: Knit 5, pass them back on left needle, pass the next to last stitch over the last so that this stitch is around the last stitch, repeat until all 4 stitches have been passed over (= 4 stitches decreased), pass the last stitch worked back on right needle.
symbols = KNIT 5 STITCHES TWISTED TOGETHER AS FOLLOWS: Knit 5, pass next to last stitch worked over the last so that this stitch is around the last stitch, repeat until all 4 stitches have been passed over (= 4 stitches decreased).
symbols = slip 1 stitch on cable needle behind piece, knit 1, knit from cable needle
symbols = slip 1 stitches on cable needle in front of piece, knit 1, knit 1 from cable needle
diagram
diagram

Each of our patterns has specific tutorial videos to help you.

Do you have a question? See a list of frequently asked questions (FAQ)

Knitting tension is what determines the final measurements of your work, and is usually measured per 10 x 10 cm. It is provided like so: number of stitches in width x number of rows in height - eg: 19 stitches x 26 rows = 10 x 10 cm.

The knitting tension is very individual; some people knit/crochet loosely while others work tightly. You adjust the knitting tension with the needle size, which is why the suggested needle size only serve as a guide! You need to adjust this (up or down) to ensure that YOUR knitting tension matches the knitting tension provided in the pattern. If you work with a different knitting tension than provided you will have a different yarn consumption, and your work will have different measurements than what the pattern suggests.

The knitting tension also determines which yarns can replace each other. As long as you achieve the same knitting tension you can replace one yarn with another.

See DROPS lesson: How to measure your tension/gauge

See DROPS video: How to make a gauge tension swatch

The required amount of yarn is provided in grams, eg: 450 g. To calculate how many balls you’ll need you first need to know how many grams are in 1 ball (25g, 50g or 100g). This information is available if you click on the individual yarn quality on our pages. Divide the amount required with the amount of each ball. For example, if each ball is 50g (the most common amount), the calculation will be as follows: 450 / 50 = 9 balls.

The important thing when changing from one yarn to another is that the knitting/crochet tension remains the same. This is so that the measurements of the finished piece will be the same as on the sketch provided. It is easier to achieve the same knitting tension using yarns from the same yarn group. It is also possible to work with multiple strands of a thinner yarn to achieve the knitting tension of a thicker one. Please try our yarn converter. We recommend you to always work a test swatch.

Please NOTE: when changing yarn the garment might have a different look and feel to the garment in the photo, due to individual properties and qualities of each yarn.

See DROPS lesson: Can I use a different yarn than the one mentioned in the pattern?

All our yarns are categorised into yarn groups (from A to F) according to thickness and knitting tension – group A contains the thinnest yarns and group F the thickest. This makes it easier for you to find alternative yarns to our patterns, should you wish to switch yarn. All yarns within the same group have a similar knitting tension and can easily replace each other. However, different yarn qualities have different structures and properties which will give the finished work a unique look and feel.

Click here for an overview of the yarns in each yarn group

At the top of all our patterns you’ll find a link to our yarn converter, which is a helpful tool should you wish to use a different yarn than suggested. By filling in the yarn quality you wish to replace, the amount (in your size) and number of strands, the converter will present good alternative yarns with the same knitting tension. Additionally it will tell you how much you’ll require in the new qualities and whether you’ll need to work with multiple strands. Most skeins are 50g (some are 25g or 100g).

If the pattern is worked with multiple colours, every colour will have to be converted separately. Similarly, if the pattern is worked with several strands of different yarns (for example 1 strand Alpaca and 1 strand Kid-Silk) you will have to find alternatives for each, individually.

Click here to see our yarn converter

Since different yarns have different qualities and textures we have chosen to keep the original yarn in our patterns. However, you can easily find options among our available qualities by using our yarn converter, or simply pick a yarn from the same yarn group.

It is possible that some retailers still have discontinued yarns in stock, or that someone has a few skeins at home that they would like to find patterns for.

The yarn converter will provide both alternative yarn as well as required amount in the new quality.

If you think it's hard to decide what size to make, it can be a good idea to measure a garment you own already and like the size of. Then you can pick the size by comparing those measures with the ones available in the pattern's size chart.

You'll find the size chart at the bottom of the pattern.

See DROPS lesson: How to read size chart

The needle size provided in the pattern serves only as a guide, the important thing is to follow the knitting tension. And since knitting tension is very individual, you will have to adjust the needle size to ensure that YOUR tension is the same as in the pattern – maybe you’ll have to adjust 1, or even 2 needle sizes, up or down to achieve the correct tension. For this, we recommend that you work test swatches.

Should you work with a different knitting tension than the one provided, the measurements of the finished garment might deviate from the measurement sketch.

See DROPS lesson: How to measure your tension/gauge

See DROPS video: How to make a gauge tension swatch

Working a garment top-down provides more flexibility and room for personal adjustment. For example it is easier to try the garment on while working, as well as making adjustments to length of yoke and shoulder caps.

The instructions are carefully explaining every step, in the correct order. Diagrams are adjusted to the knitting direction and are worked as usual.

The diagram depicts all rows/rounds, and every stitch seen from the right side. It is read from bottom to top, from right to left. 1 square = 1 stitch.

When working back and forth, every other row is worked from the right side and every other row is worked from the wrong side. When working from the wrong side, the diagram will have to be worked reversed: from left to right, knit stitches are purled, purl stitches are knit etc.

When working in the round every round is worked from the right side and the diagram are worked from right to left on all rounds.

See DROPS lesson: How to read knitting diagrams

The diagram depicts all rows/rounds, and every stitch seen from the right side. It is worked from bottom to top, from right to left.

When working back and forth every other row is worked from the right side: from right to left and every other row is worked from the wrong side: from left to right.

When working in the round, every row in the diagram are worked from the right side, from right to left.

When working a circular diagram you start in the middle and work your way outwards, counter clockwise, row by row.

The rows usually start with a given number of chain stitches (equivalent to the height of the following stitch), this will either be depicted in the diagram or explained in the pattern.

See DROPS lesson: How to read crochet diagrams

Instructions for working several diagrams after each other on the same row/round, will often be written like so: “work A.1, A.2, A.3 a total of 0-0-2-3-4 times". This means you work A.1 once, then A.2 is worked once, and A.3 is repeated (in width) the number of times provided for your size – in this case like so: S = 0 times, M = 0 times, L=2 times, XL= 3 times and XXL = 4 times.

The diagrams are worked as usual: begin with the first row in A.1, then work the first row in A.2 etc.

See DROPS lesson: How to read knitting diagrams

See DROPS lesson: How to read crochet diagrams

The total width of the garment (from wrist-to-wrist) will be larger in the larger sizes, despite the actual sleeves being shorter. The larger sizes have longer sleeve caps and wider shoulders, so there will be a good fit in all sizes.

The measurement sketch/schematic drawing provides information regarding the full length of the garment. If it’s a jumper or a jacket the length is measured from the highest point on the shoulder (usually closest to the neckline), and straight down to the bottom of the garment. It is NOT measured from the tip of shoulder. Similarly, the length of yoke is measured from the highest point on the shoulder and down to where yoke is split into body and sleeves.

See DROPS lesson: How to read a schematic drawing

Diagrams are often repeated on the round or in height. 1 repeat is the diagram the way it appears in the pattern. If it says to work 5 repeats of A.1 in the round, then you work A.1 a total of 5 times after/next to each other in the round. If it says to work 2 repeats of A.1 vertically/in height you work the entire diagram once, then begin again at the start and work the entire diagram one more time.

Chain stitches are slightly narrower than other stitches and to avoid working the cast-on edge too tight, we simply chain more stitches to begin with. The stitch count will be adjusted on the following row to fit the pattern and measurement sketch.

The rib edge is more elastic and will contract slightly compared to, for example, stocking stitch. By increasing before the rib edge, you avoid a visible difference in width between the rib edge and the rest of the body.

It’s very easy to cast off too tightly, and by making yarn overs while casting off (and simultaneously casting these off) you avoid a too tight cast off edge.

See DROPS video: How to bind off with yarn overs (yo)

To achieve an even increase (or decrease) you can increase on, for example: every 3rd and 4th row alternately, like so: work 2 rows and increase on the 3rd row, work 3 rows and increase on the 4th. Repeat this until the increase is complete.

See DROPS lesson: Increase or decrease 1 st on every 3rd and 4th row alternately

Should you prefer to work in the round instead of back and forth, you may of course adjust the pattern. You’ll need to add steeks mid-front (usually 5 stitches), and follow the instructions. When you would normally turn and work from the wrong side, simply work across the steek and continue in the round. At the end you’ll cut the piece open, pick up stitches to work bands, and cover the cut edges.

See DROPS video: How to knit steeks and cut open

Should you prefer to work back and forth instead of in the round, you may of course adjust the pattern so you work the pieces separately and then assemble them at the end. Divide the stitches for the body in 2, add 1 edge stitch in each side (for sewing) and work the front and back pieces separately.

See DROPS lesson: Can I adapt a pattern for circular needles into straight needles?

Pattern repeats can vary slightly in the different sizes, in order to get the correct proportions. If you’re not working the exact same size as the garment in the photo, yours might deviate slightly. This has been carefully developed and adjusted so that the complete impression of the garment is the same in all sizes.

Make sure to follow instructions and diagrams for your size!

If you have found a pattern you like which is available in women’s size it’s not very difficult to convert it to men’s size. The biggest difference will be the length of sleeves and body. Start working on the women size that you think would fit across the chest. The additional length will be worked right before you cast off for the armhole/sleeve cap. If the pattern is worked top-down you can add the length right after the armhole or before the first decrease on sleeve.

Regarding additional yarn amount, this will depend on how much length you add, but it is better with a skein too many than too few.

All yarns will have excess fibres (from production) that might come off as lint or shedding. Brushed yarns (ie hairier yarns) have more of these loose, excess fibres, causing more shedding.

Shedding also depends on what is worn under or over the garment, and whether this pulls at the yarn fibres. It’s therefore not possible to guarantee that there will be no shedding

Below are some tips on how to get the best result when working with hairier yarns:

1. When the garment is finished (before you wash it) shake it vigorously so the looser hairs come off. NOTE: do NOT use a lint roller, brush or any method that pulls at the yarn.

2. Place the garment in a plastic bag and put it in your freezer - the temperature will cause the fibres to become less attached to each other, and excess fibres will come off easier.

3. Leave in the freezer for a few hours before taking it out and shaking it again.

4. Wash the garment according to the instructions on the yarn label.

Pilling is a natural process that happens to even the most exclusive of fibers. It's a natural sign of wear and tear that is hard to avoid, and that is most visible in high friction areas of your garment like a sweater's arms and cuffs.

You can make your garment look as new by removing the pilling, using a fabric comb or a pill/lint remover.

Still can't find the answer you need? Then scroll down and leave your question so one of our experts can try to help you. This will be done normally within 5 to 10 working days.
In the meantime, you can read the questions and answers that others have left to this pattern or join the DROPS Workshop on Facebook to get help from fellow knitters/crocheters!

You might also like...

Bronze Summer

Inger, Norway

Bronze Summer

Iuliia, Portugal

Bronze Summer

Miriam From MS_butterflydesign, Germany

Bronze Summer

Malwina, Poland

Bronze Summer

Sabine, Germany

Bronze Summer

JoeJ5, France

Post a comment to pattern DROPS 221-4

We would love to hear what you have to say about this pattern!

If you want to leave a question, please make sure you select the correct category in the form below, to speed up the answering process. Required fields are marked *.

Comments / Questions (90)

country flag Welada Albazzaz wrote:

Im making size L and ut's written that we should increase 27 times in total.. in total means including the increases we nade in chart A1? thanks

05.08.2022 - 16:39

DROPS Design answered:

Yes, that's right. We have to work 2 things at the same time: pattern (A1, A2) and increasing for raglan (AT THE SAME TIME on first row from right side increase for RAGLAN in every transition between body and sleeves – read explanation above). Increasing for raglan have to be done 27 times in total, including the incr. in the first row.

05.08.2022 - 17:25

country flag Welada Albazzaz wrote:

When we finish chart A2 we start with A1then A2 again? and so on

05.08.2022 - 15:34

DROPS Design answered:

Dear Mrs Albazzaz, after you have finished A.2 in height, repeat A.2 all the way (A.1 is worked only one time) to the end. Happy knitting!

05.08.2022 - 16:30

country flag Welada Albazzaz wrote:

When we finish chart A2 we A1again ?

05.08.2022 - 15:32

country flag Welada Albazzaz wrote:

But when we increase for the sleeves the stitch count won't be the same as the pattern in A1

04.08.2022 - 16:46

DROPS Design answered:

Dear Mrs Albazzaz, A.1 is worked on the middle on top of sleeve one time in height, you then repeat A.2 in height to the end of sleeve. And raglan increases are worked on each side of the stitch with marker, maybe the 5th picture with focus on shoulder can help you vizualizing how it should look, you can see the stitch with marker = raglan stitch and increases on each side of this stitch, and also the wave pattern on mid on top of sleeve. Happy knitting!

05.08.2022 - 08:21

country flag Welada Albazzaz wrote:

I don't understand when we increase for the sleeves and when we don't .. i have just finshed the first time of chart A1.. could you please clarify?

04.08.2022 - 16:19

DROPS Design answered:

Dear Mrs Albazzaz, increase for the raglan on either side of each of the 8 stitches with a marker at the transition of body and sleeves a total of 24-27-29-31-35-38 times on every other row (= every row from RS) - this means you will increase when working row 1, 3 and 5 in A.1 then increase in A.2 when working row 1, 3 and 5. Don't forget to increase for neck, starting on the 3rd row from RS. Happy knitting!

04.08.2022 - 16:24

country flag Welada Albazzaz wrote:

Hi.. i have just started with the bronze summer jacket .. i knitted the first three rows.. the first i purled all the stitches.. the second i knitted the front and back stitches , A1 diagram for sleeves and increasing at the same time.. the third i purled all the stitches and ptbl for the increases.. now for the next rows we work A1 diagram for sleeves and knit the rest of the stitches but Should i make the increases or no? thanks in advance

03.08.2022 - 14:35

DROPS Design answered:

Dear Mrs Albazzaz, after you have worked the first 2 rows in A.1 continue working the remaining 3 rows (A.1 is 6 rows in total), and when A.1 is done in height, work now and repeat A.2 over A.1. At the same time, continue increasing for raglan as explained for your size. Happy knitting!

03.08.2022 - 15:19

country flag Astrid wrote:

Hej, Är det någon som har stickat kofta nr 221-4? Jag förstår inte mönstret. Det gäller stycket, Översikt över nästa avsnitt, på sidan 3. Ska ökningarna ske både före och efter markeringarna eller bara på fram- och bakstycke? Varför jag frågar att för mig är det inte helt klart och tydligt.

09.07.2022 - 07:19

DROPS Design answered:

Hej Astrid. Du ökar både före och efter markeringarna till raglan till det har ökats totalt 22-25-27-29-33-36 gånger på varje sida av de 4 maskorna med markör (dvs både på bakstycke, framstycken och ärmar). Efter det så ökar du bara på bakstycket och på framstyckena 2 gånger till. Mvh DROPS Design

12.07.2022 - 09:17

country flag Mirta Delgado wrote:

Buenas tardes, cómo están? Dónde podría encontrar el vídeo que explica la ejecución del diagrama calado del modelo Bronze Summer? Muchas gracias por su respuesta. Saludos desde Argentina!!!

06.06.2022 - 02:00

DROPS Design answered:

Hola Mirta, no tenemos vídeos que expliquen cómo trabajar todo el diagrama; puedes comprobar los vídeos relevantes para realizar esta labor aquí: https://www.garnstudio.com/video.php?patternid=10072&lang=es. También puedes leer la siguiente lección para entender mejor el diagrama: https://www.garnstudio.com/lesson.php?id=68&cid=23

06.06.2022 - 13:36

country flag Cora wrote:

What is meant to be done with the stitches with the marker thread in them? How do you know which section they belong to? For example, is the fourth stitch with the marker in it meant to be worked in stockinette or is it part of the sleeve pattern?

16.04.2022 - 18:48

DROPS Design answered:

Dear Cora, the stitches with the marker thread are worked in stocking stitch, as indicated under RAGLAN. Happy knitting!

18.04.2022 - 20:29

country flag Anna wrote:

Hi. I understand we do raglan increases on Row 2 (the first RS row). Do we continue increases on Row 4? The pattern suggests we do not continue raglan increases until we have completed 1 vertical repeat of A.1 on the sleeves (which would be Row 8) but I think this is incorrect.

12.04.2022 - 05:24

DROPS Design answered:

Hi Anna, You are right, you increase to raglan every second row (each row from the right side) at the same time as you work the pattern. Happy knitting!

12.04.2022 - 06:52