DROPS Air
DROPS Air
65% Alpaca, 28% Polyamide, 7% Wool
from 5.30 € /50g
Get the yarn to make this pattern from 31.80€.

The yarn cost is calculated from the pattern’s smallest size and the yarn’s cheapest product type. Looking for an even better price? You might find it on the DROPS Deals!

DROPS SS24

Full Moon Festival

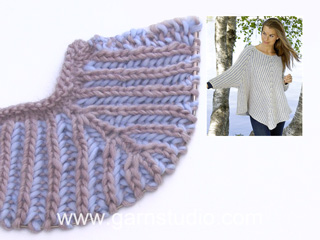
Knitted jumper in DROPS Air. The piece is worked top down, with raglan and English rib. Sizes XS - XXL.

DROPS 223-15
DROPS Design: Pattern no ai-322
Yarn group C or A + A
-------------------------------------------------------

SIZES:
XS - S - M - L - XL - XXL

MATERIALS:
DROPS AIR from Garnstudio (belongs to yarn group C)
300-350-400-450-450-500 g colour 02, wheat

KNITTING TENSION:
12 stitches in width and 34 rows in height with English rib = 10 x 10 cm.

NEEDLES:
DROPS DOUBLE POINTED NEEDLES SIZE 6 MM.
DROPS CIRCULAR NEEDLE SIZE 6 MM: Length 40 cm and 80 cm for English rib.
DROPS DOUBLE POINTED NEEDLES SIZE 4 MM.
DROPS CIRCULAR NEEDLE SIZE 4 MM: Length 40 cm and 80 cm for rib.
Needle size is only a guide. If you get too many stitches on 10 cm, change to a larger needle size. If you get too few stitches on 10 cm, change to a smaller needle size.

-------------------------------------------------------

Alternative Yarn – See how to change yarns here
Yarn Groups A to F – Use the same pattern and change the yarn here
Yarn usage using an alternative yarn – Use our yarn converter here

-------------------------------------------------------

DROPS Air
DROPS Air
65% Alpaca, 28% Polyamide, 7% Wool
from 5.30 € /50g
Get the yarn to make this pattern from 31.80€.

The yarn cost is calculated from the pattern’s smallest size and the yarn’s cheapest product type. Looking for an even better price? You might find it on the DROPS Deals!

Pattern instructions

-------------------------------------------------------

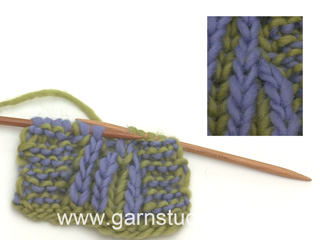
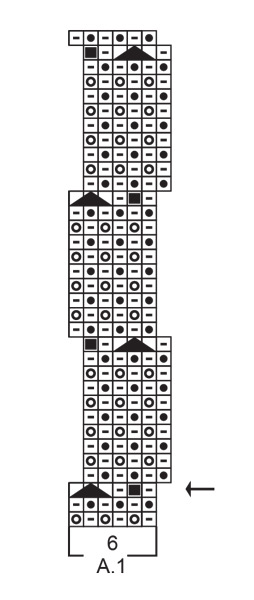
EXPLANATIONS FOR THE PATTERN:

-------------------------------------------------------

PATTERN:
See diagram A.1.

INCREASE/DECREASE TIP (evenly spaced):
To work out how to increase/decrease evenly, count the number of stitches to be increased/decreased over (e.g. 13 stitches), and divide by the number of increases/decreases to be made (e.g. 2) = 6.5. In this example, increase by making 1 yarn over after alternately each 6th and 7th stitch. On the next round work the yarn overs twisted to avoid holes. When decreasing, knit together alternately each 5th and 6th and each 6th and 7th stitch.
ENGLISH RIB:
ROUND 1: * Make 1 yarn over, slip 1 stitch as if to purl, knit 1 *, repeat from *-* to end of round.
ROUND 2: * Purl together the yarn over and slipped stitch, make 1 yarn over, slip 1 stitch as if to purl *, repeat from *-* to end of round.
ROUND 3: * Make 1 yarn over, slip 1 stitch as if to purl, knit together the yarn over and slipped stitch *, repeat from *-* to end of round.
Repeat rounds 2 and 3 onwards.

ENGLISH RIB STITCH:
When counting the stitches the yarn overs are not included.

RAGLAN:
Increase 4 stitches in each marker-stitch (= 16 stitches increased on the round).
All increases are worked on a round where the yarn overs and knitted stitches are knitted together (i.e. round 3 in the English rib).
Increase as follows in the knitted stitch:
Knit together the yarn over and knitted stitch, but do not slip the stitch from the left needle, make 1 yarn over the right needle, knit the yarn over and knitted stitch together again, move the marker to this stitch (= mid-stitch), make 1 yarn over the right needle, knit the yarn over and knitted stitch together again (= 3 stitches and 2 yarn overs), slip the stitch and yarn over off the left needle.
On the next round work the new stitches in English rib, but note that on this first round after the increases, the purled stitches in the increases are purled without yarn overs because the yarn overs have not been made.
The marker sits in the middle of the increased stitches (a knitted stitch).

DECREASE TIP (for sleeves): 
Decrease 2 stitches on round 3 in the English rib as follows: Work until there are 2 stitches left before the marker-stitch (yarn overs not counted), slip the next stitch + yarn over as if to knit together, knit the next 2 stitches + yarn over together and pass the slipped stitch + yarn-over over these knitted together stitches (= 2 stitches decreased), move the marker to the next knitted stitch.

CASTING-OFF TIP:
To avoid the cast-off edge being tight you can cast off with a larger size needle. If the edge is still tight, make 1 yarn over after approx. each 4th stitch at the same time as casting off; the yarn overs are cast off as normal stitches.

-------------------------------------------------------

START THE PIECE HERE:

-------------------------------------------------------

JUMPER – SHORT OVERVIEW OF THE PIECE:
The neck and yoke are worked in the round with circular needle, top down from mid back. The yoke is divided for body and sleeves and the body continued in the round with circular needle. The sleeves are worked in the round with short circular needle/double pointed needles, top down.
NECK:
Cast on 76-76-80-84-88-92 stitches with short circular needle size 4 mm and Air. Knit 1 round. Then work rib (knit 1, purl 1) in the round for 2 cm. The next round is worked as follows:
Work rib as before over the first 13-13-15-15-15-17 stitches, knit 13-11-11-11-13-13 and decrease 4-2-2-2-4-4 stitches evenly over these stitches – read DECREASE TIP, work rib as before over the next 25-27-29-31-31-33 stitches, knit 13-11-11-11-13-13 and decrease 4-2-2-2-4-4 stitches evenly over these stitches – read DECREASE TIP, work rib as before over the last 12-14-14-16-16-16 stitches = 68-72-76-80-80-84 stitches.
Change to circular needle size 6 mm. Insert 1 marker at the beginning of the round; the yoke is measured from this marker!

YOKE:
Now work ENGLISH RIB – read description above, the whole round. When round 3 has been completed, insert 1 marker in an ENGLISH RIB STITCH – read description above, in each transition between body and sleeves (= 4 markers) as follows:
Marker 1: Skip 12-12-14-14-14-16 stitches, insert marker in the next stitch (= half back piece).
Marker 2: Skip the next 9 stitches, insert marker in the next stitch (= sleeve).
Marker 3: Skip the next 23-25-27-29-29-31 stitches, insert marker in the next stitch (= front piece).
Marker 4: Skip the next 9 stitches, insert marker in the next stitch.
There are 11-13-13-15-15-15 stitches left on the round.

Continue in the round with English rib. AT THE SAME TIME, the next time you work round 3, begin to increase for RAGLAN – read description above. Increase like this every 8th round a total of 6-7-8-9-10-11 times = 164-184-204-224-240-260 stitches.
REMEMBER THE KNITTING TENSION!
Continue with English rib until the piece measures 21-21-23-24-26-28 cm from the marker on the neck – adjust so the next round is round 2 in the English rib.

Now divide the piece for the body and sleeves on the next round as follows:
Work the first 25-27-31-33-35-39 stitches (= ½ back piece), place the next 33-37-41-45-49-53 stitches on a thread for the sleeve, cast on 5-5-5-5-7-7 new stitches (= in side under sleeve), work the next 49-55-61-67-71-77 stitches (= front piece), place the next 33-37-41-45-49-53 stitches on a thread for the sleeve, cast on 5-5-5-5-7-7 new stitches (= in side under sleeve), work the last 24-28-30-34-36-38 stitches.
Body and sleeves are finished separately. THE PIECE IS NOW MEASURED FROM HERE!

BODY:
= 108-120-132-144-156-168 stitches. Continue in the round with English rib as before.
When the piece measures 17-19-19-20-20-20 cm from the division – adjust so the next round is round 3 in the English rib; there is 12 cm to finished length, try the jumper on and work to desired length.
Work A.1 on the whole round. When there is 1 round left in the diagram, the piece measures approx. 26-28-28-29-29-29 cm from the division.
On the next round (the last round in the diagram = round 2 in the English rib) increase stitches in the sides and insert 4 markers (which will be used when working rib) as follows:
Half back piece: * Purl together the yarn over and slipped stitch, knit 1 *, work from *-* over the next 14-14-18-18-20-22 stitches. Insert a marker here.
Side of body: * Purl the yarn over twisted (= 1 stitch increased), purl 1, knit 1 *, work from *-* over the next 26-28-30-34-36-40 stitches (= 13-14-15-17-18-20 stitches increased), insert a marker here.
Front piece: * Purl together the yarn over and slipped stitch, knit 1 *, work from *-* over the next 28-32-36-38-42-44 stitches. Insert a marker here.
Side of body: * Purl the yarn over twisted (= 1 stitch increased), purl 1, knit 1 *, work from *-* over the next 26-28-30-34-36-40 stitches (= 13-14-15-17-18-20 stitches increased), insert a marker here.
Half back piece: * Purl together the yarn over and slipped stitch, knit 1 *, work from *-* over the next 14-18-18-20-22-22 stitches.
There are 134-148-162-178-192-208 stitches on the needle.

Change to circular needle size 4 mm and work rib as follows:
(purl 1, knit 1) as far as the first marker, (purl 2, knit 1) as far as the next marker, (purl 1, knit 1) as far as the next marker, (purl 2, knit 1) as far as the next marker, (purl 1, knit 1) to end of round.
Continue this rib for 3 cm. Cast off with knit over knit and purl over purl – read CASTING-OFF TIP.
The jumper measures approx. 54-56-58-60-62-64 cm from the shoulder down.

SLEEVES:
Place the 33-37-41-45-49-53 stitches from the thread on the one side of the piece on short circular needle/double pointed needles size 6 mm and cast on 5-5-5-5-7-7 new stitches on the needle (= mid under sleeve) = 38-42-46-50-56-60 stitches.
Continue in the round with the English rib as before – make sure you begin on the correct round in the pattern, round now starts with the 1st of the 5-5-5-5-7-7 new stitches that were cast on mid under sleeve.
Sizes XS, S, M and L: go to ALL SIZES below.
Sizes XL and XXL work as follows:
Insert a marker in the middle stitch under the sleeve (= 1 knitted stitch in the English rib). Allow the marker to follow your work onwards; it is used when decreasing under the sleeve.
When the sleeve measures 4 cm from the division – adjust so the next round is round 3 in the English rib, decrease under the sleeve – read DECREASE TIP (= 2 stitches decreased). Decrease like this every 8th round a total of 2-2 times = 52-56 stitches.

ALL SIZES:
Continue working until the sleeve measures 40-41-39-39-37-35 cm from the division (shorter measurements in larger sizes due to longer yoke). There is 4 cm to finished length, try the jumper on and work to desired length.
The next round is worked as follows: * Knit together the yarn over and slipped stitch, purl 1 *, work from *-* to the end of the round. Change to double pointed needles size 4 mm and knit 1 round where you decrease 0-2-4-8-8-10 stitches evenly spaced = 38-40-42-42-44-46 stitches. Work rib (knit 1, purl 1) for 4 cm.
Cast off with knit over knit and purl over purl – remember CASTING-OFF TIP.
The sleeve measures approx. 44-45-43-43-41-39 cm from the division.
Work the other sleeve in the same way.

ASSEMBLY:
Sew the openings under the sleeves.

Diagram

symbols = make 1 yarn over, slip 1 stitch as if to purl
symbols = purl together the yarn over and slipped stitch
symbols = knit together the yarn over and slipped stitch
symbols = decrease 2 stitches as follows: Knit together the next 3 stitches (+ their respective yarn overs = 2 stitches decreased).
symbols = increase 2 stitches in the knitted stitch: Knit together the yarn over and knitted stitch, but do not slip them from the left needle, make 1 yarn over the right needle, knit the yarn over and knitted stitch together again, slip the stitch and yarn over off the left needle (= 2 stitches increased). On the next round work the new stitches in English rib, but note that on this first round after the increases, the purled stitches in the increases are purled without yarn overs because the yarn overs have not been made.
symbols = start on this round in the pattern
diagram
diagram

Each of our patterns has specific tutorial videos to help you.

Do you have a question? See a list of frequently asked questions (FAQ)

Knitting tension is what determines the final measurements of your work, and is usually measured per 10 x 10 cm. It is provided like so: number of stitches in width x number of rows in height - eg: 19 stitches x 26 rows = 10 x 10 cm.

The knitting tension is very individual; some people knit/crochet loosely while others work tightly. You adjust the knitting tension with the needle size, which is why the suggested needle size is only meant as a guide! You need to adjust this (up or down) to ensure that YOUR knitting tension matches the knitting tension provided in the pattern. If you work with a different knitting tension than provided you will have a different yarn consumption, and your work will have different measurements than what the pattern suggests.

The knitting tension also determines which yarns can replace each other. As long as you achieve the same knitting tension you can replace one yarn with another.

See DROPS lesson: How to measure your tension/gauge

See DROPS video: How to make a gauge tension swatch

The required amount of yarn is provided in grams, eg: 450 g. To calculate how many balls you’ll need you first need to know how many grams are in 1 ball (25g, 50g or 100g). This information is available if you click on the individual yarn quality on our pages. Divide the amount required with the amount of each ball. For example, if each ball is 50g (the most common amount), the calculation will be as follows: 450 / 50 = 9 balls.

The important thing when changing from one yarn to another is that the knitting/crochet tension remains the same. This is so that the measurements of the finished piece will be the same as on the sketch provided. It is easier to achieve the same knitting tension using yarns from the same yarn group. It is also possible to work with multiple strands of a thinner yarn to achieve the knitting tension of a thicker one. Please try our yarn converter. We recommend you to always work a test swatch.

Please NOTE: when changing yarn the garment might have a different look and feel to the garment in the photo, due to individual properties and qualities of each yarn.

See DROPS lesson: Can I use a different yarn than the one mentioned in the pattern?

All our yarns are categorised into yarn groups (from A to F) according to thickness and knitting tension – group A contains the thinnest yarns and group F the thickest. This makes it easier for you to find alternative yarns to our patterns, should you wish to switch yarn. All yarns within the same group have a similar knitting tension and can easily replace each other. However, different yarn qualities have different structures and properties which will give the finished work a unique look and feel.

Click here for an overview of the yarns in each yarn group

At the top of all our patterns you’ll find a link to our yarn calculator, which is a helpful tool should you wish to use a different yarn than suggested. By filling in the yarn quality you wish to replace, the amount (in your size) and number of strands, the calculator will present good alternative yarns with the same knitting tension. Additionally it will tell you how much you’ll require in the new qualities and whether you’ll need to work with multiple strands. Most skeins are 50g (some are 25g or 100g).

If the pattern is worked with multiple colours, every colour will have to be calculated separately. Similarly, if the pattern is worked with several strands of different yarns (for example 1 strand Alpaca and 1 strand Kid-Silk) you will have to find alternatives for each, individually.

Click here to see our yarn calculator

Since different yarns have different qualities and textures we have chosen to keep the original yarn in our patterns. However, you can easily find options among our available qualities by using our yarn calculator, or simply pick a yarn from the same yarn group.

It is possible that some retailers still have discontinued yarns in stock, or that someone has a few skeins at home that they would like to find patterns for.

The yarn calculator will provide both alternative yarn as well as required amount in the new quality.

If you think it's hard to decide what size to make, it can be a good idea to measure a garment you own already and like the size of. Then you can pick the size by comparing those measures with the ones available in the pattern's size chart.

You'll find the size chart at the bottom of the pattern.

See DROPS lesson: How to read size chart

The needle size provided in the pattern serves only as a guide, the important thing is to follow the knitting tension. And since knitting tension is very individual, you will have to adjust the needle size to ensure that YOUR tension is the same as in the pattern – maybe you’ll have to adjust 1, or even 2 needle sizes, up or down to achieve the correct tension. For this, we recommend that you work test swatches.

Should you work with a different knitting tension than the one provided, the measurements of the finished garment might deviate from the measurement sketch.

See DROPS lesson: How to measure your tension/gauge

See DROPS video: How to make a tension/gauge swatch

Working a garment top-down provides more flexibility and room for personal adjustment. For example it is easier to try the garment on while working, as well as making adjustments to length of yoke and shoulder caps.

The instructions are carefully explaining every step, in the correct order. Diagrams are adjusted to the knitting direction and are worked as usual.

The diagram depicts all rows/rounds, and every stitch seen from the right side. It is read from bottom to top, from right to left. 1 square = 1 stitch.

When working back and forth, every other row is worked from the right side and every other row is worked from the wrong side. When working from the wrong side, the diagram will have to be worked reversed: from left to right, knit stitches are purled, purl stitches are knit etc.

When working in the round every round is worked from the right side and the diagram are worked from right to left on all rounds.

See DROPS lesson: How to read knitting diagrams

The diagram depicts all rows/rounds, and every stitch seen from the right side. It is worked from bottom to top, from right to left.

When working back and forth every other row is worked from the right side: from right to left and every other row is worked from the wrong side: from left to right.

When working in the round, every row in the diagram are worked from the right side, from right to left.

When working a circular diagram you start in the middle and work your way outwards, counter clockwise, row by row.

The rows usually start with a given number of chain stitches (equivalent to the height of the following stitch), this will either be depicted in the diagram or explained in the pattern.

See DROPS lesson: How to read crochet diagrams

Instructions for working several diagrams after each other on the same row/round, will often be written like so: “work A.1, A.2, A.3 a total of 0-0-2-3-4 times". This means you work A.1 once, then A.2 is worked once, and A.3 is repeated (in width) the number of times provided for your size – in this case like so: S = 0 times, M = 0 times, L=2 times, XL= 3 times and XXL = 4 times.

The diagrams are worked as usual: begin with the first row in A.1, then work the first row in A.2 etc.

See DROPS lesson: How to read knitting diagrams

See DROPS lesson: How to read crochet diagrams

The total width of the garment (from wrist-to-wrist) will be larger in the larger sizes, despite the actual sleeves being shorter. The larger sizes have longer sleeve caps and wider shoulders, so there will be a good fit in all sizes.

The measurement sketch/schematic drawing provides information regarding the full length of the garment. If it’s a jumper or a jacket the length is measured from the highest point on the shoulder closest to the neckline, and straight down to the bottom of the garment. It is NOT measured from the tip of shoulder. Similarly, the length of yoke is measured from the highest point on the shoulder and down to where yoke is split into body and sleeves.

On a jacket measures are never taken along bands, unless specifically stated. Always measure inside band stitches when measuring the length.

See DROPS lesson: How to read a schematic drawing

Diagrams are often repeated on the round or in height. 1 repeat is the diagram the way it appears in the pattern. If it says to work 5 repeats of A.1 in the round, then you work A.1 a total of 5 times after/next to each other in the round. If it says to work 2 repeats of A.1 vertically/in height you work the entire diagram once, then begin again at the start and work the entire diagram one more time.

Chain stitches are slightly narrower than other stitches and to avoid working the cast-on edge too tight, we simply chain more stitches to begin with. The stitch count will be adjusted on the following row to fit the pattern and measurement sketch.

The rib edge is more elastic and will contract slightly compared to, for example, stocking stitch. By increasing before the rib edge, you avoid a visible difference in width between the rib edge and the rest of the body.

It’s very easy to cast off too tightly, and by making yarn overs while casting off (and simultaneously casting these off) you avoid a too tight cast off edge.

See DROPS video: How to bind off with yarn overs (yo)

To achieve an even increase (or decrease) you can increase on, for example: every 3rd and 4th row alternately, like so: work 2 rows and increase on the 3rd row, work 3 rows and increase on the 4th. Repeat this until the increase is complete.

See DROPS lesson: Increase or decrease 1 st on every 3rd and 4th row alternately

Should you prefer to work in the round instead of back and forth, you may of course adjust the pattern. You’ll need to add steeks mid-front (usually 5 stitches), and follow the instructions. When you would normally turn and work from the wrong side, simply work across the steek and continue in the round. At the end you’ll cut the piece open, pick up stitches to work bands, and cover the cut edges.

See DROPS video: How to knit steeks and cut open

Should you prefer to work back and forth instead of in the round, you may of course adjust the pattern so you work the pieces separately and then assemble them at the end. Divide the stitches for the body in 2, add 1 edge stitch in each side (for sewing) and work the front and back pieces separately.

See DROPS lesson: Can I adapt a pattern for circular needles into straight needles?

Pattern repeats can vary slightly in the different sizes, in order to get the correct proportions. If you’re not working the exact same size as the garment in the photo, yours might deviate slightly. This has been carefully developed and adjusted so that the complete impression of the garment is the same in all sizes.

Make sure to follow instructions and diagrams for your size!

If you have found a pattern you like which is available in women’s size it’s not very difficult to convert it to men’s size. The biggest difference will be the length of sleeves and body. Start working on the women size that you think would fit across the chest. The additional length will be worked right before you cast off for the armhole/sleeve cap. If the pattern is worked top-down you can add the length right after the armhole or before the first decrease on sleeve.

Regarding additional yarn amount, this will depend on how much length you add, but it is better with a skein too many than too few.

All yarns will have excess fibres (from production) that might come off as lint or shedding. Brushed yarns (ie hairier yarns) have more of these loose, excess fibres, causing more shedding.

Shedding also depends on what is worn under or over the garment, and whether this pulls at the yarn fibres. It’s therefore not possible to guarantee that there will be no shedding

Below are some tips on how to get the best result when working with hairier yarns:

1. When the garment is finished (before you wash it) shake it vigorously so the looser hairs come off. NOTE: do NOT use a lint roller, brush or any method that pulls at the yarn.

2. Place the garment in a plastic bag and put it in your freezer - the temperature will cause the fibres to become less attached to each other, and excess fibres will come off easier.

3. Leave in the freezer for a few hours before taking it out and shaking it again.

4. Wash the garment according to the instructions on the yarn label.

Pilling is a natural process that happens to even the most exclusive of fibers. It's a natural sign of wear and tear that is hard to avoid, and that is most visible in high friction areas of your garment like a sweater's arms and cuffs.

You can make your garment look as new by removing the pilling, using a fabric comb or a pill/lint remover.

Still can't find the answer you need? Then scroll down and leave your question so one of our experts can try to help you. This will be done normally within 5 to 10 working days.
In the meantime, you can read the questions and answers that others have left to this pattern or join the DROPS Workshop on Facebook to get help from fellow knitters/crocheters!

Post a comment to pattern DROPS 223-15

We would love to hear what you have to say about this pattern!

If you want to leave a question, please make sure you select the correct category in the form below, to speed up the answering process. Required fields are marked *.

Comments / Questions (39)

country flag Anna Sarjanen wrote:

Hej Ökningen till raglan blir mycket snyggare om man gör en ökning på varje sida om markeringen vart fjärde varv istället. Plockar upp en maska i den som ska stickas rät, stickar den räta, plockar upp en maska ur bågen på den som ska stickas avig, gör omslag och lyfter. Andra ökningen får man då på en maska som ska stickas avig. Plocka en maska ur bågen, sticka nästa rät (fast den egentligen skulle vara avig), plocka upp en ur bågen på nästa, sticka den rät.

24.09.2021 - 12:59

country flag Brigitte Grov wrote:

Hei igjen. Det har ikke blitt så pent så langt ettersom kastet da automatisk strekker seg over to masker. Kanskje jeg gjør det feil?

07.06.2021 - 13:30

DROPS Design answered:

Hei Birgitte. Du avslutter 2. omgang med "lag 1 kast om pinnen, ta 1 maske løs av pinnen som om den skulle strikkes vrang" og starter 3 omg med "lag 1 kast om pinnen, ta 1 maske løs av pinnen som om den skulle strikkes vrang". Selv om du føler at kastet strekker seg over 2 masker har du 1 maske mellom disse to kastene. Vi skal prøve å lage en video der vi viser overgangen bedre. mvh DROPS design

07.06.2021 - 15:31

country flag Brigitte wrote:

Hei! Jeg er kun på første 3 omgang helpatent, men ser at det blir litt rart ved startmerket når det er 80 masker (eller uansett partall). Dersom omgangen slutter på kast vil neste omgang starte på kast. Er det noe triks jeg ikke har fått med meg eller skal det være en slags linje nedover ryggen?

06.06.2021 - 21:41

DROPS Design answered:

Hei Birgitte. Selv om en omgang avslutter med "lag 1 kast om pinnen, ta 1 maske løs av pinnen som om den skulle strikkes vrang" og neste omgang starter med "lag 1 kast om pinnen, ta 1 maske løs av pinnen som om den skulle strikkes vrang", så vil det bli en pen overgang. mvh DROPS design

07.06.2021 - 12:05

country flag Magdalena wrote:

Hei Hvordan kan den 15. 10. 30. og 10. masken (XL) være den masken økningen til raglan skal foregå i? Det er jo i utgangspunktet en vrang patentmaske etter mønsteret og ikke en rett patentmaske slik raglanfellingen tilsier. Det er ingen sammenheng her. Takk

27.04.2021 - 12:11

DROPS Design answered:

Hei Magdalena. Når du har satt merker i arbeidet etter å ha strikker 3. omgang første gang, gjentar du kun 2. og 3. omgang av Helpatent med kast. Når du da skal strikke 3. omgang for 2. gang starter økningene til raglan. Dette er da en omgang der det strikkes lag 1 kast om pinnen, ta 1 maske løs av pinnen som om den skulle strikkes vrang, strikk kastet og den løse masken rett sammen (her økes det). mvh DROPS design

03.05.2021 - 13:15

country flag Carin wrote:

Stickar storlek s och får 4 maskor ”över” i samband med övergången mellan halskant & oket. Stämmer mönstret?

04.04.2021 - 11:45

DROPS Design answered:

Hej Carin. Har du sett att du minskar maskor i de rätstickade partierna under HALSKANT? Mvh DROPS Design

13.04.2021 - 08:58

country flag Gro wrote:

Findes der en oversigt over vanskelighedsgrad? Jeg synes, som begynder, det er svært at vide om opskriften er for svær for mig.

01.03.2021 - 04:11

DROPS Design answered:

Hej Gro, du kan søge på "nybegynder" så vil du få de letteste opskrifter at vælge imellem :)

01.03.2021 - 14:50

country flag Ann-Britt Jakobsson wrote:

Vart är själva mönstret på svenska? Det är bara diagrammet som finns!

11.02.2021 - 20:34

DROPS Design answered:

Hej Ann-Britt! Tack för info, nu finns mönstret även på svenska! Mvh DROPS Design

12.02.2021 - 13:58

country flag Maritha Broman wrote:

Hej! Jag kan inte se att det finns någon mönsterbeskrivning på Drops 223-15. Har kört ut beskrivningen men det verkar saknas? Med vänlig hälsning, Maritha Broman

05.02.2021 - 14:03

country flag Annika wrote:

Cornfields

16.01.2021 - 10:25

country flag Maija wrote:

Harvester's Dream

12.01.2021 - 10:40