
Beliebte Kategorien
Suchen Sie nach einem Garn?


Kommentare / Fragen (30)
![]() Louise hat geschrieben:
Louise hat geschrieben:
Ik begrijp niet goed hoe ik moet meerderen bij de mouwen. Dit omdat wanneer ik meerder, het telpatroon niet meer klopt. Hoe kan ik meerderen en het telpatroon behouden?
11.12.2022 - 22:23DROPS Design hat geantwortet:
Dag Louise,
Het telpatroon wordt inderdaad verbroken door het meerderen onder de mouwen, hier is niets aan te doen. Probeer het telpatroon zo ver mogelijk door te laten lopen, indien mogelijk.
12.12.2022 - 20:31
![]() Francoise Lucienne hat geschrieben:
Francoise Lucienne hat geschrieben:
Bonsoir encore merci a bientot
07.02.2022 - 17:56
![]() Francoise Lucienne hat geschrieben:
Francoise Lucienne hat geschrieben:
Bonsoir pourquoi on a au début 232 mailles et après 112 merci bonne soirée
06.02.2022 - 19:57DROPS Design hat geantwortet:
Bonjour Mme Lucienne, vous tricotez d'abord le bas du pull en rond, sur 232 mailles, puis vous rabattez les mailles des emmanchures (4 de chaque côté) et terminez chaque partie séparément soit: 4 mailles rabattues de chaque côté + 112 m pour le devant + 112 m rabattues pour le dos = 4+112+4+112= 232 m. Bon tricot!
07.02.2022 - 11:10
![]() Leen Sels hat geschrieben:
Leen Sels hat geschrieben:
Welke naalddikte gebruik ik best? Safran geeft volgens het label in tricot op nld3 een verhouding van 24st op 10cm. Ik brei vrij vast en heb nld4 nodig om in tricot deze verhouding te krijgen. Volgens het patroon heb je nld3,5 nodig om met teltekening een verhouding van 23st op 10cm te krijgen. Met nld4 heb ik 30st op 10cm. Met nld5 heb ik 25st op 10cm, maar dit is al vrij los gebreid (doorschijnend en losser dan op de foto) en ik zou nog omhoog moeten gaan naar nld 5,5 of 6. Klopt dit wel?
16.05.2021 - 21:08DROPS Design hat geantwortet:
Dag Leen Sels,
Ja, de stekenverhouding zoals aangegeven in het patroon klopt. Je hebt 23 steken op 10 cm in de breedte. Met name de breedte is van belang in dit geval bij de stekenverhouding. In deze link vind je meer informatie over de stekenverhouding.
20.05.2021 - 16:52
![]() Petra hat geschrieben:
Petra hat geschrieben:
Wat betekend sm ik dacht 2 samen breien. Daarna een omslag, ik krijg dan gaatjes klopt dit. Gr Petra
03.04.2021 - 14:32
![]() Myrna Laupland hat geschrieben:
Myrna Laupland hat geschrieben:
Ribbed Fantasy Should I do the neck ribbing and sew in the sleeves before or after blocking? Thank you
08.11.2020 - 05:31DROPS Design hat geantwortet:
Dear Mrs Laupland, some knitters always block, some other never - so this look to be just a personnal question. Contact your DROPS store for any further individual assistance. Happy knitting!
09.11.2020 - 10:42
![]() Fata Viden hat geschrieben:
Fata Viden hat geschrieben:
Kan jag få beskrivning på svenska tack på förhand Mvh //Fata
20.10.2020 - 17:40DROPS Design hat geantwortet:
Hej. Under bilden kan du ändra språk så att du får mönstret på svenska. Mvh DROPS Design
21.10.2020 - 09:48Carol hat geschrieben:
I've finally gotten the courage to pick it up again, but (sorry) I still don't understand how I'm meant to work the front & back separately with new yarn whilst on circular needles. Do I need to work back & forth, front & back separately, on straight needles, keeping half of the work on a stitch holder? I'm getting discouraged. Thanks.
04.12.2017 - 08:39DROPS Design hat geantwortet:
Dear Carol, that's right, just slip the sts on back piece onto a stitch holder/a thread and work the sts for front piece back and forth on straight (or circular) needle. Happy knitting!
04.12.2017 - 10:38Carol hat geschrieben:
Thanks for your reply. When you say: "Cut the yarn and continue front piece separately with 1st st on needle for front piece... " you don't take into account that the first stitch on the needle is actually two bound-off stitches away from the front, so there's a hole. If I can figure out a way to overcome that, do I then have to work it back & forth, not in a circle? Do I need extra needles? Thanks for your speedy reply.
27.11.2017 - 20:52DROPS Design hat geantwortet:
Dear Carol, you should bind off the last 2 sts on round so that there are 4 sts bound off on each side for armholes (= no st should remain on the side). Then work each piece separately with new yarn. Happy knitting!
28.11.2017 - 08:58Carol hat geschrieben:
I'm just at the point where I'm meant to bind off 2 or 4 stitches to begin the armhole, but I end up left with one stitch in the middle of a bound-off section. I have no idea how to proceed with this, and I've never worked in the round before. Can you explain how I proceed? It says I should work the front and back separately, so does that mean I add another ball of yarn and continue in the round? I'm completely confused! Thanks! Carol
26.11.2017 - 11:18DROPS Design hat geantwortet:
Dear Carol, you bind off for the armholes 2 sts at beg of round (half 1st armhole), 4 sts for 2nd armhole and the last 2 sts on round for 1st armhole (= 2nd half). Cut the yarn and continue front piece separately with 1st st on needle for front piece. Happy knitting!
27.11.2017 - 10:14
|
|||||||
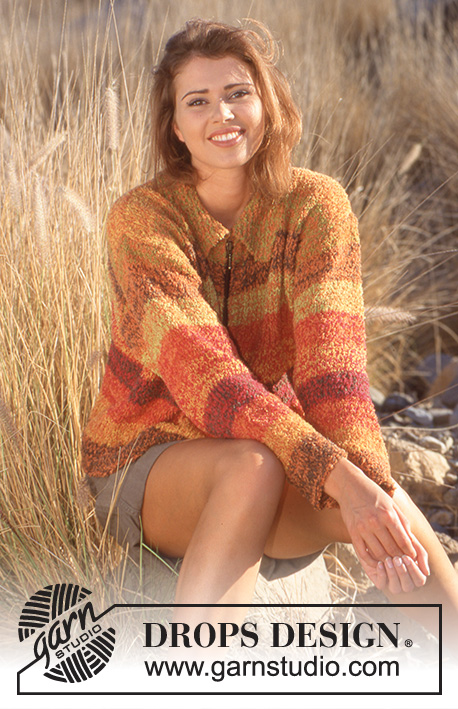
Ribbed Fantasy |
|||||||
 |
 |
||||||
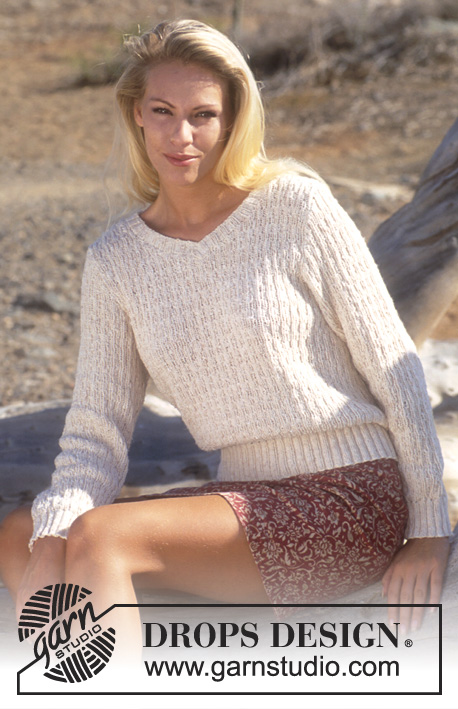
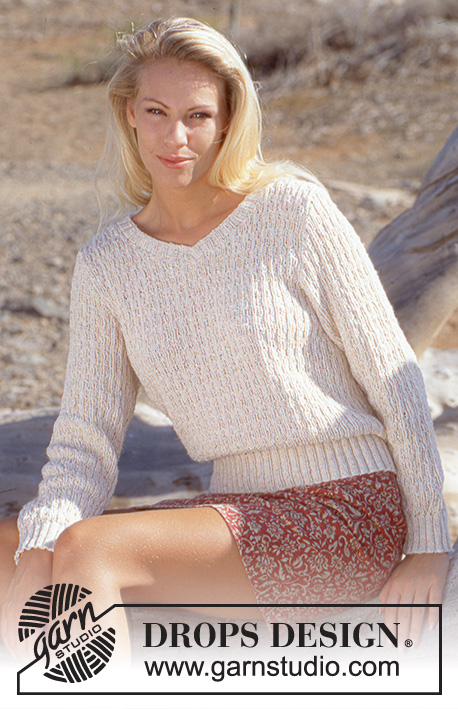
Gestrickter Pullover mit Strukturmuster in DROPS Safran
DROPS 56-8 |
|||||||
|
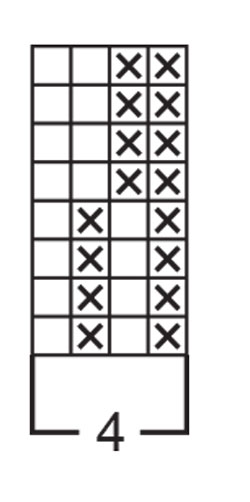
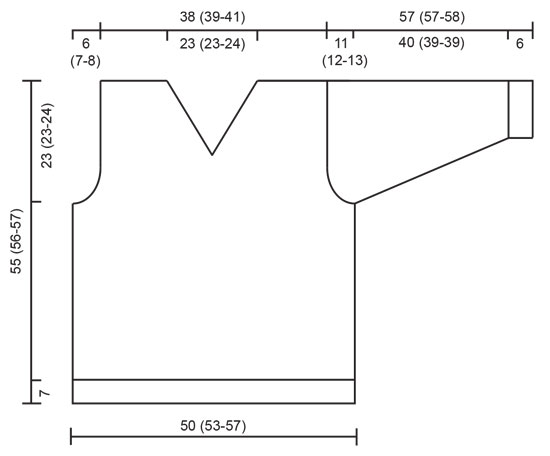
Bündchen: * 2 re., 2 li. *. von *-* wiederholen. Muster: Siehe Diagramm. Das Diagramm zeigt das Muster von rechts. Vorder- und Rückenteil: Mit naturmeliert auf Rundstricknadel Nr. 2,5, 232 (244-260) M. anschlagen und 7 cm Bündchen stricken. Zu Rundstricknadel Nr. 3,5 wechseln und die nächste R. wie folgt stricken: * 2 re. zusammen, 1 Umschlag *. von * - * wiederholen. Danach das Muster stricken. Stimmt die Maschenprobe? Nach 32 (33-33) cm die nächste R. wie folgt stricken: 2 M. für das Armloch abk., 112 (118-126) M. für das Vorderteil stricken, 4 M. für das Armloch abk., 112 (118-126) M für das Rückenteil stricken, 2 M. für das Armloch abk. Jetzt jede Seite einzeln fertig stricken. Vorderteil: = 112 (118-126) M. Weiter auf beiden Seiten in jeder 2. R. für die Armlöcher abketten: 3 M. x 2, 2 M. x 2 (3-3), 1 M. x 2 (2-4) = 88 (90-94) M. Nach 43 (44-45) cm das Vorderteil teilen und für den V-Ausschnitt, in jeder 2. R. abk.: 3 M. x 1, 2 M. x 10, 1 M. x 2 (3-4). Alle 4 R.: 1 M. x 1. Nach 55 (56-57) cm abk. Rückenteil: = 112 (118-126) M. Wie beim Vorderteil für das Armloch abk. = 88 (90-94). Nach 53 (54-55) cm 46 (48-50) M. für den Hals abk. Danach bei jeder 2. R. gegen Hals abk.: 2 M. x 1, 1 M. x 1. Nach 55 (56-57) cm abk. Ärmel: Mit naturmeliert auf Nadelspiel Nr. 2,5, 60 (64-64) M. und 6 cm stricken. Zu Nadelspiel Nr. 3,5 wechseln und wie folgt stricken: * 2 re. zusammen, 1 Umschlag *. von * - * wiederholen. Danach das Muster stricken und unter dem Ärmel aufnehmen: 2 M. x 21 (20-21). Bei Grösse S+L alle 5. R. Bei Grösse M abwechslungsweise alle 5 und 6 R. = 102 (104-106) M. Nach 46 (45-45) cm unter dem Ärmel 4 M. abk. und die Arbeit hin und zurück stricken. Weiter, bei jeder 2. R. gegen die Schulter abk.: 3 M. x 4 (3-3), 2 M. x 8 (11-13), 3 M. x 4 (3-3). Danach abk. Zusammennähen: Die Schulternaht zusammennähen. Rund um den Hals mit Nadelspiel Nr. 2,5, ca. 142-162 M. aufnehmen (muss durch 4 M. + 2 M. teilbar sein) und 2,5, cm Bündchen hin und zurück stricken. Danach abk. Den rechten Kragen über den linken legen und annähen. Die Ärmel hinein nähen. |
|||||||
Erklärungen zum Diagramm |
|||||||
|
|||||||
 |
|||||||
 |
|||||||
Haben Sie diese Anleitung nachgearbeitet?Dann taggen Sie Ihre Fotos mit #dropspattern oder schicken Sie sie an die #dropsfan Galerie Brauchen Sie Hilfe bei dieser Anleitung?Sie finden 18 Videotutorials, einen Kommentar/Fragen-Bereich und vieles mehr, wenn sie die Anleitung bei garnstudio.com aufrufen. © 1982-2026 DROPS Design A/S. Wir besitzen alle Rechte. Dieses Dokument, einschließlich aller Untersektionen, hat Urheberrechte. Mehr dazu, was Sie mit unseren Anleitungen machen können, finden Sie ganz unten auf der Seite zu jeder Anleitung. |
|||||||


Mit über 40 Jahren Tätigkeit im Entwerfen von Strick- und Häkelmustern bietet Ihnen DROPS Design eine der umfangreichsten Sammlungen von kostenlosen Anleitungen im Internet - in 17 Sprachen übersetzt. Zum jetzigen Zeitpunkt haben wir insgesamt 324 Handarbeitshefte und 12290 Anleitungen auf Deutsch. 12202
Unser Ziel ist es, Ihnen die besten Angebote zum Stricken und Häkeln, Inspirationen und Ratschläge sowie qualitativ hochstehende Garne zu unglaublichen Preisen zu bieten! Möchten Sie unsere Anleitungen nicht nur für den persönlichen Gebrauch nutzen? Unsere Copyright Bedingungen finden Sie bei allen unseren Anleitungen ganz unten auf der jeweiligen Seite. Viel Spaß beim Handarbeiten!
Kommentieren Sie die Anleitung DROPS 56-8
Wir würden gerne Ihre Meinung zu diesem Modell erfahren!
Wenn Sie eine Frage stellen möchten, prüfen Sie bitte, dass Sie die richtige Kategorie im unten stehenden Formular gewählt haben - so bekommen Sie schneller eine Antwort. Die obligatorischen Felder sind mit einem * gekennzeichnet.