
Beliebte Kategorien
Suchen Sie nach einem Garn?


Kommentare / Fragen (168)
![]() Caryn hat geschrieben:
Caryn hat geschrieben:
Good day, Is it possible to chat to someone on line as I want to check my interpretation of this pattern as my friend, an experienced knitter, has a different understanding. I am a beginner who loves to learn and try new things. Kind regards Caryn
26.08.2024 - 12:58DROPS Design hat geantwortet:
Dear Caryn, you can try to ask your DROPS Store, even per mail or telephone, ask other knitters in our DROPS Workshop or simply ask your question here so that we can try to help you. Happy knitting!
27.08.2024 - 08:53
![]() Sharon Hunt hat geschrieben:
Sharon Hunt hat geschrieben:
Knitting an extra row/round between increases when working a raglan that is incorrect in height basically means to knit an extra round/row after every decrease round/row? Correct. Thanks
14.08.2024 - 22:21DROPS Design hat geantwortet:
Hi Sharon, Yes, that is correct :)
15.08.2024 - 06:37
![]() Aina Eilen Krogh hat geschrieben:
Aina Eilen Krogh hat geschrieben:
Nydelig🤩
13.06.2024 - 10:43
![]() Julia hat geschrieben:
Julia hat geschrieben:
Garnmenge für Größe S passte bei mir nicht! Sonst stimmten die Angaben für den Garnverbrauch von Drops in den letzten 10 Jahren bei mir immer. Ich musste jetzt für die letzten sechs Reihen noch Wolle nachbestellen.
24.05.2024 - 21:10
![]() Marilyn Growns hat geschrieben:
Marilyn Growns hat geschrieben:
Thankyou for all the support given over the various stages with issues I have had understanding how to knit this cardigan. I am extremely happy as I have finished it and it looks amazing:)
20.05.2024 - 14:20
![]() Marilyn Growns hat geschrieben:
Marilyn Growns hat geschrieben:
Really appreciate the support. Last question I hope. Re Raglan sleeve and raglan body. At row 17 size L - . Would this starting row look like the following..Knit pattern to 1st sleeve - K2 tog,k2,slip 1,k1, psso, repeated at end of sleeve, then immediaetly the same instruction k2 tog, k2, slip 1,k1,psso at the start of the back body, knit the rest of the pattern, then k2 tog, k2, slip 1, k1, psso and then start the decrease process again for the next sleeve? Cannot find a video for this. Thanks
08.05.2024 - 10:11DROPS Design hat geantwortet:
Dear Mrs Growns, in size L you will first decrease 8 sts for raglan 17 times on every other row, ie decrease on both sleeve and body (front and back pieces), then decrease only on body on next row from RS (18th decrease for body), then decrease again 8 sts (1st decrease on every 4th row on sleeves + 19th decrease on body); from now on, decrease on every other right side row = on every 4th row 8 sts (both body and sleeve) a total of 2 times then increase only on sleeve a total of 3 times on every 4th row - you have increased (17+1+2+3= 23 times on sleeves and 17+1+1+2=21 times on body). Happy knitting!
08.05.2024 - 13:09
![]() Marilyn Growns hat geschrieben:
Marilyn Growns hat geschrieben:
Please clarify - RAGLAN SLEEVE instruction - decrease every other row 17 times for LARGE and then decrease every row 6 times. Does this mean - Dec on the RS only 17 times - 34 rows in total (K2tog, K2,slip 1 st as if to knit, K1, psso) and thereafter decrease on the RS (K2tog, K2,slip 1 st as if to knit, K1, psso) followed by the WS (P2 twisted tog, P2, P2 tog) 6 times Thanks in advance
05.05.2024 - 08:58DROPS Design hat geantwortet:
Dear Marilyn, yes, it means just that. "Every other row" is every row from the right side, "every row" means every right side AND every wrong side row as well. Happy Crafting!
05.05.2024 - 15:30
![]() Marilyn Growns hat geschrieben:
Marilyn Growns hat geschrieben:
Drops 169-1 no w‐583. Size Large Re instruction: Yoke - slip sleeves on to same circular needle as body where armholes were cast off = 306 stitches. My question is....instructions say slip. However looking at the video on YouTube for' how to work raglan from the bottom up' the video shows 'knitting' the sleeve on NOT 'slipping' the sleeves onto the circular needle. Please could you clarify if I should SLIP or KNIT the sleeve onto the circular needle. Thanks in advance
03.05.2024 - 19:55DROPS Design hat geantwortet:
Dear Marily, honestly, it does not really matter. If you slip the stitches, then you can continue from the right side, if you knit the stitches, the next row will be from the wrong side. In both cases you should pay attention to continue the pattern from the right place in the diagram. Happy Knitting!
03.05.2024 - 23:13
![]() Marilyn Growns hat geschrieben:
Marilyn Growns hat geschrieben:
Re - Sleeve....when piece measures 48 cm ( size large) the pattern says... cast off 6 stitches mid under sleeve which leaves 60 stitches.. I have placed markers all the way up the sleeve, therefore should I decrease 3 stitches either side of the last marker? The video is not working. Thankyou
02.04.2024 - 00:10DROPS Design hat geantwortet:
Hi Marilyn, Yes you cast off 3 stitches on each side of the marker. Happy knitting!
02.04.2024 - 06:38
![]() Marilyn Growns hat geschrieben:
Marilyn Growns hat geschrieben:
Can you please let me know how often the cable is done? i cannot see it in the pattern. I am making size L. I do however note that on 16/06/21 you answered Jenny's question - every 8th row. Have I interpreted that correctly? Looking at the picture of the cardigan it looks like in total there are 11 cables to the neckline. Please could you confirm. Sorry for the many questions. I love this pattern and really want to be able to complete it. Thanks in advance
23.01.2024 - 14:54DROPS Design hat geantwortet:
Dear Mrs Growsn, cables are worked on every 8th row as follows in A.1: Row 1 with cable, Row 2 til 8 without cable, repeat these 8 rows. Happy knitting!
24.01.2024 - 08:14
|
||||||||||
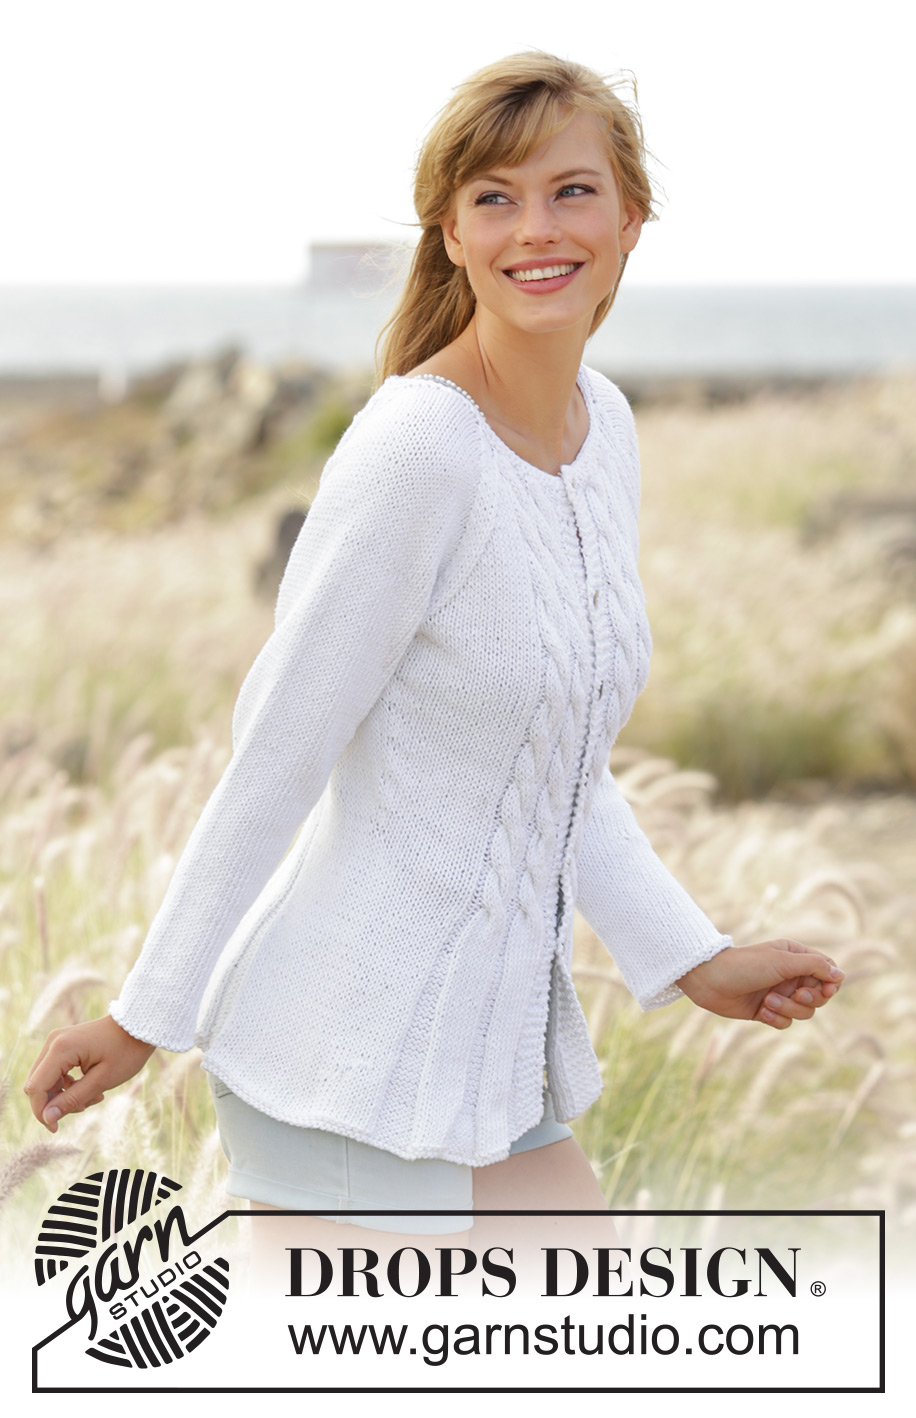
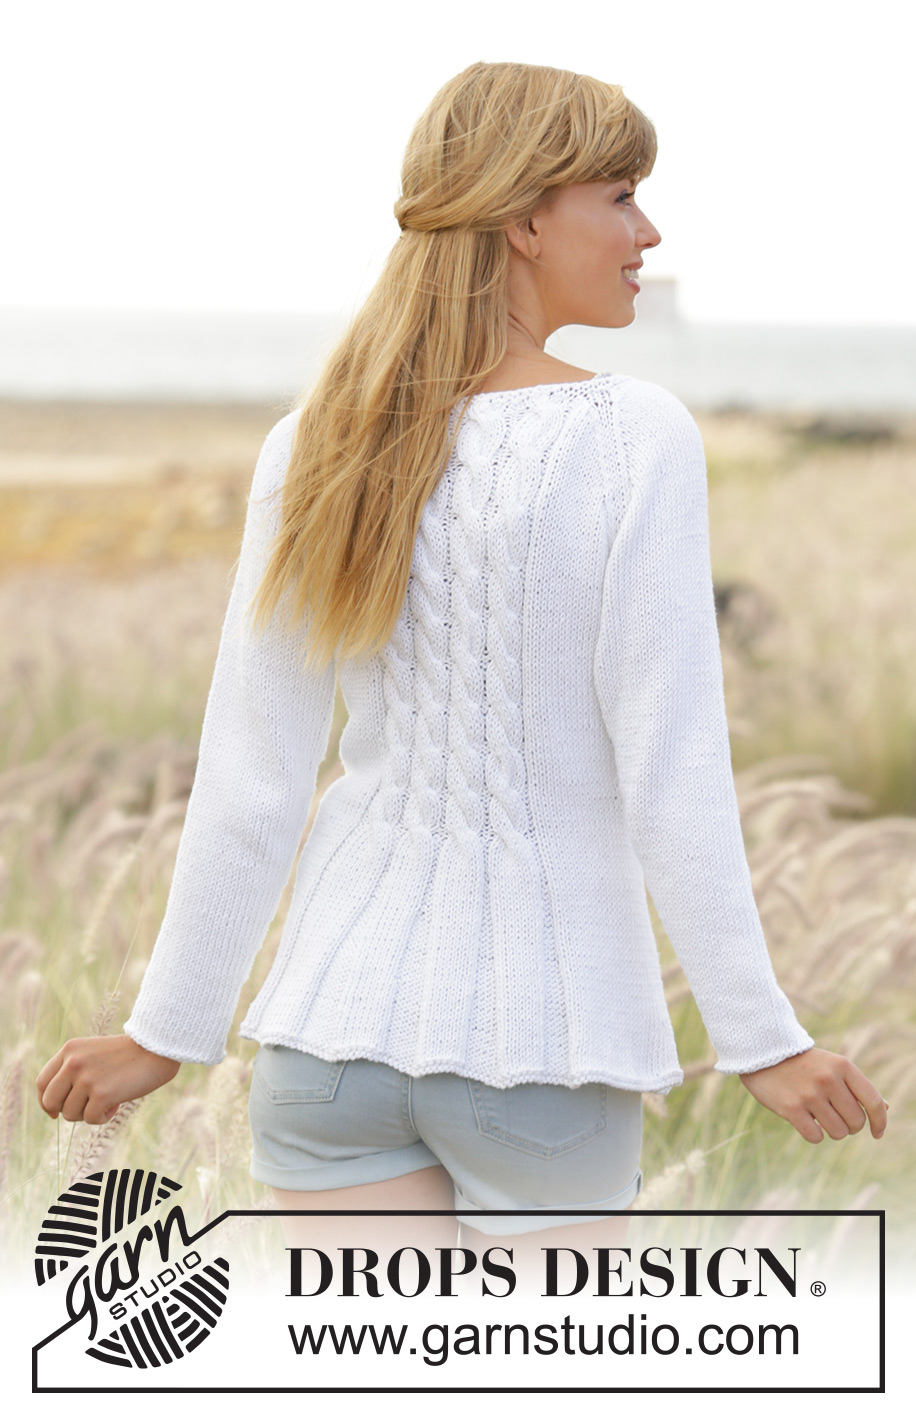
Romantic Twist#romantictwistcardigan |
||||||||||
 |
 |
|||||||||
Gestrickte taillierte DROPS Jacke in ”Paris” mit Zopfmuster und Raglanärmeln. Größe S - XXXL.
DROPS 169-1 |
||||||||||
|
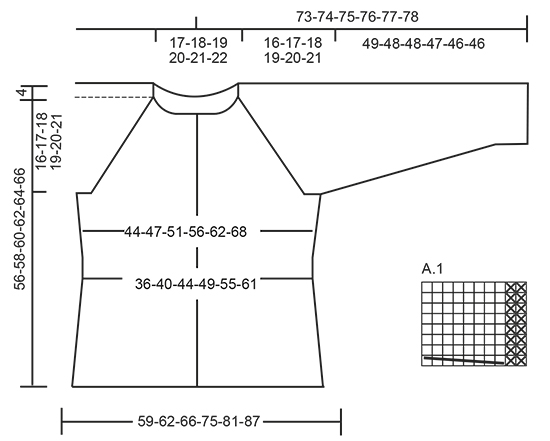
KRAUSRIPPEN (in Hin- und Rück-R): 1 Krausrippe = 2 R kraus re = 2 R re. KRAUSRIPPEN (in Rd): 1 Krausrippe = 2 Rd kraus re = 1 Rd re und 1 Rd li. ABNAHMETIPP: 1 M abnehmen, indem 2 M li zusgestr werden. In der einen Rd am Anfang und in der nächsten Rd am Ende jedes Linksbereichs abnehmen und in dieser Weise weiter abwechselnd abnehmen. MUSTER: Siehe Diagramm A.1. Das Diagramm zeigt alle Hin- und Rück-R, Hin-R werden von rechts nach links, Rück-R von links nach rechts gelesen. RAGLANABNAHMEN: Es werden 2 M an jedem Übergang zwischen Rumpfteil und Ärmeln abgenommen. Wie folgt in Hin-R abnehmen: 2 M re zusstr, 2 M re (der Markierer sitzt dazwischen), 1 M wie zum Rechtsstr abheben, 1 M re, die abgehobene M überziehen. Wie folgt in Rück-R abnehmen: 2 M li verschränkt zusstr, 2 M li (der Markierer sitzt dazwischen), 2 M li zusstr STRICKTIPP: Wenn die Maschenprobe in der Höhe nicht stimmt, d.h. zu kurz ist, wird die Raglanschrägung nicht lang genug und der Armausschnitt zu klein. Dies lässt sich anpassen, indem zwischen den Abnahme-R in regelmäßigen Abständen 1 zusätzliche R ohne Abnahmen gestr wird. KNOPFLÖCHER: An der rechten Blende werden Knopflöcher eingearb. 1 Knopfloch = die 2. und 3. M ab dem Rand re zusstr und dann 1 Umschlag arb. Die Knopflöcher bei folgenden Maßen einarb: GR. S: 19, 26, 33, 40, 47 und 54 cm. GR. M: 19, 26, 33, 40, 48 und 56 cm. GR. L: 19, 26, 34, 42, 50 und 58 cm. GR. XL: 19, 28, 36, 44, 52 und 60 cm. GR. XXL: 19, 26, 33, 40, 47, 54 und 62 cm. GR. XXXL: 19, 26, 33, 40, 48, 56 und 64 cm. --------------------------------------------------------- RUMPFTEIL: Die Arb wird in Hin- und Rück-R auf der Rundnadel gestr, ab dem vorderen Rand. 216-228-240-266-286-306 M (einschl. beidseitig je 5 M für die vorderen Blenden) auf Rundnadel Nr. 5 mit Paris anschlagen. 1 KRAUSRIPPE (= 2 R kraus re, siehe oben) str, dann wie folgt str – ab der Hin-R: 5 M kraus re, * 8 M li, 8 M re *, von *-* insgesamt 2 x arb, 8 M li, 27-33-39-44-54-64 M glatt re, * 8 M li, 8 M re *, von *-* insgesamt 4-4-4-5-5-5 x arb, 8 M li, 27-33-39-44-54-64 M glatt re, * 8 M li, 8 M re *, von *-* insgesamt 2 x arb, 8 M li, 5 M kraus re. In dieser Musterfolge weiterstr. MASCHENPROBE BEACHTEN! Bei einer Gesamtlänge von 5 cm in allen Linksbereichen je 1 M abnehmen (= 11-11-11-12-12-12 Abnahmen pro Abnahme-Rd) – ABNAHMETIPP lesen. Diese Abnahmen alle 3 cm noch weitere 5 x wdh = 150-162-174-194-214-234 M. An der rechten Blende KNOPFLÖCHER einarb – siehe oben. Bei einer Gesamtlänge von 21 cm wie folgt weiterstr: 5 M kraus re, Muster A.1 2 x, 2 M li, glatt re über die nächsten 27-33-39-44-54-64 M, Muster A.1 4-4-4-5-5-5 x, 2 M li, glatt re über die nächsten 27-33-39-44-54-64 M, Muster A.1 2 x, 2 M li, 5 M kraus re. 2 Markierer anbringen, je 1 nach den ersten und vor den letzten je 40-43-46-51-56-61 M (= Vorderteile, = 70-76-82-92-102-112 M zwischen den Markierern für das Rückenteil). Bei einer Gesamtlänge von 23 cm beidseitig jedes Markierers je 1 M zunehmen (= 4 M zugenommen), diese Zunahmen alle 2½-3-3-3½-3½-4 cm noch weitere 5 x wdh = 174-186-198-218-238-258 M. Bei einer Gesamtlänge von 40-41-42-43-44-45 cm die nächste R wie folgt für die Armausschnitte str – ab der Hin-R: 43-46-49-54-59-64 M str, die nächsten 6 M abketten, 76-82-88-98-108-118 M str, die nächsten 6 M abketten, die restlichen 43-46-49-54-59-64 M str. Die Arb zur Seite legen und die Ärmel str. ÄRMEL: Die Arb wird in Rd auf dem Nadelspiel gestr. 32-34-36-38-40-42 M auf Nadelspiel Nr. 5 mit Paris anschlagen. 1 KRAUSRIPPE (= 2 Rd kraus re, siehe oben) str, dann glatt re weiterstr. 1 Markierer am Rd-Beginn anbringen (= an der unteren Ärmelmitte). Bei einer Gesamtlänge von 8 cm 2 M an der unteren Ärmelmitte zunehmen, diese Zunahmen alle 3-2½-2½-2½-2-2 cm noch weitere 13-13-14-15-16-16 x wdh = 60-62-66-70-74-76 M. Bei einer Gesamtlänge von 49-48-48-47-46-46 cm (die kürzeren Maße bei den größeren Größen werden durch eine längere Armkugel ausgeglichen) die mittleren 6 M an der unteren Ärmelmitte abketten = 54-56-60-64-68-70 M. Die Arb zur Seite legen und den 2. Ärmel ebenso str. PASSE: Die Ärmel-M an den beiden Stellen, an denen beim Rumpfteil für die Armausschnitte abgekettet wurde, auf dieselbe Rundnadel wie die Rumpfteil-M legen = 270-286-306-334-362-386 M. An jedem Übergang zwischen Rumpfteil und Ärmeln je 1 Markierer anbringen (= 4 Markierer). Im Muster wie zuvor weiterstr, GLEICHZEITIG die RAGLANABNAHMEN (siehe oben) arb, es wird an Rumpfteil und Ärmeln in unterschiedlichem Rhythmus abgenommen, wie folgt: ÄRMEL: In jeder 2. R 16-17-17-18-18-19 x abnehmen, dann in jeder R 4-4-6-7-9-9 x = insgesamt 20-21-23-25-27-28 x abnehmen. RUMPFTEIL: In jeder 4. R 4-2-0-0-0-0 x abnehmen, dann in jeder 2. R 11-16-19-21-19-16 x, dann in jeder R 0-0-2-0-7-15 x = insgesamt 15-18-21-21-26-31 x wdh. Nach allen Abnahmen sind 130-130-130-150-150-150 M auf der Nadel. In der nächsten R über jedem Zopf von A.1 je 2 M abnehmen = 114-114-114-132-132-132 M. 2 Krausrippen (= 4 R kraus re) über alle M str, in der ersten R 20-16-12-26-22-18 M gleichmäßig verteilt abnehmen = 94-98-102-106-110-114 M. Abketten. FERTIGSTELLEN: Die Öffnungen unter den Armen schließen. Die Knöpfe an die linke Blende nähen. |
||||||||||
Erklärungen zum Diagramm |
||||||||||
|
||||||||||
 |
||||||||||
Haben Sie diese Anleitung nachgearbeitet?Dann taggen Sie Ihre Fotos mit #dropspattern #romantictwistcardigan oder schicken Sie sie an die #dropsfan Galerie Brauchen Sie Hilfe bei dieser Anleitung?Sie finden 27 Videotutorials, einen Kommentar/Fragen-Bereich und vieles mehr, wenn sie die Anleitung bei garnstudio.com aufrufen. © 1982-2026 DROPS Design A/S. Wir besitzen alle Rechte. Dieses Dokument, einschließlich aller Untersektionen, hat Urheberrechte. Mehr dazu, was Sie mit unseren Anleitungen machen können, finden Sie ganz unten auf der Seite zu jeder Anleitung. |
||||||||||


Mit über 40 Jahren Tätigkeit im Entwerfen von Strick- und Häkelmustern bietet Ihnen DROPS Design eine der umfangreichsten Sammlungen von kostenlosen Anleitungen im Internet - in 17 Sprachen übersetzt. Zum jetzigen Zeitpunkt haben wir insgesamt 325 Handarbeitshefte und 12298 Anleitungen auf Deutsch. 12210
Unser Ziel ist es, Ihnen die besten Angebote zum Stricken und Häkeln, Inspirationen und Ratschläge sowie qualitativ hochstehende Garne zu unglaublichen Preisen zu bieten! Möchten Sie unsere Anleitungen nicht nur für den persönlichen Gebrauch nutzen? Unsere Copyright Bedingungen finden Sie bei allen unseren Anleitungen ganz unten auf der jeweiligen Seite. Viel Spaß beim Handarbeiten!
Kommentieren Sie die Anleitung DROPS 169-1
Wir würden gerne Ihre Meinung zu diesem Modell erfahren!
Wenn Sie eine Frage stellen möchten, prüfen Sie bitte, dass Sie die richtige Kategorie im unten stehenden Formular gewählt haben - so bekommen Sie schneller eine Antwort. Die obligatorischen Felder sind mit einem * gekennzeichnet.