
Beliebte Kategorien
Suchen Sie nach einem Garn?


Kommentare / Fragen (69)
![]() KTY hat geschrieben:
KTY hat geschrieben:
Bonsoir, très joli modèle. Est-il possible de rallonger les manches de quelques centimètres sans avoir à recalculer? Merci pour votre réponse
23.03.2021 - 21:29DROPS Design hat geantwortet:
Bonjour Kty, probablement, vous trouverez ici d'autres hauts tricotés en fils du groupe B, avec des longueurs de manches différentes; vous pourrez vous en inspirer pour trouver la longueur/la méthode qui vous convient. Bon tricot!
24.03.2021 - 07:52
![]() Louise Ojén hat geschrieben:
Louise Ojén hat geschrieben:
Jeg er lidt over halvvejs i bærestykket med A2. Og det går nu op for mig at mønsteret er skævt. I opskriften står der at jeg skal strikke 14 m ret, A2 osv. Men hvornår starter de 14 masker ret? For starter de altid lige efter raglan mærket så vil mønstret jo ikke ende midt på...? Hvordan sikrer jeg mig at mønstret bliver på midten af forstykket, når der i opskriften står jeg skal strikke 14 masker derefter A2 osv? Vh. Louise.
05.01.2020 - 21:54
![]() Eva hat geschrieben:
Eva hat geschrieben:
Dobrý den, prosím jak na to raglánové skosení při Velikosti XL. NEMOHU SE V TOM VYZNAT. Děkuji
30.06.2019 - 13:05DROPS Design hat geantwortet:
Dobrý den, Evo, text návodu je upravený a přeformulovaný, podívejte se, prosím, na odstavec RAGLÁNOVÉ ZKOSENÍ a pak rozpis pro SEDLO - věřím, že teď bude postup srozumitelnější a jasnější. Příjemné letní pletení! Hana
01.07.2019 - 08:43
![]() Deb From Nova Scotia hat geschrieben:
Deb From Nova Scotia hat geschrieben:
I mad this sweater in Belle navy blue, hand washed with Eucalan delicate soap, blocked and let it dry. Love the yarn; drapes nicely & has a nice weight and shine to it. I like the fit of the sweater, but, like a few others, I find the neck too wide. I’m a fairly new knitter and don’t know what to do to make the neck opening smaller. What do you suggest? I’d like to make another sweater from this pattern. I’m guessing that I should cast on fewer stitches, and knit extra rows. Correct?
20.02.2019 - 02:58DROPS Design hat geantwortet:
Dear Deb From Nova Scotia, this pattern has a quite large neck as shown in the picture. We are unfortunately not able to adapt every pattern to every single request but please contact your DROPS store - even per mail or telephone - for any individual assistance. Happy knitting!
20.02.2019 - 09:36
![]() Dk hat geschrieben:
Dk hat geschrieben:
Hello, I finished the a2 and done all the 17 raglan repetitions for size small. However, instead of finding 294 stitches I only have 286. Which actually makes sense since 17 repetitions times 8 stitches is actually 136, plus the previous 150 totals 286. Is this a mistake on the pattern? Thank you !
04.11.2018 - 17:19DROPS Design hat geantwortet:
Dear Dk, you increase for the raglan a total of 18 times (= 17 more times = 18 times), so that you will have 150 sts + (8 sts inc x 18 times = 144)= 294 sts. Happy knitting!
05.11.2018 - 09:44
![]() Kathy Fae hat geschrieben:
Kathy Fae hat geschrieben:
Thank you for the help. Another question regarding A2 section. I’m making a large. I have 50 sts on that section. (Instructions were knit 49, knit 1, then place a marker) So I have 50. I’ll work raglan increase, 4 sts, knit 16, work chart, (17 sts), that’s a total of 37 sts that only leaves 13 sts until marker. The A2 design will not be centered on the chest. What am I doing wrong?
21.06.2018 - 18:19DROPS Design hat geantwortet:
Dear Mrs Fae, A.2 should be centered over the 49 sts on front piece = K16, work A.2, K14, inc for raglan = YO, K1, YO, K1fb, K1 (= st with marker), K1fb, YO, K1, YO and continue working inc at each raglan, at the end of round you will work the increase on each side of first marker (= at the end of round + at the beg of next round). Happy knitting!
22.06.2018 - 07:54
![]() Kathy Fae hat geschrieben:
Kathy Fae hat geschrieben:
I’m unsure about A2 section. I’ve placed all my raglan markers. I’m making a Large. Is this correct: Row 1, work raglan increases (4 sts), knit 16, work row 1 of chart, then continue on with knit and regular increases to end. Row 2, knit all, twisted knit ay certain YOs. Row 3, work raglan increases, then knit 16 again, then row 3 of chart. I’m uncertain because the charted area moves over two stitches due to the two raglan increases. Am I doing this right?
21.06.2018 - 09:18DROPS Design hat geantwortet:
Dear Mrs Fae, when you will work row 3 in A.2 you should line it up over the row 1 in A.2, ie over the same 17 sts as on row 1 (you can insert a marker before and after these 17 sts to mark where A.2 should be worked). The number of sts on each side of A.2 will increase due to the raglan increases. Happy knitting!
21.06.2018 - 15:24
![]() Julie hat geschrieben:
Julie hat geschrieben:
Right now i have 294 stitches when i separate the stitches for the sleeves and the front and back on my needles i will only have 162 stitches when it written that i should have 174 the extra 12 stitches is that what i'm adding to the sleeves and counts for the 174? where does a person put the stitch markers?
28.05.2018 - 02:53DROPS Design hat geantwortet:
Dear Julie, the new markers will be inserted in the middle of the new 6 sts cast on under sleeve: 81 sts (= front piece), 6 sts (= 3 sts, 1 marker, 3 sts), 81 sts (= back piece), 6 sts (= 3 sts, 1 marker, 3 sts) = 174 sts (there are now 66 sts on each side on thread/st holders). Happy knitting!
28.05.2018 - 09:48
![]() Julie hat geschrieben:
Julie hat geschrieben:
Hi I have another question the A 2 design how many stitches are between the holes? I really don’t understand the directions so any kind of help you could give would be much appreciated
18.05.2018 - 05:39DROPS Design hat geantwortet:
Dear Julie, diagram A.2 is showing the 17 sts you have to work on mid front. Start reading diagram from the bottom corner on the right side towards the left on every round. Inserting a marker at the beg and another marker at the end of A.2 to mark these 17 sts can help. Happy knitting!
18.05.2018 - 09:05
![]() Julie hat geschrieben:
Julie hat geschrieben:
Could you please explain to me on the yoke part of the pattern when i switch the needles to size 4 i increased the 16 stitches on the next round it says it wants to set 4 markers than i knitted the 45 stitches and knitted one more stitch and put the 2nd marker on this stitch is this stitch is to be the dividing stitch between front and the sleeve?jploog
17.05.2018 - 03:30DROPS Design hat geantwortet:
Dear Julie, that's right the stitch with the 2nd marker is the st on raglan line between front and sleeve, the st with 3rd marker is between sleeve and back piece, the st with 4th marker is between back piece and sleeve (first st on round is the one between sleeve and front piece). Happy knitting!
17.05.2018 - 09:02
|
|||||||||||||||||||
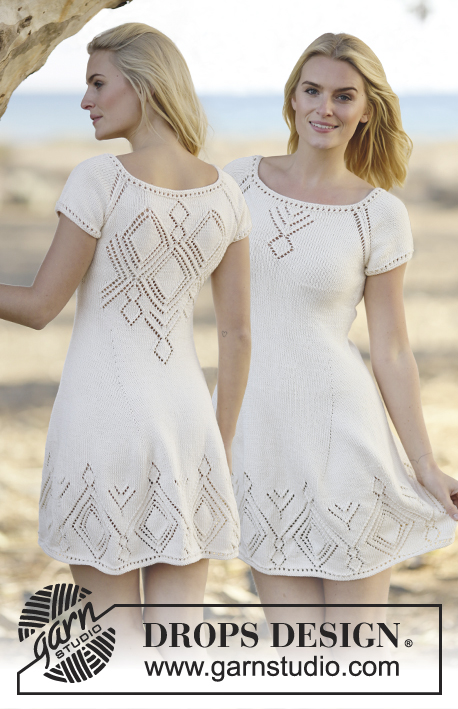
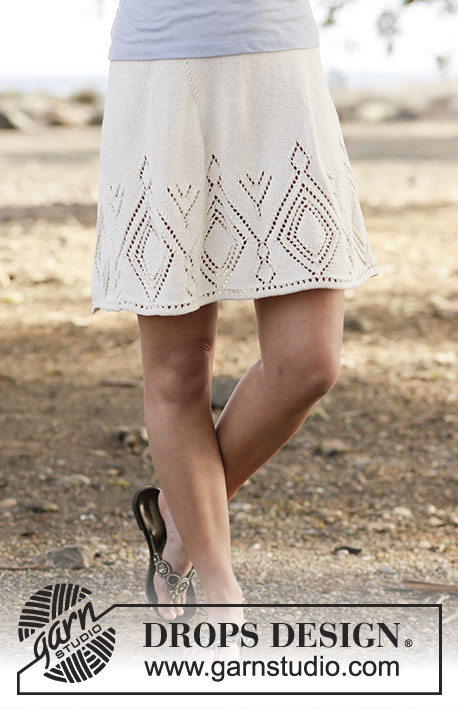
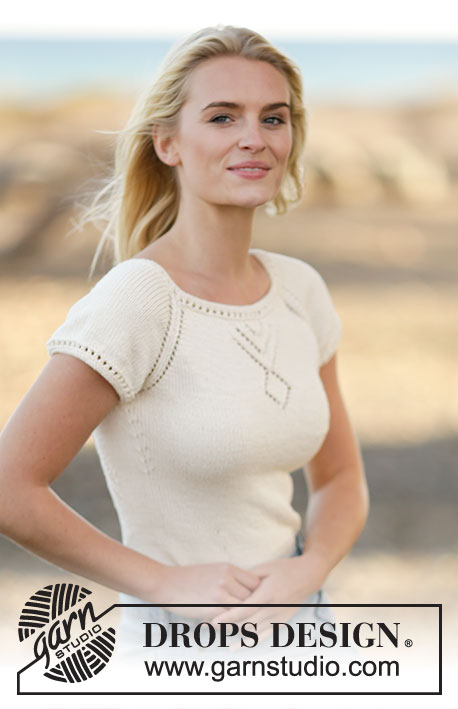
Serene Spring |
|||||||||||||||||||
 |
 |
||||||||||||||||||
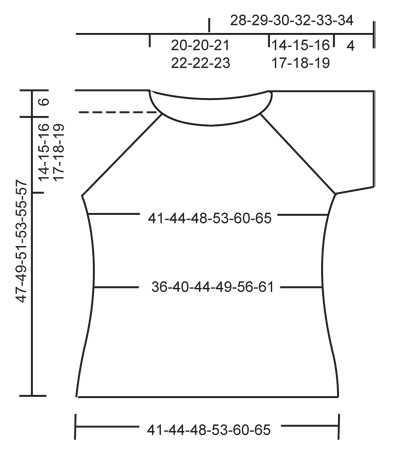
Von oben nach unten gestricktes DROPS TOP in ”Belle” mit Lochmuster und Raglanärmeln. Größe S - XXXL.
DROPS Extra 0-1104 |
|||||||||||||||||||
|
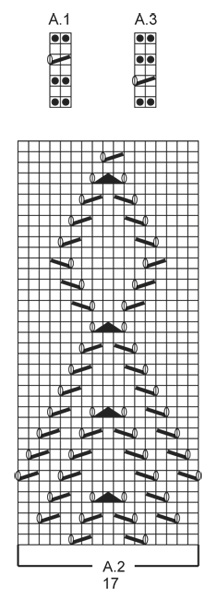
MUSTER: Siehe Diagramme A.1 - A.3. ABNAHMETIPP: 1 M vor dem Markierer wie folgt abnehmen: Str bis noch 2 M vor dem Markierer übrig sind, 1 M abheben, 1 M re, die abgehobene M überziehen. 1 M nach dem Markierer wie folgt abnehmen: 2 M re zusstr. RAGLANZUNAHMEN: In den verschiedenen Größen wird unterschiedlich zugenommen: GR. S-M: Beidseitig jedes Markierers 1 M wie folgt zunehmen (= insg. 8 M zugenommen): 1 Umschlag, 1 M re verschr, 1 M re (= markierte M), 1 M re verschr, 1 Umschlag. Die Umschläge in der nä. Rd nicht verschr str, sie sollen Löcher bilden. Diese Zunahmen in jeder 2. Rd weitere 17-19 x wdh. BITTE BEACHTEN: Die Zunahmen am 1. Markierer wie folgt arbeiten: Am Rundenbeginn (d.h. nach der markierten M): 1 M re verschr, 1 Umschlag. Am Rundenende (d.h. vor der markierten M): 1 Umschlag, 1 M re verschr, 1 M re (= markierte Masche). GR. L-XL-XXL-XXXL: Beidseitig jedes Markierers 2 M wie folgt zunehmen (= insg. 16 M zugenommen): 1 Umschlag, 1 M re, 1 Umschlag, 1 M re verschr, 1 M re (= markierte M), 1 M re verschr, 1 Umschlag, 1 M re, 1 Umschlag (den ersten und letzten Umschlag in der nächsten Rd re verschr str, sie sollen keine Löcher bilden, die beiden mittleren Umschläge jedoch NICHT verschr stricken, sie sollen Löcher bilden). Diese Zunahmen in jeder 2. Rd weitere 1-1-1-3 x wdh. BITTE BEACHTEN: Die Zunahmen am 1. Markierer wie folgt arbeiten: Am Rundenbeginn (d.h. nach der markierten M): 1 M re verschr, 1 Umschlag, 1 M re, 1 Umschlag. Am Rundenende (d.h. vor der markierten M): 1 Umschlag, 1 M re, 1 Umschlag, 1 M re verschr, 1 M re (= markierte Masche). Danach wie folgt zunehmen: Beidseitig jedes Markierer 1 M wie folgt zunehmen (= insg. 8 M zugenommen): 1 Umschlag, 1 M re verschr, 1 M re (= markierte M), 1 M re verschr, 1 Umschlag. Die Umschläge in der nächsten Rd NICHT verschr str, sie sollen Löcher bilden. Diese Zunahmen in jeder 2. Rd insgesamt 19-20-22-21 x arb. ZUNAHMETIPP: 1 M vor dem Markierer beginnen und wie folgt zunehmen: 1 Umschlag, 2 M re (der Markierer befindet sich dazwischen), 1 Umschlag. In der nächsten Rd die Umschlag re verschr str, um Löcher zu vermeiden. ---------------------------------------------------------- TOP: Die Arb wird in Runden auf der Rundnadel gestr, von oben nach unten. PASSE: 134-134-140-144-144-148 M auf Rundnadel Nr. 3,5 mit Belle anschlagen. A.1 (= 2 M) über alle M str. Wenn A.1 1 x in der Höhe gestr wurde, zu Rundnadel Nr. 4 wechseln. In der nächsten Rd alle M re str und gleichzeitig 16-20-14-22-42-46 M gleichmäßig verteilt zunehmen (= 150-154-154-166-186-194 M). In der nä. Rd wie folgt 4 Markierer setzen, d.h. je 1 Markierer in die mittlere M in jeder Raglanlinie: Den 1. Markierer in die letzte M der Vor-Rd, 45-47-49-55-65-71 M re str (= Vorderteil), 1 M re str und den 2. Markierer in diese M setzen, 28-28-26-26-26-24 M re str (= Ärmel), 1 M re str und den 3. Markierer in diese M setzen, 45-47-49-55-65-71 M re str (= Rückenteil), 1 M re str und den 4. Markierer in diese M setzen, 28-28-26-26-26-24 M re str (= Ärmel). MASCHENPROBE BEACHTEN! Dann wie folgt str und GLEICHZEITIG mit den RAGLANZUNAHMEN beginnen (siehe oben): Die Raglanzunahme am Rundenbeginn nach dem 1. Markierer stricken (siehe Beschreibung unter RAGLANZUNAHMEN oben), 14-15-16-19-24-27 M re str, A.2 (= 17 M), re str bis noch 1-1-2-2-2-2 M vor dem 2. Markierer übrig sind, die RAGLANZUNAHMEN str (siehe oben), re str bis noch 1-1-2-2-2-2 M vor dem 3. Markierer übrig sind, die Raglanzunahmen str, re str bis noch 1-1-2-2-2-2 M vor dem 4. Markierer übrig sind, die Raglanzunahmen str, re str bis noch 1-1-2-2-2-2 M vor dem 1. Markierer übrig sind, die Raglanzunahme vor dem 1. Markierer str. Wenn A.2 1 x in der Höhe gestr wurde, glatt re über diese M str. Nach allen Zunahmen sind 294-314-338-358-394-426 M auf der Nadel. Die Arb hat eine Gesamtlänge von ca. 14-15-16-17-18-19 cm. Glatt re weiterstr und GLEICHZEITIG wie folgt arb: die ersten 81-87-95-103-117-129 M str (= Vorderteil), die nächsten 66-70-74-76-80-84 M für den Ärmel stilllegen, 6-6-6-8-8-8 neue M unter dem Arm anschlagen (1 Markierer in die Mitte dieser neuen M setzen = Seite), die nächsten 81-87-95-103-117-129 M str (= Rückenteil), die nächsten 66-70-74-76-80-84 M für den Ärmel stilllegen, 6-6-6-8-8-8 neue M unter dem Arm anschlagen (1 Markierer in die Mitte dieser neuen M setzen = Seite) (= 174-186-202-222-250-274 M auf der Nadel). 1 Markierer setzen, DIE ARB WIRD NUN AB HIER GEMESSEN! RUMPFTEIL: Glatt re weiterstr. Bei einer Länge von 3 cm beidseitig jedes Seitenmarkierers je 1 M abnehmen (= 4 M abgenommen) – ABNAHMETIPP lesen. Diese Abnahmen alle 2½-4-4-4-4-4 cm noch weitere 5-3-3-3-3-3 x wdh (= 150-170-186-206-234-258 M). Bei einer Länge von 20 cm für alle Größen beidseitig jedes Seitenmarkierers je 1 M zunehmen (= 4 M zugenommen) - ZUNAHMETIPP lesen. Diese Zunahmen alle 2-4-4-4-4-4 cm noch weitere 5-3-3-3-3-3 x wdh (= 174-186-202-222-250-274 M). Bei einer Länge von 31-32-33-34-35-36 cm zu Rundnadel Nr. 3,5 wechseln. Alle M im Muster A.3 (= 2 M) str. Wenn A.3 zu Ende gestr wurde, abketten. ÄRMEL: Die Arb wird in Runden auf dem Nadelspiel gestr. Die stillgelegten M des einen Ärmels zurück auf Nadelspiel Nr. 4 legen und 6-6-6-8-8-8 M unter dem Arm anschlagen (= 72-76-80-84-88-92 M). In Rd 2 cm glatt re str, in der nächsten Rd 8 M gleichmäßig verteilt abnehmen (= 64-68-72-76-80-84 M). Zu Nadelspiel Nr. 3,5 wechseln. Alle M im Muster A.3 str. Wenn A.3 zu Ende gestr wurde, abketten. Den 2. Ärmel ebenso str. FERTIGSTELLEN: Die Öffnungen unter den Armen schließen. |
|||||||||||||||||||
Erklärungen zum Diagramm |
|||||||||||||||||||
|
|||||||||||||||||||
 |
|||||||||||||||||||
 |
|||||||||||||||||||
Haben Sie diese Anleitung nachgearbeitet?Dann taggen Sie Ihre Fotos mit #dropspattern oder schicken Sie sie an die #dropsfan Galerie Brauchen Sie Hilfe bei dieser Anleitung?Sie finden 21 Videotutorials, einen Kommentar/Fragen-Bereich und vieles mehr, wenn sie die Anleitung bei garnstudio.com aufrufen. © 1982-2026 DROPS Design A/S. Wir besitzen alle Rechte. Dieses Dokument, einschließlich aller Untersektionen, hat Urheberrechte. Mehr dazu, was Sie mit unseren Anleitungen machen können, finden Sie ganz unten auf der Seite zu jeder Anleitung. |
|||||||||||||||||||


Mit über 40 Jahren Tätigkeit im Entwerfen von Strick- und Häkelmustern bietet Ihnen DROPS Design eine der umfangreichsten Sammlungen von kostenlosen Anleitungen im Internet - in 17 Sprachen übersetzt. Zum jetzigen Zeitpunkt haben wir insgesamt 324 Handarbeitshefte und 12290 Anleitungen auf Deutsch. 12202
Unser Ziel ist es, Ihnen die besten Angebote zum Stricken und Häkeln, Inspirationen und Ratschläge sowie qualitativ hochstehende Garne zu unglaublichen Preisen zu bieten! Möchten Sie unsere Anleitungen nicht nur für den persönlichen Gebrauch nutzen? Unsere Copyright Bedingungen finden Sie bei allen unseren Anleitungen ganz unten auf der jeweiligen Seite. Viel Spaß beim Handarbeiten!
Kommentieren Sie die Anleitung DROPS Extra 0-1104
Wir würden gerne Ihre Meinung zu diesem Modell erfahren!
Wenn Sie eine Frage stellen möchten, prüfen Sie bitte, dass Sie die richtige Kategorie im unten stehenden Formular gewählt haben - so bekommen Sie schneller eine Antwort. Die obligatorischen Felder sind mit einem * gekennzeichnet.