
Beliebte Kategorien
Suchen Sie nach einem Garn?


Kommentare / Fragen (123)
Lisa hat geschrieben:
Hi, I am working on the sleeve for size S, and after the third increase I already have the total 57 tr/ch stitches , because increasing by 1tr+1ch at each end of the row means there is an increase of 4 stitches for the row, but the pattern only counts 2 to calculate the total. Is that correct, and if so should I end up with a total of 69 stitches? Or am I doing something wrong? thanks
30.04.2017 - 16:33DROPS Design hat geantwortet:
Dear Lisa, number of sts after increase will be check, thank you. Happy crocheting!
02.05.2017 - 10:35
![]() Sylvia hat geschrieben:
Sylvia hat geschrieben:
What does, A.1B stands for. First time doing symbols. Thanks
02.04.2017 - 07:12DROPS Design hat geantwortet:
Dear Sylvia, diagram A.1 is divided into 3 parts: A.1A = beg of row from RS (= row1: 3 ch, 1 ch, skip 1 st, 1 dc in next st) and end of row from WS, then A.1B to repeat until last 3 sts on row 1 (= *1 ch, skip 1 st, 1 dc in next ch*, repeat from *-* a total of 3 times for 1 repeat of A.1B, repeat these until 2 sts remain on row, and A.1C = end of row from RS, beg of row from WS (row 1 = 1 ch, 1 dc in last st). Your DROPS store will provide you any further invidivual assistance required for reading charts. Happy crocheting!
03.04.2017 - 10:39
![]() Tommie hat geschrieben:
Tommie hat geschrieben:
Can you send me the pattern for this. I would be happy to pay for a pdf or written out.
03.11.2016 - 02:33DROPS Design hat geantwortet:
Dear Tommie, you will find the pattern for free scrolling down the page. Happy crocheting!
03.11.2016 - 09:45Eva hat geschrieben:
Hello!!!Can you tell me the size of the jumper on picture?Thank you.
10.08.2016 - 00:13DROPS Design hat geantwortet:
Dear Eva, our models are usually wearing size M - read more about sizing here. Happy crocheting!
10.08.2016 - 08:45
![]() Wendy hat geschrieben:
Wendy hat geschrieben:
I am on the back section starting A2 which seems to be a row of treble's. I've done that and I have 5 extra trebles which I don't know how to get rid of but also, because it has gone from a mesh pattern to all treble's, it is very curly. Am I reading the pattern correctly, is it a row of all treble's?
04.08.2016 - 23:51DROPS Design hat geantwortet:
Dear Wendy, A.2 is all trebles - remember to check and keep gauge (17 tr = 10 cm) when working A.1, and do not work too tight the rows with ch and tr. Happy crocheting!
05.08.2016 - 09:45
![]() Wendy hat geschrieben:
Wendy hat geschrieben:
I really want to make this and looking at it, it appears easy, however, I don't understand the pattern at all. On the back piece, after the foundation row, I've done a treble in the 6th chain from the hook as instructed. It tells me that is A.1A, but the diagram shows it as two chains and a treble. Is it possible to get the written pattern instructions as opposed to looking at the diagram? If not, can you tell me what to do after the first treble in row 2.
31.07.2016 - 01:57DROPS Design hat geantwortet:
Dear Wendy, when you work first row you skip first 5 ch (working in the 6th ch from hook), these first 5 ch are : 1st tr (= 3 ch), 1 ch before next tr + 1 ch skipped before crocheting next tr). At the beg of row 2 work A.1C: 3ch, 1 tr around next ch, then repeat A.1B and finish with A.1C. Happy crocheting!
01.08.2016 - 09:35
![]() Sarah hat geschrieben:
Sarah hat geschrieben:
I need further clarification on the sleeve increases, inadvertently I am acquiring an extra two stitches when increasing the sleeves leading to too many stitches. I have looked at the pattern to see how I can prevent the extra stitches from occurring but having great difficulty in figuring out how, can you advise further? The first increase stitch is placed at A.1 A and at the end however the extra stitches are occurring in every third row following this, hope this makes sense, Thanks Sarah
11.03.2016 - 23:30DROPS Design hat geantwortet:
Dear Sarah, you inc for sleeve 1 st in each side, ie you will have a total of 2 tr more on every inc row - increase should be done by working 1 tr + 1 ch more in outermost tr in each side. On next row, work in A.1 as before, you will have same as before, but just 2 more tr per inc row. Happy crocheting!
12.03.2016 - 18:03Trishy hat geschrieben:
I'm new to the Crotchet world. And was wondering, if I try to make a large size in this jumper, how do I know how many stitches do I need for the back, & front etc?
31.10.2015 - 04:23DROPS Design hat geantwortet:
Dear Trishy, you will find at the bottom of the pattern a measurement chart, compare the measurements (in cm) to a similar garment you have and like the shape and find out the matching size - you can then follow this size in the pattern. Read more about sizing here. Happy crocheting!
31.10.2015 - 18:09
![]() Federica Piucci hat geschrieben:
Federica Piucci hat geschrieben:
Buon pomeriggio, io intendo confezionare questa maglia in con due colori diversi, uno per la parte superiore e uno per quella inferiore. Indicativamente quanti grammi potrebbero servire per le due parti prese separatamente?
12.10.2015 - 15:06DROPS Design hat geantwortet:
Buongiorno Federica. Non riusciamo ad essere precisi sul quantitativo di filato necessario per lavorare con due colori. Lavorare un piccolo campione con i due diversi motivi potrebbe dare una prima indicazione. Il suo rivenditore di fiducia è a sua disposizione per consigliarla. Se possibile e non troppo oneroso, si informi anche sulla possibilità di restituire eventuali gomitoli di filato integri e non utilizzati. Buon lavoro!
16.10.2015 - 23:39Dalia hat geschrieben:
When piece measures 53-54-55-56-57-58 cm / 21''-21¼''-21 5/8''-22''-22½''-22¾'', insert 1 marker in each side (marks where armhole beg). where exactly do I insert my markers?
14.07.2015 - 10:29DROPS Design hat geantwortet:
Dear Dalia, see answer below. Happy crocheting!
27.07.2015 - 11:29
|
|||||||
Donna#donnasweater |
|||||||
 |
 |
||||||
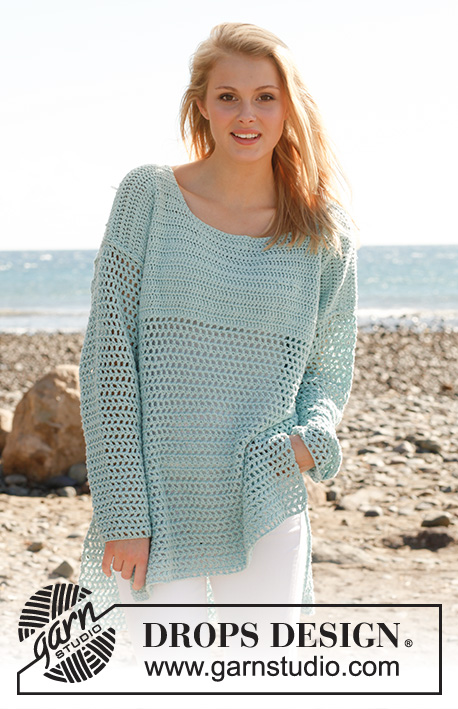
Gehäkelter DROPS Pullover in „Cotton Light“. Größe S - XXXL.
DROPS 145-19 |
|||||||
|
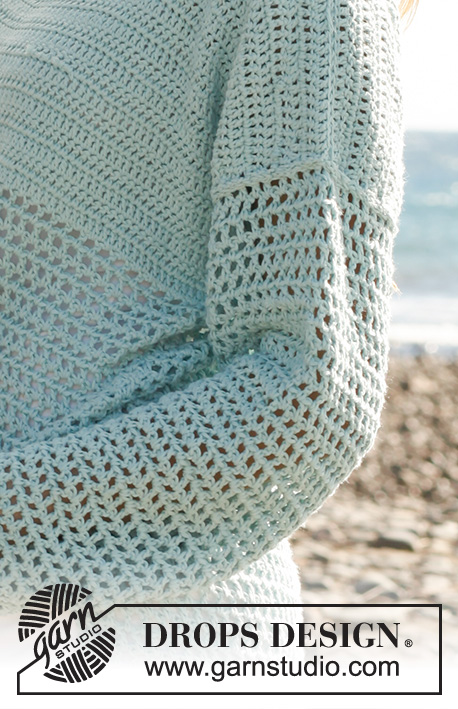
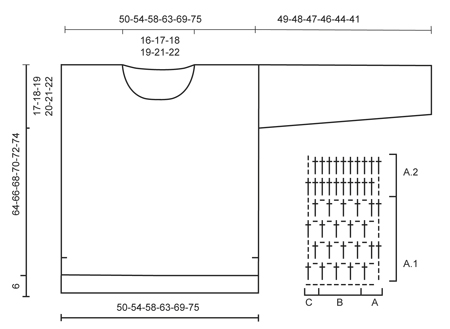
MUSTER: Nach Diagramm A.1 und A.2 häkeln TIPP ZUR ABNAHME: Wenden wenn noch 1 Stb zu häkeln ist = 1 Stb abgenommen. TIPP ZUR AUFNAHME: Man nimmt auf, indem man 1 Stb + 1 Lm zusätzlich in das äußerste Stb auf jeder Seite häkelt. Die aufgenommenen M werden dann ins Muster A.1 integriert. ---------------------------------------------------------- RÜCKENTEIL: Das Rückenteil wird in Hin- und Rückreihen gehäkelt, es ist 6 cm länger als das VORDERTEIL. Locker 88-94-102-110-120-130 Lm auf Nadel 4 häkeln (es ist sehr wichtig, dass die Lm LOCKER gehäkelt werden, damit die Unterkante nicht zu stramm wird). 1 Stb in die 6. Lm von der Nadel häkeln (nun ist A.1 A gehäkelt – Siehe Diagramm). A.1 B über die nächsten 80-86-94-102-112-122 Lm häkeln und schließen mit A.1 C in die 2 letzten Lm. Weiter nach A.1 häkeln. Nach 47-48-49-50-51-52 cm wie folgt häkeln: A.2 A, dann A.2 B bis noch 2 Stb/Lm zu häkeln sind, dann A.2 C = 85-91-99-107-117-127 Stb. Mit Muster A.2 bis zum fertigen Maß weiterhäkeln. Nach 53-54-55-56-57-58 cm auf jeder Seite eine Markierung anbringen (markiert den Anfang des Armloches). Nach 68-70-72-74-76-78 NICHT über die mittleren 27-29-31-33-35-37 Stb häkeln = 29-31-34-37-41-45 Stb für jede Schulter. Die Schulterteile werden nun separat fertig gehäkelt. Weiter im Muster A.2 häkeln. Nach 70-72-74-76-78-80 cm den Faden abschneiden und vernähen. VORDERTEIL: bis zu einer Gesamthöhe von 41-42-43-44-45-46 cm wie das RÜCKENTEIL häkeln – Bitte beachten Sie: das Rückenteil ist 6 cm länger als das VORDERTEIL – daher die verschiedenen Maßangaben. Nun wie folgt weiterhäkeln: A.2 A, dann A.2 B bis noch 2 Stb/Lm zu häkeln sind, A.2 C = 85-91-99-107-117-127 Stb. Mit Muster A.2 bis zum fertigen Maß weiterhäkeln. Nach 47-48-49-50-51-52 cm auf jeder Seite eine Markierung anbringen (markiert den Anfang des Armloches). Nach 56-58-60-62-64-66 cm NICHT über die mittleren 23-25-27-29-31-33 Stb häkeln. Die Schulterteile werden nun separat fertig gehäkelt. GLEICHZEITIG in jeder R 2 x 1 Stb für die Halsrundung abn – siehe TIPP ZUR ABNAHME = 29-31-34-37-41-45 Stb für jede Schulter. Weiter im Muster A.2 häkeln. Nach 64-66-68-70-72-74 cm den Faden abschneiden und vernähen. ÄRMEL: Die Ärmel werden in Hin- und Rückreihen gehäkelt Locker 48-48-50-52-54-56 auf Nadel 4 häkeln (es ist sehr wichtig, dass die Lm LOCKER gehäkelt werden, damit die Unterkante nicht zu stramm wird). 1 Stb in die 6. Lm von der Nadel häkeln (nun ist A.1 A gehäkelt – Siehe Diagramm). A.1 B über die nächsten 40-40-42-44-46-48 Lm häkeln und schließen mit A.1 C in die 2 letzten Lm = 45-45-47-49-51-53 Stb/Lm. Weiter nach A.1 häkeln. Nach 8 cm auf jeder Seite 1 M aufn – siehe TIPP ZUR AUFNAHME. Diese Aufnahmen noch 5-7-8-9-9-10 x alle 7-5-4½-3½-3½-3 cm wdh (insgesamt 6-8-9-10-10-11 Aufnahmen) = 57-61-65-69-71-75 Stb/Lm. Nach 49-48-47-46-44-41 cm den Faden abschneiden und vernähen (in den größeren Größen sind die Ärmel kürzer, da die Schulterpartie breiter ist). FERTIGSTELLEN: Schulternähte schließen. ÄRMEL einsetzen – am Vorder- und Rückenteil von der Schulter nach unten bis zu den Markierungen. Die Ärmel- und Seitennaht in einem Stück zusammennähen, aber nach 26 cm am RÜCKENTEIL und 20 cm am VORDERTEIL aufhören = Schlitz. |
|||||||
Erklärungen zum Diagramm |
|||||||
|
|||||||
 |
|||||||
Haben Sie diese Anleitung nachgearbeitet?Dann taggen Sie Ihre Fotos mit #dropspattern #donnasweater oder schicken Sie sie an die #dropsfan Galerie Brauchen Sie Hilfe bei dieser Anleitung?Sie finden 5 Videotutorials, einen Kommentar/Fragen-Bereich und vieles mehr, wenn sie die Anleitung bei garnstudio.com aufrufen. © 1982-2026 DROPS Design A/S. Wir besitzen alle Rechte. Dieses Dokument, einschließlich aller Untersektionen, hat Urheberrechte. Mehr dazu, was Sie mit unseren Anleitungen machen können, finden Sie ganz unten auf der Seite zu jeder Anleitung. |
|||||||


Mit über 40 Jahren Tätigkeit im Entwerfen von Strick- und Häkelmustern bietet Ihnen DROPS Design eine der umfangreichsten Sammlungen von kostenlosen Anleitungen im Internet - in 17 Sprachen übersetzt. Zum jetzigen Zeitpunkt haben wir insgesamt 324 Handarbeitshefte und 12290 Anleitungen auf Deutsch. 12202
Unser Ziel ist es, Ihnen die besten Angebote zum Stricken und Häkeln, Inspirationen und Ratschläge sowie qualitativ hochstehende Garne zu unglaublichen Preisen zu bieten! Möchten Sie unsere Anleitungen nicht nur für den persönlichen Gebrauch nutzen? Unsere Copyright Bedingungen finden Sie bei allen unseren Anleitungen ganz unten auf der jeweiligen Seite. Viel Spaß beim Handarbeiten!
Kommentieren Sie die Anleitung DROPS 145-19
Wir würden gerne Ihre Meinung zu diesem Modell erfahren!
Wenn Sie eine Frage stellen möchten, prüfen Sie bitte, dass Sie die richtige Kategorie im unten stehenden Formular gewählt haben - so bekommen Sie schneller eine Antwort. Die obligatorischen Felder sind mit einem * gekennzeichnet.