
Beliebte Kategorien
Suchen Sie nach einem Garn?


Kommentare / Fragen (59)
![]() Gilardi Claudette hat geschrieben:
Gilardi Claudette hat geschrieben:
Je ne comprends pas l'explication des manches.que veut dire "avec les rangs raccourcis comme avant,aux mêmes endroits" Merci
31.01.2022 - 09:02DROPS Design hat geantwortet:
Bonjour Mme Gilardi, vous avez auparavant tricoté des rangs raccourcis sur toute la longueur, lorsque vous tricotez les manches, vous allez tourner aux mêmes endroit qu'avant (moins de fois car moins de marqueurs), et continuer ainsi les rangs raccourcis comme avant. Bon tricot!
31.01.2022 - 10:23
![]() Martens hat geschrieben:
Martens hat geschrieben:
Ik ben deze Eden vest aan het breien. Ik ben nu de libkermouw aan het breien. Deze moeten in verkorte toeren gebreid worden. De eerste en de tweede toer van de verkorte toeren moeten gewoon volledig heen en terug gebreid worden. Blijft dit ook gelden in de mouw? Want er zijn maar 2 verkorte toeren in de mouw ipv 3. Ik begrijp tevens niet hoe je 35 cm meet (aan de onderkant op het breedste deel) in de uitleg van de linkermouw. Kan u mij daarmee helpen, please?
09.01.2021 - 20:24DROPS Design hat geantwortet:
Dag Martens,
De lengte van de mouw meet je aan de onderkant van de mouw op het breedste deel. Als je verkorte toeren maakt op de mouw, keer je het werk op het zelfde punt als bij de panden, dus het aantal steken vanaf de hals tot het keerpunt voor de verkorte toeren moet hetzelfde zijn. Hoe de verkorte toeren herhaald worden is verder precies hetzelfde als op de panden.
10.01.2021 - 12:15
![]() Bobby Garland hat geschrieben:
Bobby Garland hat geschrieben:
OK, I think I get it. I need to do 1 more row on the LF (row 1 for me) in order to end at the top. Then, I need to attach a new yarn to stitch #64 on the WS and knit the side piece. Then I will end up with the last row on the RS. Then I will cut that yarn. Then I will go back to the top edge on the LF and pick up yarn and turn to the WS to start the sleeve on those 51 sts. It would have been nice if the instructions had been more specific, instead of saying "work approximately..."
08.01.2021 - 19:57
![]() Bobby Garland hat geschrieben:
Bobby Garland hat geschrieben:
I get what you are saying, but I am not asking about the sleeve, as I am not there yet. I need to know if I am to cut the yarn at the lower edge of the left front piece and reattach it to the WS at stitch #64 to start the first row of the side piece so as to end on the RS of the side piece as instructed. There is no other way to end up on the RS unless you start the side piece on the WS in the middle of the work.
08.01.2021 - 17:21DROPS Design hat geantwortet:
Dear Mrs Garland, after left front piece measures 23 cm, adjust so that next row will be worked from RS and now work this 1 cm starting from RS = from the bottom edge over the first 64 cm - adjust this 1 cm so that last row is worked from RS, then cut the yarn and join it to work sleeve (starting from RS) over the 51 sts left unworked on needle (starting from RS). Happy knitting!
11.01.2021 - 06:57
![]() Bobby Garland hat geschrieben:
Bobby Garland hat geschrieben:
OK, so you also cut the yarn at the end of the left front, which for me is at the lower edge, and reattach to stitch # 64 (for small size) in order to start the side piece on the WS, so as to finish last row of side piece on the RS?
08.01.2021 - 15:15DROPS Design hat geantwortet:
Dear Mrs Garland, the last row on left front piece is worked from RS, but when you turn and work sleeve, first row on sleve is worked from WS = this means you don't need to cut the yarn between left front piece and sleeve, then after sleeve, just work the 64 sts on side at the end of a WS row. - no need to cut the yarn neither between sleeve and back piece. Happy knitting!
08.01.2021 - 16:19
![]() Bobby Garland hat geschrieben:
Bobby Garland hat geschrieben:
Thank you for your response. Another question....I finished the left front and ended on row 8 of short row sequence, which means the next row would be a right side row. In order to finish the side piece on the RS as instructed and have the side pieces be the same number of rows and have a marker in the middle, I would have to start the side piece on the WS. Do I cut the yarn and start at stitch number 64 at the other end from the WS?
08.01.2021 - 14:08DROPS Design hat geantwortet:
Dear Mrs Garland, last row worked for side on front piece is worked from the right side, then cut the yarn and work sleeve. Last row worked on sleeve is from WS, after you have worked this last row on sleeve, work the stitches of the side at the end of this row = from WS, all stitches are now back on needle, turn and start short rows at the beg of next row from RS. Happy knitting!
08.01.2021 - 15:02
![]() Bobby Garland hat geschrieben:
Bobby Garland hat geschrieben:
For short rows, when moving from left front to sleeve to back to sleeve to right front, do you continue in the same numerical sequence from the previous section, or do you start again at row 1 or do you reverse the short row sequence, work rows 8-1? You start with row 1 at the left front border and end up with row 8 at the right front....the pieces would not be "mirrored." Even if you have the same number of rows, the short rows would not be in the same place. Does it matter?
04.01.2021 - 14:50DROPS Design hat geantwortet:
Dear Mrs Garland, after you have worked the sleeve, work the short rows on back piece starting from row 1 of short rows. Happy knitting!
05.01.2021 - 10:43
![]() LISA RENBARGER hat geschrieben:
LISA RENBARGER hat geschrieben:
A friend and I are about to cast on Eden to knit at the same time. My bust measurement is between size M & L. Is there positive ease built in to the pattern?
13.01.2020 - 16:49DROPS Design hat geantwortet:
Dear Mrs Renbarger, measure a similar garment you have and like the shape and compare these measurements to the one in the measurement chart (taken flat from side to side, in cm) to find out the matching size. You can then either decide if you want it rather tight or rather loose (with negative or positive ease). Read more here. Happy knitting!
14.01.2020 - 07:17
![]() Kironieke hat geschrieben:
Kironieke hat geschrieben:
If i cast on 120 stitches for size M with 23st/cm (tension) how do i get to the total height of 75cm? It only adds up to the 52cm of the body, not the yoke/sleeve part.
21.05.2019 - 20:53DROPS Design hat geantwortet:
Dear Kironieke, the 120 stitches will measure 52 cm = whole length of jacket as shown in measurement chart (= 23 cm yoke + 29 cm body). Happy knitting!
22.05.2019 - 09:14
![]() Rosie FRANCIS hat geschrieben:
Rosie FRANCIS hat geschrieben:
When knitting the left sleeve, you will have between 51 and 62 stitches, how many do you work before turning on the short rows? The short row instructions work for the whole garment (between 115 and 138 stitches)
06.08.2018 - 22:35DROPS Design hat geantwortet:
Dear Mrs Francis, you should work the short rows on the left sleeve on the same places you worked the short rows on the top of front piece before, ithe "turns" should continue and be aligned from the beg of piece. Happy knitting!
07.08.2018 - 09:38
|
||||
Eden#edencardigan |
||||
|
|
||||
Quer gestrickte DROPS Weste in ”Fabel”. Grösse S - XXXL.
DROPS 134-4 |
||||
|
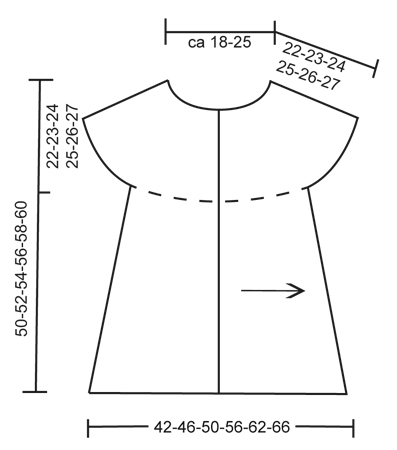
STRICKTIPP: Nach jedem Abdrehen die erste M. abnehmen und den Faden anziehen. VERKÜRZTE REIHEN: Damit die Arbeit ihre Form bekommt strickt man verkürzte Reihen. * Über alle M. stricken, die Arbeit drehen und zurück stricken, über 103-108-112-115-119-122 M. stricken, die Arbeit drehen und zurück - siehe Stricktipp! 89-94-97-99-103-105 M. stricken, die Arbeit drehen und zurück stricken. 71-75-77-79-81-83 M. stricken, die Arbeit drehen und zurück stricken *. Von *-* wiederholen, d.h. 1 Rapport = 2 R. oben und 8 R. unten. MESTTIPP: Die Arbeit wird liegend gemessen. -------------------------------------------------------- WESTE: Die Arbeit wird quer gestrickt (auf der linken Seite anfange. Achten Sie bitte darauf: Das Bild wurde gespiegelt). LINKES VORDERTEIL: Die ganze Arbeit wird re. gestrickt (= Krausrippen). Mit ocean view auf Nadel Nr. 3,5,115-120-125-129-134-138 M. anschlagen. Die 1. R. von der Vorderseite von unten nach oben (= Nacken) stricken. 3 cm hin und zurück stricken (= Blende). Stimmt die Maschenprobe? Jetzt von der Vorderseite mit den verkürzten Reihen anfangen. Nach ca. 23-25-27-30-33-35 cm (von der Anschlagskante an der unteren Kante gemessen) – siehe MESSTIPP! Jetzt das Seitenteil wie folgt: 1 cm nur über die untersten 64-67-70-72-74-76 M hin und zurück stricken. Hier markieren (= Seite). Weite 1 cm nur über die ersten 64-67-70-72-74-76 M. stricken und diese M. auf einen Hilfsfaden legen (mit einer R. von der Vorderseite abschliessen). Jetzt den Ärmel stricken. LINKER ÄRMEL: = 51-53-55-57-60-62 M. auf der Nadel. Mit den verkürzten Reihen weiterstricken bis der Ärmel ca. 30-31-32-33-34-35 cm misst (an der breiten Seite gemessen). Mit 1 R. von der Rückseite abschliessen. RÜCKENTEIL: Die 64-67-70-72-74-76 M. vom Hilfsfaden wieder auf die Nadel legen = 115-120-125-129-134-138 M. Mit den verkürzten Reihen weiterstricken bis die Arbeit von der Markierung auf der Seite ca. 21-23-25-28-31-33 cm misst (an der unteren Kante gemessen). Die Arbeit hier markieren (= hintere Mitte). Nach ca. 20-22-24-27-30-32 cm von der hinteren Mitte das Seitenteil wie folgt stricken: 1 cm nur über die ersten 64-67-70-72-74-76 M, die Seite markieren, einen weiteren cm nur über die ersten 64-67-70-72-74-76 M. Jetzt die ersten 64-67-70-72-74-76 M. auf einen Hilfsfaden legen (mit 1 R. von der Vorderseite abschliessen. RECHTER ÄRMEL: Wie der linke Ärmel. RECHTES VORDERTEIL: Die 64-67-70-72-74-76 M. vom Hilfsfaden wieder auf die Nadel legen = 115-120-125-129-134-138 M. Mit den verkürzten Reihen weiterstricken bis das rechte Vorderteil gleich breit ist wie das linken Vorderteil (ohne die Blende). Jetzt 1½ cm hin und zurück über alle M. Bei der nächsten R. von der Vorderseite die Knopflöcher wie folgt stricken: 12 M. stricken, die 2 nächsten M. abk., * 12-13-14-14-15-15 M. stricken, die 2 nächsten M. abk *, von *-* wiederholen. Total 4 Mal. Die restlichen M. stricken. Bei der nächsten R. über den abgeketteten M. je 2 neue M. anschlagen. Nachdem die Blende 3 cm misst abk. ZUSAMMENNÄHEN: Mit 2 Fäden braun auf Nadel Nr. 4 wie folgt: Unten am rechten Vorderteil anfangen und 1 fM häkeln * 2 Lm, ca. 1 cm überspringen, 1 fM *, von *-* rund um die Weste wiederholen. Die Knöpfe annähen. |
||||
Erklärungen zum Diagramm |
||||
|
||||
 |
||||
Haben Sie diese Anleitung nachgearbeitet?Dann taggen Sie Ihre Fotos mit #dropspattern #edencardigan oder schicken Sie sie an die #dropsfan Galerie Brauchen Sie Hilfe bei dieser Anleitung?Sie finden 6 Videotutorials, einen Kommentar/Fragen-Bereich und vieles mehr, wenn sie die Anleitung bei garnstudio.com aufrufen. © 1982-2026 DROPS Design A/S. Wir besitzen alle Rechte. Dieses Dokument, einschließlich aller Untersektionen, hat Urheberrechte. Mehr dazu, was Sie mit unseren Anleitungen machen können, finden Sie ganz unten auf der Seite zu jeder Anleitung. |
||||


Mit über 40 Jahren Tätigkeit im Entwerfen von Strick- und Häkelmustern bietet Ihnen DROPS Design eine der umfangreichsten Sammlungen von kostenlosen Anleitungen im Internet - in 17 Sprachen übersetzt. Zum jetzigen Zeitpunkt haben wir insgesamt 324 Handarbeitshefte und 12290 Anleitungen auf Deutsch. 12202
Unser Ziel ist es, Ihnen die besten Angebote zum Stricken und Häkeln, Inspirationen und Ratschläge sowie qualitativ hochstehende Garne zu unglaublichen Preisen zu bieten! Möchten Sie unsere Anleitungen nicht nur für den persönlichen Gebrauch nutzen? Unsere Copyright Bedingungen finden Sie bei allen unseren Anleitungen ganz unten auf der jeweiligen Seite. Viel Spaß beim Handarbeiten!
Kommentieren Sie die Anleitung DROPS 134-4
Wir würden gerne Ihre Meinung zu diesem Modell erfahren!
Wenn Sie eine Frage stellen möchten, prüfen Sie bitte, dass Sie die richtige Kategorie im unten stehenden Formular gewählt haben - so bekommen Sie schneller eine Antwort. Die obligatorischen Felder sind mit einem * gekennzeichnet.