
Beliebte Kategorien
Suchen Sie nach einem Garn?


Kommentare / Fragen (59)
![]() Camilla hat geschrieben:
Camilla hat geschrieben:
Jeg er ved at lave pandebåndet. I diagrammet står der man skal strikke ret over ret og vrang over vrang. Når jeg har slået de 12 masker op er 1. pind på vrang-siden, den næste pind på ret-siden. Dvs. snoninger bliver lavet fra vrang siden? Hvorfor skal jeg så strikke ret på hjælpepinden og de resterende masker?
02.11.2014 - 23:31DROPS Design hat geantwortet:
Hej Camilla. 1. pind er retsiden. Snoningerne laves paa retsiden.
06.11.2014 - 13:42
![]() Carla hat geschrieben:
Carla hat geschrieben:
Il modello è bellissimo, ma devo mettere il doppio dei punti. Come costruire lo schema? Devo farlo speculare? Grazie per la risposta
07.09.2014 - 10:29DROPS Design hat geantwortet:
Deve mettere il doppio dei punti perché utilizza un filato più sottile? Nel caso in cui dovesse fare così potrebbe lavorare la treccia più larga (con più maglie ogni fascia della treccia) per esempio. Se deve fare la fascia deve fare prima un campione per capire quanto rende con il filato che utilizzerà.
11.09.2014 - 16:31
![]() Klára S hat geschrieben:
Klára S hat geschrieben:
Dobrý den, v českém návodu neodpovídá popis vzorku originálu. Hezký den Klára S
01.02.2014 - 20:23DROPS Design hat geantwortet:
Dobrý den, děkuji za upozornění - opraveno!
08.02.2014 - 01:06
![]() Isabel hat geschrieben:
Isabel hat geschrieben:
Hallo, Maakt het nog uit wat voor maat kabelnaald ik gebruik voor de hoofdband? Bedankt
26.10.2013 - 14:06DROPS Design hat geantwortet:
Hoi Isabel. De kabelnld moet niet te dun zijn. Heb je niet een hele dikke kabelnld, dan kan je eventueel een sokkenbreinld gebruiken.
28.10.2013 - 19:13
![]() Jan hat geschrieben:
Jan hat geschrieben:
Got it - thank you - sorry to be so dense :)
30.01.2013 - 00:43
![]() Jan hat geschrieben:
Jan hat geschrieben:
Yes, I have checked your video which is great for a cable stitch in the middle of a row, not as the first stitch in the row. The difference is that the skein side of the wrapping yarn is on the cable needle not the right hand needle so i am not sure if that yarn should go behind the cable needle or infront of the cable needle prior to knitting the next/6th stitch.
29.01.2013 - 18:49DROPS Design hat geantwortet:
In front, because stitches you have to knit next are in front of slipped sts.
29.01.2013 - 21:49
![]() Jan hat geschrieben:
Jan hat geschrieben:
Another source of my confustion -the wrap over yarn is on the cable needle since it is the first 5 stiches being slipped, when a cable is worked in the middle of a piece, the wrap over yarn is on the right hand knitting needle. Thank you again.
29.01.2013 - 13:41DROPS Design hat geantwortet:
Have you checked out our Video tutorials for cable knitting?
29.01.2013 - 14:58
![]() Jan hat geschrieben:
Jan hat geschrieben:
Thank you for your response and clarification. One more question - does the wrapping yarn for the 11th row go behind the cable needle and slipped stiches or in front? Thank you
29.01.2013 - 13:35DROPS Design hat geantwortet:
The yarn should not run over stitches in front and should not be visible. When you slip first 5 sts to cable needle behind piece, keep yarn front to knit next st from left needle.
29.01.2013 - 14:48
![]() Jan hat geschrieben:
Jan hat geschrieben:
I am making the neckwarmer and have a question regarding the 11th row. If I read the pattern correctly, this row starts with the 5 stitches slipped off to the cable needle. I find this awkward since the first stitch has the wrapping yarn (for lack of a better term). Am I reading the pattern correctly? I hope I am explaining myself properly.
28.01.2013 - 23:43DROPS Design hat geantwortet:
Dear Jan, you are correct, on row 11 the first 5 sts are slipped on cable needle behind piece for the cable. Happy knitting!
29.01.2013 - 09:02
![]() Isabel Hicks hat geschrieben:
Isabel Hicks hat geschrieben:
Would be grateful for some help! Am doing this lovely headband but- cast on 12 stitches K1 then cabled 4 back knitted 4 . Three stitches left - please tell me how do I get the braiding as no stitches left to do the other half of the chart - where am I going wrong?.. Many thanks
20.01.2013 - 00:32DROPS Design hat geantwortet:
Dear Mrs Hicks, diagram is read from bottom right towards the left (RS) and left towards right side (WS), and M1 =12 sts, row 3 is : K4, cable on the next 8 sts. R7 : cable on the first 8 sts, K4. Happy knitting!
21.01.2013 - 18:21
|
||||||||||||||||
Braidy#braidyset |
||||||||||||||||
 |
 |
|||||||||||||||
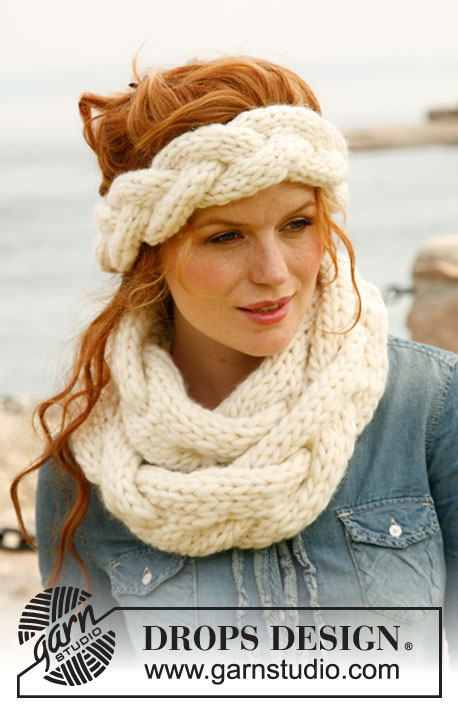
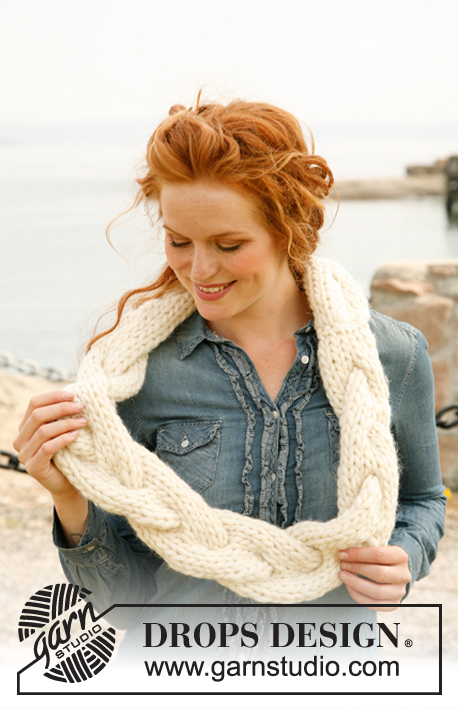
DROPS Stirnband und Kragen in ”Polaris”.
DROPS 134-7 |
||||||||||||||||
|
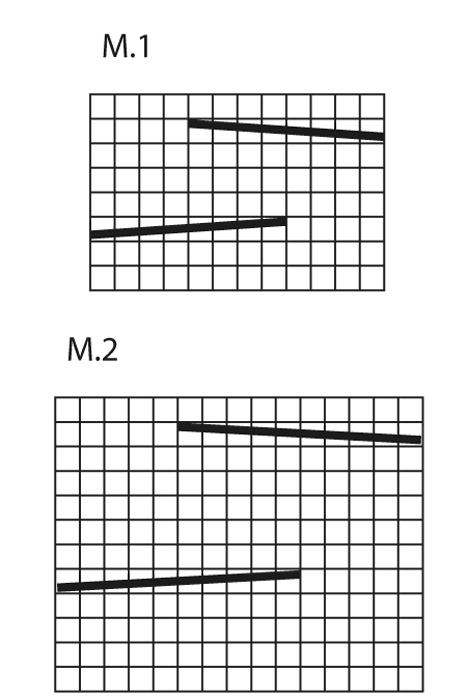
MUSTER: Siehe Diagramm. Das Diagramm zeigt die Hin- und die Rückreihen von der Vorderseite. FADENWECHSEL: Teilen Sie die letzten 15 cm des alten Fadens in zwei Teile und schneiden Sie den einen Teil ab. Bei neuen Faden ebenfalls den einen Faden der ersten 15 cm abschneiden. Die Enden ineinander verdrehen. -------------------------------------------------------- -------------------------------------------------------- STIRNBAND: Die Arbeit wird hin und zurück gestrickt und danach hinten zusammengenäht. Mit Polaris auf Nadel Nr. 12, 12 M. anschlagen und ca. 50 cm M1 stricken. Nach einem ganzen Rapport 1 R. glatt stricken und danach abk. Danach die Anschlags- gegen die Abkettkante nähen. -------------------------------------------------------- KRAGEN: Die Arbeit wird hin und zurück gestrickt und danach hinten zusammengenäht. Mit Polaris auf Nadel Nr. 15, 15 M. anschlagen und ca. 120 cm M2 stricken stricken. Nach einem ganzen Rapport 4 R. glatt stricken und danach abk. Danach die Anschlags- gegen die Abkettkante nähen. Die Arbeit in eine 8 legen und anziehen. |
||||||||||||||||
Erklärungen zum Diagramm |
||||||||||||||||
|
||||||||||||||||
 |
||||||||||||||||
Haben Sie diese Anleitung nachgearbeitet?Dann taggen Sie Ihre Fotos mit #dropspattern #braidyset oder schicken Sie sie an die #dropsfan Galerie Brauchen Sie Hilfe bei dieser Anleitung?Sie finden 5 Videotutorials, einen Kommentar/Fragen-Bereich und vieles mehr, wenn sie die Anleitung bei garnstudio.com aufrufen. © 1982-2026 DROPS Design A/S. Wir besitzen alle Rechte. Dieses Dokument, einschließlich aller Untersektionen, hat Urheberrechte. Mehr dazu, was Sie mit unseren Anleitungen machen können, finden Sie ganz unten auf der Seite zu jeder Anleitung. |
||||||||||||||||


Mit über 40 Jahren Tätigkeit im Entwerfen von Strick- und Häkelmustern bietet Ihnen DROPS Design eine der umfangreichsten Sammlungen von kostenlosen Anleitungen im Internet - in 17 Sprachen übersetzt. Zum jetzigen Zeitpunkt haben wir insgesamt 324 Handarbeitshefte und 12290 Anleitungen auf Deutsch. 12202
Unser Ziel ist es, Ihnen die besten Angebote zum Stricken und Häkeln, Inspirationen und Ratschläge sowie qualitativ hochstehende Garne zu unglaublichen Preisen zu bieten! Möchten Sie unsere Anleitungen nicht nur für den persönlichen Gebrauch nutzen? Unsere Copyright Bedingungen finden Sie bei allen unseren Anleitungen ganz unten auf der jeweiligen Seite. Viel Spaß beim Handarbeiten!
Kommentieren Sie die Anleitung DROPS 134-7
Wir würden gerne Ihre Meinung zu diesem Modell erfahren!
Wenn Sie eine Frage stellen möchten, prüfen Sie bitte, dass Sie die richtige Kategorie im unten stehenden Formular gewählt haben - so bekommen Sie schneller eine Antwort. Die obligatorischen Felder sind mit einem * gekennzeichnet.