
Beliebte Kategorien
Suchen Sie nach einem Garn?


Kommentare / Fragen (89)
![]() Sybille hat geschrieben:
Sybille hat geschrieben:
Bei dem Stück, wo immer 10 Maschen mehr gestrickt werden, damit die Hose hinten höher wird als vorn, sind Löcher entstanden. Sie sind dort, wo jeweils gewendet wurde. Was habe ich hier denn falsch gemacht?
29.05.2022 - 16:29DROPS Design hat geantwortet:
Liebe Sybille, wenn Sie die nächste Runde über alle Maschen stricken, dann können Sie den Faden zwischen 2 verkürzten Reihen auffassen, und diesen Faden verschränkt mit der nächsten Masche stricken - wie bei diesem Video (Timecode 4:00 z.B.) gezeigt wird. Viel Spaß beim stricken!
30.05.2022 - 08:08
![]() Sybille hat geschrieben:
Sybille hat geschrieben:
Wie verhält sich die Wolle/das Material nach dem Waschen? Ist die Hose dann noch genauso in Form?
21.04.2022 - 12:04DROPS Design hat geantwortet:
Liebe Sybille, ja sicher, folgen Sie einfach die Pfelgehinweise - beachten Sie nur, daß Alpaca nicht Superwash (wie Fabel) ist, dh die Hose soll dann gewaschen werden, wie unter Alpaca beschrieben wird. Viel Spaß beim stricken!
21.04.2022 - 13:29
![]() Katrine hat geschrieben:
Katrine hat geschrieben:
Hei! Er det slik at de to garnene i ullbuksrmønsteret skal strikkes samtidig på pinne nr 4?
10.02.2022 - 22:04
![]() Ingunn Kjørholt Wolline hat geschrieben:
Ingunn Kjørholt Wolline hat geschrieben:
See previous post, answer was not helpful. I have tried binding of according to the pattern, but the finish looks sloppy with 2/3 of the leg being stockinette stitch which will naturally roll up. Would have been nice to see in the pictures how it is supposed to look. Any suggestions, other than rib finish?
03.02.2022 - 22:52DROPS Design hat geantwortet:
Dear Mrs Kjørholt Wolline, sorry that the previous answer didn't help, the tights on the pictures have been worked/cast off as explained, ie with stitches in stocking stitch and rib as worked before. Make sure to avoid casting off too loosely to avoid a wavy edge and not too tight neither. You can then block bottom of tights/legs if necessary. Some knitters have worked ribbing edge at the bottom of leg, you can see their projects on Ravelry - if it can help. Happy knitting!
04.02.2022 - 09:00
![]() Ingunn Kjørholt Wolline hat geschrieben:
Ingunn Kjørholt Wolline hat geschrieben:
I am about to cast off first leg and it says to bind off in pattern, but I worry about it being too roomy at the ankles. I could of course finish in rib, but that is not the look I'm going for. The pictures are no help since the model are wearing boots, so what type of fit is this?
01.02.2022 - 18:33DROPS Design hat geantwortet:
Dear Mrs Kjørholt Wolline, the tights on the picture ends at the bottom of leg with pattern as before, ie stocking stitch with the rib on the outer side of leg. Feel free to add some cm ribbing edge at the very bottom if you feel it necessary. Happy knitting!
02.02.2022 - 07:42
![]() Darren Paterson hat geschrieben:
Darren Paterson hat geschrieben:
Thank you for the previous answers. I have another question (sorry!): I seem to be doing something wrong in the transition from the initial ribbing to the stockinette + rib where the ribbing doesn't line up. I'm doing size S, and I'm starting the 19 stockinette stitches at the cast on stitch (1 before the MT). Am I starting this in the wrong place? Also: when knitting to make it longer in the back, do I knit in pattern the whole time? I.e., stockinette + sections of K2, P5?
26.01.2022 - 00:10DROPS Design hat geantwortet:
Dear Mrs Paterson, start with the stitch with the marker: P3, K2, P5, K2, P5, K2 = 19 sts worked in stocking stitch, 33 sts in rib as before (= (P5, K2)*4 (= 28 sts) + P5, then work 37 sts in stocking st (= previously (K2,P5)x5 (= 35 sts) + K2), then work the next 33 sts in rib as before (= (P5, K2)*4 (= 28 sts) and work stocking stitch to the end of the round. Happy knitting!
26.01.2022 - 09:03
![]() Arabella hat geschrieben:
Arabella hat geschrieben:
Hi! I have made the tights following your pattern and they turned out great. However, as my waist is considerably smaller than my hips, they are not staying put. Any tips on how to put an inconspicuous elastic so they don't gap/fall down. Thank you!
23.01.2022 - 01:40DROPS Design hat geantwortet:
Dear Arabella, You could try to turn the top 2 cm down sew it and add the elastic there, but if you want to keel the waistline, try sewing the elastic to the line between the ribbed and the knit part at the waist. Also, you might try to thread elastic thread into the top few rows of ribbing. Happy Stitching!
24.01.2022 - 00:46
![]() Darren Paterson hat geschrieben:
Darren Paterson hat geschrieben:
Another question: the first row calls for P3, *K2, P5*, repeat from *, finish with P2, but that leaves me with 2 extra stitches at the end. Is it actually P3, *K2, P5*, repeat from *, finish with K2, P2?
21.01.2022 - 19:59DROPS Design hat geantwortet:
Correct, see also below. Happy knitting!
24.01.2022 - 08:20
![]() Darren Paterson hat geschrieben:
Darren Paterson hat geschrieben:
I'm really excited about trying this pattern, but I just don't understand how to get started with the placement of the marking threads. I'm doing size Small. Do I P3 before placing the first MT? Or do I place a MT and then Purl? And do I do 70 or 71 stitches before placing another MT? (Does the MT go between stitches 70 & 71, or after stitch 71?) And does "finish with P2" mean that on the last repeat of *K2, P5* I'm actually doing K2, P7? I'm hopelessly confused by that first row... :(
21.01.2022 - 19:45DROPS Design hat geantwortet:
Dear Mrs Paterson, set the first marker in the first stitch of the round (the first of the P3), and insert the 2nd marker in the 71st stitch of the round. You work in rib starting with P3, then repeat (K2, P5) until 4 sts remain, work K2 and end with P5 (you will then have P5 all the round). Happy knitting!
24.01.2022 - 08:20
![]() Maria hat geschrieben:
Maria hat geschrieben:
Not really find your comment useful (see below). I want to make these specific leggings but would need some advise as per below. Many thanks.
11.01.2022 - 11:51DROPS Design hat geantwortet:
Dear Maria, you can use both Nepal or Big Merino - calculate new amount of yarn here - Using Big Merino (Superwash yarn), you don't need to go one size down, but make sure in both cases that tension will match (and read extra tips for washing superwash yarn linked below). Happy knitting!
12.01.2022 - 09:12
|
|
Rhoda |
|
 |
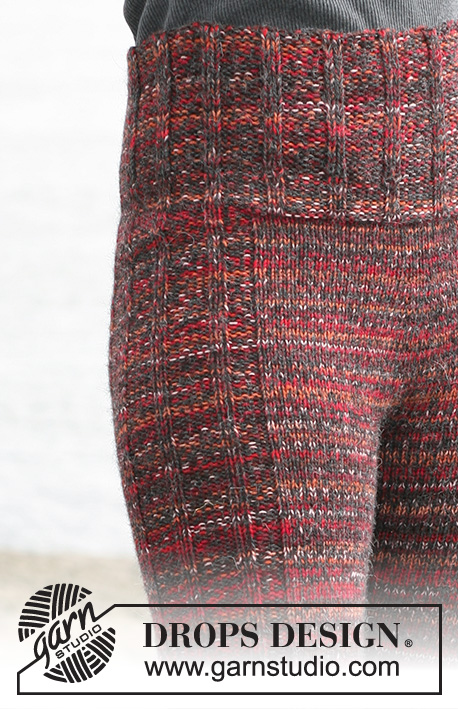 |
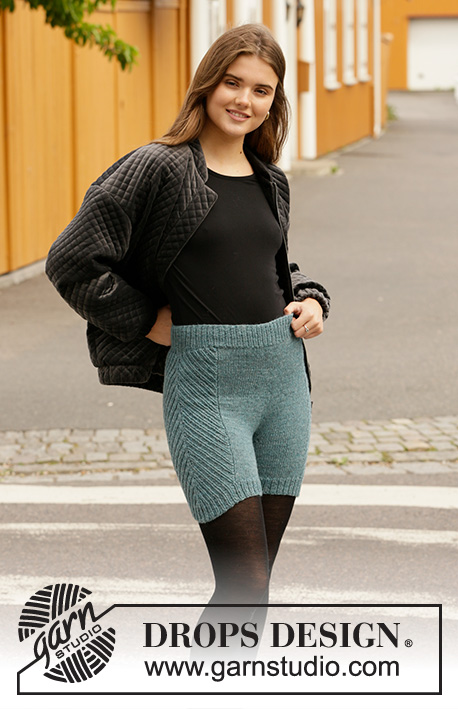
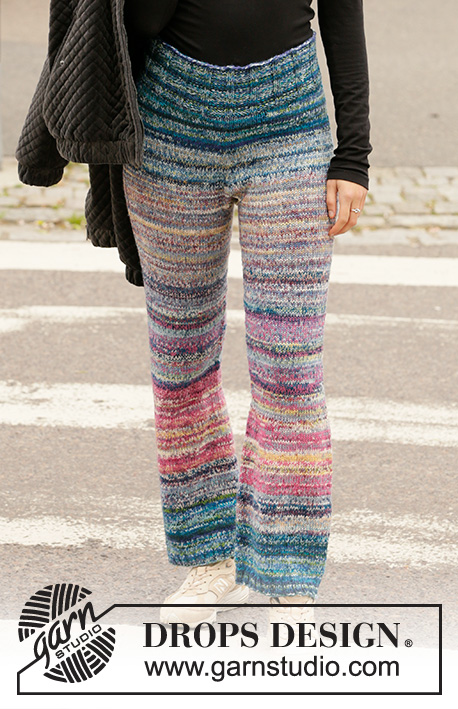
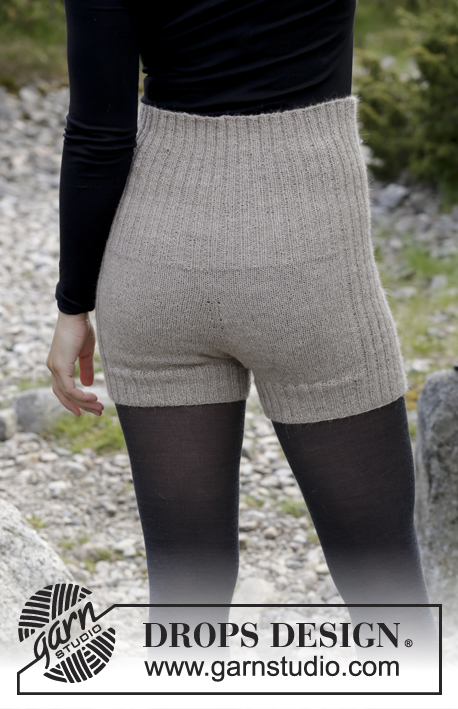
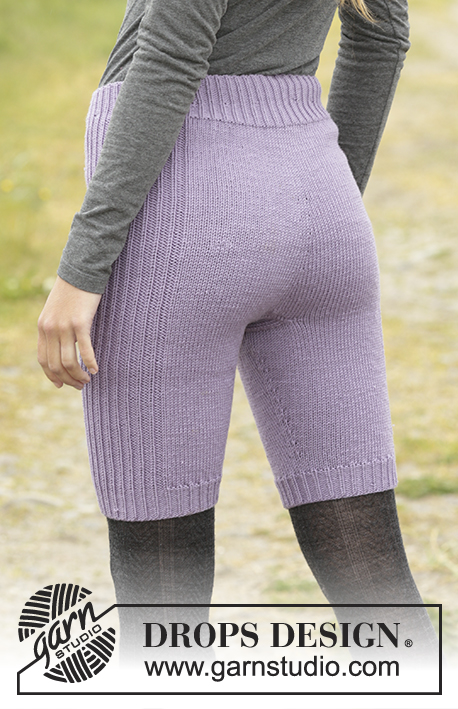
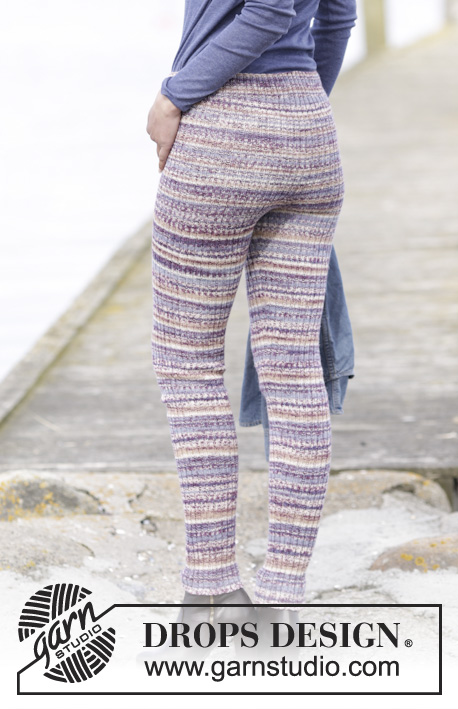
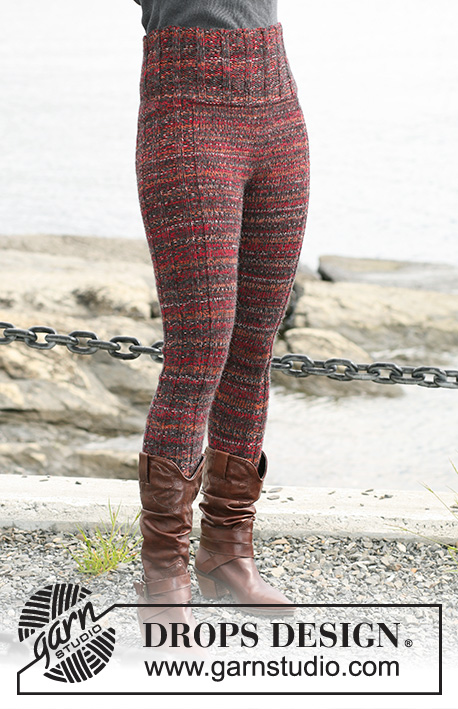
DROPS Hosen in „Fabel“ und „Alpaca“. In Grösse S-XXL.
DROPS 103-23 |
|
|
Maschenprobe: Achtung, die Nadelnummer (Ndl) ist nur ein Vorschlag! Tipp zum Abnehmen (gilt für die Beine): Auf beiden Seiten des Markierungsfadens. Vor dem Markierungsfaden: 2 re. zusammen. Nach dem Markierungsfaden: 1 M. re. abheben, 1 re., die abgehobene über die gestrickte ziehen. Tipp zum Aufnehmen: Grösse S, L und XXL: Vorne und hinten in der Mitte, auf beiden Seiten der 3 M. re. aufnehmen. Grösse M und XL: Vorne und hinten, auf beiden Seiten der 2 M. re. aufnehmen. Hose: Die Arbeit wird rund, von oben nach unten, gestrickt. Mit 1 Faden jeder Qualität auf Rundstricknadel Nr. N. 4, 140-154-168-182-196 M. anschlagen und 10 cm Bündchen, wie folgt stricken. Grösse S, L und XXL: 3 li. – 1 Markierungsfaden in die erste Masche einziehen = hintere Mitte, * 2 re., 5 li. *, von *-* wiederholen und mit 2 li. abschliessen – in die 71.-85.-99. M. einen zweiten Markierungsfaden einziehen (in die Mitte der 5 li.) = vordere Mitte. Grösse M und XL: 1 Markierungsfaden in die erste M. einziehen = hintere Mitte, 1 re., * 5 li., 2 re. *, von *-* wiederholen und mit 5 li. und 1 re. abschliessen - nach 77-91 M. einen zweiten Markierungsfaden einziehen (in der Mitte der 2 re.) = vordere Mitte. Wie folgt weiterfahren: 19-22-26-29-33 M. glatt stricken, 33 M. Bündchen (wie gehabt), 37-44-51-58-65 M. glatt gestrickt, 33 M. Bündchen (wie gehabt) 18-22-25-29-32 M. glatt gestrickt. Nach 11 cm, wie folgt stricken damit die Hose hinten breiter wird als vorne: Die Arbeit 10 M. nach dem Markierungsfaden (hintere Mitte) drehen, die erste M. abheben und 20 M. zurück stricken (die 10 M. bis zum Markierungsfaden und 10 M. weiter), die Arbeit drehen und die erste M. abheben, und 30 M. zurück stricken (10 M. bis zum Markierungsfaden und 20 M. nach dem Markierungsfaden, also 10 M. mehr als beim vorherigen Mal) wiederholen bis noch 20-14-28-22-16 M. bis zur vorderen Mitte übrig sind. Die Arbeit ein letztes Mal drehen damit man wieder auf die rechte Seite der Arbeit kommt. Jetzt wieder über alle M. stricken. Wenn die Arbeit vorne 13-14-14-15-15 cm misst (hinten ca. 18-20-20-21-22 cm) wird, wie oben erklärt, hinten und vorne aufgenommen: bei jeder 5.-5.-6.-6.-7. R., auf beiden Seiten der Markierungsfäden je 1 M. aufnehmen total 7 Mal = 168-182-196-210-224 M. Nach 27-29-31-33-35 cm (vorne) die ersten 6-6-7-7-8 M. abk., die nächsten 73-79-85-91-97 M. auf einen Hilfsfaden legen (=Bein), die nächsten 11-12-13-14-15 M. auf der Nadel lassen (=Schritt), die nächsten 73-79-85-91-97 M. wieder auf einen Hilfsfaden legen (= Bein) und die restlichen 5-6-6-7-7 M. abketten. Über die 11-12-13-14-15 M. für den Schritt werden 9-10-11-12-13 cm glatt gestrickt. Die M. abk. und hinten in der Mitte (bei den abgeketteten M.) annähen. Bein: Die 73-79-85-91-97 M. des einen Beines auf eine Rundstricknadel Nr. 4 legen und entlang des Schrittes 18-20-20-22-24 M. aufnehmen = 91-99-105-113-121 M. Über die 33 M. auf der Seite Bündchen stricken, die restlichen 58-66-72-80-88 M. werden glatt gestrickt. In der Mitte der Innenseite (an der Stelle, an der am Schritt aufgenommen wurde) einen Markierungsfaden einziehen. Nach 8 cm, auf beiden Seiten des Markierungsfadens je 1 M. abnehmen – siehe Tipp zum Abnehmen: alle 4-3,5-3-2,5-2,5 cm wiederholen total 17-20-22-25-28 Mal = 57-59-61-63-65 M. – wenn nötig zu einem Nadelspiel wechseln. Weiterstricken bis das Bein ca. 78-79-80-81-82 cm misst. Danach re. über re. und li. über li. abk. Danach das zweite Bein stricken. |
|
Haben Sie diese Anleitung nachgearbeitet?Dann taggen Sie Ihre Fotos mit #dropspattern oder schicken Sie sie an die #dropsfan Galerie Brauchen Sie Hilfe bei dieser Anleitung?Sie finden 17 Videotutorials, einen Kommentar/Fragen-Bereich und vieles mehr, wenn sie die Anleitung bei garnstudio.com aufrufen. © 1982-2026 DROPS Design A/S. Wir besitzen alle Rechte. Dieses Dokument, einschließlich aller Untersektionen, hat Urheberrechte. Mehr dazu, was Sie mit unseren Anleitungen machen können, finden Sie ganz unten auf der Seite zu jeder Anleitung. |
|


Mit über 40 Jahren Tätigkeit im Entwerfen von Strick- und Häkelmustern bietet Ihnen DROPS Design eine der umfangreichsten Sammlungen von kostenlosen Anleitungen im Internet - in 17 Sprachen übersetzt. Zum jetzigen Zeitpunkt haben wir insgesamt 325 Handarbeitshefte und 12298 Anleitungen auf Deutsch. 12210
Unser Ziel ist es, Ihnen die besten Angebote zum Stricken und Häkeln, Inspirationen und Ratschläge sowie qualitativ hochstehende Garne zu unglaublichen Preisen zu bieten! Möchten Sie unsere Anleitungen nicht nur für den persönlichen Gebrauch nutzen? Unsere Copyright Bedingungen finden Sie bei allen unseren Anleitungen ganz unten auf der jeweiligen Seite. Viel Spaß beim Handarbeiten!
Kommentieren Sie die Anleitung DROPS 103-23
Wir würden gerne Ihre Meinung zu diesem Modell erfahren!
Wenn Sie eine Frage stellen möchten, prüfen Sie bitte, dass Sie die richtige Kategorie im unten stehenden Formular gewählt haben - so bekommen Sie schneller eine Antwort. Die obligatorischen Felder sind mit einem * gekennzeichnet.