
Beliebte Kategorien
Suchen Sie nach einem Garn?


Kommentare / Fragen (13)
![]() Linda Pine hat geschrieben:
Linda Pine hat geschrieben:
I am COMPLETELY confused by the instructions for working the stripe pattern "at the same time inc 1 st each side on every and every other row alternately". After reading the questions and answers in the Comments section - I am even MORE confused. Surely there is a better way to describe what should be done.!!!!
06.01.2023 - 16:39
![]() Kathy Tee hat geschrieben:
Kathy Tee hat geschrieben:
The instructions state “ inc 1 st each side on every and every other row alternately”. What specifically does “every and every other row alternately” mean. Please provide an example in your reply eg. if I have to work a total of 10 rows, on which of those rows do I include the increases.
12.08.2022 - 03:34DROPS Design hat geantwortet:
Dear Mrs Tee, this lesson explains how to decrease or increase on every 3rd and 4th row alternately, maybe it can help you to understand how to decrease here on every row (instead of on every 3rd row in the lesson) and 2nd row (instead of every 4th row in the lesson). Hope it can help you.
12.08.2022 - 09:57
![]() Kathy Tee hat geschrieben:
Kathy Tee hat geschrieben:
In your earlier reply to HCL (05.03.2020 kl. 10:06 ) you advise, ”*1 row with decreases, 1 row with decreases, 1 row without decreases*” which confirms I am to work in the first 2 of every 3 rows, but the decreases would occur on Rows 1, 2, 4, 5, 7, 8, 10, 11, 13 etc. instead. Please confirm which example, either the one shown here or the one in my previous message (12.08.2022 - 00:56.) is correct.
12.08.2022 - 01:33DROPS Design hat geantwortet:
Dear Mrs Tee, you can also work that way, you will have decreased the same number of rows at the end with the same number of rows, decreasing alternately on every row and every other row would be more likely as previous comment. Hope it can help.
12.08.2022 - 09:51
![]() Kathy Tee hat geschrieben:
Kathy Tee hat geschrieben:
Based on your reply to Jane Doe (10.08.2022 kl. 16:14), if for example I worked in pattern for 13 rows, are you indicating the decreases would occur on Rows 1, 3, 4, 6, 7, 9, 10, 12, 13 etc. So, after Rows 1 and 2, I am to then decrease in the first 2 of every next 3 rows. “Row 1 - decrease, Row 2 -no decrease, then *Decrease in next 2 rows, next row (rows 5, 8, 11 etc) no decrease* repeat from *to*”. Is this correct?
12.08.2022 - 00:56DROPS Design hat geantwortet:
Dear Mrs Tee, that's correct. Happy knitting!
12.08.2022 - 09:49
![]() Jane Doe hat geschrieben:
Jane Doe hat geschrieben:
Your answer is incredibly confusing! "you will decrease 1 stitch on both sides of the 2 middle stitches but you should decrease on every row and on every other row alternately, i.e.: *work 1 row with decrease, 1 row without decrease, 1 row with decrease* and repeat from *-*" So, I actually decrease every other row (1 row without decrease, 1 row with decrease). Not every row and every other row alternately.
11.08.2022 - 18:22DROPS Design hat geantwortet:
Dear Mrs Doe, sorry for confusion, let me try again - you have to decrease 2 stitches alternately on every row and every other row, this means the decreases might occure from the right side as well as from the wrong side, after 1 row you have decreased 2 sts, after these 3 rows you will have decreased 4 sts. Hope it can help.
12.08.2022 - 09:56
![]() Kathy Tee hat geschrieben:
Kathy Tee hat geschrieben:
Please provide detailed explanation as to which rows inc’s and dec’s are worked in the following instructions: “inc 1 st each side on every and every other row alternately”, “Continue inc each side, at the same time dec 1 st on both sides of the 2 middle sts on every and every other row alternately”, “discontinue dec in the middle of piece and now dec each side as inc before on every and every row alternately”
10.08.2022 - 16:33
![]() Jane Doe hat geschrieben:
Jane Doe hat geschrieben:
After joining the two top pieces on the front, I understand that you increase at either end of every row and decrease every other row 2 stitches in the center ? Is this correct?
10.08.2022 - 13:22DROPS Design hat geantwortet:
Dear Mrs Doe, not exactly, you will decrease 1 stitch on both sides of the 2 middle stitches but you should decrease on every row and on every other row alternately, i.e.: *work 1 row with decrease, 1 row without decrease, 1 row with decrease* and repeat from *-*. Happy knitting!
10.08.2022 - 16:14
![]() Wilma Keighley hat geschrieben:
Wilma Keighley hat geschrieben:
Sorry, it’s me again. I’m at the stage where the central deceased have been discontinued and decreases at the edges are happening. I can see that the side decreases are forming the shoulder but it really looks like the central decreases should continue. I am definitely correct that the central decreases should have stopped ;as the pattern says). Even the picture of the jersey looks like the central decreases continue the the end.
16.03.2022 - 15:59
![]() Wilma Keighley hat geschrieben:
Wilma Keighley hat geschrieben:
Re your reply. Yes tension is fine. What should mid front (where the decrease line is) measure when side measures 52cm?
08.03.2022 - 14:58DROPS Design hat geantwortet:
Hi Wilma, When you now continue and start to decrease in each side, the sides will not get any longer, but the mid front will. When piece measures 39-40-42 cm mid front, put piece aside. :)
09.03.2022 - 09:11
![]() Wilma Keighley hat geschrieben:
Wilma Keighley hat geschrieben:
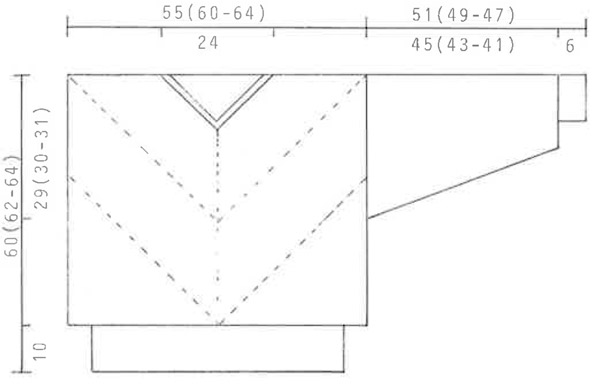
I am working on the front and the side now measures 52 cm. Looking at the diagram, I think the mid front ought to be about 26 cm but it is much less than this. Have I misunderstood where to measure the side or done something else wrong? Thanks.
07.03.2022 - 23:18DROPS Design hat geantwortet:
Dear Mrs Keighley, do you have correct tension? ie 36 rows stocking stitch = 10 cm?
08.03.2022 - 11:09
|
|
City Jungle |
|
 |
 |
Gestrickter Pullover mit schrägen Streifen in DROPS Camelia oder DROPS Alpaca. Größe S – L.
DROPS 9-18 |
|
|
MUSTER: Rippenmuster: 1 M re verschränkt, 1 M li im Wechsel. Streifenmuster: Das Muster wird glatt re gestrickt. 2 R in Schwarz und 2 R in Beige im Wechsel stricken. ABNAHMETIPP FÜR DIE VORDERE MITTE: Die 2 M vor den mittleren 2 M re verschränkt zusammenstricken, die 2 M nach den 2 mittleren M re zusammenstricken. Auf der Rückseite diese M entsprechend links (statt rechts) oder links verschränkt (statt rechts verschränkt) zusammenstricken. Soweit nicht anders angegeben, gilt die Angabe vor der Klammer für Größe S, die erste Angabe in der Klammer für Größe M und die zweite Angabe in der Klammer für Größe L. Ist nur eine Angabe vorhanden, gilt diese für alle Größen. VORDERTEIL: Das Vorderteil wird zunächst in 2 Teilen in Hin- und Rück-R jeweils ab der unteren Ecke schräg in Richtung Mitte gestrickt, dann werden alle M auf einer Nadel zusammengefügt. Für den ersten Teil des Vorderteils 3 M auf Stricknadel Nr. 3 in Schwarz anschlagen und im Streifenmuster (siehe oben) stricken, dabei beidseitig abwechselnd in jeder und jeder 2. R je 1 M zunehmen (= 2 M zugenommen pro Zunahme-R). – Maschenprobe beachten! Wenn 99 (107-115) M auf der Nadel sind, das Strickstück zur Seite legen, das Strickstück misst an den Seiten ca. 28 (30-32) cm. Den zweiten Teil des Vorderteils ebenso stricken, dann alle M auf eine Nadel legen (= 198 (214-230) M). Weiterhin abwechselnd in jeder und jeder 2. R beidseitig je 1 M zunehmen, dabei GLEICHZEITIG beidseitig der 2 mittleren M je 1 M abnehmen – siehe ABNAHEMTIPP AN DER VORDEREN MITTE. Auf diese Weise bleibt die Anzahl der M pro R insgesamt gleich (d.h. es werden 2 M zugenommen und 2 M abgenommen pro Zunahme-/Abnahme-Reihe). Wenn das Strickstück an der Seite 50 (52-54) cm misst, mit den Zunahmen am Rand enden und dafür beidseitig abwechselnd in jeder und jeder 2. R je 1 M abnehmen. Wenn das Strickstück in der Mitte 39 (40-42) cm misst, die M nicht abketten, sondern das Strickstück zur Seite legen. RÜCKENTEIL: Das Rückenteil ebenso stricken. ÄRMEL: Die Ärmel werden in Runden gestrickt. 50 (52-54) M auf Nadelspiel Nr. 2,5 in Schwarz anschlagen und 6 cm im Rippenmuster stricken (siehe oben). Zu Nadelspiel Nr. 3 wechseln und im Streifenmuster stricken, dabei GLEICHZEITIG in der 1. Rd 25 (25-25) M gleichmäßig verteilt zunehmen (= 75 (77-79) M). Die Masche an der unteren Ärmelmitte markieren und beidseitig der markierten Masche 35 (37-38) x je 1 M wie folgt zunehmen (= 2 neue M pro Zunahme-Rd): Größe S: in jeder 4. Rd Größe M und L: abwechselnd in jeder 3. und 4. Rd = 145 (151-155) M. Bei einer Gesamtlänge des Ärmels von 51 (49-47) cm alle M abketten (die kürzere Ärmellänge wird durch eine breitere Schulter wieder ausgeglichen). FERTIGSTELLEN: Die Schulternähte schließen. Für die Halsblende die stillgelegten M von Vorderteil und Rückenteil auf Nadelspiel Nr. 2,5 nehmen und in Runden in Schwarz 2 cm im Rippenmuster stricken, dabei GLEICHZEITIG an der vorderen Mitte und an der hinteren Mitte wie folgt abnehmen: Bis zu den mittleren 3 M an der vorderen bzw. hinteren Mitte stricken, die mittlere M auf eine Hilfsnadel vor die Arbeit legen, die Masche davor und die Masche danach re zusammenstricken, die mittlere M über die zusammengestrickten M ziehen. Diese Abnahmen in jeder 4. Rd wdh (= 4 abgenommene M pro Rd). Wenn die Blende 2 cm misst, alle M abketten. Die Seitennähte schließen. Für das untere Bündchen ca. 214 (222-230) M aus dem Vorder- und Rückenteil auf Rundnadel Nr. 2,5 in Schwarz auffassen und in Runden 10 cm im Rippenmuster stricken, locker abketten, damit der Rand elastisch bleibt. Die Ärmel einnähen. Nach Wunsch Schulterpolster einnähen. |
|
 |
|
Haben Sie diese Anleitung nachgearbeitet?Dann taggen Sie Ihre Fotos mit #dropspattern oder schicken Sie sie an die #dropsfan Galerie Brauchen Sie Hilfe bei dieser Anleitung?Sie finden 27 Videotutorials, einen Kommentar/Fragen-Bereich und vieles mehr, wenn sie die Anleitung bei garnstudio.com aufrufen. © 1982-2026 DROPS Design A/S. Wir besitzen alle Rechte. Dieses Dokument, einschließlich aller Untersektionen, hat Urheberrechte. Mehr dazu, was Sie mit unseren Anleitungen machen können, finden Sie ganz unten auf der Seite zu jeder Anleitung. |
|


Mit über 40 Jahren Tätigkeit im Entwerfen von Strick- und Häkelmustern bietet Ihnen DROPS Design eine der umfangreichsten Sammlungen von kostenlosen Anleitungen im Internet - in 17 Sprachen übersetzt. Zum jetzigen Zeitpunkt haben wir insgesamt 324 Handarbeitshefte und 12290 Anleitungen auf Deutsch. 12202
Unser Ziel ist es, Ihnen die besten Angebote zum Stricken und Häkeln, Inspirationen und Ratschläge sowie qualitativ hochstehende Garne zu unglaublichen Preisen zu bieten! Möchten Sie unsere Anleitungen nicht nur für den persönlichen Gebrauch nutzen? Unsere Copyright Bedingungen finden Sie bei allen unseren Anleitungen ganz unten auf der jeweiligen Seite. Viel Spaß beim Handarbeiten!
Kommentieren Sie die Anleitung DROPS 9-18
Wir würden gerne Ihre Meinung zu diesem Modell erfahren!
Wenn Sie eine Frage stellen möchten, prüfen Sie bitte, dass Sie die richtige Kategorie im unten stehenden Formular gewählt haben - so bekommen Sie schneller eine Antwort. Die obligatorischen Felder sind mit einem * gekennzeichnet.