
Beliebte Kategorien
Suchen Sie nach einem Garn?


Kommentare / Fragen (18)
![]() Birgitta hat geschrieben:
Birgitta hat geschrieben:
Hej 🧶🙏☀️ Förstår inte hur jag ska öka på armen så mönstret stämmer . Med vänlig hälsning, Birgitta
24.02.2026 - 12:14DROPS Design hat geantwortet:
Hei Birgitta. Strikk de økte maskene i glattstrikk til du har nok masker til at de kan inngå i mønstret. Men husk at når du starter på mønstret, så sørg for å få en rapport midt oppå ermet. mvh DROPS Design
09.03.2026 - 09:47
![]() Lydie hat geschrieben:
Lydie hat geschrieben:
Bonjour et merci de vos réponses, de plus rapides. Comment tricoter les motifs quand le nombre de mailles est inférieur aux 12 du diagramme ? Cordialement Lydie
24.11.2025 - 16:53DROPS Design hat geantwortet:
Bonjour Lydie, regardez la lecon DROOPS ICI. Bon tricot!
30.11.2025 - 19:00
![]() Lydie hat geschrieben:
Lydie hat geschrieben:
Comment tricoter les motifs avec les augmentations de la manche ? Merci de votre réponse Cordialement
20.11.2025 - 22:10DROPS Design hat geantwortet:
Bonjour Lydie, les augmentations à la fin de tour se tricotent comme la maille suivante du motif (en lisant le diagramme de droite à gauche), celles au début du tour vont se tricoter comme la maille précédente (on va lire le diagramme de gauche à droite pour étendre le motif vers la droite). Bon tricot!
21.11.2025 - 07:43
![]() Lydie hat geschrieben:
Lydie hat geschrieben:
Peut on tricoter les manches avec une aiguille circulaire D avance merci
05.11.2025 - 22:22DROPS Design hat geantwortet:
Bonjour Lydie, tout à fait, vous pouvez commencer les manches avec une aiguille circulaire de 40 cm ou bien dès le début tricoter en magic loop avec une aiguille circulaire de 80 cm. Bon tricot!
06.11.2025 - 09:19
![]() Lone hat geschrieben:
Lone hat geschrieben:
Hvordan får man placeret en rapport på midten?
06.09.2025 - 18:18DROPS Design hat geantwortet:
Hei Lona. Da må man telle hvor mange masker man har, og så finne ut hvor man skal starte på diagrammet i forhold til hvor mange masker man har fra midt under til midt oppå. mvh DROPS Design
22.09.2025 - 10:15
![]() Alice hat geschrieben:
Alice hat geschrieben:
Is there a simple way to convert this pattern to a cardigan? I just love the design!
24.08.2025 - 18:30DROPS Design hat geantwortet:
Dear Alice, we don't make custom patterns. You will need to calculate the pattern by checking how to center the texture patterns while adding the bands. It would be easier to look for a simple cardigan worked in DROPS Karisma and then work the texture pattern over that cardigan. Happy knitting!
26.08.2025 - 23:12
![]() Silke hat geschrieben:
Silke hat geschrieben:
Moin Der Pullover ist wunderschön und ich würde ihn mir gerne stricken. Aber leider nur bis Gr. L . Das ist mir zu klein. Wird die Anleitung aktualisiert? Die neueren Anleitungen sind meistens bis Gr. XXL.
23.08.2025 - 19:58DROPS Design hat geantwortet:
Liebe Silke, hier finden Sie Modellen für XXL mit einer ähnlichen Maschenprobe, das kann Ihnen inspirieren, um dieses Modell zu den gewüsnchten Größe anzupassen. Viel Spaß beim Stricken!
25.08.2025 - 10:01
![]() Lena hat geschrieben:
Lena hat geschrieben:
Ik heb een proeflesje gebreid van de wol die voor dit patroon genoemd wordt en nu is het proeflapje 11 breedt en 11,5 hoog. Maar ik vind de stevigheid en dichtheid van het lapje al best hoog en wil liever niet een dunnere naald gebruiken. Wat kan ik doen?
03.04.2025 - 10:02DROPS Design hat geantwortet:
Dag Lena,
Dit is wel de normale stekenverhouding voor dit garen. Als je het toch losser wilt hebben, zou je het patroon om kunnen rekenen op basis van je stekenverhouding. Dus berekenen hoeveel steken je op moet zetten om dezelfde breedte te krijgen. Je zult dus minder op moeten zetten.
09.04.2025 - 11:00
![]() Jillian Watson hat geschrieben:
Jillian Watson hat geschrieben:
I require a shorter garment than the pattern shows. I have adjusted the length of the body between the bottom & the split for the armholes. Do i adjust the armhole length accordingly, or do I follow the armhole measurement shown on the pattern to accommodate the sleeve? Thank you.
01.03.2025 - 11:07DROPS Design hat geantwortet:
Dear Jillian, the upper section, from the armholes to the neck, should remain the same, since these yoke decreases are fundamental to keep the correct shaping of the piece.To shorten the piece you only need to shorten the body section, between the lower edge and before the armholes. Happy knitting!
02.03.2025 - 18:43
![]() Mieke hat geschrieben:
Mieke hat geschrieben:
Can I use Double Knit yarn for this pattern?
16.09.2024 - 15:08
|
|||||||
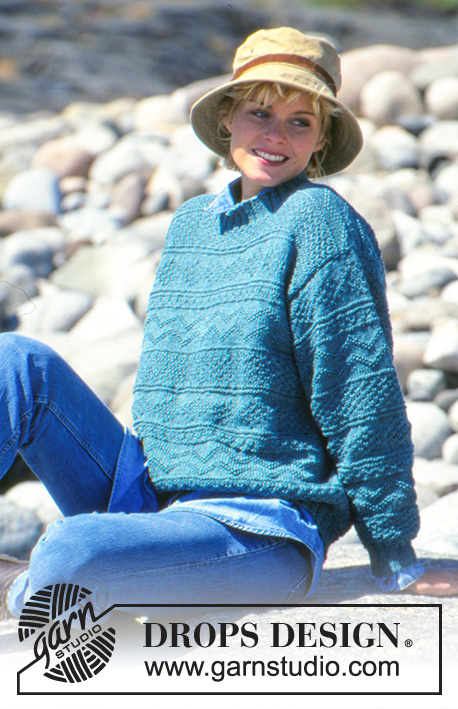
Water Textures |
|||||||
 |
 |
||||||
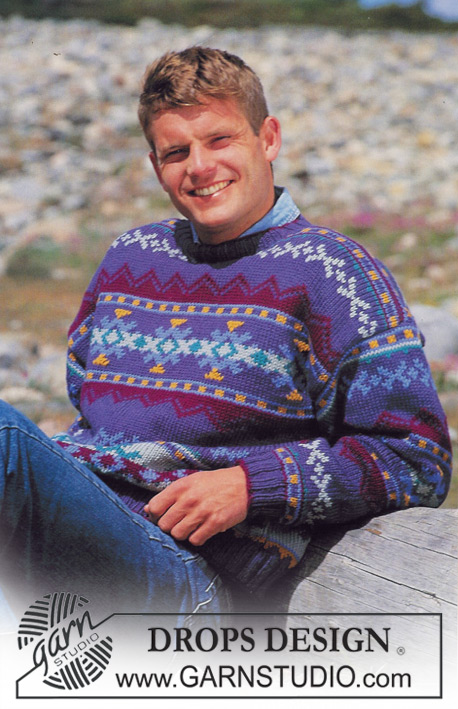
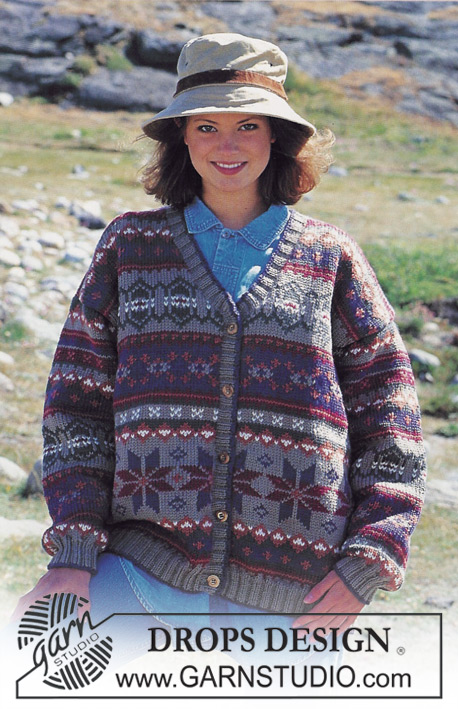
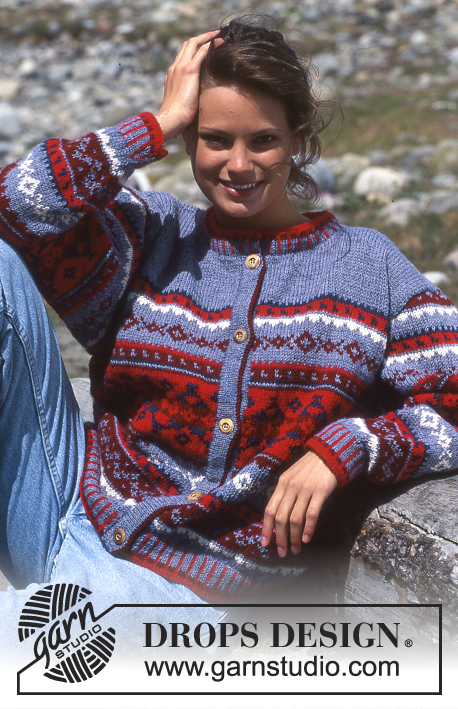
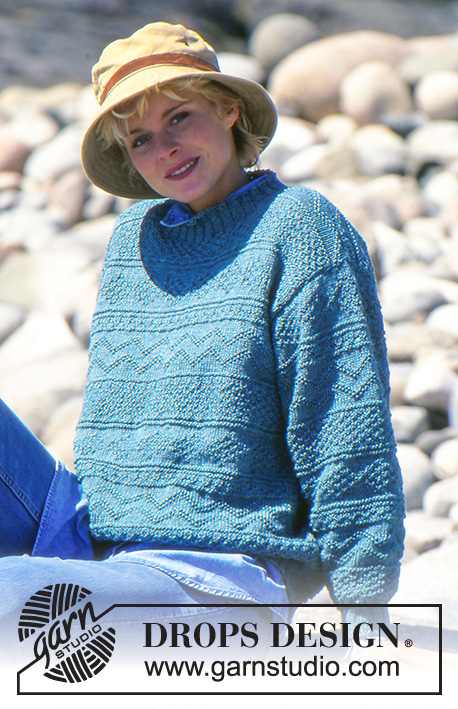
DROPS Damen und Herrenpulli in „Karisma“
DROPS 40-8 |
|||||||
|
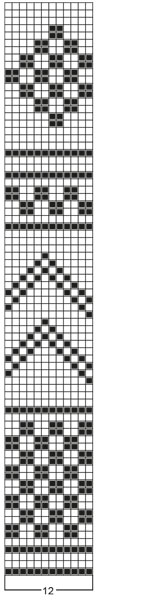
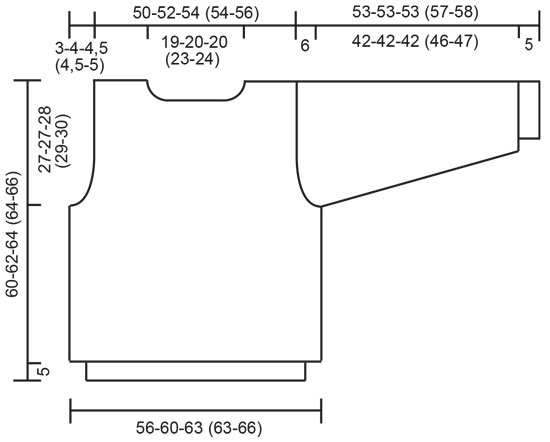
20 M. x 30 R auf Nadel Nr. 4 im Muster gestrickt = 10 x 10 cm. Muster: Siehe Diagramm. Das Diagramm zeigt das Muster von der rechten Seite. Bündchen: * 2 re., 2 li. *. Von *-* wiederholen. Vorder- und Rückenteil: Die Zahlen in Klammer () = Herrengrössen. Mit grün auf Rundstricknadel Nr. 2,5, 188-192-200 (200-208) M. anschlagen und 5 cm Bündchen stricken. Zu Rundstricknadel Nr. 4 wechseln und das Muster stricken. Gleichzeitig bei der 1. R. gleichmässig verteilt 40-48-52 (52-56) M. aufnehmen = 228-240-252 (252-264) M. Stimmt die Maschenprobe? Nach 33- 35-36 (35-36) cm auf beiden Seiten 4 M. für das Armloch abk. Passen Sie auf dass das Muster in die Mitte kommt. Jetzt jede Seite einzeln fertig stricken. Vorderteil: = 110-116-122 (122-128) M. Weiter bei jeder 2. R. gegen das Armloch abk.: 2 M. x 2-2-2 (2-3), 1 M. x 1-2-3 (3-2) = 100-104-108 (108-112) M. Nach 55-57-59 (59-61) cm die mittleren 28-30-30 (36-38) M. für den Hals abk. Weiter bei jeder 2. R. gegen den Hals abk.: 2 M. x 2, 1 M. x 1. Nach 60-62-64 (64-66) cm abk. Rückenteil: = 110-116-122 (122-128) M. Wie beim Vorderteil für das Armloch abk. = 100-104-108 (108-112) M. Nach 58-60-62 (62-64) cm die mittleren 34-36-36 (42-44) M. für den Hals abk. Bei der nächsten R. 2 M. gegen den Hals abk. Nach 60-62-64 (64-66) cm abk. Ärmel: Mit grün auf Nadelspiel Nr. 2,5, 48-48-48 (48-52) M. anschlagen und 5 cm Bündchen stricken. Zu Nadelspiel Nr. 4 wechseln und das Muster stricken. Passen Sie auf dass das Muster in die Mitte kommt. Gleichzeitig bei der 1. R. 6-6-8 (10-8) M. aufnehmen = 54-54-56 (58-60) M. Gleichzeitig nach dem Bündchen unter dem Ärmel aufnehmen: 2 M. x 27-27-28 (29-30). Bei Damen S+M+L bei jeder 4. R. und bei Herren S/M+M/L abwechslungsweise bei jeder 4. und 5. R. * = 108-108-112 (116-120) M. Nach 47-47-47 (51-52) cm unter dem Ärmel 6 M. abk. und die Arbeit hin und zurück stricken. Weiter bei jeder 2. R. gegen die Schulter abk.: 4 M. x 8. Danach abk. Die Arbeit misst ca. 53--53-53 (57-58) cm. Zusammennähen: Die Schulternaht zusammennähen. Rund um den Hals mit grün auf Nadelspiel Nr. 2,5, ca. 100-112 M. aufnehmen und 5 cm Bündchen stricken. Danach abk. und die Ärmel einnähen. |
|||||||
Erklärungen zum Diagramm |
|||||||
|
|||||||
 |
|||||||
 |
|||||||
Haben Sie diese Anleitung nachgearbeitet?Dann taggen Sie Ihre Fotos mit #dropspattern oder schicken Sie sie an die #dropsfan Galerie Brauchen Sie Hilfe bei dieser Anleitung?Sie finden 18 Videotutorials, einen Kommentar/Fragen-Bereich und vieles mehr, wenn sie die Anleitung bei garnstudio.com aufrufen. © 1982-2026 DROPS Design A/S. Wir besitzen alle Rechte. Dieses Dokument, einschließlich aller Untersektionen, hat Urheberrechte. Mehr dazu, was Sie mit unseren Anleitungen machen können, finden Sie ganz unten auf der Seite zu jeder Anleitung. |
|||||||


Mit über 40 Jahren Tätigkeit im Entwerfen von Strick- und Häkelmustern bietet Ihnen DROPS Design eine der umfangreichsten Sammlungen von kostenlosen Anleitungen im Internet - in 17 Sprachen übersetzt. Zum jetzigen Zeitpunkt haben wir insgesamt 324 Handarbeitshefte und 12290 Anleitungen auf Deutsch. 12202
Unser Ziel ist es, Ihnen die besten Angebote zum Stricken und Häkeln, Inspirationen und Ratschläge sowie qualitativ hochstehende Garne zu unglaublichen Preisen zu bieten! Möchten Sie unsere Anleitungen nicht nur für den persönlichen Gebrauch nutzen? Unsere Copyright Bedingungen finden Sie bei allen unseren Anleitungen ganz unten auf der jeweiligen Seite. Viel Spaß beim Handarbeiten!
Kommentieren Sie die Anleitung DROPS 40-8
Wir würden gerne Ihre Meinung zu diesem Modell erfahren!
Wenn Sie eine Frage stellen möchten, prüfen Sie bitte, dass Sie die richtige Kategorie im unten stehenden Formular gewählt haben - so bekommen Sie schneller eine Antwort. Die obligatorischen Felder sind mit einem * gekennzeichnet.