
Beliebte Kategorien
Suchen Sie nach einem Garn?


Kommentare / Fragen (11)
![]() Sophie LACAILLE hat geschrieben:
Sophie LACAILLE hat geschrieben:
Bonjour, Je ne comprend pas bien les explications de la manche : augmenter 2 m sous la manche 27-27-28 fois. Que faut-il comprendre par 2 m sous la manche ? Et un tour équivaut-il à 2 rangs ? Merci de votre éclairage.
15.01.2023 - 15:39DROPS Design hat geantwortet:
Bonjour Mme Lacaille, pour 1 tour, vous tricotez toutes les mailles sur l'aiguille, pour augmenter 2 mailles sous la manche augmentez 1 maille à la fin du tour + 1 maille au début du tour suivant. Répétez ces augmentations soit alternativement tous les 3 et 4 tours (en S et L: voir cette leçon) soi tous les 4 tours (en M = tricotez 1 tour d'augmentations, 1 tour sans augmentations). Bon tricot!
16.01.2023 - 09:31
![]() Sophie LACAILLE hat geschrieben:
Sophie LACAILLE hat geschrieben:
Bonjour, j'aimerais savoir comment tricoter le premier rang en rouge foncé, faut-il faire un rang tout à l'endroit ou bien commencer la bordure avec ce rang ?
13.12.2022 - 11:05DROPS Design hat geantwortet:
Bonjour Mme Lacaille, vous pouvez effectivement tricoter ce 1er rang en rouge en mailles envers sur l'envers pour commencer la bordure sur l'endroit. Bon tricot!
13.12.2022 - 13:33
![]() Sophie LACAILLE hat geschrieben:
Sophie LACAILLE hat geschrieben:
Bonjour, je viens de commencer le modèle 38-7 mais je ne comprend pas comment je dois augmenter 10 fois 4 mailles à gauche de l'ouvrage. Faut-il augmenter à la fin du rang ou à l'intérieur de ce même rang avant la fin du rang ? Cordialement
11.12.2022 - 19:01DROPS Design hat geantwortet:
Bonjour Mme Lacaille, pour monter 10 fois 4 mailles à gauche, vu sur l'endroit, vous devez monter ces mailles (cf vidéo) en fin de rang sur l'endroit (= à gauche, vu sur l'endroit), et ceci 10 fois sur l'endroit (sur 20 rangs au total). Bon tricot!
12.12.2022 - 10:01
![]() Bernike Pasveer hat geschrieben:
Bernike Pasveer hat geschrieben:
Er staat dat ik ‘aan de rechterkant’ 6 steken moet afkanten, maar wat is de rechterkant?
05.06.2022 - 19:09DROPS Design hat geantwortet:
Dag Bernike,
Dit is de rechter kant aan de goede kant van het werk. Je breit het werk heen en weer vanaf midden voor en je breit dus richting de mouw. De onderkant is dus middenvoor en de rechterkant van het breiwerk wordt uiteindelijk de onderkant van het vest als je het draagt.
05.06.2022 - 20:27Lezlie Dhillon hat geschrieben:
I'm stuck on decreasing for sleeve cap: "Decrease to shape the sleeve cap on every other row...... where do I place the decreases - spread them evenly through the round or all at once at the beginning of the round? Sorry - I've never knitted sleeve caps before.
03.03.2016 - 22:00DROPS Design hat geantwortet:
Dear Mrs Dhillon, for sleeve cap cast off (pattern will be edited) 6 sts a total of 5 times at the beg of every row on each side (= every other row on each side) and cast off remaining sts. Happy knitting!
04.03.2016 - 10:43Lezlie Dhillon hat geschrieben:
I've almost finished the body of this sweater, and I'm on the sleeves - just a question about the two stitch increase inside the mid arm area: should I make two stitches right together or stagger them - I was making one stitch at the end of the round and then knit one at the beginning of the next round then make the second stitch - so that there was always one knit stitch in between the increases. How did you make the increases? Thank you! Lezlie Dhillon
12.02.2016 - 00:20DROPS Design hat geantwortet:
Dear Mrs Dhillon, you can inc 1 st at end of round, K1 (or K2 as you rather) and inc 1 st at beg of next round. Happy knitting!
12.02.2016 - 12:08Lezlie Dhillon hat geschrieben:
I found the problem: the cast on amount of stitches should be 114 instead of 116, which I believe is a typo?
23.05.2015 - 19:43DROPS Design hat geantwortet:
Dear Mrs Dhillon, number of sts for size M has been edited into 110 sts - see tab "corrections", written pattern online has been edited. Thank you. Happy knitting!
26.05.2015 - 09:46Lezlie Dhillon hat geschrieben:
I think if I can't make it past this question, perhaps I should move on to another project!! I'm an intermediate knitter, but I've done Fairisle, cables and knitting in the round, but some of the instructions have me stumped!! I'm knitting a medium for which I cast on 116 stitches. When I knit the Edge and moss stitches the calculation seems off?
23.05.2015 - 08:34DROPS Design hat geantwortet:
Dear Mrs Dhillon, the jacket is worked sideways, after the edge you cast off 6 sts towards neckline and continue increasing for neckline = 148 sts (= 74 cm) and cast off for then for armhole. 74 cm + 3 cm on bottom edge worked afterwards = 77 cm from bottom to shoulder as in shown in measurement chart. Happy knitting!
23.05.2015 - 14:04Lezlie Dhillon hat geschrieben:
Thank you for your quick response! So the first row worked in Wine Red - I assume is a knit row of stockinette stitch? Also for the Edge stitch itself - it includes "moss" stitch which is K1P1, so when the Edge stitch says "3 moss sts" would this be K1P1N1 or is each moss st a set of K1P1? Also, on the pattern the 2nd * is missing, in the Edge description. So should it be placed before the "3 stocking sts". Sorry for so many questions, but I'm eager to get going on this project!
21.05.2015 - 20:36DROPS Design hat geantwortet:
Dear Mrs Dhillon, that's right, you first work 1 row stocking st in wine red, then continue with dark brown then (from RS): *K 3, K1, P1, K1 (= 3 sts in moss st)* - typo will be edited thank you. Happy knitting!
22.05.2015 - 09:40Lezlie Dhillon hat geschrieben:
I'm just beginning this project and I'm wondering about the instructions in the beginning of the body, after I've cast on. After it says, "continue as follows back and forth on needle: 1 row wine red, change to dark brown and work 3 cm Edge". Is the "1 row wine red", the first row of Edge stitch included in the 3 cm? Thank you!
21.05.2015 - 01:38DROPS Design hat geantwortet:
Dear Mrs Dhillon, you cast on sts with wine red, work 1 row in wine red, then change to dark brown and work the edge in dark brown for 3 cm (excluding the row in wine red). Happy knitting!
21.05.2015 - 09:02
|
|
So Long |
|
 |
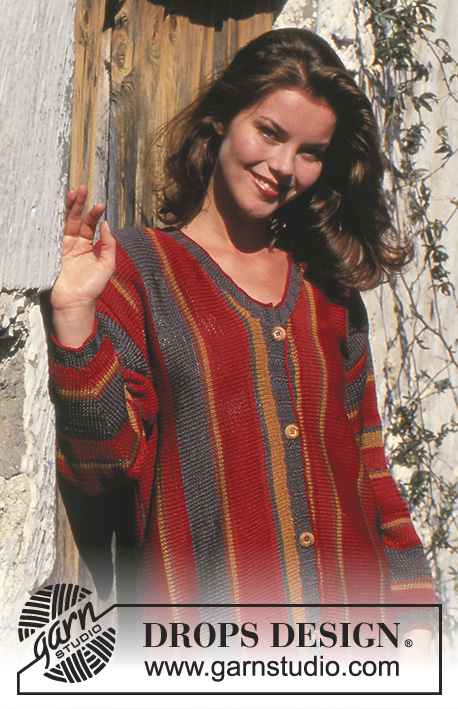 |
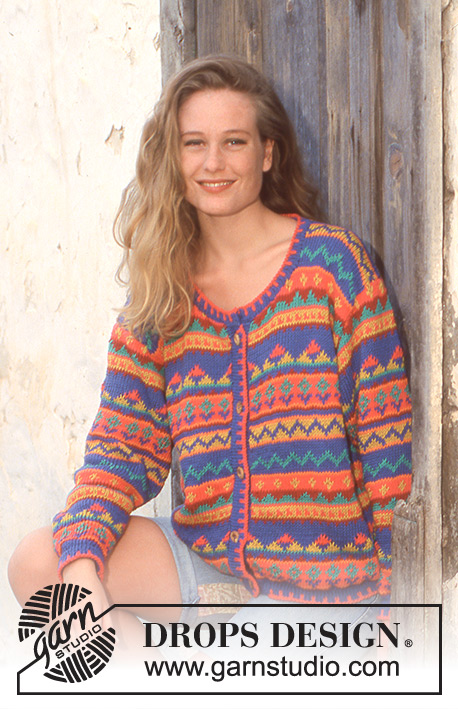
Gestreifte Jacke in „Muskat“
DROPS 38-7 |
|
|
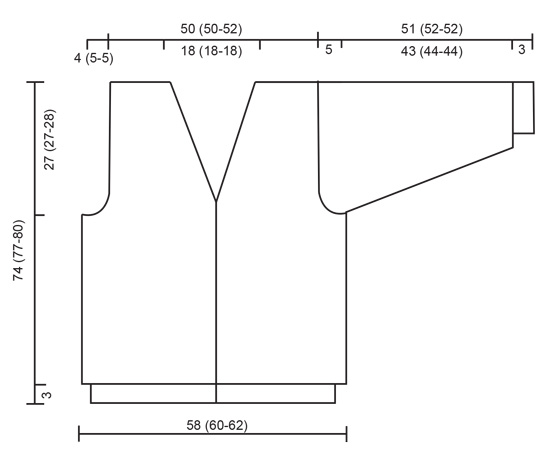
20 M. x 26 R. auf Nadel Nr. 4 glatt gestrickt = 10 x 10 cm. Streifen: * 2 R. gelb, 2 R. dunkelbraun, 2 R. rost, 12 R. weinrot, 2 R. rost, 2 R. gelb, 2 R. braun, 12 R. dunkelbraun, 2 R. weinrot, 6 R. rost, 2 r. braun, 2 r. gelb, 18 R. weinrot, 2 R. gelb, 2 R. braun, 6 R. rost, 2 R. weinrot, 4 R. gelb *, von *-* wiederholen. Perlmuster: * 1. R.: 1 re., 1 li. 2. R: re. über li. und li. über re. * 2. R. wiederholen. Kante: * 3 M. glatt, 3 M. Perlmuster *, von *-* wiederholen. Vorder- und Rückenteil: Die Arbeit wird von der vorderen Mitte her quer gestrickt (am linken Vorderteil anfangen). Mit weinrot auf Rundstricknadel Nr. 3, 108 (116-120) M. anschlagen und wie folgt stricken: 1 R. weinrot, zu dunkelbraun wechseln und 2 cm Kante stricken. Zu Rundstricknadel Nr. 4 wechseln und auf der rechten Seite 6 (6-6) M. abk. Von hier wird die Arbeit weiter gemessen = 102 (108-114) M. Mit dem Streifen weiterfahren. Nach 4 R. auf der linken Seite bei jeder 2. R. aufnehmen: 4 M. x 10 = 142 (148-154) M. Nach 25 (25-26) cm bei jeder 2. R. gegen das Armloch abk.: 45 (45-47) M. x 1, 3 M. x 3 = 88 (94-98) M. Nach 30 (32-33) cm auf der linken Seite bei jeder 2. R. aufnehmen 2.p: 3 M. x 3, 45 (45-47) M. x 1 = 142 (148-154) M. Nach 49 (51-53) cm auf der linken Seite 4 M. für den Hals abk. = 138 (144-150) M. Weiterstricken bis die Arbeit 67 (69-71) cm misst (der Hals misst 18 (18-18) cm). Jetzt auf der linken Seite 4 M. aufnehmen = 142 (148-154) M. Nach 83 (85-88) cm bei jeder 2. R. für das Armloch abk.: 45 (45-47) M. x 1, 3 M. x 3 = 88 (94-98) M. Nach 88 (92-95) cm auf der linken Seite bei jeder 2. R. aufnehmen: 3 M. x 3, 45 (45-47) M. x 1 = 142 (148-154) M. Nach 107 (111-115) cm auf der linken Seite bei jeder 2. R. aufnehmen: 4 M. x 10 = 102 (108-114) M. 4 R. stricken (die Arbeit misst ca. 116 (120-124) cm). Zu Rundstricknadel Nr. 3 und dunkelbraun wechseln und auf der rechten Seite 6 (6-6) M. anschlagen. 3 M. Kante stricken, jedoch nach 1 cm gleichmässig verteilt 5 (6-6) Knopflöcher einstricken - 1 Knopfloch = 2 M. abk. und bei der nächsten R. darüber 2 neue M. anschlagen. Nach 3 cm zu weinrot wechseln und 1 R. stricken. Danach abk. Ärmel: Mit weinrot auf Nadelspiel Nr. 3, 48 (48-48) M. anschlagen und 1 R. stricke. Danach zu dunkelbraun wechseln und 3 cm Kante stricken. Zu Nadelspiel Nr. 4 wechseln und die Streifen stricken (mit 6 R. weinrot anfangen). Gleichzeitig bei der 1. R. gleichmässig verteilt 6 (6-8) M. aufnehmen = 54 (54-56) M. Gleichzeitig nach der Kante unter dem Ärmel aufnehmen: 2 M. x 27 (27-28) bei Grösse S+L abwechslungsweise bei jeder 3. und 4. R. * bei Grösse M bei jeder 4. R. = 108 (108-112) M. Nach 46 (47-47) cm unter dem Ärmel 8 M. abk. und die Arbeit hin und zurück stricken. Weiter bei jeder 2. R. gegen die Schulter abk.: 6 M. x 5. Danach abk. Die Arbeit misst ca. 51 (52-52) cm. Zusammennähen: Die Schulternaht zusammennähen. An der unteren Kante mit dunkelbraun auf Rundstricknadel Nr. 3, 207 (213-219) M. aufnehmen und wie folgt stricken: 3 cm Kante, die letzte R. in weinrot stricken und mit weinrot abk. Rund um den Hals mit Rundstricknadel Nr. 3, ca. 120 M. aufnehmen und 3 cm Kante stricken (wie unten an der Kante). Die Kante an die Blende annähen. Die Ärmel einnähen und die Knöpfe annähen. |
|
 |
|
Haben Sie diese Anleitung nachgearbeitet?Dann taggen Sie Ihre Fotos mit #dropspattern oder schicken Sie sie an die #dropsfan Galerie Brauchen Sie Hilfe bei dieser Anleitung?Sie finden 21 Videotutorials, einen Kommentar/Fragen-Bereich und vieles mehr, wenn sie die Anleitung bei garnstudio.com aufrufen. © 1982-2026 DROPS Design A/S. Wir besitzen alle Rechte. Dieses Dokument, einschließlich aller Untersektionen, hat Urheberrechte. Mehr dazu, was Sie mit unseren Anleitungen machen können, finden Sie ganz unten auf der Seite zu jeder Anleitung. |
|


Mit über 40 Jahren Tätigkeit im Entwerfen von Strick- und Häkelmustern bietet Ihnen DROPS Design eine der umfangreichsten Sammlungen von kostenlosen Anleitungen im Internet - in 17 Sprachen übersetzt. Zum jetzigen Zeitpunkt haben wir insgesamt 324 Handarbeitshefte und 12278 Anleitungen auf Deutsch. 12190
Unser Ziel ist es, Ihnen die besten Angebote zum Stricken und Häkeln, Inspirationen und Ratschläge sowie qualitativ hochstehende Garne zu unglaublichen Preisen zu bieten! Möchten Sie unsere Anleitungen nicht nur für den persönlichen Gebrauch nutzen? Unsere Copyright Bedingungen finden Sie bei allen unseren Anleitungen ganz unten auf der jeweiligen Seite. Viel Spaß beim Handarbeiten!
Kommentieren Sie die Anleitung DROPS 38-7
Wir würden gerne Ihre Meinung zu diesem Modell erfahren!
Wenn Sie eine Frage stellen möchten, prüfen Sie bitte, dass Sie die richtige Kategorie im unten stehenden Formular gewählt haben - so bekommen Sie schneller eine Antwort. Die obligatorischen Felder sind mit einem * gekennzeichnet.